
Spring IOC容器装配Bean_基于注解配置方式
bean的实例化
1.导入jar包(必不可少的)
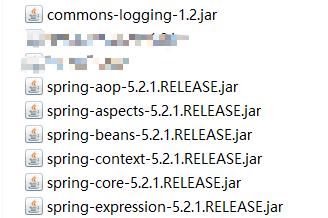
2.实例化bean
- applicationContext.xml(xml的写法)
<bean id="userDao" class="com.igeekhome.dao.impl.UserDao"></bean>
- 注解的写法
第一种:在 applicationContext.xml中开启注解扫描(同时引入context命名空间)
<?xml version="1.0" encoding="UTF-8"?>

<beans xmlns="http://www.springframework.org/schema/beans"

       xmlns:xsi="http://www.w3.org/2001/XMLSchema-instance"

       xmlns:context="http://www.springframework.org/schema/context"

       xsi:schemaLocation="http://www.springframework.org/schema/beans http://www.springframework.org/schema/beans/spring-beans.xsd http://www.springframework.org/schema/context https://www.springframework.org/schema/context/spring-context.xsd">

    <!--开启注解扫描

    context:component-scan 配置spring ioc容器开启注解扫描,扫描指定包下的@Component修饰的类,将这些类的对象创建交给spring ioc容器完成

    base-package: 需要扫描哪些包(及其子包)

    -->

    <context:component-scan base-package="com.igeekhome"></context:component-scan>

</beans>
第二种:@Component、@Service、@Controller、@Repository 用于实例化bean
Spring3.0为我们引入了组件自动扫描机制,它可以在类路径底下寻找标注了@Component、@Service、@Controller、@Repository注解的类,并把这些类纳入进spring容器中管理
@Service、@Controller、@Repository是@Component衍生的子注解
- @Repository用于标注数据访问组件(如DAO层组件)
- @Service用于标注业务层组件(如Service层)
- @Controller用于标注控制层组件(如struts中的action层)
- @Component泛指组件,当组件不好归类的时候,我们可以使用这个注解进行标注
/*

注解:添加在实现类上(思想同配置文件)

@Component 等价于  <bean id="userDaoImpl" class="com.igeekhome.dao.impl.UserDaoImpl"></bean>

id:默认是类名(首字母小写) value:bean的id

@Component(value = "userDao")

@Component("userDao")

 */

@Repository("userDao")

public class UserDaoImpl implements IUserDao {

    public void select() {

        System.out.println("UserDao...select...");

    }

}
bean属性的依赖注入
简单数据类型依赖注入
Spring3.0后,提供 @Value注解,可以完成简单数据的注入
/*

@Component

@Component(value="customerService")

@Service(value="customerService")

四者都等价

*/

@Service("customerService")

public class CustomerService {

    //简单类型的成员变量

    @Value("Rose")//参数的值简单类型

    private String name="Jack";

    //保存业务方法

    public void save(){

       System.out.println("CustomerService业务层被调用了。。。");

       System.out.println("name:"+name);

    }

}
复杂类型数据依赖注入
1.使用@Value 结合SpEL -- spring3.0 后用
@Service("userService")

public class UserServiceImpl implements IUserService {

   /*<bean id="userDao" class="com.igeekhome.dao.impl.UserDao">           </bean>

      @Value("#{bean的id}")

     */

     //写法一 (在属性声明上面注入,底层自动还是生成setUserDao())

    @Value("#{userDao}")

    private UserDaoImpl userDao;

    //写法二

     @Value("#{userDao}")

    public void setUserDao(UserDaoImpl userDao) {

        this.userDao = userDao;

    }

    public void list() {

        System.out.println("UserServiceImpl...list...");

        userDao.select();

    }

}
2.使用@Autowired 结合 @Qualifier
@Autowired:可以单独使用,如果单独使用,按照类型进行注入(会在spring ioc容器中查找类型为com.igeekhome.dao.impl.UserDaoImpl的bean并进行注入,如果找不到,肯定注入失败;如果找到匹配的单个bean,则注入成功; 如果找到多个相同类型的bean,则会选择其中一个bean进行注入
@Qualifier:与@Autowired结合,按照名称进行注入
@Autowired//默认按照类型注入的

@Qualifier("userDao")//必须配合@Autowired注解使用,根据名字注入

private UserDaoImpl userDao;
3.JSR-250标准(基于jdk) 提供注解@Resource
如果没有指定name属性,那么先按照名称(注解修饰的属性名)进行注入,在容器中查找bean的name/id为userDao的bean,如果找到,则注入成功。如果按照名称进行注入没有找到相对应的bean,那么就会使用按照类型进行装配,如果没有改类型,则注入失败,抛出异常;如果容器中存在单个该类型的bean,则注入成功;如果容器中存在多个相同类型bean,则注入失败(expected single matching bean but found 2: userDaoxxx,userDaox)
如果指定了name属性,那么就只会按照name进行注入
@Resource//(name="userDao")

private UserDaoImpl userDao;
4.JSR-330标准(jdk) 提供 @Inject和@Named注解(不推荐)
需要先导入 javax.inject 的 jar
使用@Inject,默认按照类型注入,使用@inject和@Named注解,则按照名称注入。用法与@Autowired 结合 @Qualifier 的用法一致
bean的初始化和销毁
1.applicationContext.xml 中的写法
<!--

    init-method:指定初始化方法

    destroy-method: 指定销毁触发方法

    -->

    <bean id="lifecycle" class="com.igeekhome.bean.LifeCycleBean" scope="singleton" init-method="initMethod" destroy-method="destroyMethod"></bean>
2.注解写法
使用 @PostConstruct 注解, 标明初始化方法 ---相当于 init-method 指定初始化方法
使用 @PreDestroy 注解, 标明销毁方法 ----相当于 destroy-method 指定对象销毁方法
@Repository("userDao")

public class UserDaoImpl implements IUserDao {

    public void select() {

        System.out.println("UserDao...select...");

    }

    //init-method

    @PostConstruct

    public void init() {

        System.out.println("init...");

    }

    //destory-method

    @PreDestroy

    public void destory() {

        System.out.println("destory");

    }

}
bean的作用域
1.applicationContext.xml 中的写法
默认是 singleton 单例 ,prototype是多例
<bean id=”” class=”” scope=”prototype”>
2.注解写法
通过@Scope注解,指定Bean的作用域
@Service("userService")

//@Scope("singleton")默认是单列

@Scope("prototype")

public class UserServiceImpl implements IUserService { }
备注
只有在Spring配置文件中开启了注解扫描
才能使用 @Component @Autowired @Resource @PostConstruct @PreDestroy等注解
Spring IOC容器装配Bean_基于注解配置方式的更多相关文章
- Spring IOC容器装配Bean_基于XML配置方式
开发所需jar包 实例化Bean的四种方式 1.无参数构造器 (最常用) <?xml version="1.0" encoding="UTF-8"?> ...
- IoC容器装配Bean(xml配置方式)(Bean的生命周期)
1.Spring管理Bean,实例化Bean对象 三种方式 第一种:使用类构造器实例化(默认无参数) package cn.itcast.spring.initbean; /** * 使用构造方法 实 ...
- Spring IoC 源码分析 (基于注解) 之 包扫描
在上篇文章Spring IoC 源码分析 (基于注解) 一我们分析到,我们通过AnnotationConfigApplicationContext类传入一个包路径启动Spring之后,会首先初始化包扫 ...
- 使用Spring框架入门四:基于注解的方式的AOP的使用
一.简述 前面讲了基于XML配置的方式实现AOP,本文简单讲讲基于注解的方式实现. 基于注解的方式实现前,要先在xml配置中通过配置aop:aspectj-autoproxy来启用注解方式注入. &l ...
- Spring IOC 容器预启动流程源码探析
Spring IOC 容器预启动流程源码探析 在应用程序中,一般是通过创建ClassPathXmlApplicationContext或AnnotationConfigApplicationConte ...
- spring-framework-中文文档一:IoC容器、介绍Spring IoC容器和bean
5. IoC容器 5.1介绍Spring IoC容器和bean 5.2容器概述 本章介绍Spring Framework实现控制反转(IoC)[1]原理.IoC也被称为依赖注入(DI).它是一个过程, ...
- 学习Spring(一) 实例化Spring IoC容器
实例化Spring IoC容器 1,读取其配置来创建bean实例 2,然后从Spring IoC容器中得到可用的bean实例 Spring提供两种IoC容器实现类型 a,一种为bean工厂 b,应用程 ...
- Spring IoC容器管理Action
Spring IoC容器管理Action有两种方式:DelegatingRequestProcessor.DelegatingActionProxy 不管采用哪一种方式,都需要随应用启动时创建Appl ...
- [原创]java WEB学习笔记103:Spring学习---Spring Bean配置:基于注解的方式(基于注解配置bean,基于注解来装配bean的属性)
本博客的目的:①总结自己的学习过程,相当于学习笔记 ②将自己的经验分享给大家,相互学习,互相交流,不可商用 内容难免出现问题,欢迎指正,交流,探讨,可以留言,也可以通过以下方式联系. 本人互联网技术爱 ...
随机推荐
- MIT线性代数:3.矩阵相乘
- [ASP.NET Core 3框架揭秘] 依赖注入[5]: 利用容器提供服务
毫不夸张地说,整个ASP.NET Core框架是建立在依赖注入框架之上的.ASP.NET Core应用在启动时构建管道以及利用该管道处理每个请求过程中使用到的服务对象均来源于依赖注入容器.该依赖注入容 ...
- 使用Typescript重构axios(十四)——实现拦截器
0. 系列文章 1.使用Typescript重构axios(一)--写在最前面 2.使用Typescript重构axios(二)--项目起手,跑通流程 3.使用Typescript重构axios(三) ...
- Handler dispatch failed; nested exception is java.lang.NoClassDefFoundError: org/springframework/util/PatternMatchUtils
{ "message": "Handler dispatch failed; nested exception is java.lang.NoClassDefFoundE ...
- pxe批量部署脚本
#!/bin/bash #检查环境 setenforce 0 sed -i 's/=enforce/=disabled/g' /etc/selinux/config systemctl restart ...
- drf
跨域同源 django做跨域同源 需要把csrf去掉 跨站请求伪造 同源 同源机制:域名.协议.端口号相同的同源 简单请求 不写头部请求 跨域会拦截报错缺少请求信息 (1) 请求方法是以下三种方法之一 ...
- Spring注解之@RestControllerAdvice
前言 前段时间部门搭建新系统,需要出异常后统一接口的返回格式,于是用到了Spring的注解@RestControllerAdvice.现在把此注解的用法总结一下. 用法 首先定义返回对象Respons ...
- Python 基础之 I/O 模型
一.I/O模型 IO在计算机中指Input/Output,也就是输入和输出.由于程序和运行时数据是在内存中驻留,由CPU这个超快的计算核心来执行,涉及到数据交换的地方,通常是磁盘.网络等,就需要IO接 ...
- CSS复合选择器是什么?复合选择器是如何工作
复合选择器介绍 复合选择器其实很好理解,说白了就跟我们生活中的有血缘关系家庭成员一样,通过标签或者class属性或id属性,去找对应的有血缘关系的某个选择器,具体的大家往下看哦. 如果是初学者对基本的 ...
- diff算法
diff算法的作用计算出Virtual DOM中真正变化的部分,并只针对该部分进行原生DOM操作,而非重新渲染整个页面. 传统diff算法 通过循环递归对节点进行依次对比,算法复杂度达到 O(n^3) ...