
部署Cloudera Management for centos 7
hadoop生态圈框架工具甚多,自己整合起来很是繁琐,特别是oozie以及hue结合来实现hive、mr、spark等定时依赖任务更是一步一个坑,为了减少踩坑,只好从apache hadoop,转向CDH。
两个各有利弊,CDH贵在整合方便。本次教程大部分来自http://www.cnblogs.com/fujiangong/p/5620050.html,稍作修改,记录踩下的坑。
JDK环境
JDK版本:jdk-8u121-linux-x64.rpm
CM包
CM版本:5.10.0 cloudera-manager-centos7-cm5.10.0_x86_64.tar.gz
下载地址:http://archive.cloudera.com/cm5/cm/5/cloudera-manager-centos7-cm5.10.0_x86_64.tar.gz
CDH包
CDH版本:5.10.0
CDH-5.10.0-1.cdh5.10.0.p0.41-el7.parcel CDH-5.10.0-1.cdh5.10.0.p0.41-el7.parcel.sha1 manifest.json
下载地址
http://archive.cloudera.com/cdh5/parcels/5.10.0/CDH-5.10.0-1.cdh5.10.0.p0.41-el7.parcel
http://archive.cloudera.com/cdh5/parcels/5.10.0/CDH-5.10.0-1.cdh5.10.0.p0.41-el7.parcel.sha1
http://archive.cloudera.com/cdh5/parcels/5.10.0/manifest.json
java-mysql连接jar包
下载地址:http://central.maven.org/maven2/mysql/mysql-connector-java/5.1.22/mysql-connector-java-5.1.22.jar
备注:mysql的jar包不要使用6.x版本,会有兼容问题,这里使用的是5.1.22
数据库
类型:MariaDB
节点
10.0.0.1 slave1
10.0.0.2 slave2
10.0.0.3 slave3
10.0.0.4 slave4
10.0.0.5 master
10.0.0.6 standby
二、底层环境准备
注:准备安装前需要把相关的包文件下载下来,并上传到服务器上
1、安装JDK
所有节点
1)安装系统原有java
yum -y install java |
2)卸载OpenJDK
cdh指定使用oracle jdk,所以卸载掉
openjdk-headless
openjdk
保留其它工具包
3)安装下载的java
rpm -ivh jdk-8u121-linux-x64.rpm |
2、更改主机名和hosts
所有节点
注意每个主机名对应的IP,按实际情况更改。
/etc/hostname
/etc/hosts
3、关闭防火墙
systemctl stop firewalldsystemctl disable firewalldsed -i "s/SELINUX=enforcing/SELINUX=disabled/" /etc/selinux/configreboot |
4、安装NTP服务
所有节点
yum -y install ntp |
配置略过
5、SSH无密码登陆
配置Cloudera Management Service所在节点无密码登陆到其他节点
本次在节点standby节点
ssh-keygen -t rsaGenerating public/private rsa key pair.Enter file in which to save the key (/root/.ssh/id_rsa): 回车Enter passphrase (empty for no passphrase): 回车Enter same passphrase again: 回车Your identification has been saved in /root/.ssh/id_rsa.Your public key has been saved in /root/.ssh/id_rsa.pub.The key fingerprint is:bc:14:e2:59:42:1f:21:80:eb:49:d8:3b:7c:8d:b7:f9 root@bigdata05.tfpay.comThe key's randomart image is:+--[ RSA 2048]----+| ...o o. || . . o . || o . o + ||. + . * . || + o oo S || * o o. . || o . o. || o || .E |+-----------------+ssh-copy-id masterssh-copy-id slave1ssh-copy-id slave2ssh-copy-id slave3ssh-copy-id slave4 |
6、安装数据库
service节点
yum -y install mariadb-servervi /etc/my.cnf [mysqld] datadir=/var/lib/mysql socket=/var/lib/mysql/mysql.sock symbolic-links=0 character-set-server=utf8 \\添加的行 [mysqld_safe] log-error=/var/log/mariadb/mariadb.log pid-file=/var/run/mariadb/mariadb.pidsystemctl start mariadbsystemctl enable mariadb |
初始化数据库
mysql_secure_installation/usr/bin/mysql_secure_installation: line 379: find_mysql_client: command not foundNOTE: RUNNING ALL PARTS OF THIS SCRIPT IS RECOMMENDED FOR ALL MariaDB SERVERS IN PRODUCTION USE! PLEASE READ EACH STEP CAREFULLY!In order to log into MariaDB to secure it, we'll need the currentpassword for the root user. If you've just installed MariaDB, andyou haven't set the root password yet, the password will be blank,so you should just press enter here.Enter current password for root (enter for none):OK, successfully used password, moving on...Setting the root password ensures that nobody can log into the MariaDBroot user without the proper authorisation.Set root password? [Y/n] y \\设置数据库root密码New password: \\设置密码Re-enter new password: \\再次输入密码Password updated successfully!Reloading privilege tables.. ... Success!By default, a MariaDB installation has an anonymous user, allowing anyoneto log into MariaDB without having to have a user account created forthem. This is intended only for testing, and to make the installationgo a bit smoother. You should remove them before moving into aproduction environment.Remove anonymous users? [Y/n] y \\移除匿名用户 ... Success!Normally, root should only be allowed to connect from 'localhost'. Thisensures that someone cannot guess at the root password from the network.Disallow root login remotely? [Y/n] y \\禁止root用户远程登录 ... Success!By default, MariaDB comes with a database named 'test' that anyone canaccess. This is also intended only for testing, and should be removedbefore moving into a production environment.Remove test database and access to it? [Y/n] y \\删除测试数据库 - Dropping test database... ... Success! - Removing privileges on test database... ... Success!Reloading the privilege tables will ensure that all changes made so farwill take effect immediately.Reload privilege tables now? [Y/n] // ... Success!Cleaning up...All done! If you've completed all of the above steps, your MariaDBinstallation should now be secure.Thanks for using MariaDB! |
7、其他安装与配置
所有节点
# yum -y install psmisc MySQL-python at bc bind-libs bind-utils cups-client cups-libs cyrus-sasl-gssapi cyrus-sasl-plain ed fuse fuse-libs httpd httpd-tools keyutils-libs-devel krb5-devel libcom_err-devel libselinux-devel libsepol-devel libverto-devel mailcap noarch mailx mod_ssl openssl-devel pcre-devel postgresql-libs python-psycopg2 redhat-lsb-core redhat-lsb-submod-security x86_64 spax time zlib-devel# chmod +x /etc/rc.d/rc.local# echo "echo 0 > /proc/sys/vm/swappiness" >>/etc/rc.d/rc.local# echo "echo never > /sys/kernel/mm/transparent_hugepage/defrag" >>/etc/rc.d/rc.local# echo 0 > /proc/sys/vm/swappiness# echo never > /sys/kernel/mm/transparent_hugepage/defrag# yum -y install rpcbind# systemctl start rpcbind# echo "systemctl start rpcbind" >> /etc/rc.d/rc.local |
三、开始安装CDH
1、传宝、解包
把下载好的一下相应包文件上传到service节点内
mysql-java连接包在所有节点上都要上传
tar zxvf cloudera-manager-centos7-cm5.10.0_x86_64.tar.gz -C /opt/ |
2、创建数据库
# mysql -uroot -pEnter password: \\输入数据库密码Welcome to the MariaDB monitor. Commands end with ; or \g.Your MariaDB connection id is 10Server version: 5.5.47-MariaDB MariaDB ServerCopyright (c) 2000, 2015, Oracle, MariaDB Corporation Ab and others.Type 'help;' or '\h' for help. Type '\c' to clear the current input statement.MariaDB [(none)]> create database hive DEFAULT CHARSET utf8 COLLATE utf8_general_ci;Query OK, 1 row affected (0.00 sec)MariaDB [(none)]> create database amon DEFAULT CHARSET utf8 COLLATE utf8_general_ci;Query OK, 1 row affected (0.00 sec)MariaDB [(none)]> create database hue DEFAULT CHARSET utf8 COLLATE utf8_general_ci;Query OK, 1 row affected (0.00 sec)MariaDB [(none)]> create database monitor DEFAULT CHARSET utf8 COLLATE utf8_general_ci;Query OK, 1 row affected (0.00 sec)MariaDB [(none)]> create database oozie DEFAULT CHARSET utf8 COLLATE utf8_general_ci;Query OK, 1 row affected (0.00 sec)MariaDB [(none)]> grant all on *.* to root@"%" Identified by "1234.com";Query OK, 0 rows affected (0.00 sec)MariaDB [(none)]> exit# /opt/cm-5.10.0/share/cmf/schema/scm_prepare_database.sh mysql cm -hlocalhost -uroot -p1234.com --scm-host localhost scm scm scmJAVA_HOME=/usr/java/jdk1.8.0_121Verifying that we can write to /opt/cm-5.10.0/etc/cloudera-scm-serverCreating SCM configuration file in /opt/cm-5.10.0/etc/cloudera-scm-serverExecuting: /usr/java/jdk1.8.0_121/bin/java -cp /usr/share/java/mysql-connector-java.jar:/usr/share/java/oracle-connector-java.jar:/opt/cm-5.10.0/share/cmf/schema/../lib/* com.cloudera.enterprise.dbutil.DbCommandExecutor /opt/cm-5.10.0/etc/cloudera-scm-server/db.properties com.cloudera.cmf.db.2016-06-17 13:32:20,562 [main] INFO com.cloudera.enterprise.dbutil.DbCommandExecutor - Successfully connected to database.All done, your SCM database is configured correctly! |
3、创建用户
所有节点
useradd --system --home=/opt/cm-5.10.0/run/cloudera-scm-server --shell=/bin/false --comment "Cloudera SCM User" cloudera-scm |
4、制作本地源
service节点执行
cp CDH-5.10.0-1.cdh5.10.0.p0.41-el7.parcel CDH-5.10.0-1.cdh5.10.0.p0.41-el7.parcel.sha1 manifest.json /opt/cloudera/parcel-repo/mv CDH-5.10.0-1.cdh5.10.0.p0.41-el7.parcel.sha1 CDH-5.10.0-1.cdh5.10.0.p0.41-el7.parcel.sha |
5、拷贝jar包
所有节点
cp mysql-connector-java-5.1.22.jar /usr/share/java/mysql-connector-java.jar |
service节点
cp mysql-connector-java-5.1.22.jar /opt/cm-5.10.0/share/cmf/lib/ |
6、更改配置
sed -i "s/server_host=localhost/server_host=10.0.0.6/" /opt/cm-5.10.0/etc/cloudera-scm-agent/config.inimkdir /opt/cm-5.10.0/run/cloudera-scm-agent |
7、启动服务
service节点
/opt/cm-5.10.0/etc/init.d/cloudera-scm-server startscp -r /opt/cm-5.10.0 master:/optscp -r /opt/cm-5.10.0 slave1:/opt……………… |
所有节点
/opt/cm-5.10.0/etc/init.d/cloudera-scm-agent start |
8、浏览页面开始安装
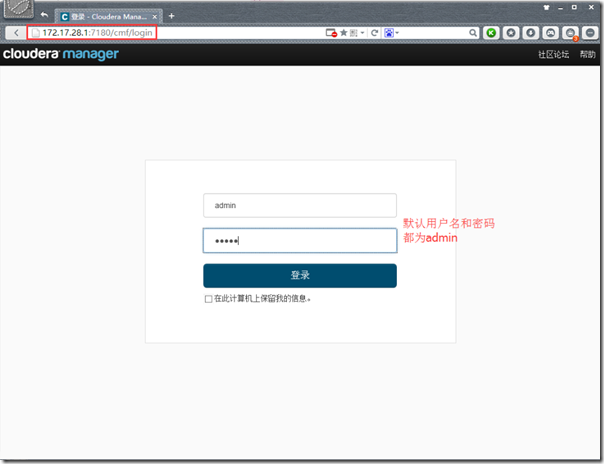
1)登陆
打开浏览器,访问service节点的7180端口
输入用户名和密码admin、admin
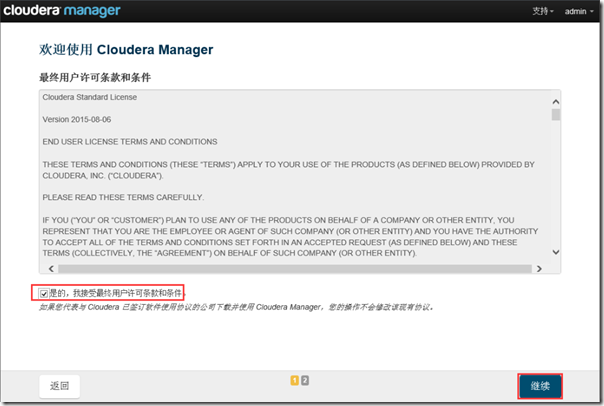
安装的时候没有截图,图就用网上的教程里的了,CDH5都差不多,小版本改动不大
2)接受协议
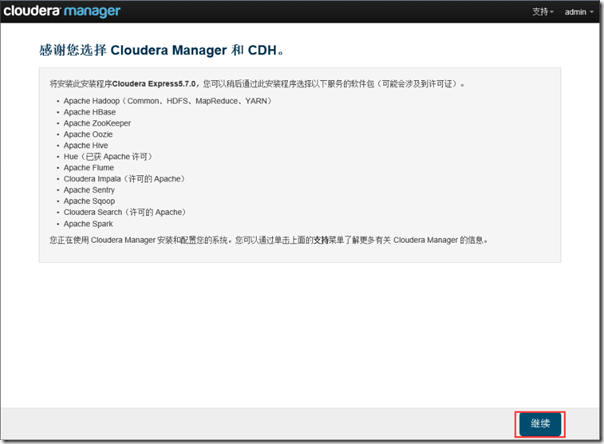
3)选择版本
本文档选择Cloudera Express免费开源版本

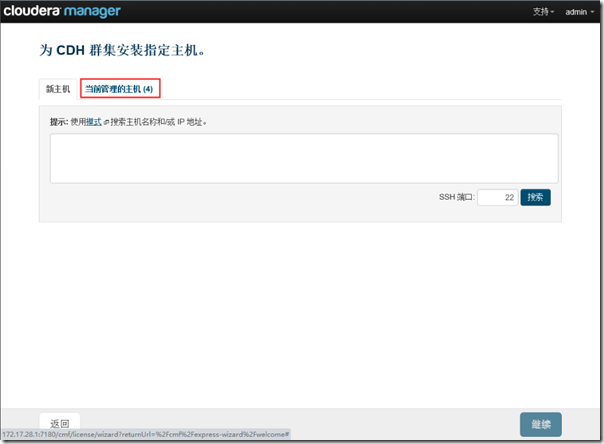
4)指定主机
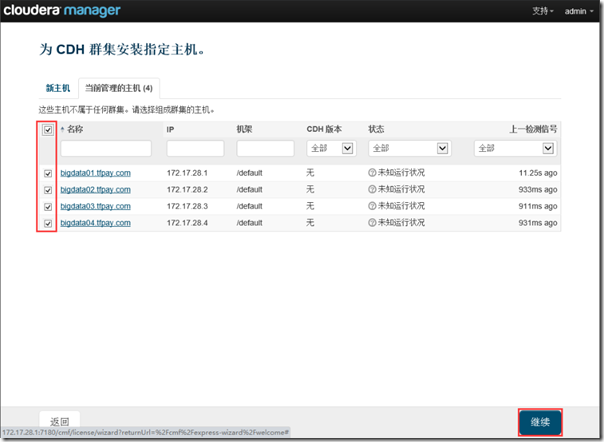
5)选择CDH版本
注:选择在制作本地源时选择的版本,如果选择别的版本的话会去官网下载那样安装速度会很慢
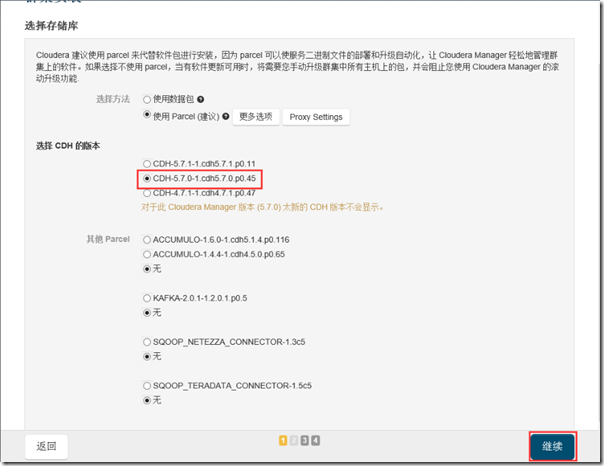
上图里我们选5.10.0
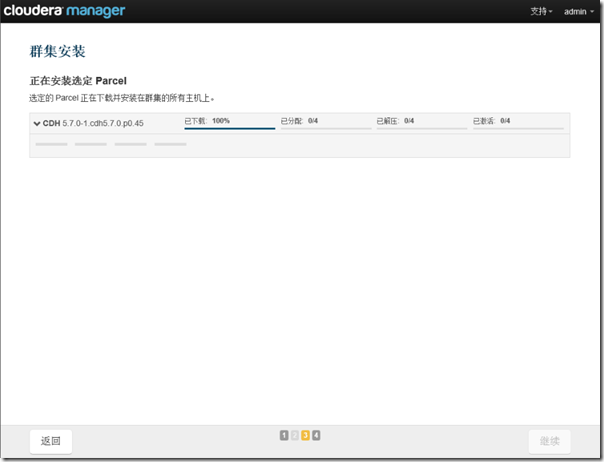
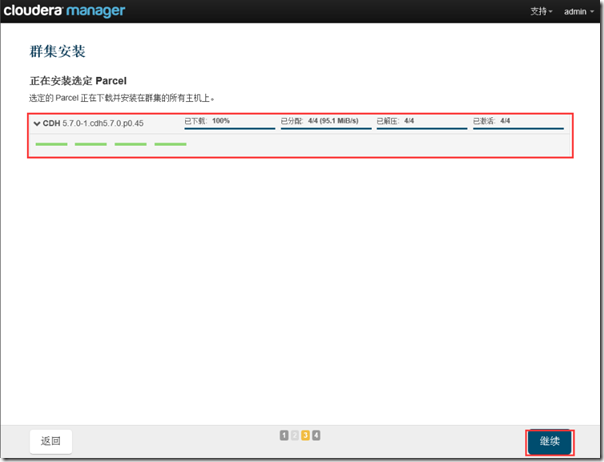
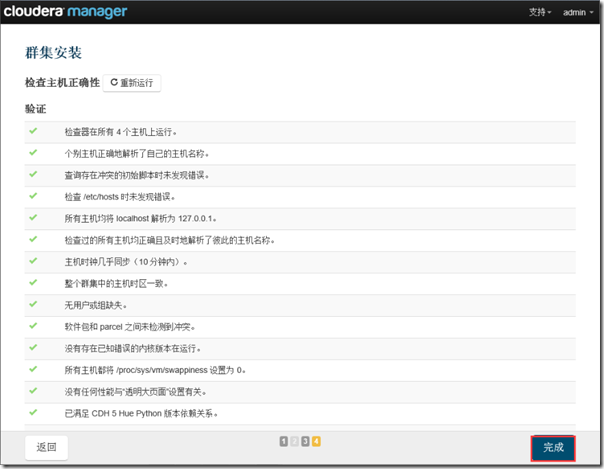
6)检查主机正确性
确保全部验证通过
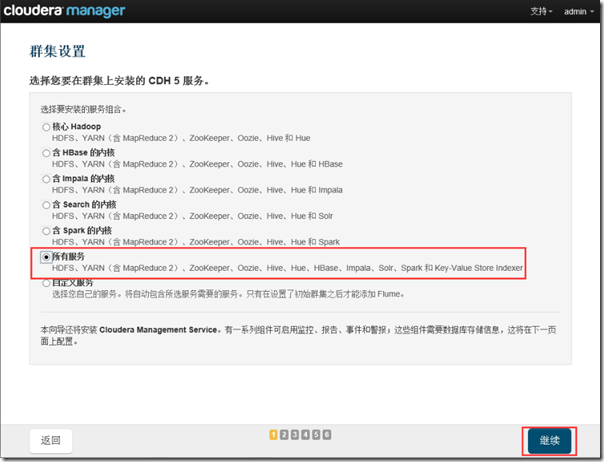
7)选择安装的服务
本文选择的是安装所有服务
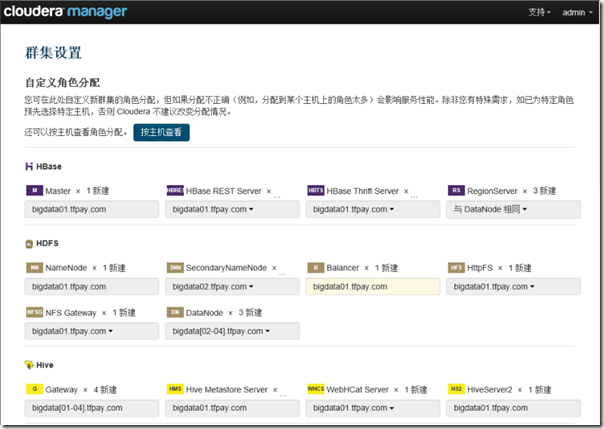
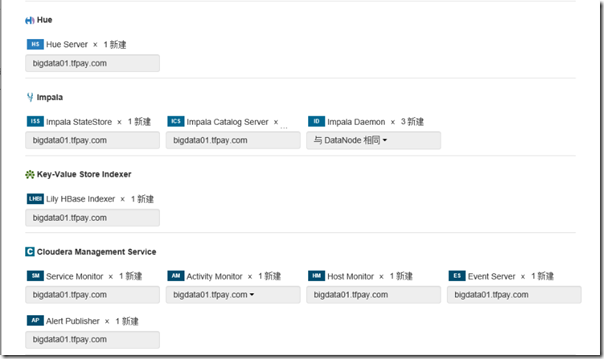
8)角色分配
这里应该根据自己的实际需求和服务器的硬件参数自己选择
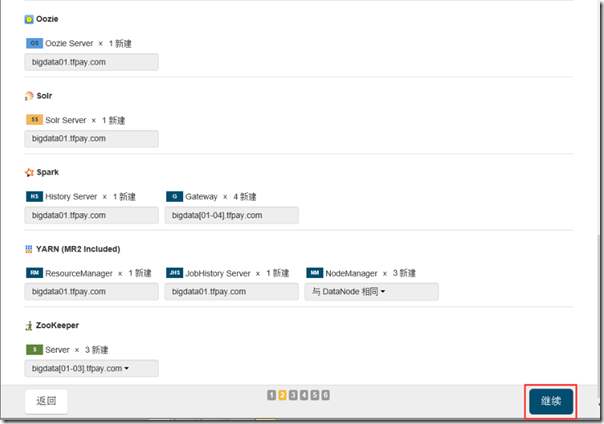
9)数据库设置
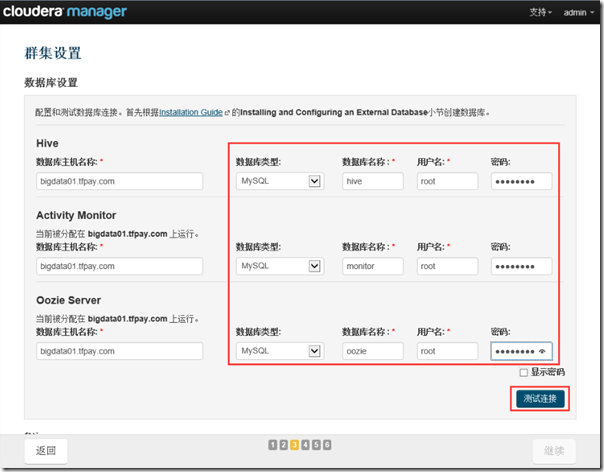
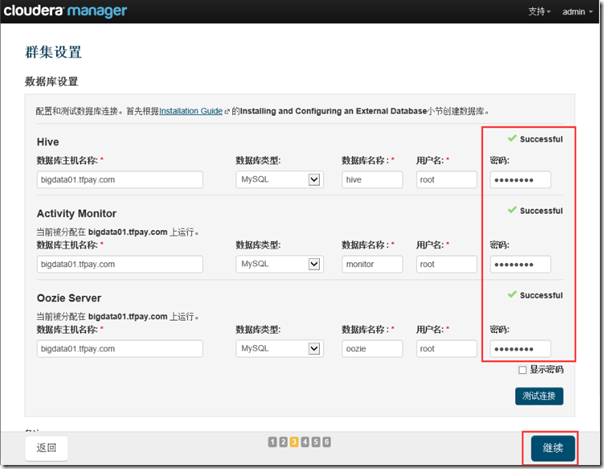
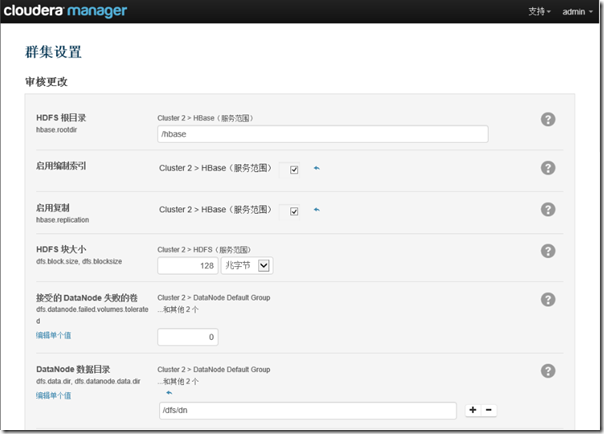
10)群集设置
可以根据自己的实际情况更改设置,本文采用默认配置。这些配置可以在集群安装完成以后后续更改
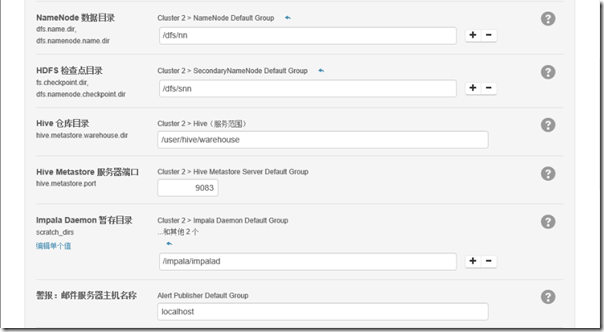
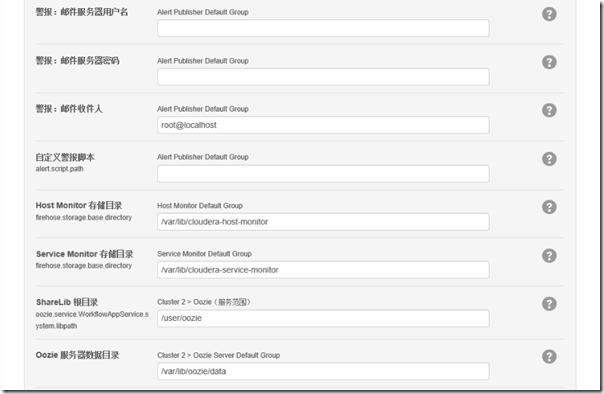
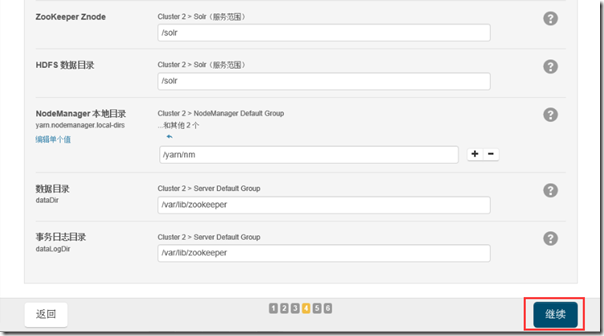
11)开始安装
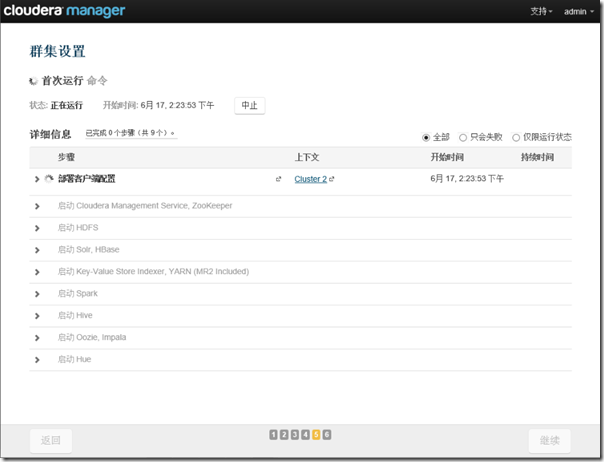
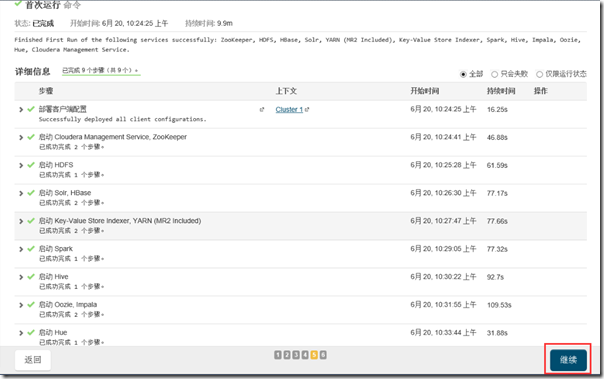
无错误信息全部通过
12)安装完成
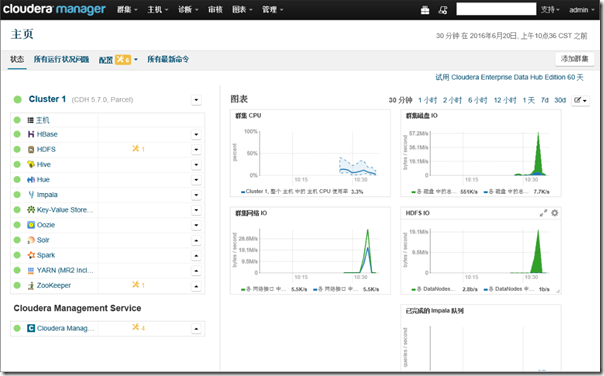
第一次安装完成后,会出现一些配置的警告信息。这些可以根据提示信息更改。
四、问题总结
1、由于我们的服务器是在阿里云上,无法通过内网IP访问HUE,所有,需要设置HUE可通过外网访问:


勾选之后重启hue,但是过会儿就会提示运行状态不良,这里是CDH有个问题,讲HUE绑定0.0.0.0之后,agent检测hue时,检测IP地址也会使用0.0.0.0,而不是内网IP,导致通讯是由于安全原因出现问题,所以需要添加配置:

2、开启hue的notebook选项卡
默认不开启notebook,需要添加配置:

部署Cloudera Management for centos 7的更多相关文章
- Hadoop生态圈-基于yum源的方式部署Cloudera Manager5.15.1
Hadoop生态圈-基于yum源的方式部署Cloudera Manager5.15.1 作者:尹正杰 版权声明:原创作品,谢绝转载!否则将追究法律责任. 我之前分享过关于离线方式部署Cloudera ...
- Hadoop生态圈-离线方式部署Cloudera Manager5.15.1
Hadoop生态圈-离线方式部署Cloudera Manager5.15.1 作者:尹正杰 版权声明:原创作品,谢绝转载!否则将追究法律责任. 到目前位置,Cloudera Manager和CDH最新 ...
- Asp.Net Core 程序部署到Linux(centos)生产环境(二):docker部署
运行环境 照例,先亮环境:软件的话我这里假设你已经批准好了.net core 运行环境,未配置可以看我的这篇[linux(centos)搭建.net core 运行环境] 腾讯云 centos:7.2 ...
- Asp.Net Core 程序部署到Linux(centos)生产环境(一):普通部署
运行环境 照例,先亮底 centos:7.2 cpu:1核 2G内存 1M带宽 辅助工具:xshell xftp 搭建.net core运行环境 .net core 的运行环境我单独写了一篇,请看我的 ...
- CDH上Cloudera Management Service 各个角色迁移至其他节点
1.首先查看Cloudera Management Service下有哪些服务,cdh版本为5.9.2: 可以看到基本上有以上6个角色: 2.停止所有角色,并执行删除: 3.找到集群中另外一个节点,添 ...
- Cloudera Manager (centos)安装详细介绍
文章全部来自:Cloudera Manager (centos)安装详细介绍http://www.aboutyun.com/thread-9190-1-1.html(出处: about云开发) 这里已 ...
- 手动部署LNMP环境(CentOS 7)
手动部署LNMP环境(CentOS 7) 一.修改 yum 源 [root@localhost ~]# rpm -Uvh https://dl.fedoraproject.org/pub/epel/e ...
- 史上最全CentOS6离线安装部署Cloudera Manager5.9.3
史上最全CentOS6离线安装部署Cloudera Manager5.9.3
- 离线部署 Cloudera Manager 5 和 CDH 5.12.1 及使用 CDH 部署 Hadoop 集群服务
Cloudera Manager Cloudera Manager 分为两个部分:CDH和CM. CDH是Cloudera Distribution Hadoop的简称,顾名思义,就是cloudera ...
随机推荐
- python 基础学习小记
Python应该是写起来最舒服的动态语言了,一下是一些读书笔记,本文中安装的是3.0,有几点需要注意: print "xxx" 要换成 print("xxx") ...
- Biztalk AS2开发经验总结
一. 准备证书 4 1. 升级win2008 R2证书服务 4 2. 申请证书 6 二. 配置证书 13 1. 为AS2配置证书 13 2. ...
- 使用JAVA开发微信公众平台(一)——环境搭建与开发接入
一. 初始微信公众平台 微信公众平台,即我们平时所说的"公众号",曾用名"官方平台"."媒体平台",但最终命名为"公众平台&quo ...
- shell编程其实真的很简单(四)
上篇我们学习了shell中条件选择语句的用法.接下来本篇就来学习循环语句.在shell中,循环是通过for, while, until命令来实现的.下面就分别来看看吧. for for循环有两种形式: ...
- Vuex核心知识(2.0)
Vuex 是一个专门为 Vue.js 应该程序开发的状态管理模式,它类似于 Redux 应用于 React 项目中,他们都是一种 Flux 架构.相比 Redux,Vuex 更简洁,学习成本更低.希望 ...
- 拆开Ceph看队列和线程
作者:吴香伟 发表于 2017/01/08 版权声明:可以任意转载,转载时务必以超链接形式标明文章原始出处和作者信息以及版权声明 我上小学时家离学校很远,家在某某山脚,学校在镇里.每周回家一趟,周五放 ...
- android之intent显式,显式学习
intent,意图 当从一个Activity到另一个Activity时调用,这里重点学习显式,隐式的使用 使用语句上的区别: 隐式意图: 显式意图: setAction ...
- [傻瓜版] Redis在Windows下的开发环境配置步骤
redis默认运行在unix体系下,windows无法直接运行官方版.以下是几种解决方案, 一)Windows移植版.启动速度飞快,优先推荐使用. a) 2.6.12 是稳定版,我用64位版来做开发环 ...
- jquery实现全选、全不选、反选、获取选中的所有值总结
HTML 我们的页面上有一个歌曲列表,列出多行歌曲名称,并匹配复选框供用户选择,并且在列表下方有一排操作按钮. <!doctype html> <html> <head& ...
- 理解 ES6 语法中 yield 关键字的返回值
在 ES6 中新增了生成器函数的语法,本文解释了生成器函数内 yield 关键字的返回值. 描述 根据语法规范,yield 关键字用来暂停和继续执行一个生成器函数.当外部调用生成器的 next() 方 ...