Tensorflow图像处理
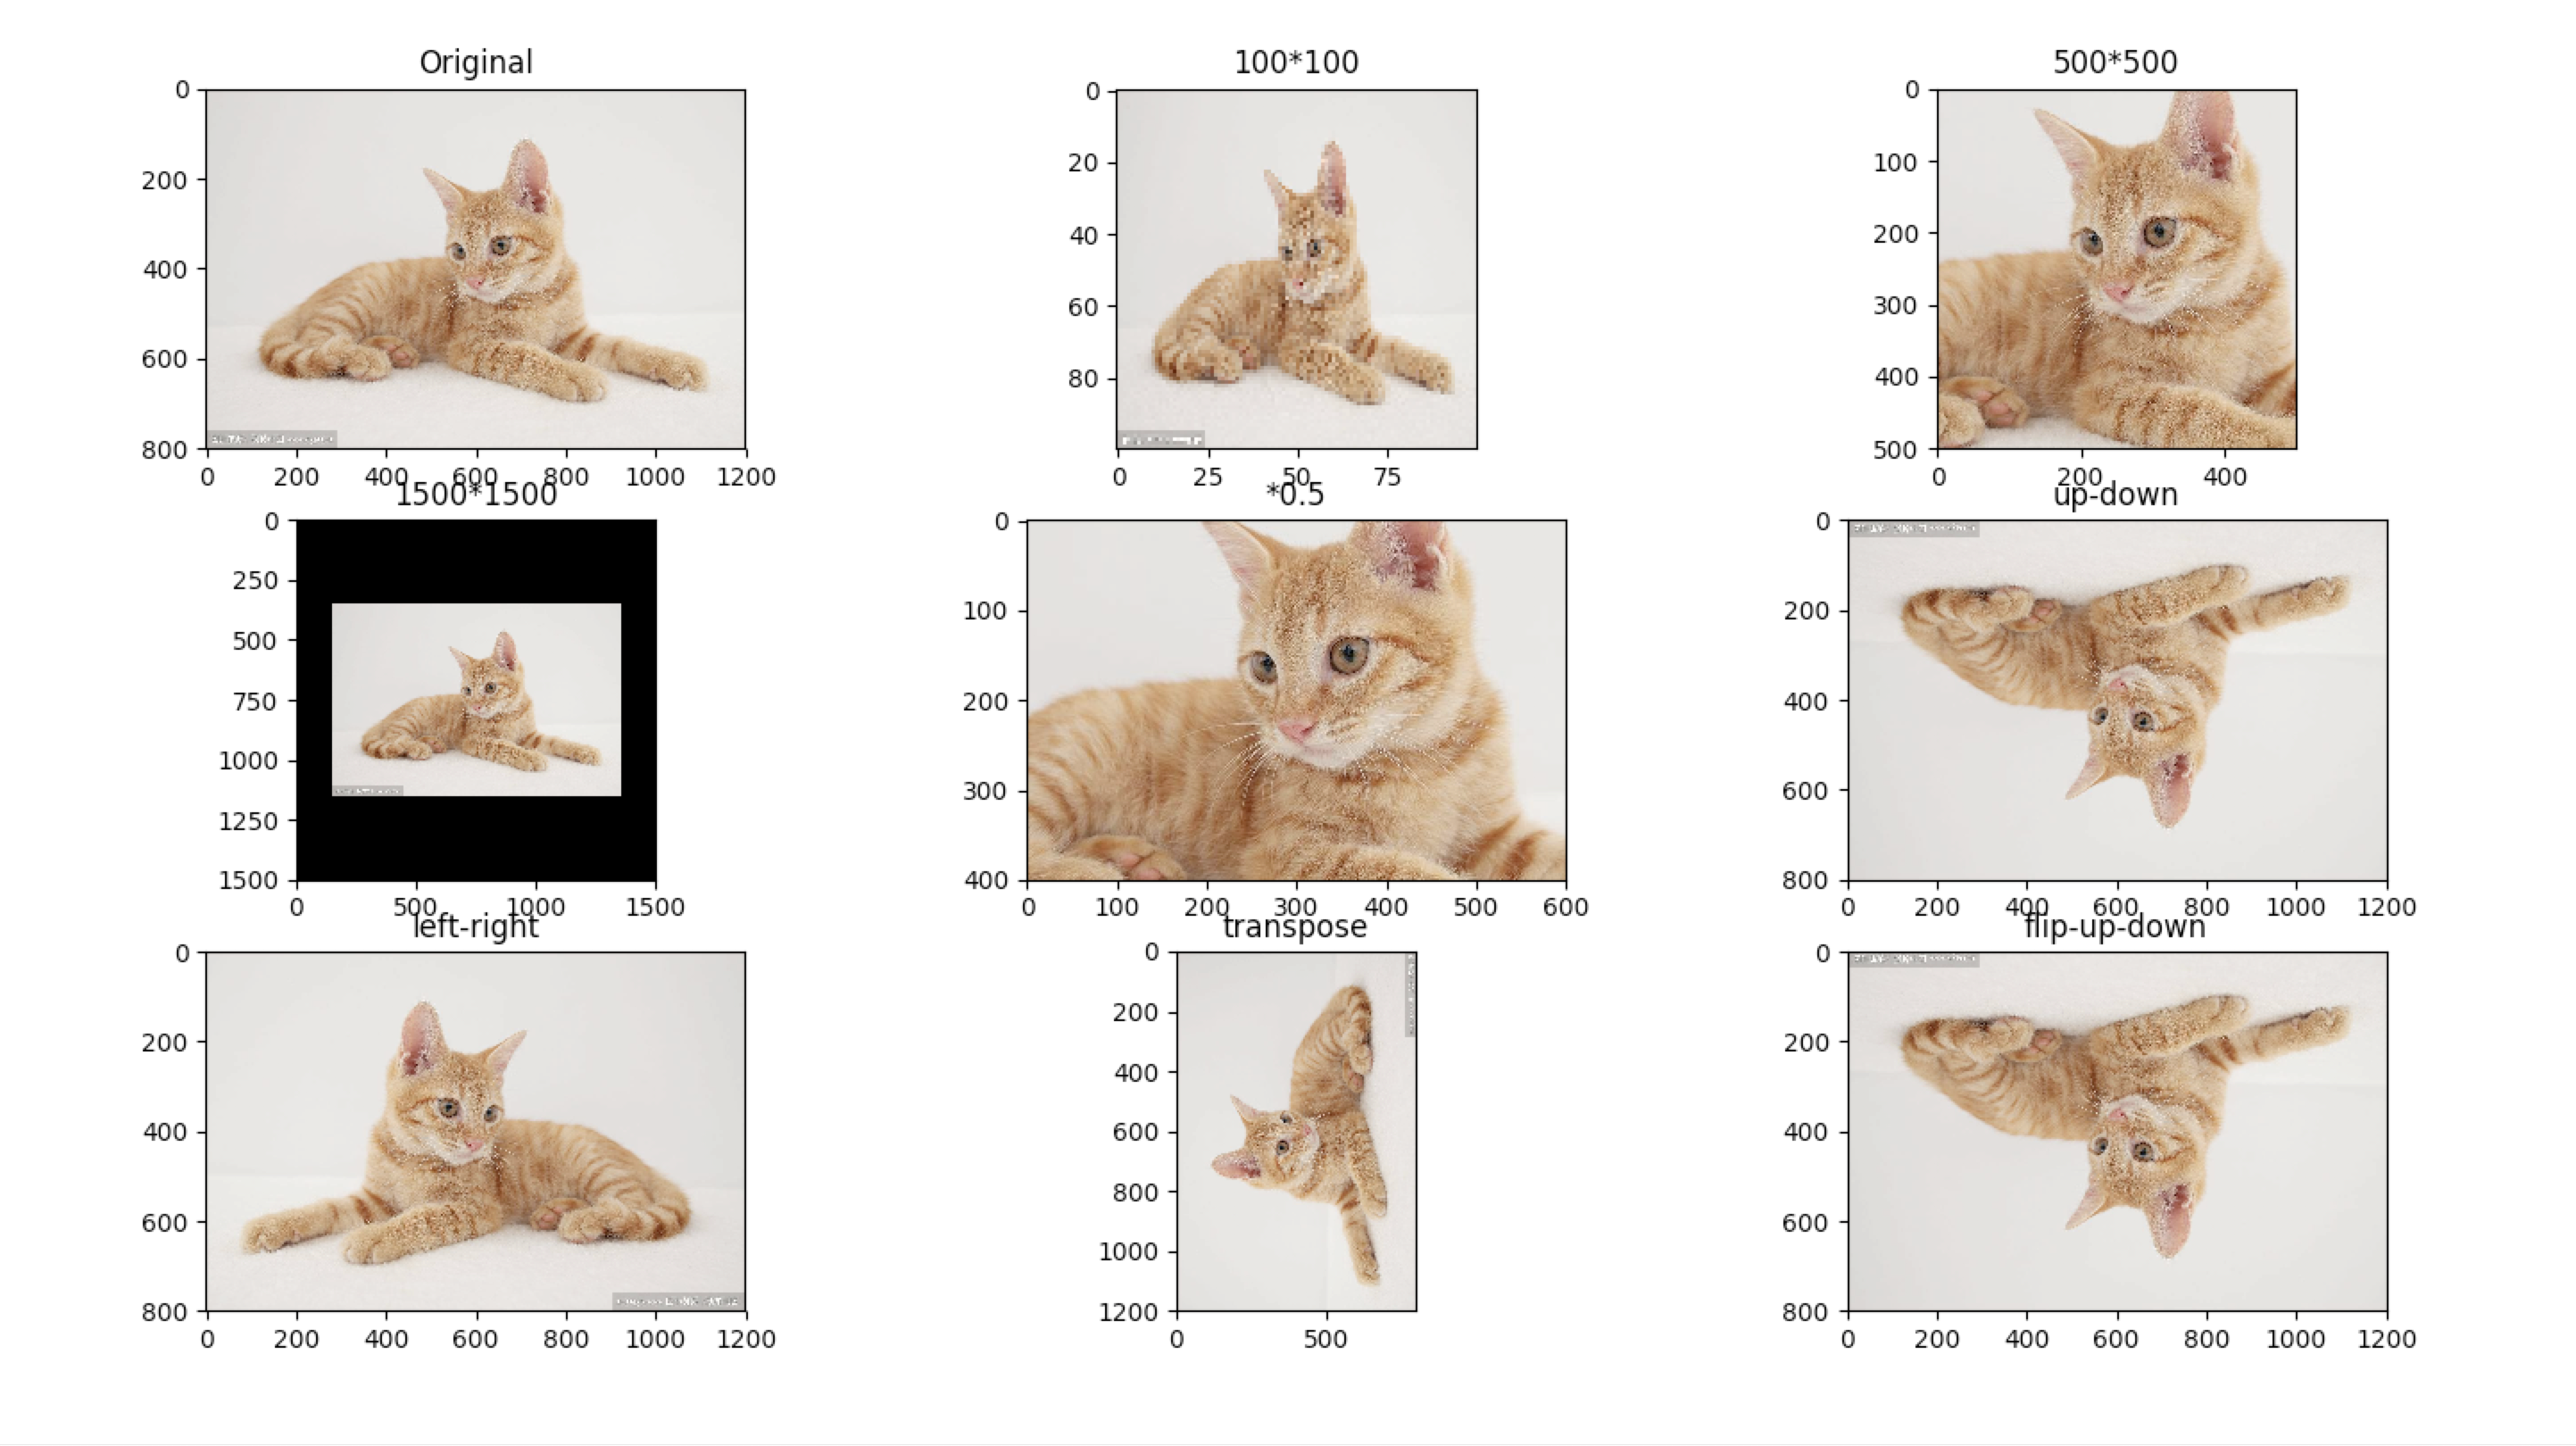
Tensorflow图像处理主要包括:调整尺寸,图像翻转,调整色彩,处理标注框。
代码如下:
#coding=utf-8

import matplotlib.pyplot as plt

import tensorflow as tf

import numpy as np

image_raw_data = tf.gfile.FastGFile('cat.jpg','rb').read()

with tf.Session() as sess:

     img_data = tf.image.decode_jpeg(image_raw_data)

     plt.subplot(331)

     plt.title("Original")

     plt.imshow(img_data.eval())

     #plt.show()

     resized = tf.image.resize_images(img_data, [100, 100], method=0)

     # TensorFlow的函数处理图片后存储的数据是float32格式的,需要转换成uint8才能正确打印图片。

     print("Digital type: ", resized.dtype)

     resized = np.asarray(resized.eval(), dtype='uint8')

     # tf.image.convert_image_dtype(rgb_image, tf.float32)

     plt.subplot(332)

     plt.title("100*100")

     plt.imshow(resized)

     #plt.show()

     croped = tf.image.resize_image_with_crop_or_pad(img_data, 500, 500)

     padded = tf.image.resize_image_with_crop_or_pad(img_data, 1500, 1500)

     plt.subplot(333)

     plt.title("500*500")

     plt.imshow(croped.eval())

    # plt.show()

     plt.subplot(334)

     plt.title("1500*1500")

     plt.imshow(padded.eval())

     #plt.show()

     central_cropped = tf.image.central_crop(img_data, 0.5)

     plt.subplot(335)

     plt.title("*0.5")

     plt.imshow(central_cropped.eval())

#     plt.show()

     # 上下翻转

     flipped1 = tf.image.flip_up_down(img_data)

     plt.subplot(336)

     plt.title("up-down")

     plt.imshow(flipped1.eval())

     #plt.show()

     # 左右翻转

     flipped2 = tf.image.flip_left_right(img_data)

     plt.subplot(337)

     plt.title("left-right")

     plt.imshow(flipped2.eval())

     #plt.show()

     # 对角线翻转

     transposed = tf.image.transpose_image(img_data)

     plt.subplot(338)

     plt.title("transpose")

     plt.imshow(transposed.eval())

    # plt.show()

     flipped3 = tf.image.random_flip_up_down(img_data)

     plt.subplot(339)

     plt.title("flip-up-down")

     plt.imshow(flipped3.eval())

     plt.show()

#————————————————————————————————————————————#

     # 将图片的亮度-0.5。

     adjusted = tf.image.adjust_brightness(img_data, -0.5)

     plt.subplot(331)

     plt.imshow(adjusted.eval())

     plt.title("bright-0.5")

     #plt.show()

     # 将图片的亮度0.5

     adjusted = tf.image.adjust_brightness(img_data, 0.5)

     plt.subplot(332)

     plt.imshow(adjusted.eval())

     plt.title("bright+0.5")

     #plt.show()

     # 在[-max_delta, max_delta)的范围随机调整图片的亮度。

     adjusted = tf.image.random_brightness(img_data, max_delta=0.5)

     plt.subplot(333)

     plt.imshow(adjusted.eval())

     plt.title("bright-random")

     #plt.show()

     # 将图片的对比度-5

     adjusted = tf.image.adjust_contrast(img_data, -5)

     plt.subplot(334)

     plt.imshow(adjusted.eval())

     plt.title("contrast-5")

     #plt.show()

     # 将图片的对比度+5

     adjusted = tf.image.adjust_contrast(img_data, 5)

     plt.subplot(335)

     plt.imshow(adjusted.eval())

     plt.title("contrast+5")

     #plt.show()

     # 在[lower, upper]的范围随机调整图的对比度。

     adjusted = tf.image.random_contrast(img_data, 0.1, 0.6)

     plt.subplot(336)

     plt.imshow(adjusted.eval())

     plt.title("contrast-random")

     #plt.show()

     # 调整图片的色相

     adjusted = tf.image.adjust_hue(img_data, 0.1)

     plt.subplot(337)

     plt.imshow(adjusted.eval())

     plt.title("hue_0.1")

     #plt.show()

     # 在[-max_delta, max_delta]的范围随机调整图片的色相。max_delta的取值在[0, 0.5]之间。

     adjusted = tf.image.random_hue(img_data, 0.5)

     plt.subplot(338)

     plt.imshow(adjusted.eval())

     plt.title("hue-random_0.5")

     #plt.show()

     # 将图片的饱和度-5。

     adjusted = tf.image.adjust_saturation(img_data, -2)

     plt.subplot(339)

     plt.title("saturation-2")

     plt.imshow(adjusted.eval())

     plt.show()

     # 在[lower, upper]的范围随机调整图的饱和度。

     #adjusted = tf.image.random_saturation(img_data, 0, 5)

     # 将代表一张图片的三维矩阵中的数字均值变为0,方差变为1。

     #adjusted = tf.image.per_image_standardization(img_data)
效果图:

Tensorflow图像处理的更多相关文章
- TensorFlow图像处理API
TensorFlow提供了一些常用的图像处理接口,可以让我们方便的对图像数据进行操作,以下首先给出一段显示原始图片的代码,然后在此基础上,实践TensorFlow的不同API. 显示原始图片 impo ...
- [tensorflow]图像处理相关模块的安装(python3中PIL)
直接上过程图(平台为Anaconda): 默认已经配置完了tensorflow的3.5的环境 我这里已经安装完成 接下来,就可以在python文件中引入模块了 from PIL import Imag ...
- TensorFlow图像处理函数
参考书 <TensorFlow:实战Google深度学习框架>(第2版) 图像编码处理+图像大小调整+图像翻转+图像色彩调整+处理标注框 #!/usr/bin/env python # - ...
- tensorflow图像处理函数(1)
1.tensorflow中对jpeg格式图像的编码/解码函数: import matplotlib.pyplot as plt import tensorflow as tf image_raw_da ...
- 吴裕雄 python 神经网络——TensorFlow 图像处理函数
import numpy as np import tensorflow as tf import matplotlib.pyplot as plt image_raw_data = tf.gfile ...
- 吴裕雄--天生自然 pythonTensorFlow图形数据处理:TensorFlow图像处理函数
import numpy as np import tensorflow as tf import matplotlib.pyplot as plt #读取图片 image_raw_data = tf ...
- Tensorflow图像处理以及数据读取
关于tensoflow的图像的处理,看到了一篇文章,个人觉得不错.https://blog.csdn.net/weiwei9363/article/details/79917942
- TensorFlow深度学习实战---图像数据处理
图像的亮度.对比度等属性对图像的影响非常大,这些因素都会影响最后的识别结构.当然,复杂的预处理过程可能会导致训练效率的下降(利用TensorFlow中多线程处理输入数据的解决方案). 同一不同的原始数 ...
- ubuntu远程桌面
用Linux已经有很长一段时间,但主要用于嵌入式开发(用交叉工具链进行版本编译),所以用命令行就可以了,而且敲的最多的命令就是make.最近开始搭建TensorFlow的开发环境,大部分工作都是命令行 ...
随机推荐
- 预定义的类型“System.Object”未定义或未导入
打开一个以前的程序 ,发现报这个错误.检查了程序,发现程序的引用 System 不见了 ,尝试 引用失败.. 查了有人说重新建立 Sln文件有用.. 一头雾水,随后 尝试操作 ,程序有用了 具体步骤: ...
- angularJs 技巧总结及最佳实践
强烈建议通读官方wiki文档,里面包含了FAQ,最佳实践,深入理解最核心的Directive及Scope等文章, 基础 1. 使用ng-repeat指令,为防止重复值发生的错误.加上track by ...
- [CF1063F]String Journey[后缀数组+线段树]
题意 在 \(S\) 中找出 \(t\) 个子串满足 \(t_{i+1}\) 是 \(t_{i}\) 的子串,要让 \(t\) 最大. \(|S| \leq 5\times 10^5\). 分析 定义 ...
- mybatis源码-解析配置文件(一)之XML的DOM解析方式
目录 简介 Java 中 XML 文件解析 解析方式 DOM 解析 XML 新建 XML 文件 DOM 操作相关类 Java 读取 XML 文件 一起学 mybatis @ 简介 在之前的文章< ...
- unity音量设置(同时设置到多个物体上)——引伸语言设置
在游戏中游戏设置是一个很重要的功能,但是比如语言设置和音量设置分散在很多个物体的组件上,如果每个对应的物体都放到一个链表里,会导致程序雍总难堪,使用事件调用是最好的方式 音量存储类 SoundMana ...
- springmvc 事务回滚说明
Spring中的@Transactional(rollbackFor = Exception.class)属性详解 序言 今天我在写代码的时候,看到了.一个注解@Transactional(rollb ...
- 20135202闫佳歆--week5 分析system_call中断处理过程--实验及总结
week 5 实验:分析system_call中断处理过程 一.使用gdb跟踪分析一个系统调用内核函数(上周选择那一个系统调用)--getpid 复习视频: 如何实现? - 更新menu代码到最新版 ...
- 20135337朱荟潼 Linux第八周学习总结——进程的切换和系统的一般执行过程
第八周 进程的切换和系统的一般执行过程 一.进程切换关键代码switch_to 1.不同类型进程有不同调度需求--两种分类 2.调度策略--规则 Linux中进程优先级是动态的,周期性调整. 3.时机 ...
- 第二个Sprint冲刺第六天(燃尽图)补
- 小学四则运算APP 第一个冲刺 第二天
团队成员:陈淑筠.杨家安.陈曦 团队选题:小学四则运算APP 第一次冲刺阶段时间:11.17~11.27 本次程序是为了解决上次判断的问题,但是还是出现新的问题页面无法调整,需要进行改进 本次改进代码 ...