使用tensorflow的lstm网络进行时间序列预测
这篇文章将讲解如何使用lstm进行时间序列方面的预测,重点讲lstm的应用,原理部分可参考以下两篇文章:
Understanding LSTM Networks LSTM学习笔记
编程环境:python3.5,tensorflow 1.0
本文所用的数据集来自于kesci平台,由云脑机器学习实战训练营提供:真实业界数据的时间序列预测挑战
数据集采用来自业界多组相关时间序列(约40组)与外部特征时间序列(约5组)。本文只使用其中一组数据进行建模。
加载常用的库:
- #加载数据分析常用库
- import pandas as pd
- import numpy as np
- import tensorflow as tf
- from sklearn.metrics import mean_absolute_error,mean_squared_error
- from sklearn.preprocessing import MinMaxScaler
- import matplotlib.pyplot as plt
- % matplotlib inline
- import warnings
- warnings.filterwarnings('ignore')
- path = '../input/industry/industry_timeseries/timeseries_train_data/11.csv'
- data11 = pd.read_csv(path,names=['年','月','日','当日最高气温','当日最低气温','当日平均气温','当日平均湿度','输出'])
- data11.head()
| 年 | 月 | 日 | 当日最高气温 | 当日最低气温 | 当日平均气温 | 当日平均湿度 | 输出 | |
|---|---|---|---|---|---|---|---|---|
| 0 | 2015 | 2 | 1 | 1.9 | -0.4 | 0.7875 | 75.000 | 814.155800 |
| 1 | 2015 | 2 | 2 | 6.2 | -3.9 | 1.7625 | 77.250 | 704.251112 |
| 2 | 2015 | 2 | 3 | 7.8 | 2.0 | 4.2375 | 72.750 | 756.958978 |
| 3 | 2015 | 2 | 4 | 8.5 | -1.2 | 3.0375 | 65.875 | 640.645401 |
| 4 | 2015 | 2 | 5 | 7.9 | -3.6 | 1.8625 | 55.375 | 631.725130 |
- ##load data(本文以第一个表为例,其他表类似,不再赘述)
- f=open('../input/industry/industry_timeseries/timeseries_train_data/11.csv')
- df=pd.read_csv(f) #读入数据
- data=df.iloc[:,3:8].values #取第3-7列
- #定义常量
- rnn_unit=10 #hidden layer units
- input_size=4
- output_size=1
- lr=0.0006 #学习率
- tf.reset_default_graph()
- #输入层、输出层权重、偏置
- weights={
- 'in':tf.Variable(tf.random_normal([input_size,rnn_unit])),
- 'out':tf.Variable(tf.random_normal([rnn_unit,1]))
- }
- biases={
- 'in':tf.Variable(tf.constant(0.1,shape=[rnn_unit,])),
- 'out':tf.Variable(tf.constant(0.1,shape=[1,]))
- }
- def get_data(batch_size=60,time_step=20,train_begin=0,train_end=487):
- batch_index=[]
- scaler_for_x=MinMaxScaler(feature_range=(0,1)) #按列做minmax缩放
- scaler_for_y=MinMaxScaler(feature_range=(0,1))
- scaled_x_data=scaler_for_x.fit_transform(data[:,:-1])
- scaled_y_data=scaler_for_y.fit_transform(data[:,-1])
- label_train = scaled_y_data[train_begin:train_end]
- label_test = scaled_y_data[train_end:]
- normalized_train_data = scaled_x_data[train_begin:train_end]
- normalized_test_data = scaled_x_data[train_end:]
- train_x,train_y=[],[] #训练集x和y初定义
- for i in range(len(normalized_train_data)-time_step):
- if i % batch_size==0:
- batch_index.append(i)
- x=normalized_train_data[i:i+time_step,:4]
- y=label_train[i:i+time_step,np.newaxis]
- train_x.append(x.tolist())
- train_y.append(y.tolist())
- batch_index.append((len(normalized_train_data)-time_step))
- size=(len(normalized_test_data)+time_step-1)//time_step #有size个sample
- test_x,test_y=[],[]
- for i in range(size-1):
- x=normalized_test_data[i*time_step:(i+1)*time_step,:4]
- y=label_test[i*time_step:(i+1)*time_step]
- test_x.append(x.tolist())
- test_y.extend(y)
- test_x.append((normalized_test_data[(i+1)*time_step:,:4]).tolist())
- test_y.extend((label_test[(i+1)*time_step:]).tolist())
- return batch_index,train_x,train_y,test_x,test_y,scaler_for_y
- #——————————————————定义神经网络变量——————————————————
- def lstm(X):
- batch_size=tf.shape(X)[0]
- time_step=tf.shape(X)[1]
- w_in=weights['in']
- b_in=biases['in']
- input=tf.reshape(X,[-1,input_size]) #需要将tensor转成2维进行计算,计算后的结果作为隐藏层的输入
- input_rnn=tf.matmul(input,w_in)+b_in
- input_rnn=tf.reshape(input_rnn,[-1,time_step,rnn_unit]) #将tensor转成3维,作为lstm cell的输入
- cell=tf.contrib.rnn.BasicLSTMCell(rnn_unit)
- #cell=tf.contrib.rnn.core_rnn_cell.BasicLSTMCell(rnn_unit)
- init_state=cell.zero_state(batch_size,dtype=tf.float32)
- output_rnn,final_states=tf.nn.dynamic_rnn(cell, input_rnn,initial_state=init_state, dtype=tf.float32) #output_rnn是记录lstm每个输出节点的结果,final_states是最后一个cell的结果
- output=tf.reshape(output_rnn,[-1,rnn_unit]) #作为输出层的输入
- w_out=weights['out']
- b_out=biases['out']
- pred=tf.matmul(output,w_out)+b_out
- return pred,final_states
- #——————————————————训练模型——————————————————
- def train_lstm(batch_size=80,time_step=15,train_begin=0,train_end=487):
- X=tf.placeholder(tf.float32, shape=[None,time_step,input_size])
- Y=tf.placeholder(tf.float32, shape=[None,time_step,output_size])
- batch_index,train_x,train_y,test_x,test_y,scaler_for_y = get_data(batch_size,time_step,train_begin,train_end)
- pred,_=lstm(X)
- #损失函数
- loss=tf.reduce_mean(tf.square(tf.reshape(pred,[-1])-tf.reshape(Y, [-1])))
- train_op=tf.train.AdamOptimizer(lr).minimize(loss)
- with tf.Session() as sess:
- sess.run(tf.global_variables_initializer())
- #重复训练5000次
- iter_time = 5000
- for i in range(iter_time):
- for step in range(len(batch_index)-1):
- _,loss_=sess.run([train_op,loss],feed_dict={X:train_x[batch_index[step]:batch_index[step+1]],Y:train_y[batch_index[step]:batch_index[step+1]]})
- if i % 100 == 0:
- print('iter:',i,'loss:',loss_)
- ####predict####
- test_predict=[]
- for step in range(len(test_x)):
- prob=sess.run(pred,feed_dict={X:[test_x[step]]})
- predict=prob.reshape((-1))
- test_predict.extend(predict)
- test_predict = scaler_for_y.inverse_transform(test_predict)
- test_y = scaler_for_y.inverse_transform(test_y)
- rmse=np.sqrt(mean_squared_error(test_predict,test_y))
- mae = mean_absolute_error(y_pred=test_predict,y_true=test_y)
- print ('mae:',mae,' rmse:',rmse)
- return test_predict
test_predict = train_lstm(batch_size=80,time_step=15,train_begin=0,train_end=487)- iter: 3900 loss: 0.000505382
- iter: 4000 loss: 0.000502154
- iter: 4100 loss: 0.000503413
- iter: 4200 loss: 0.00140424
- iter: 4300 loss: 0.000500015
- iter: 4400 loss: 0.00050004
- iter: 4500 loss: 0.000498159
- iter: 4600 loss: 0.000500861
- iter: 4700 loss: 0.000519379
- iter: 4800 loss: 0.000499999
- iter: 4900 loss: 0.000501265
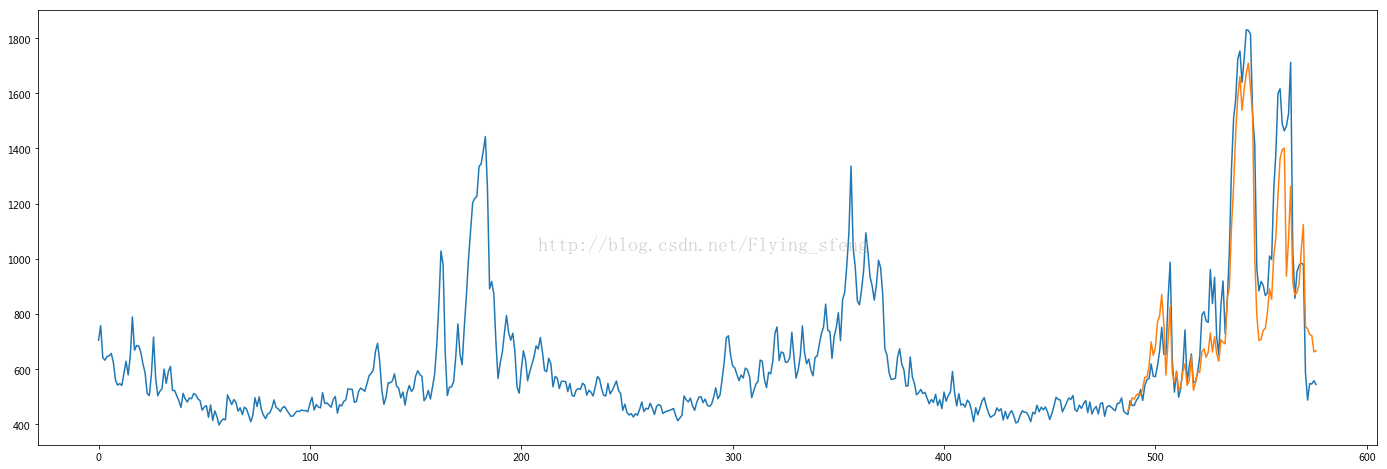
- mae: 121.183626208 rmse: 162.049017904
- plt.figure(figsize=(24,8))
- plt.plot(data[:, -1])
- plt.plot([None for _ in range(487)] + [x for x in test_predict])
- plt.show()
--------------------- 本文来自 Flying_sfeng 的CSDN 博客 ,全文地址请点击:https://blog.csdn.net/flying_sfeng/article/details/78852816?utm_source=copy
使用tensorflow的lstm网络进行时间序列预测的更多相关文章
- 基于 Keras 用 LSTM 网络做时间序列预测
目录 基于 Keras 用 LSTM 网络做时间序列预测 问题描述 长短记忆网络 LSTM 网络回归 LSTM 网络回归结合窗口法 基于时间步的 LSTM 网络回归 在批量训练之间保持 LSTM 的记 ...
- Python中利用LSTM模型进行时间序列预测分析
时间序列模型 时间序列预测分析就是利用过去一段时间内某事件时间的特征来预测未来一段时间内该事件的特征.这是一类相对比较复杂的预测建模问题,和回归分析模型的预测不同,时间序列模型是依赖于事件发生的先后顺 ...
- Tensorflow 循环神经网络 基本 RNN 和 LSTM 网络 拟合、预测sin曲线
时序预测一直是比较重要的研究问题,在统计学中我们有各种的模型来解决时间序列问题,但是最近几年比较火的深度学习中也有能解决时序预测问题的方法,另外在深度学习领域中时序预测算法可以解决自然语言问题等. 在 ...
- (数据科学学习手札40)tensorflow实现LSTM时间序列预测
一.简介 上一篇中我们较为详细地铺垫了关于RNN及其变种LSTM的一些基本知识,也提到了LSTM在时间序列预测上优越的性能,本篇就将对如何利用tensorflow,在实际时间序列预测任务中搭建模型来完 ...
- 第二十一节,使用TensorFlow实现LSTM和GRU网络
本节主要介绍在TensorFlow中实现LSTM以及GRU网络. 一 LSTM网络 Long Short Term 网络—— 一般就叫做 LSTM ——是一种 RNN 特殊的类型,可以学习长期依赖信息 ...
- 吴裕雄--天生自然神经网络与深度学习实战Python+Keras+TensorFlow:使用TensorFlow和Keras开发高级自然语言处理系统——LSTM网络原理以及使用LSTM实现人机问答系统
!mkdir '/content/gdrive/My Drive/conversation' ''' 将文本句子分解成单词,并构建词库 ''' path = '/content/gdrive/My D ...
- TensorFlow实现时间序列预测
常常会碰到各种各样时间序列预测问题,如商场人流量的预测.商品价格的预测.股价的预测,等等.TensorFlow新引入了一个TensorFlow Time Series库(以下简称为TFTS),它可以帮 ...
- 使用TensorFlow的递归神经网络(LSTM)进行序列预测
本篇文章介绍使用TensorFlow的递归神经网络(LSTM)进行序列预测.作者在网上找到的使用LSTM模型的案例都是解决自然语言处理的问题,而没有一个是来预测连续值的. 所以呢,这里是基于历史观察数 ...
- Kesci: Keras 实现 LSTM——时间序列预测
博主之前参与的一个科研项目是用 LSTM 结合 Attention 机制依据作物生长期内气象环境因素预测作物产量.本篇博客将介绍如何用 keras 深度学习的框架搭建 LSTM 模型对时间序列做预测. ...
随机推荐
- Redis和数据库 数据同步问题
Redis和数据库同步问题 缓存充当数据库 比如说Session这种访问非常频繁的数据,就适合采用这种方案:当然了,既然没有涉及到数据库,那么也就不会存在一致性问题: 缓存充当数据库热点缓存 读操作 ...
- Codeforces Round #373 (Div. 2) E. Sasha and Array 线段树维护矩阵
E. Sasha and Array 题目连接: http://codeforces.com/contest/719/problem/E Description Sasha has an array ...
- Beyond Compare 4提示已经过了30天试用期,破解方式,亲测可用
修改注册表 1)在搜索栏中输入 regedit ,打开注册表 2) 删除项目:计算机\HKEY_CURRENT_USER\Software\Scooter Software\Beyond Compar ...
- (67)Wangdao.com第十一天_JavaScript 数组的遍历
for 普通方式遍历 var arr = [0,1,2,3,4,5,6]; for(i=0; i<arr.length; i++){ document.write("["+i ...
- 群晖NAS简介(转)
Synology 群晖科技(Synology )创立于 2000 年,自始便专注于打造高效能.可靠.功能丰富且绿色环保的 NAS 服务器,是全球少数几家以单纯的提供网络存储解决方案获得世界认同的华人企 ...
- MongoDB 那些坑(转)
MongoDB 是目前炙手可热的 NoSQL 文档型数据库,它提供的一些特性很棒:如自动 failover 机制,自动 sharding,无模式 schemaless,大部分情况下性能也很棒.但是薄荷 ...
- E3-1260L (8M Cache, 2.40 GHz) E3-1265L v2 (8M Cache, 2.50 GHz)
http://ark.intel.com/compare/52275,65728 Product Name Intel® Xeon® Processor E3-1260L (8M Ca ...
- C#后台调用LPT1端口实现小票机打印方法。
public class POSPrinter { const int OPEN_EXISTING = 3; string prnPort = "LPT1"; [DllImport ...
- DM6467开发领航-开发坏境安装
- Snmp学习总结(四)——WinServer2003安装和配置SNMP
一.安装SNMP 今天讲解一下在WinServer2003安装和配置SNMP,具体操作步骤如下: 找到[控制面板]→[添加或删除程序]