python pytest测试框架介绍二
在介绍一中简单介绍了pytest的安装和简单使用,接下来我们就要实际了解pytest了
一、pytest的用例发现规则
pytest可以在不同的函数、包中发现用例,发现的规则如下
- 文件名以test_开头的py文件
- 以test_开头的函数
- 以Test开头的类
- 以test_开头的方法(与2类似)
- 要注意的是所有的包必须要有init.py文件(在使用各种编辑器时会自动生成)
二、pytest运行方式
1、单独执行某一个py文件里所有的用例
pytest test_mod.py
2、执行目录下所有的用例
pytest testing/
会按发现规则执行该目录下符合的用例
3、单独执行某一个用例
以函数形式的用例

pytest test_mod.py::testfunc

以类形式的用例

pytest testmod.py::testclass::test_method
三、pytest的测试框架(fixture)模式---xUnit格式
pytest支持以xUnit格式型的测试模型(setup/teardown),但还与python自带的unittest还是有一点差别,如下
- 模块形式----使用setup_module/teardown_module
- 函数形式----使用setup_function/teardown_function
- 类形式----使用setup_class/teardown_class
- 方法形式---使用setup_method/teardown_method
说了还是不好理解,我们还是通过例子还呈现
1、pytest以函数形式形成测试用例
from __future__ import print_function

def setup_module(module):

    print('\nsetup_module()')

def teardown_module(module):

    print('teardown_module()')

def setup_function(function):

    print('\nsetup_function()')

def teardown_function(function):

    print('\nteardown_function()')

def test_1():

    print('-  test_1()')

def test_2():

    print('-  test_2()')
运行结果如下:
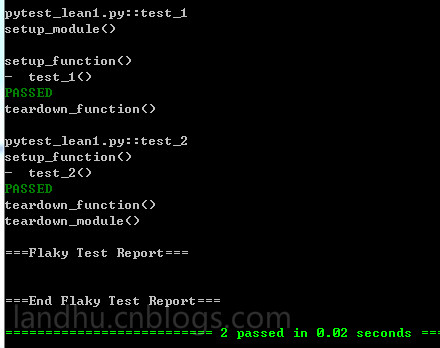
通过结果可以看出,各顺序如下
setup_module()----->setup_function()----->test_1----->teardown_function()----->setup_function()----->test_2--->teardown_function()---->teardown_module()
setup_module()和teardown_module只会在开始测试及测试结束时各运行一次
而setup_function()和teardwon_function会在每个用例开始前及结束后各运行一次
2、pytest以类形式的测试用例
from __future__ import print_function

class TestClass:

    @classmethod

    def setup_class(cls):

        print ('\nsetup_class()')

    @classmethod

    def teardown_class(cls):

        print ('teardown_class()')

    def setup_method(self, method):

        print ('\nsetup_method()')

    def teardown_method(self, method):

        print ('\nteardown_method()')

    def test_3(self):

        print('- test_3()')

    def test_4(self):

        print('- test_4()')
运行结果如下
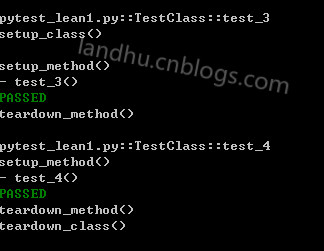
从结果可以看出,类形式的执行顺序如下
setup_class()--->setup_method()---->test_3()---->teardown_method()--->setup_mothod()-->test_4()---->teardown_method()---->teardonw_class()
setup_class和teardown_class只会在类调用前及结束后各运行一次
setup_method和teardown_method会在每个用例时都会运行
以类形式运行时,类里的用例执行顺序是不会变的,这点比unittest好
3、运行unittest框架模式
pytest也可以直接运行unittest模式的测试用例,如下
class my(unittest.TestCase):

    def delf(self,a):

        print a

    @classmethod

    def set_resource(self):

        bb='setUpclass'

        print bb

    @classmethod

    def setUpClass(cls):

        print "setUpclass"

        cls.set_resource()

    def setUp(self):

        print "setUp"

        floating_ip = ('setUptoTearDwon',)

        self.addCleanup(self.delf,

                        floating_ip[0])

    def test_1(self):

        '''i dont konw'''

        a=''

        print "test_1"

        floating_ip = ('bbbbb',)

        self.addCleanup(self.delf,

                        floating_ip[0])

        print ""

        self.addCleanup(self.delf,

                        a)

    def tearDown(self):

        print 'this is tearDown'

    def test_2(self):

        print "test_2"

    @classmethod

    def tearDownClass(cls):

        print "teardown...."
使用pytest运行该文件,结果如下
collected 2 items

unittest_fomater.py ..

========================== 2 passed in 0.19 seconds ===========================
可以看出,pytest也支持unittest的addCleanup功能等
需要注意的是,如果你在pytest模式中使用setupClass()函数是不行的,不会识别,但如果用例类继承之unittest.Testcase,还是可以识别的
class TestClass:

    @classmethod

    def setUpClass(cls):

        print ('\nsetup_class()')

    @classmethod

    def teardown_class(cls):

        print ('teardown_class()')

    def setup(self):

        print ('\nsetup_method()')

    def teardown_method(self, method):

        print ('\nteardown_method()')

    def test_3(self):

        print('- test_3()')

    def test_4(self):

        print('- test_4()')
用pytest运行时,结果如下,没有识别到setUpclass
collected 2 items

pytest_lean1.py::TestClass::test_3

setup_method()

- test_3()

PASSED

teardown_method()

pytest_lean1.py::TestClass::test_4

setup_method()

- test_4()

PASSED

teardown_method()

teardown_class()
python pytest测试框架介绍二的更多相关文章
- python pytest测试框架介绍四----pytest-html插件html带错误截图及失败重测机制
一.html报告错误截图 这次介绍pytest第三方插件pytest-html 这里不介绍怎么使用,因为怎么使用网上已经很多了,这里给个地址给大家参考,pytest-html生成html报告 今天在这 ...
- python pytest测试框架介绍三
之前介绍了pytest以xUnit形式来写用例,下面来介绍pytest特有的方式来写用例 1.pytest fixture实例1 代码如下 from __future__ import print_f ...
- python pytest测试框架介绍一
一.安装 pytest不是python默认的package,需要自动手工安装. pytest支持python 2.6--3.5之间的版本,同时可以在unix及windows上安装 安装方式: pip ...
- python pytest测试框架介绍五---日志实时输出
同样的,在使用pytest进行自动化测试时,需要将实时日志打印出来,而不是跑完后才在报告中出结果. 不过,好在pytest在3.3版本开始,就支持这一功能了,而不用再像nose一样,再去装第三方插件. ...
- Pytest测试框架(二):pytest 的setup/teardown方法
PyTest支持xUnit style 结构, setup() 和 teardown() 方法用于初始化和清理测试环境,可以保证测试用例的独立性.pytest的setup/teardown方法包括:模 ...
- 『德不孤』Pytest框架 — 1、Pytest测试框架介绍
目录 1.什么是单元测试框架 2.单元测试框架主要做什么 3.单元测试框架和自动化测试框架有什么关系 4.Pytest测试框架说明 5.Pytest框架和Unittest框架区别 (1)Unittes ...
- 【pytest系列】- pytest测试框架介绍与运行
如果想从头学起pytest,可以去看看这个系列的文章! https://www.cnblogs.com/miki-peng/category/1960108.html 前言 目前有两种纯测试的测 ...
- [翻译]pytest测试框架(二):使用
此文已由作者吴琪惠授权网易云社区发布. 欢迎访问网易云社区,了解更多网易技术产品运营经验. 调用pytest 调用命令: python -m pytest [...] 上面的命令相当于在命令行直接调用 ...
- python nose测试框架全面介绍十---用例的跳过
又来写nose了,这次主要介绍nose中的用例跳过应用,之前也有介绍,见python nose测试框架全面介绍四,但介绍的不详细.下面详细解析下 nose自带的SkipTest 先看看nose自带的S ...
随机推荐
- lua封装的位运算
1.移位运算基础 --与 同为1,则为1 --或 有一个为1,则为1 --非 true为 false,其余为true --异或 相同为0,不同为1 --ZZMathBit = {} function ...
- 怎么解决BarTender因为未检测到IIS安装失败的问题
个别小伙伴在安装BarTender条码标签设计软件的时候,遇到“未检测到IIS,无法安装BarTender Web Print Server配套程序”导致安装失败的问题,本文小编给大家分享解决BarT ...
- 让Zend Studio联系关系CakePHP模板文件.ctp
让Zend Studio关联CakePHP模板文件.ctp Zend Studio是套强大的PHP编辑器,各种给力让PHP开发者爱不释手.对于CakePHP程序员来说,有件事情相当头疼,在初始安装好Z ...
- Java使用泛型实现栈结构
泛型是Java SE5.0的重要特性,使用泛型编程可以使代码获得最大的重用.由于在使用泛型时要指明泛型的具体类型,这样就避免了类型转换.本实例将使用泛型来实现一个栈结构,并对其进行测试. 思路分析:既 ...
- 诡异的DataTime.Now.ToString()
昨天晚上调程序的时候在服务器上出现这种问题 DataTime.Now.ToString("yyyy-MM-dd HH:mm:ss") 居然出现了2014-8-14 8:nn:14: ...
- 在SSH框架中,如何得到POST请求的URL和参数列表
在做项目的API通知接口的时候,发现在SSH框架中无法获取到对方服务器发来的异步通知信息.最后排查到的原因可能是struts2对HttpServletRequest进行了二次处理,那么该如何拿到pos ...
- Spring容器AOP的理解
一句话理解:根据被代理对象信息通过Proxy动态生成我们具体的代理类. 实现就动态代理.那动态代理是什么呢? 动态代理其实并不是什么新鲜的东西,学过设计模式的人都应该知道代理模式,代理模式就是一种静态 ...
- 利用DB实现简单去重处理
业务需要针对某文件进行判重操作,用Perl实现如下 #!/usr/bin/perl my %h; s/\s+$// and $h{$_}++ while <>; print "$ ...
- osg内置shader变量
uniform int osg_FrameNumber:当前OSG程序运行的帧数: uniform float osg_FrameTime:当前OSG程序的运行总时间: uniform float o ...
- Unity3d OnApplicationPause与OnApplicationFocus
在手机游戏当中,会碰到“强制暂停”,如:锁屏.接电话或短信之类的.如果“强制暂停”时间过长,网络游戏有时得重新登录等事件. 而Unity3d,Android Plugins中的UnityPlayer. ...