
[图像处理] YUV图像处理入门3
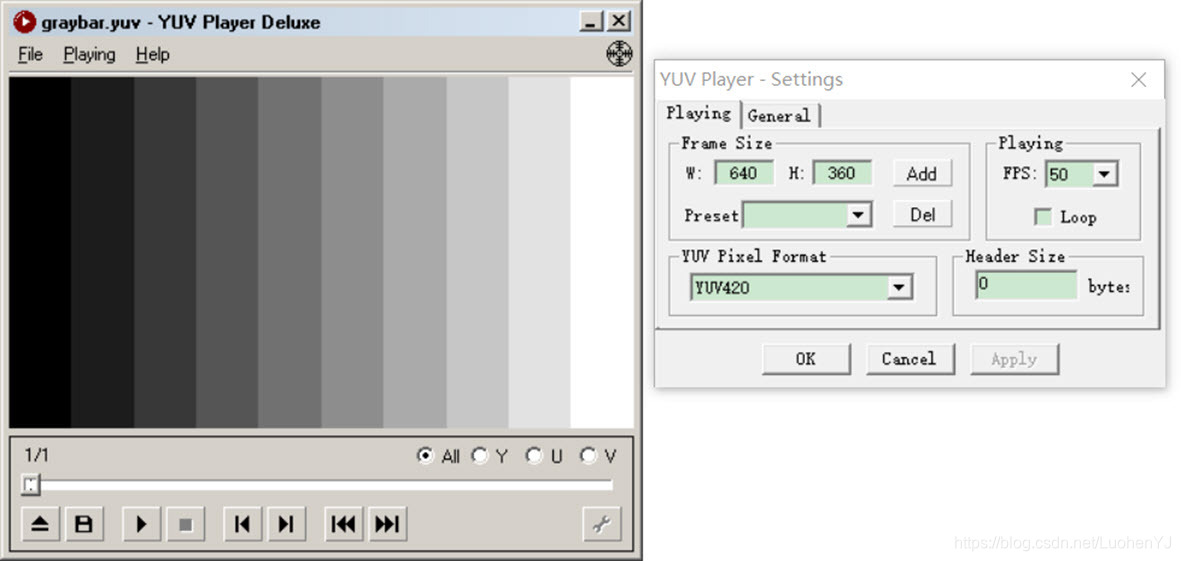
5 yuv420格式的灰阶测试图
本程序中的函数主要是为YUV420P视频数据流的第一帧图像添加边框。函数的代码如下所示:
/**

 * @file 5 yuv_graybar.cpp

 * @author luohen

 * @brief gray scale bar of yuv

 * @date 2018-12-07

 *

 */

#include "stdafx.h"

#include <stdio.h>

#include <stdlib.h>

#include <string.h>

#include <math.h>

#include <iostream>

using namespace std;

/**

 * @brief

 *

 * @param width		width of input yuv420p file

 * @param height	height of input yuv420p file

 * @param ymin		minimum value of y

 * @param ymax		maximum value of y

 * @param barnum 	Number of bars

 * @param url		location of input yuv420p file

 * @return int

 */

int yuv420_graybar(int width, int height, int ymin, int ymax, int barnum, const char *url)

{

	//每个灰度条的宽度

	int barwidth;

	//每个灰度阶次范围

	float lum_inc;

	//计算Y值

	unsigned char lum_temp;

	//uv分量宽高

	int uv_width, uv_height;

	//reading yuv image

	FILE *input_fp;

	if ((input_fp = fopen(url, "rb")) == NULL)

	{

		printf("%s open error!\n", url);

		return -1;

	}

	else

	{

		printf("%s open.\n", url);

	}

	//writing yuv image

	FILE *output_fp = fopen("video_result/gray_test.yuv", "wb+");

	int t = 0, i = 0, j = 0;

	//每个灰度条的宽度

	barwidth = width / barnum;

	//每个灰度阶次范围

	lum_inc = ((float)(ymax - ymin)) / ((float)(barnum - 1));

	//uv分量宽高

	uv_width = width / 2;

	uv_height = height / 2;

	unsigned char *data_y = new unsigned char[width * height];

	unsigned char *data_u = new unsigned char[uv_width * uv_height];

	unsigned char *data_v = new unsigned char[uv_width * uv_height];

	//Output Info

	//输出信息

	printf("Y, U, V value from picture's left to right:\n");

	for (t = 0; t < (width / barwidth); t++)

	{

		//计算Y值

		lum_temp = ymin + (char)(t * lum_inc);

		printf("%3d, 128, 128\n", lum_temp);

	}

	//保存数据

	for (j = 0; j < height; j++)

	{

		for (i = 0; i < width; i++)

		{

			t = i / barwidth;

			lum_temp = ymin + (char)(t * lum_inc);

			data_y[j * width + i] = lum_temp;

		}

	}

	for (j = 0; j < uv_height; j++)

	{

		for (i = 0; i < uv_width; i++)

		{

			data_u[j * uv_width + i] = 128;

		}

	}

	for (j = 0; j < uv_height; j++)

	{

		for (i = 0; i < uv_width; i++)

		{

			data_v[j * uv_width + i] = 128;

		}

	}

	fwrite(data_y, width * height, sizeof(unsigned char), output_fp);

	fwrite(data_u, uv_width * uv_height, sizeof(unsigned char), output_fp);

	fwrite(data_v, uv_width * uv_height, sizeof(unsigned char), output_fp);

	fclose(input_fp);

	fclose(output_fp);

	delete[] data_y;

	delete[] data_u;

	delete[] data_v;

	return 0;

}

/**

 * @brief main

 *

 * @return int

 */

int main()

{

	int state = yuv420_graybar(640, 360, 0, 255, 10, "video/graybar.yuv");

	return 0;

}
调用函数为:
int yuv420_graybar(int width, int height, int ymin, int ymax, int barnum, const char *url);实际上这部分代码和前面代码差不多,先取得YUV数据流,类似一个一维数组,读第一帧图像,然后依次读到y,u,v三个分量起始位置,再对y,u,v的像素值分别进行处理。
结果如图所示:
6 两张yuv420p图像的峰值信噪比(psnr)计算
本程序中的函数主要是比较两张yuv420p图像的峰值信噪。函数的代码如下所示:
/**

 * @file 6 yuv420_psnr.cpp

 * @author luohen

 * @brief Compute the PSNR values of two yuv files

 * @date 2018-12-08

 *

 */

#include "stdafx.h"

#include <stdio.h>

#include <stdlib.h>

#include <string.h>

#include <math.h>

#include <iostream>

using namespace std;

/**

 * @brief

 *

 * @param url1	location of input yuv420p file1

 * @param url2	location of input yuv420p file2

 * @param w		width of input yuv420p file

 * @param h		height of input yuv420p file

 * @return int

 */

int yuv420_psnr(const char *url1, const char *url2, int w, int h)

{

	//reading yuv iamges

	FILE *fp1 = fopen(url1, "rb+");

	FILE *fp2 = fopen(url2, "rb+");

	unsigned char *pic1 = new unsigned char[w * h];

	unsigned char *pic2 = new unsigned char[w * h];

	fread(pic1, 1, w * h, fp1);

	fread(pic2, 1, w * h, fp2);

	double mse_sum = 0, mse = 0, psnr = 0;

	//computing mse

	for (int j = 0; j < w * h; j++)

	{

		mse_sum += pow((double)(pic1[j] - pic2[j]), 2);

	}

	mse = mse_sum / (w * h);

	//computing psnr

	psnr = 10 * log10(255.0 * 255.0 / mse);

	printf("%5.3f\n", psnr);

	delete[] pic1;

	delete[] pic2;

	fclose(fp1);

	fclose(fp2);

	return 0;

}

/**

 * @brief main

 *

 * @return int

 */

int main()

{

	int state = yuv420_psnr("video/akiyo.yuv", "video/distort_akiyo.yuv", 352, 288);

	return 0;

}
调用函数为:
int yuv420_psnr(const char *url1, const char *url2, int w, int h);这段代码主要是计算两张图像的接近程度,psnr值具体介绍可以见文章:
https://www.cnblogs.com/ranjiewen/p/6390846.html。
本文所用的两张图像一张是akiyo视频流首帧图像,另外一张是前面为akiyo加上边框的图像。两张图像的psnr值为13.497。一般psnr值越大两张图像越接近。
7 yuv420图像顺时针旋转90度
本程序中的函数主要是将YUV420P视频数据流的第一帧图像顺时针旋转90度。函数的代码如下所示:
/**

 * @file 7 yuv_Rotation90.cpp

 * @author luohen

 * @brief 90 degree rotation of yuv420 images

 * @date 2018-12-08

 *

 */

#include "stdafx.h"

#include <stdio.h>

#include <stdlib.h>

#include <string.h>

#include <math.h>

#include <iostream>

using namespace std;

/**

 * @brief Pre-defined image size

 *

 */

#define image_h 288

#define image_w 352

/**

  * @brief

  *

  * @param url location of input yuv420p file

  * @return int

  */

int yuv420_Rotation90(const char *url)

{

	//reading yuv files

	FILE *input_fp;

	//writingyuv files

	FILE *output_fp = fopen("video_result/output_rotation.yuv", "wb+");

	//reading yuv datas

	if ((input_fp = fopen(url, "rb")) == NULL)

	{

		printf("%s open error!\n", url);

		return -1;

	}

	else

	{

		printf("%s open.\n", url);

	}

	//Input image array definition

	unsigned char input_Y[image_h][image_w];

	unsigned char input_U[image_h / 2][image_w / 2];

	unsigned char input_V[image_h / 2][image_w / 2];

	//Output image array definition

	unsigned char output_Y[image_w][image_h];

	unsigned char output_U[image_w / 2][image_h / 2];

	unsigned char output_V[image_w / 2][image_h / 2];

	int w = image_w;

	int h = image_h;

	fread(input_Y, sizeof(unsigned char), w * h, input_fp);

	fread(input_U, sizeof(unsigned char), w / 2 * h / 2, input_fp);

	fread(input_V, sizeof(unsigned char), w / 2 * h / 2, input_fp);

	//Y 90 degree rotation

	for (int x = 0; x < h; x++)

	{

		for (int y = 0; y < w; y++)

		{

			//旋转之后,输出的x值等于输入的y坐标值

			//y值等于输入列高-输入x坐标值-1

			output_Y[y][h - x - 1] = input_Y[x][y];

		}

	}

	//u 90 degree rotation

	for (int x = 0; x < h / 2; x++)

	{

		for (int y = 0; y < w / 2; y++)

		{

			//旋转之后,输出的x值等于输入的y坐标值

			//y值等于输入列高-输入x坐标值-1

			output_U[y][h / 2 - x - 1] = input_U[x][y];

		}

	}

	//v 90 degree rotation

	for (int x = 0; x < h / 2; x++)

	{

		for (int y = 0; y < w / 2; y++)

		{

			//旋转之后,输出的x值等于输入的y坐标值

			//y值等于输入列高-输入x坐标值-1

			output_V[y][h / 2 - x - 1] = input_V[x][y];

		}

	}

	fwrite(output_Y, sizeof(unsigned char), w * h, output_fp);

	fwrite(output_U, sizeof(unsigned char), w / 2 * h / 2, output_fp);

	fwrite(output_V, sizeof(unsigned char), w / 2 * h / 2, output_fp);

	fclose(input_fp);

	fclose(output_fp);

	return 0;

}

/**

 * @brief main

 *

 * @return int

 */

int main()

{

	int state = yuv420_Rotation90("video/akiyo.yuv");

	return 0;

}
调用函数为:
int yuv420_Rotation90(const char *url);这段代码主要是分别提取yuv分量,然后将y,u,v分量分别旋转90度。但是提取yuv分量和以前的代码有所不同。
首先是建立yuv三个分量输入的静态二维数组,相比使用动态数组,这种方式处理数据简单很多,但是需要实现确定输入图像的大小。
unsigned char input_Y[image_h][image_w];

unsigned char input_U[image_h / 2][image_w / 2];

unsigned char input_V[image_h / 2][image_w / 2];
然后建立旋转后的输出数组,输出数组定义是,由于是旋转90度,长宽进行了对调。
unsigned char output_Y[image_w][image_h];

unsigned char output_U[image_w / 2][image_h / 2];

unsigned char output_V[image_w / 2][image_h / 2];
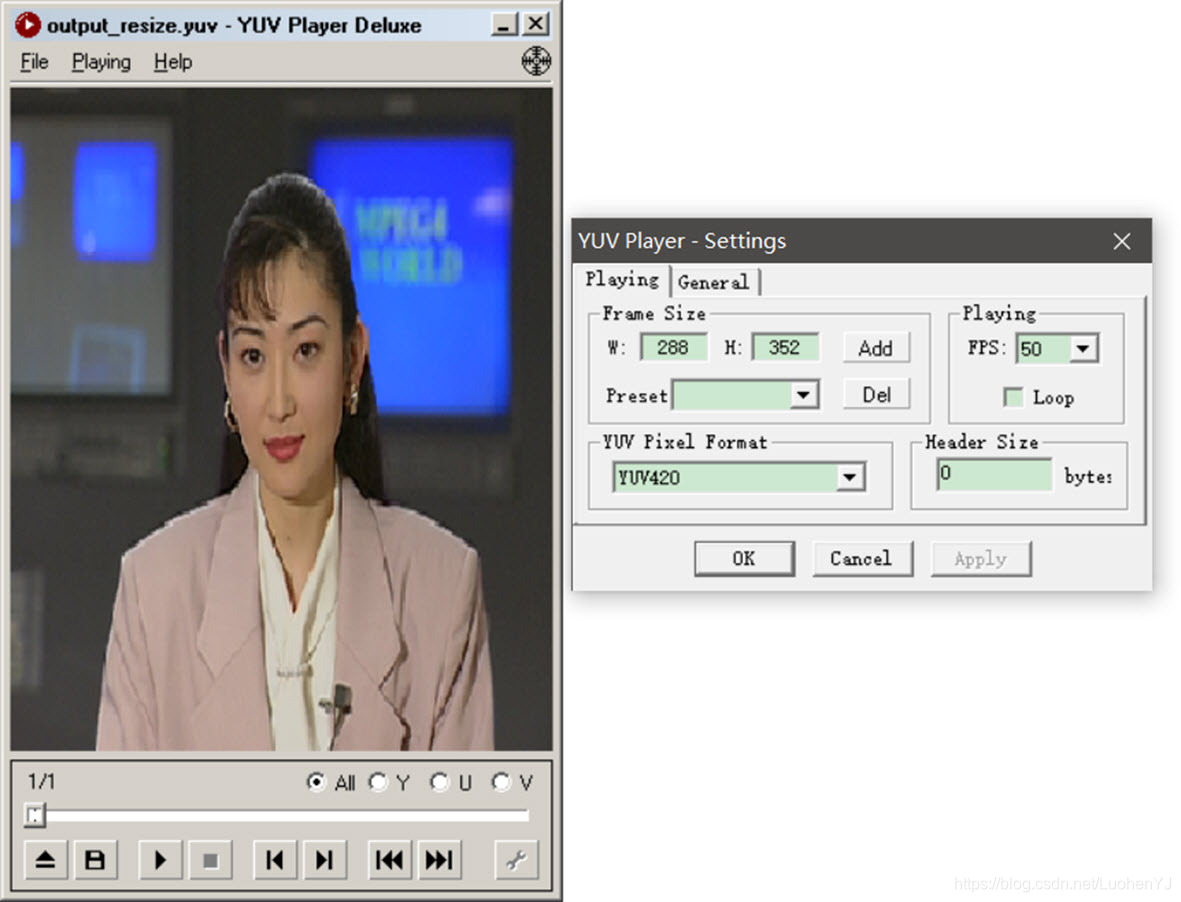
其他旋转操作,就是图像赋值过程。旋转后akiyo图像尺寸变为(288,352)
结果如图所示:

8 yuv420图像大小重置
本程序中的函数主要是对YUV420P视频数据流的第一帧图像进行缩放或者放大。类似opencv中的resize函数,函数的代码如下所示:
/**

 * @file 8 yuv_resize.cpp

 * @author luohen

 * @brief adjusting yuv image size

 * @date 2018-12-08

 *

 */

#include "stdafx.h"

#include <stdio.h>

#include <stdlib.h>

#include <string.h>

#include <math.h>

#include <string.h>

#include <iostream>

using namespace std;

#define HEIGHT 288

#define WIDTH 352

/**

 * @brief

 *

 * @param url			location of input yuv420p file

 * @param out_width		output image width

 * @param out_height	output image height

 * @return int

 */

int yuv420_resize(const char *url, int out_width, int out_height)

{

	//input array

	unsigned char yin[HEIGHT][WIDTH];

	unsigned char uin[HEIGHT / 2][WIDTH / 2];

	unsigned char vin[HEIGHT / 2][WIDTH / 2];

	//output array

	unsigned char *yout = new unsigned char[out_width * out_height];

	unsigned char *uout = new unsigned char[out_width / 2 * out_height / 2];

	unsigned char *vout = new unsigned char[out_width / 2 * out_height / 2];

	///reading yuv file

	FILE *input_fp;

	//writing yuv file

	FILE *output_fp = fopen("video_result/output_resize.yuv", "wb+");

	if ((input_fp = fopen(url, "rb")) == NULL)

	{

		printf("%s open error!\n", url);

		return -1;

	}

	else

	{

		printf("%s open.\n", url);

	}

	fread(yin, sizeof(unsigned char), HEIGHT * WIDTH, input_fp);

	fread(uin, sizeof(unsigned char), HEIGHT * WIDTH / 4, input_fp);

	fread(vin, sizeof(unsigned char), HEIGHT * WIDTH / 4, input_fp);

	//Y

	for (int i = 0; i < out_height; i++)

	{

		for (int j = 0; j < out_width; j++)

		{

			int i_in = round(i * HEIGHT / out_height);

			int j_in = round(j * WIDTH / out_width);

			yout[i * out_width + j] = yin[i_in][j_in];

		}

	}

	//U

	for (int i = 0; i < out_height / 2; i++)

	{

		for (int j = 0; j < out_width / 2; j++)

		{

			int i_in = round(i * (HEIGHT / 2) / (out_height / 2));

			int j_in = round(j * (WIDTH / 2) / (out_width / 2));

			uout[i * out_width / 2 + j] = uin[i_in][j_in];

		}

	}

	//V

	for (int i = 0; i < out_height / 2; i++)

	{

		for (int j = 0; j < out_width / 2; j++)

		{

			int i_in = round(i * (HEIGHT / 2) / (out_height / 2));

			int j_in = round(j * (WIDTH / 2) / (out_width / 2));

			vout[i * out_width / 2 + j] = vin[i_in][j_in];

		}

	}

	fwrite(yout, sizeof(unsigned char), out_width * out_height, output_fp);

	fwrite(uout, sizeof(unsigned char), out_width * out_height / 4, output_fp);

	fwrite(vout, sizeof(unsigned char), out_width * out_height / 4, output_fp);

	delete[] yout;

	delete[] uout;

	delete[] vout;

	fclose(input_fp);

	fclose(output_fp);

	return 0;

}

/**

 * @brief main

 *

 * @return int

 */

int main()

{

	int state = yuv420_resize("video/akiyo.yuv", 288, 352);

	return 0;

}
调用函数为:
int yuv420_resize(const char *url, int out_width, int out_height);这段代码也是通过事先设定yuv输入输出的静态二维数组来进行处理的。其中out_width, out_height
是输出图像的宽高,这段代码中输出图像的宽高可以设定为任意值。所用图像resize方法是最简单的最邻近插值法。
插值方法见文章:
https://blog.csdn.net/caomin1hao/article/details/81092134。
当设置调整后的图像宽高为288,352时,结果如下:
[图像处理] YUV图像处理入门3的更多相关文章
- [图像处理] YUV图像处理入门1
目前数字图像处理技术已经应用生活各个方面,但是大部分教程都是利用第三方库(如opencv)对RGB图像格式进行处理.对于YUV图像格式的图像处理教程较少.于是博主搬运总结了多个大牛的文章,总结出来这个 ...
- [图像处理] YUV图像处理入门2
1 分离YUV420中YUV分量 本程序中的函数主要是将YUV420P视频数据流的第一帧图像中的Y.U.V三个分量分离开并保存成三个文件.函数的代码如下所示: /** * @file 1 yuv_sp ...
- [图像处理] YUV图像处理入门4
9 yuv420图像截取 本程序中的函数主要是对YUV420P视频数据流的第一帧图像进行截取.类似opencv中的rect函数,函数的代码如下所示: /** * @file 9 yuv_clip.cp ...
- [图像处理] YUV图像处理入门5
12 yuv420转换为rgb(opencv mat) yuv格式具有亮度信息和色彩信息分离的特点,但大多数图像处理操作都是基于RGB格式,而且自己造轮子工作量太大.因此通常都会将yuv转换为rgb, ...
- Python图像处理库Pillow入门
http://python.jobbole.com/84956/ Pillow是Python里的图像处理库(PIL:Python Image Library),提供了了广泛的文件格式支持,强大的图像处 ...
- MATLAB图像处理_Bayer图像处理 & RGB Bayer Color分析
Bayer图像处理 Bayer是相机内部的原始图片, 一般后缀名为.raw. 很多软件都可以查看, 比如PS. 我们相机拍照下来存储在存储卡上的.jpeg或其它格式的图片, 都是从.raw格式转化 ...
- 打基础丨Python图像处理入门知识详解
摘要:本文讲解图像处理基础知识和OpenCV入门函数. 本文分享自华为云社区<[Python图像处理] 一.图像处理基础知识及OpenCV入门函数>,作者: eastmount. 一.图像 ...
- Atitit 图像处理知识点 知识体系 知识图谱v2
Atitit 图像处理知识点 知识体系 知识图谱v2 霍夫变换(Hough Transform) 霍夫变换是图像处理中从图像中识别几何形状的基本方法之一,应用很广泛,也有很多改进算法.主要用来从图像 ...
- Atitit 图像处理知识点 知识体系 知识图谱
Atitit 图像处理知识点 知识体系 知识图谱 图像处理知识点 图像处理知识点体系 v2 qb24.xlsx 基本知识图像金字塔op膨胀叠加混合变暗识别与检测分类肤色检测other验证码生成 基本 ...
随机推荐
- C++ 栈和典型迷宫问题
C++ 栈和迷宫问题 1. 前言 栈是一种受限的数据结构,要求在存储数据时遵循先进后出(Last In First Out)的原则.可以把栈看成只有一个口子的桶子,进和出都是走的这个口子(也称为栈顶) ...
- 2022-08-25-cdn套中套
layout: post cid: 19 title: cdn套中套 slug: 19 date: 2022/08/25 20:32:00 updated: 2022/08/26 11:20:20 s ...
- 生成随机数的几种方法、Math.random()随机数的生成、Random()的使用
第一种方法使用:System.currentTimeMillis(); final long l = System.currentTimeMillis(); final int rs = (int) ...
- win10桌面右键卡顿卡死解决方法
win+R,打开命令行 输入services.msc 找到NADIA Display Container LS,将其由自动改为禁用,解决问题. PS:网上有些改注册表的方法,确实可以治标,但是大家都应 ...
- SpringCloud微服务实战——搭建企业级开发框架(四十七):【移动开发】整合uni-app搭建移动端快速开发框架-添加Axios并实现登录功能
uni-app自带uni.request用于网络请求,因为我们需要自定义拦截器等功能,也是为了和我们后台管理保持统一,这里我们使用比较流行且功能更强大的axios来实现网络请求. Axios ...
- Angular SSR 探究
一般来说,普通的 Angular 应用是在 浏览器 中运行,在 DOM 中对页面进行渲染,并与用户进行交互.而 Angular Universal 是在 服务端 进行渲染(Server-Side Re ...
- JavaScript之数组高阶API—reduce()
一文搞懂JavaScript数组中最难的数组API--reduce() 前面我们讲了数组的一些基本方法,今天给大家讲一下数组的reduce(),它是数组里面非常重要也是比较难的函数,那么这篇文章就好好 ...
- java学习之EL和JSTL
0x00前言 EL和JSTL都是JSP的内容的拓展,都是开发的一些东西,稍微学习记录一下,避免以后忘记 0x01EL 0x1基本用法 概念:Expression language 表达式语言 作用:替 ...
- mysql删库报错
3.开发人员测试环境删库报错 #解决:在数据库的物理目录中(mysql的data目录),进入要删除的数据库目录,查看是否有文件存在,若存在,使用rm -rf 命令清除:再次执行删除数据库命令即可 [r ...
- Aspose.Cells设置单元格背景色不生效
Style.BackgroundColor property 获取或设置样式的背景颜色.public Color BackgroundColor { get; set; } 评论 如果要设置单元格的颜 ...