Android 自定义View修炼-自定义可动画展开收缩View的实现
有时候需要点击一个view可以动画展开和收缩折叠一个View这样的效果,这样就可以直接自定义View来实现。
本例中,采用继承FrameLayout来实现自定义的ExpandView。下面将详细介绍各个部分来实现该类以及如何使用该自定义视图。
效果图如下:
未展开效果:

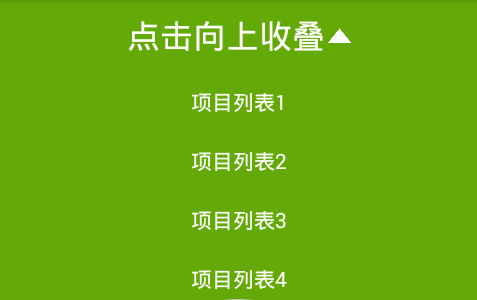
正在向上折叠收缩中的效果:

已经展开效果:
自定义展开类:ExpandView的实现:
package com.czm.customview;

import android.content.Context;

import android.util.AttributeSet;

import android.view.LayoutInflater;

import android.view.View;

import android.view.animation.Animation;

import android.view.animation.AnimationUtils;

import android.widget.FrameLayout;

import android.widget.LinearLayout;

public class ExpandView extends FrameLayout{

    private Animation mExpandAnimation;

    private Animation mCollapseAnimation;

    private boolean mIsExpand;

    public ExpandView(Context context) {

        this(context,null);

        // TODO Auto-generated constructor stub

    }

    public ExpandView(Context context, AttributeSet attrs) {

        this(context, attrs,0);

        // TODO Auto-generated constructor stub

    }

    public ExpandView(Context context, AttributeSet attrs, int defStyle) {

        super(context, attrs, defStyle);

        // TODO Auto-generated constructor stub

        initExpandView();

    }

    private void initExpandView() {

        LayoutInflater.from(getContext()).inflate(R.layout.layout_expand, this, true);

        mExpandAnimation = AnimationUtils.loadAnimation(getContext(), R.anim.expand);

        mExpandAnimation.setAnimationListener(new Animation.AnimationListener() {

            @Override

            public void onAnimationStart(Animation animation) {

                // TODO Auto-generated method stub

            }

            @Override

            public void onAnimationRepeat(Animation animation) {

                // TODO Auto-generated method stub

            }

            @Override

            public void onAnimationEnd(Animation animation) {

                setVisibility(View.VISIBLE);

            }

        });

        mCollapseAnimation = AnimationUtils.loadAnimation(getContext(), R.anim.collapse);

        mCollapseAnimation.setAnimationListener(new Animation.AnimationListener() {

            @Override

            public void onAnimationStart(Animation animation) {

                // TODO Auto-generated method stub

            }

            @Override

            public void onAnimationRepeat(Animation animation) {

                // TODO Auto-generated method stub

            }

            @Override

            public void onAnimationEnd(Animation animation) {

                setVisibility(View.INVISIBLE);

            }

        });

    }

    public void collapse() {

        if (mIsExpand) {

            mIsExpand = false;

            clearAnimation();

            startAnimation(mCollapseAnimation);

        }

    }

    public void expand() {

        if (!mIsExpand) {

            mIsExpand = true;

            clearAnimation();

            startAnimation(mExpandAnimation);

        }

    }

    public boolean isExpand() {

        return mIsExpand;

    }

    public void setContentView(){

        View view = null;

            view = LayoutInflater.from(getContext()).inflate(R.layout.layout_expand, null);

        removeAllViews();

        addView(view);

    }

}
对应的ui配置文件:layout_expand.xml的实现:
<?xml version="1.0" encoding="utf-8"?>

<LinearLayout xmlns:android="http://schemas.android.com/apk/res/android"

    android:layout_width="match_parent"

    android:layout_height="match_parent"

    android:orientation="vertical"

    android:background="#63A90A"

    android:gravity="center_horizontal">

    <TextView

        android:id="@+id/enterlesson"

        android:layout_width="wrap_content"

        android:layout_height="wrap_content"

        android:text="项目列表1"

        android:textSize="14sp"

        android:singleLine="true"

        android:gravity="center"

        android:textColor="#FFFFFF"

        android:drawablePadding="10dp"

        android:layout_marginBottom="10dp"

        android:layout_marginTop="10dp"/>

    <TextView

        android:id="@+id/enterlesson"

        android:layout_width="wrap_content"

        android:layout_height="wrap_content"

        android:text="项目列表2"

        android:textSize="14sp"

        android:singleLine="true"

        android:gravity="center"

        android:textColor="#FFFFFF"

        android:drawablePadding="10dp"

        android:layout_marginBottom="10dp"

        android:layout_marginTop="10dp"/>

    <TextView

        android:id="@+id/enterlesson"

        android:layout_width="wrap_content"

        android:layout_height="wrap_content"

        android:text="项目列表3"

        android:textSize="14sp"

        android:singleLine="true"

        android:gravity="center"

        android:textColor="#FFFFFF"

        android:drawablePadding="10dp"

        android:layout_marginBottom="10dp"

        android:layout_marginTop="10dp"/>

    <TextView

        android:id="@+id/enterlesson"

        android:layout_width="wrap_content"

        android:layout_height="wrap_content"

        android:text="项目列表4"

        android:textSize="14sp"

        android:singleLine="true"

        android:gravity="center"

        android:textColor="#FFFFFF"

        android:drawablePadding="10dp"

        android:layout_marginBottom="10dp"

        android:layout_marginTop="10dp"/>

</LinearLayout>
展开动画代码:
<?xml version="1.0" encoding="utf-8"?>
<set xmlns:android="http://schemas.android.com/apk/res/android" >
<scale
android:duration="200"
android:fromXScale="1."
android:fromYScale=".0"
android:pivotX="50%"
android:pivotY="0%"
android:toXScale="1."
android:toYScale="1." />
</set>
收缩叠起代码:
<?xml version="1.0" encoding="utf-8"?>

<set xmlns:android="http://schemas.android.com/apk/res/android" >

    <scale

        android:duration="120"

        android:fromXScale="1."

        android:fromYScale="1."

        android:pivotX="50%"

        android:pivotY="0%"

        android:toXScale="1."

        android:toYScale="0." />

</set>
如何使用上面自定义的ExpandView类呢?分为两步:
(1)在UI配置文件里引用定义 该View:
<LinearLayout
android:id="@+id/layout_title"
android:layout_width="fill_parent"
android:layout_height="50dp"
android:background="#63A90A"
android:orientation="horizontal"
android:gravity="center">
<TextView
android:id="@+id/textview_title"
android:layout_width="wrap_content"
android:layout_height="wrap_content"
android:textColor="#FFFFFF"
android:textSize="22sp"
android:text="点击向下展开"
/>
<ImageView
android:id="@+id/imageview_state"
android:layout_width="15dp"
android:layout_height="15dp"
android:layout_marginLeft="2dp"
android:src="@drawable/expand"
/>
</LinearLayout>
<com.czm.customview.ExpandView

                android:id="@+id/expandView"

                android:layout_width="match_parent"

                android:layout_height="wrap_content"

                android:background="#00FF00"

                android:visibility="invisible"

                android:layout_below="@+id/layout_title"

                android:layout_marginBottom="150dp"

                android:clickable="true"/>
(1)在java类中引用ExpandView类:
private ExpandView mExpandView;

    private LinearLayout mLinearLayout;

    private TextView mTextView;

    private ImageView mImageView;

public void initExpandView(){

       mLinearLayout = (LinearLayout)findViewById(R.id.layout_title);

        mTextView = (TextView)findViewById(R.id.textview_title);

        mImageView = (ImageView)findViewById(R.id.imageview_state);

        mExpandView = (ExpandView) findViewById(R.id.expandView);

        mExpandView.setContentView();

        mLinearLayout.setClickable(true);

        mLinearLayout.setOnClickListener(new OnClickListener() {

            @Override

            public void onClick(View v) {

                // TODO Auto-generated method stub

                if(mExpandView.isExpand()){

                    mExpandView.collapse();

                    mTextView.setText("点击向下展开");

                    mImageView.setImageDrawable(getResources().getDrawable(R.drawable.expand));

                }else{

                    mExpandView.expand();

                    mTextView.setText("点击向上收叠");

                    mImageView.setImageDrawable(getResources().getDrawable(R.drawable.collapse));

                }

            }

        });

}
Android 自定义View修炼-自定义可动画展开收缩View的实现的更多相关文章
- Android 自定义View修炼-自定义弹幕效果View
一.概述 现在有个很流行的效果就是弹幕效果,满屏幕的文字从右到左飘来飘去.看的眼花缭乱,看起来还蛮cool的 现在就是来实现这一的一个效果,大部分的都是从右向左移动漂移,本文的效果中也支持从左向右的漂 ...
- Android 自定义View修炼-自定义View-带百分比进度的圆形进度条(采用自定义属性)
很多的时候,系统自带的View满足不了我们功能的需求,那么我们就需要自己来自定义一个能满足我们需求的View,自定义View我们需要先继承View,添加类的构造方法,重写父类View的一些方法,例如o ...
- Android 自定义View修炼-自定义加载进度动画XCLoadingImageView
一.概述 本自定义View,是加载进度动画的自定义View,继承于ImageView来实现,主要实现蒙层加载进度的加载进度效果. 支持水平左右加载和垂直上下加载四个方向,同时也支持自定义蒙层进度颜色. ...
- Android 自定义View修炼-自定义HorizontalScrollView视图实现仿ViewPager效果
开发过程中,需要达到 HorizontalScrollView和ViewPager的效果,于是直接重写了HorizontalScrollView来达到实现ViewPager的效果. 实际效果图如下: ...
- Android 自定义View修炼-Android 实现自定义的卫星式菜单(弧形菜单)View
一.总述 Android 实现卫星式菜单也叫弧形菜单的主要要做的工作如下:1.动画的处理2.自定义ViewGroup来实现卫星式菜单View (1)自定义属性 a. 在attrs.xml中 ...
- [转]Android自定义控件三部曲系列完全解析(动画, 绘图, 自定义View)
来源:http://blog.csdn.net/harvic880925/article/details/50995268 一.自定义控件三部曲之动画篇 1.<自定义控件三部曲之动画篇(一)—— ...
- Android 自定义View修炼-打造完美的自定义侧滑菜单/侧滑View控件
一.概述 在App中,经常会出现侧滑菜单,侧滑滑出View等效果,虽然说Android有很多第三方开源库,但是实际上 咱们可以自己也写一个自定义的侧滑View控件,其实不难,主要涉及到以下几个要点: ...
- Android 自定义View修炼-仿QQ5.0 的侧滑菜单效果的实现
有一段时间没有写博客了,最近比较忙,没什么时间写,刚好今天有点时间, 我就分享下,侧滑菜单的实现原理,一般android侧滑的实现原理和步骤如下:(源码下载在下面最后给出哈) 1.使用ViewGrou ...
- Android中自定义View和自定义动画
Android FrameWork 层给我们提供了很多界面组件,但是在实际的商业开发中这些组件往往并不能完全满足我们的需求,这时候我们就需要自定义我们自己的视图和动画. 我们要重写系统的View就必须 ...
随机推荐
- 【BZOJ 1010】 [HNOI2008]玩具装箱toy (斜率优化)
1010: [HNOI2008]玩具装箱toy Time Limit: 1 Sec Memory Limit: 162 MBSubmit: 9330 Solved: 3739 Descriptio ...
- [wikioi]最长严格上升子序列
http://wikioi.com/problem/1576/ 经典的动态规划.我写了个o(n^2)的DP方法. PPT:http://wenku.baidu.com/view/bd290294dd8 ...
- queue与topic的技术特点对比
1 queue与topic的技术特点对比 Topic Queue 概要 Publish Subscribe messaging 发布订阅消息 Point-to-Point 点对点 有无状态 to ...
- 关于Json传递的日期/Date(数字)/解析
在将DateTime类型的数据Json后传到前台展示,出现如下效果 ,在客户端如何解析呢?在jquery easyui 的字段中加一个格式化的函数调用. { field: 'CreateTime' ...
- Apache Log4j使用实例
Apache Log4j使用实例 原创作品,允许转载,转载时请务必以超链接形式标明文章 原始出处 .作者信息和本声明.否则将追究法律责任. Blog: 1.Logger类 通过Logger类的静 ...
- MS SQL Server 如何得到执行最耗时的前N条T-SQL语句-
--得到最耗时的前N条T-SQL语句 --适用于SQL SERVER 2005及其以上版本 --给N赋初值为30 ;with maco as ( select top (@n) plan_handle ...
- HDOJ -- 1015
1.DFS #include<cmath> #include<cstdio> #include<cstdlib> #include<string> #i ...
- 基于.NET平台的分层架构实战(六)——依赖注入机制及IoC的设计与实现[转]
原文:http://www.cnblogs.com/leoo2sk/archive/2008/06/19/1225223.html 我们设计的分层架构,层与层之间应该是松散耦合的.因为是单向单一调用, ...
- 转 wordpress搭建
新建一个博客文件 在搭建博客的过程中,我们需要创建一个文件,用来存储博客的相关信息.这些信息包括域名的信息,主机空间服务器ip,FTP登录名和密码,空间面板登录信息等等,只要是与该博客有关的信息,全部 ...
- JavaScript高级程序设计30.pdf
第12章 DOM2和DOM3 DOM1级主要定义的是HTML和XML文档的底层结构.DOM2和DOM3则在这个结构的基础上引入了更多的交互能力,也支持更高级的XML特性 DOM2和DOM3级分为许多模 ...