
nginx内置高可用配置与第三方高可用模块nginx_ustream_check_mudule配置
1. nginx 第三方高可用模块
| IP | 备注 |
|---|---|
| 10.0.0.63 | proxy |
| 10.0.0.64 | web1 |
| 10.0.0.65 | web2 |
这里会讲解一些nignx常用高可用方案,以及引入第三方高可用模块来了解nginx作为高可用服务它是如何运行的
2. 基础环境安装
10.0.0.63  nginx 增加 nginx_upstream_check_module模块

10.0.0.64  nginx

10.0.0.65  nginx

-------------------------------------------------------------

#3台都安装上nginxx:

useradd  www -u 1200 -M -s /sbin/nologin

mkdir -p /var/log/nginx

yum install -y cmake pcre pcre-devel openssl openssl-devel gd-devel \

    zlib-devel gcc gcc-c++ net-tools iproute telnet wget curl &&\

    yum clean all && \

    rm -rf /var/cache/yum/*

mkdir -p /server/tools

cd /server/tools

wget https://www.chenleilei.net/soft/nginx-1.16.1.tar.gz

tar xf nginx-1.16.1.tar.gz

cd nginx-1.16.1

./configure --prefix=/usr/local/nginx --with-http_image_filter_module --user=www --group=www \

    --with-http_ssl_module --with-http_v2_module --with-http_stub_status_module \

    --pid-path=/var/run/nginx/nginx.pid

make -j 4 && make install && \

    rm -rf /usr/local/nginx/html/*  && \

    echo "nginx daemo hello" >/usr/local/nginx/html/index.html  && \

echo "export PATH=$PATH:/usr/local/nginx/sbin" >>/etc/profile

chown -R www.www /var/log/nginx /usr/local/nginx

source /etc/profile

nginx -s reload

ps -ef|grep nginx
3. nginx的高可用配置
默认的nginx高可用是一个后端连接不可用时且没有健康检查,他会一台台轮询.在 如: 金钱交易的期间都会关闭这个默认高可用'proxy_next_upstream',原因就是,敏感交易有可能在默认时间未结束前得到了响应,而另一方面有其他服务器响应了该请求,可能会出现重复交易情况,所以建议关闭默认的高可用策略,从而改用更简单易用的其他高可用模块来实现,它就是 "ngx_http_proxy_module"
3.1 默认高可用策略介绍
server 10.0.0.10:80 max_fails=2 fail_timeout=30;

weight        权重

max_fails     失败次数后停止该服务器

fail_timeout  踢出后重新检测时间. 一般max_fails和fail_timeout一起启用的,也就是失败n次,等待N秒

backup        备用服务器

max_conns     允许最大连接数

slow_start    节点恢复后不立即加入到集群.
3.2 安装 ngx_upstream_check_module [10.0.0.63]
github: https://github.com/yaoweibin/nginx_upstream_check_module
[root@master tools]# git clone https://github.com/yaoweibin/nginx_upstream_check_module.git

[root@master tools]# ll

drwxr-xr-x 7 root root      4096 Apr 16 21:53 nginx_upstream_check_module

[root@master tools]# cd nginx_upstream_check_module/

[root@master nginx_upstream_check_module]# pwd

/server/tools/nginx_upstream_check_module   #这个路径用于编译nginx新增模块使用.

# nginx_upstream_check_module 模块目录:

[root@master nginx_upstream_check_module]# ll

total 268

-rw-r--r-- 1 root root      0 Apr 16 21:53 CHANGES

-rw-r--r-- 1 root root   7921 Apr 16 21:53 check_1.11.1+.patch

-rw-r--r-- 1 root root   8330 Apr 16 21:53 check_1.11.5+.patch

-rw-r--r-- 1 root root   8060 Apr 16 21:53 check_1.12.1+.patch

-rw-r--r-- 1 root root   8054 Apr 16 21:53 check_1.14.0+.patch

-rw-r--r-- 1 root root   8409 Apr 16 21:53 check_1.16.1+.patch

-rw-r--r-- 1 root root   5483 Apr 16 21:53 check_1.2.1.patch

-rw-r--r-- 1 root root   7130 Apr 16 21:53 check_1.2.2+.patch

-rw-r--r-- 1 root root   7094 Apr 16 21:53 check_1.2.6+.patch

-rw-r--r-- 1 root root   6791 Apr 16 21:53 check_1.5.12+.patch

-rw-r--r-- 1 root root   8295 Apr 16 21:53 check_1.7.2+.patch

-rw-r--r-- 1 root root   8346 Apr 16 21:53 check_1.7.5+.patch

-rw-r--r-- 1 root root   8509 Apr 16 21:53 check_1.9.2+.patch

-rw-r--r-- 1 root root   6943 Apr 16 21:53 check.patch

-rw-r--r-- 1 root root    749 Apr 16 21:53 config

drwxr-xr-x 2 root root     43 Apr 16 21:53 doc

-rw-r--r-- 1 root root   1709 Apr 16 21:53 nginx-sticky-module.patch

drwxr-xr-x 2 root root     29 Apr 16 21:53 nginx-tests

-rw-r--r-- 1 root root 112085 Apr 16 21:53 ngx_http_upstream_check_module.c

-rw-r--r-- 1 root root    529 Apr 16 21:53 ngx_http_upstream_check_module.h

-rw-r--r-- 1 root root   2848 Apr 16 21:53 ngx_http_upstream_jvm_route_module.patch

-rw-r--r-- 1 root root  11509 Apr 16 21:53 README

drwxr-xr-x 6 root root     79 Apr 16 21:53 test

-rw-r--r-- 1 root root   3342 Apr 16 21:53 upstream_fair.patch

drwxr-xr-x 2 root root     81 Apr 16 21:53 util

#编译nginx:

1. 获取nginx原有编译参数:

configure arguments: --prefix=/usr/local/nginx --with-http_image_filter_module --user=www --group=www --with-http_ssl_module --with-http_v2_module --with-http_stub_status_module --pid-path=/var/run/nginx/nginx.pid

2. 同步模块代码:

cd /server/tools/nginx-1.16.1

 patch -p1 < /server/tools/nginx_upstream_check_module/check_1.16.1+.patch

输出:

[root@master nginx-1.16.1]# patch -p1 < /server/tools/nginx_upstream_check_module/check_1.16.1+.patch

patching file src/http/modules/ngx_http_upstream_hash_module.c

patching file src/http/modules/ngx_http_upstream_ip_hash_module.c

patching file src/http/modules/ngx_http_upstream_least_conn_module.c

patching file src/http/ngx_http_upstream_round_robin.c

patching file src/http/ngx_http_upstream_round_robin.h

3. 重新编译nginx来添加模块:

[root@master ~ ]# cd /server/tools/nginx-1.16.1

[root@master nginx-1.16.1]# ./configure --prefix=/usr/local/nginx --with-http_image_filter_module --user=www --group=www --with-http_ssl_module --with-http_v2_module --with-http_stub_status_module --pid-path=/var/run/nginx/nginx.pid --add-module=/server/tools/nginx_upstream_check_module/

[root@master nginx-1.16.1]# make

make结束后拷贝新的nginx二进制文件替换老版本,这和版本升级流程一样

#拷贝二进制文件替换老的nginx二进制文件

[root@master nginx-1.16.1]# \cp -a objs/nginx /usr/local/nginx/sbin/

#查看进程:

[root@master nginx-1.16.1]# ps -ef|grep nginx

root      43754      1  0 22:17 ?        00:00:00 nginx: master process nginx

www       43755  43754  0 22:17 ?        00:00:00 nginx: worker process

root      43774  37915  0 22:17 pts/0    00:00:00 grep --color=auto nginx

#关闭nginx后重新启动nginx:

[root@master nginx-1.16.1]# pkill nginx

[root@master nginx-1.16.1]# nginx

#检查模块安装是否成功:

[root@master nginx-1.16.1]# nginx -V

nginx version: nginx/1.16.1

built by gcc 4.8.5 20150623 (Red Hat 4.8.5-39) (GCC)

built with OpenSSL 1.0.2k-fips  26 Jan 2017

TLS SNI support enabled

configure arguments: --prefix=/usr/local/nginx --with-http_image_filter_module --user=www --group=www --with-http_ssl_module --with-http_v2_module --with-http_stub_status_module --pid-path=/var/run/nginx/nginx.pid --add-module=/server/tools/nginx_upstream_check_module/

#可以看到已经安装了

顺便做一下语法高亮显示的小优化:

mkdir ~/.vim -p

cp -r contrib/vim/* ~/.vim/
4.第三方高可用模块nginx_ustream_check_mudule的配置使用
安装完了模块后,需要对nginx进行配置才能使得新模块得到应用
egrep -v "#|^$" /usr/local/nginx/conf/nginx.conf.default > /usr/local/nginx/conf/nginx.conf

vim /usr/local/nginx/conf/nginx.conf

配置为如下:

#-----------------------------------------------------------------------------#

worker_processes  1;

events {

    worker_connections  1024;

}

http {

log_format  main  '$remote_addr - $remote_user [$time_local] "$request" '

                  '$status $body_bytes_sent "$http_referer" '

                  '"$http_user_agent" "$http_x_forwarded_for"';

access_log  logs/access.log  main;

upstream web {

        server 10.0.0.64;

        server 10.0.0.65;

        }

    include       mime.types;

    default_type  application/octet-stream;

    sendfile        on;

    keepalive_timeout  65;

    server {

        listen       80;

        server_name  locaalhost;

        location / {

                proxy_connect_timeout 2s;

                proxy_read_timeout 2s;

                proxy_next_upstream off;

                proxy_pass http://web;

        }

        error_page   500 502 503 504  /50x.html;

        location = /50x.html {

            root   html;

        }

    }

}

#-----------------------------------------------------------------------------#

2. 修改添加模块配置项:

worker_processes  1;

events {

    worker_connections  1024;

}

http {

log_format  main  '$remote_addr - $remote_user [$time_local] "$request" '

                  '$status $body_bytes_sent "$http_referer" '

                  '"$http_user_agent" "$http_x_forwarded_for"';

access_log  logs/access.log  main;

upstream web {

        server 10.0.0.64;

        server 10.0.0.65;

        #模块配置项 用于检查后端服务器是否正常

        check interval=5000 rise=1 fall=3 timeout=4000;

        check interval=3000 rise=2 fall=5 timeout=1000 type=ssl_hello;

        check interval=3000 rise=2 fall=5 timeout=1000 type=http;

        check_http_send "HEAD / HTTP/1.0\r\n\r\n";

        check_http_expect_alive http_2xx http_3xx http_4xx http_5xx;

        #模块配置项 用于检查后端服务器是否正常

        }

    include       mime.types;

    default_type  application/octet-stream;

    sendfile        on;

    keepalive_timeout  65;

    server {

        listen       80;

        server_name  locaalhost;

        location / {

                proxy_connect_timeout 2s;

                proxy_read_timeout 2s;

                proxy_next_upstream off;

                proxy_pass http://web;

        }

        error_page   500 502 503 504  /50x.html;

        location = /50x.html {

            root   html;

        }

    }

}
验证模块可用性:
1. 为后端nginx添加时别内容:

10.0.0.64服务器添加:

echo  "10.0.0.64 nginx daemon" >index.html

10.0.0.65服务器添加:

echo  "10.0.0.65 nginx daemon" >index.html
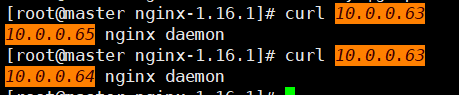
可以看出节点分配正常
4.1 后端健康检查测试
前端负载均衡 开启日志记录,获取访问的后端节点IP,便于查看配置是否正确,这个配置在企业中也是必备,务必掌握
http模块下修改默认日志记录为如下:

log_format  main  '$remote_addr - $remote_user [$time_local] "$request" '

                  '$status $body_bytes_sent "$http_referer" '

                  '"$http_user_agent" "$http_x_forwarded_for" $request_time $upstream_response_time $upstream_addr $upstream_status';

access_log  logs/access.log  main;
配置完毕后,继续测试负载均衡模块的可用性
默认端口都开 检查日志访问情况:

10.0.0.1 - - [16/Apr/2020:23:11:29 +0800] "GET / HTTP/1.1" 200 23 "-" "Mozilla/5.0 (Windows NT 10.0; Win64; x64) AppleWebKit/537.36 (KHTML, like Gecko) Chrome/80.0.3987.122 Safari/537.36" "-" 0.001 0.002 10.0.0.64:80 200

10.0.0.1 - - [16/Apr/2020:23:11:29 +0800] "GET / HTTP/1.1" 200 23 "-" "Mozilla/5.0 (Windows NT 10.0; Win64; x64) AppleWebKit/537.36 (KHTML, like Gecko) Chrome/80.0.3987.122 Safari/537.36" "-" 0.001 0.001 10.0.0.65:80 200

10.0.0.1 - - [16/Apr/2020:23:11:30 +0800] "GET / HTTP/1.1" 200 23 "-" "Mozilla/5.0 (Windows NT 10.0; Win64; x64) AppleWebKit/537.36 (KHTML, like Gecko) Chrome/80.0.3987.122 Safari/537.36" "-" 0.001 0.002 10.0.0.64:80 200

10.0.0.1 - - [16/Apr/2020:23:11:32 +0800] "GET / HTTP/1.1" 200 23 "-" "Mozilla/5.0 (Windows NT 10.0; Win64; x64) AppleWebKit/537.36 (KHTML, like Gecko) Chrome/80.0.3987.122 Safari/537.36" "-" 0.001 0.001 10.0.0.65:80 200

#从这里可以看出,我们访问10.0.0.63负载均衡的时候,他会一次去访问10.0.0.64,一次去访问10.0.0.65, 照此依次轮询.

#现在关闭后端某个节点,用于测试模块是否正常检测:

2020/04/16 23:18:38 [error] 46559#0: send() failed (111: Connection refused)

2020/04/16 23:18:41 [error] 46559#0: send() failed (111: Connection refused)

2020/04/16 23:18:44 [error] 46559#0: send() failed (111: Connection refused)

2020/04/16 23:18:47 [error] 46559#0: send() failed (111: Connection refused)

2020/04/16 23:18:50 [error] 46559#0: send() failed (111: Connection refused)

2020/04/16 23:18:50 [error] 46559#0: disable check peer: 10.0.0.64:80   #<---- 移除了该节点

他会进行5次检测,发现后端节点无法访问,直接将故障节点移除集群.

同时当这个集群角色恢复后,该模块依然能够检测出并将其重新加入集群.

如下:

2020/04/16 23:20:53 [error] 46559#0: send() failed (111: Connection refused)

2020/04/16 23:20:56 [error] 46559#0: send() failed (111: Connection refused)

2020/04/16 23:21:03 [error] 46559#0: enable check peer: 10.0.0.64:80    #<---- 添加了该节点
nginx内置高可用配置与第三方高可用模块nginx_ustream_check_mudule配置的更多相关文章
- (转)最新版 nginx内置变量 大全
原文:http://www.cnphp.info/nginx-embedded-variables-lasted-version.html 在配置基于nginx服务器的网站时,必然会用到 nginx内 ...
- nginx内置全局变量
nginx内置全局变量 $args 请求中的参数; $binary_remote_addr 远程地址的二进制表示 $body_bytes_sent 已发送的消 ...
- nginx内置变量总结
nginx内置变量 2019-02-28 变量名称 变量用途 $atg_PARAMETER 客户端GET请求中 PARAMETER字段的值 ...
- nginx 内置变量
http://blog.sina.com.cn/s/articlelist_1834459124_1_1.html nginx内置变量杂谈 http://nginx.org/en/docs/http ...
- nginx内置变量 大全
nginx内置变量 内置变量存放在 ngx_http_core_module 模块中,变量的命名方式和apache 服务器变量是一致的.总而言之,这些变量代表着客户端请求头的内容,例如$http_u ...
- -e $request_filename + nginx内置变量
-e表示只要filename存在,则为真,不管filename是什么类型,当然这里加了!就取反额外的一些-e filename 如果 filename存在,则为真-d filename 如果 file ...
- 查看python内部模块命令,内置函数,查看python已经安装的模块命令
查看python内部模块命令,内置函数,查看python已经安装的模块命令 可以用dir(modules) 或者用 pip list或者用 help('modules') 或者用 python -m ...
- nginx基础学习第二篇:nginx内置变量的使用
ngx_http_core模块提供的内置变量有很多,常见的有 $uri,用来获取当前请求的uri,不含请求参数. $request_uri,用来获取请求最原始的uri,包含请求参数,且未解码. $re ...
- Nginx 内置全局变量
Nginx在使用过程中,有不少的内置全局变量可以用做条件判断和编程控制,本文总结一些已知的指令,以供参考. $arg_PARAMETER 这个变量包含在查询字符串时GET请求PARAMETER的值. ...
随机推荐
- Jenkins+Ant+JMeter集成
Tomcat是jenkins运行的容器,jenkins实际上是依赖于Tomcat才能启动的.Jenkins可以调度ant的脚本. Ant和maven类似,maven是执行pom文件,ant是执行bui ...
- 040.集群网络-CNI网络模型
一 CNM网络模型 1.1 网络模型 生产环境中,跨主机容器间的网络互通已经成为基本要求,更高的要求包括容器固定IP地址.一个容器多个IP地址.多个子网隔离.ACL控制策略.与SDN集成等.目前主流的 ...
- Java基础 - 原码、反码、补码
目录 机器数 真值 原码 反码 补码 为什么使用原码. 反码. 补码 机器数 所有数字在计算机底层都是以二进制形式存在的.它的表现形式叫做机器数,这个数有正负之分,最高位为符号位.0 表示正数, 1 ...
- F版本SpringCloud 2—什么是SpringCloud?SpringCloud版本选择
引言:搭建微服务架构就像是买电脑,使用SpringCloud就是在买品牌机. 前言 昂,美好的天气里,不想直接说技术,给小伙伴萌看看傍晚的天空吧. -- 能找到天上的北极星吗? 上一篇文章中,通过一个 ...
- C++中 string 中的方法的使用详解
string 字符串在所有的语言中都非常重要,c++也不例外,接下来我们将介绍string中的常用方法 1. size() 和 length() 函数 : 他们返回字符串的真实长度,且不会因为空格而截 ...
- 题解 P2642 【双子序列最大和】
前言 其实这道题的关键就是在于预处理,其方法类似于 合唱队形 正文 求最大子段和 要想求出双子序列最大和,首先我们要会求出最大子段和 最大子段和的求值方法很简单 定义 \(f_i\) 为以第 \(i\ ...
- 图论-最短路径 floyd/dijkstra-Find the City With the Smallest Number of Neighbors at a Threshold Distance
2020-01-30 22:22:58 问题描述: 问题求解: 解法一:floyd 这个题目一看就是floyd解最合适,因为是要求多源最短路,floyd算法是最合适的,时间复杂度为O(n ^ 3). ...
- [图中找环] Codeforces 659E New Reform
New Reform time limit per test 1 second memory limit per test 256 megabytes input standard input out ...
- JavaScript语法记要
JavaScript语法记要 1.JS代码忽略缩进和换行 2.JS六种数据类型 String // 字符串 Number // 数值 Boolean // 布尔值 null // 空值 undefin ...
- SVM | 支持向量机原理讲解(二)
一.线性可分的支持向量机存在的问题 在支持向量机一中,我们介绍了当数据集是线性可分的时候,我们可以使用线性可分的支持向量机将数据进行分类(由于隔了很长时间才更新,因此忘记了支持向量机一的读者可以回看支 ...