用Keras搭建神经网络 简单模版(二)——Classifier分类(手写数字识别)
# -*- coding: utf-8 -*-

import numpy as np

np.random.seed(1337) #for reproducibility再现性

from keras.datasets import mnist

from keras.utils import np_utils

from keras.models import Sequential#按层

from keras.layers import Dense, Activation#全连接层

import matplotlib.pyplot as plt

from keras.optimizers import RMSprop
从mnist下载手写数字图片数据集,图片为28*28,将每个像素的颜色(0到255)改为(0倒1),将标签y变为10个长度,若为1,则在1处为1,剩下的都标为0。
#dowmload the mnisst the path '~/.keras/datasets/' if it is the first time to be called

#x shape (60000 28*28),y shape(10000,)

(x_train,y_train),(x_test,y_test) = mnist.load_data()#0-9的图片数据集

#data pre-processing

x_train = x_train.reshape(x_train.shape[0],-1)/255 #normalize 到【0,1】

x_test = x_test.reshape(x_test.shape[0],-1)/255

y_train = np_utils.to_categorical(y_train, num_classes=10) #把标签变为10个长度,若为1,则在1处为1,剩下的都标为0

y_test = np_utils.to_categorical(y_test,num_classes=10)
搭建神经网络,Activation为激活函数。由于第一个Dense传出32.所以第二个的Dense默认传进32,不用特意设置。
#Another way to build neural net

model = Sequential([

        Dense(32,input_dim=784),#传出32

        Activation('relu'),

        Dense(10),

        Activation('softmax')

        ])

#Another way to define optimizer

rmsprop = RMSprop(lr=0.001,rho=0.9,epsilon=1e-08,decay=0.0)

# We add metrics to get more results you want to see

model.compile( #编译

        optimizer = rmsprop,

        loss = 'categorical_crossentropy',

        metrics=['accuracy'], #在更新时同时计算一下accuracy

        )
训练和测试
print("Training~~~~~~~~")

#Another way to train the model

model.fit(x_train,y_train, epochs=2, batch_size=32) #训练2大批,每批32个

print("\nTesting~~~~~~~~~~")

#Evalute the model with the  metrics we define earlier

loss,accuracy = model.evaluate(x_test,y_test)

print('test loss:',loss)

print('test accuracy:', accuracy)
全代码:
# -*- coding: utf-8 -*-

import numpy as np

np.random.seed(1337) #for reproducibility再现性

from keras.datasets import mnist

from keras.utils import np_utils

from keras.models import Sequential#按层

from keras.layers import Dense, Activation#全连接层

import matplotlib.pyplot as plt

from keras.optimizers import RMSprop

#dowmload the mnisst the path '~/.keras/datasets/' if it is the first time to be called

#x shape (60000 28*28),y shape(10000,)

(x_train,y_train),(x_test,y_test) = mnist.load_data()#0-9的图片数据集

#data pre-processing

x_train = x_train.reshape(x_train.shape[0],-1)/255 #normalize 到【0,1】

x_test = x_test.reshape(x_test.shape[0],-1)/255

y_train = np_utils.to_categorical(y_train, num_classes=10) #把标签变为10个长度,若为1,则在1处为1,剩下的都标为0

y_test = np_utils.to_categorical(y_test,num_classes=10)

#Another way to build neural net

model = Sequential([

        Dense(32,input_dim=784),#传出32

        Activation('relu'),

        Dense(10),

        Activation('softmax')

        ])

#Another way to define optimizer

rmsprop = RMSprop(lr=0.001,rho=0.9,epsilon=1e-08,decay=0.0)

# We add metrics to get more results you want to see

model.compile( #编译

        optimizer = rmsprop,

        loss = 'categorical_crossentropy',

        metrics=['accuracy'], #在更新时同时计算一下accuracy

        )

print("Training~~~~~~~~")

#Another way to train the model

model.fit(x_train,y_train, epochs=2, batch_size=32) #训练2大批,每批32个

print("\nTesting~~~~~~~~~~")

#Evalute the model with the  metrics we define earlier

loss,accuracy = model.evaluate(x_test,y_test)

print('test loss:',loss)

print('test accuracy:', accuracy)
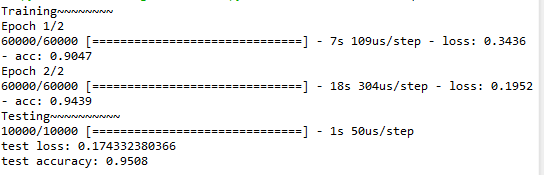
结果为:

用Keras搭建神经网络 简单模版(二)——Classifier分类(手写数字识别)的更多相关文章
- 机器学习(二)-kNN手写数字识别
一.kNN算法是机器学习的入门算法,其中不涉及训练,主要思想是计算待测点和参照点的距离,选取距离较近的参照点的类别作为待测点的的类别. 1,距离可以是欧式距离,夹角余弦距离等等. 2,k值不能选择太大 ...
- 用Keras搭建神经网络 简单模版(三)—— CNN 卷积神经网络(手写数字图片识别)
# -*- coding: utf-8 -*- import numpy as np np.random.seed(1337) #for reproducibility再现性 from keras.d ...
- 用Keras搭建神经网络 简单模版(六)——Autoencoder 自编码
import numpy as np np.random.seed(1337) from keras.datasets import mnist from keras.models import Mo ...
- 用Keras搭建神经网络 简单模版(四)—— RNN Classifier 循环神经网络(手写数字图片识别)
# -*- coding: utf-8 -*- import numpy as np np.random.seed(1337) from keras.datasets import mnist fro ...
- 用Keras搭建神经网络 简单模版(一)——Regressor 回归
首先需要下载Keras,可以看到我用的是TensorFlow 的backend 自己构建虚拟数据,x是-1到1之间的数,y为0.5*x+2,可视化出来 # -*- coding: utf-8 -*- ...
- 用Keras搭建神经网络 简单模版(五)——RNN LSTM Regressor 循环神经网络
# -*- coding: utf-8 -*- import numpy as np np.random.seed(1337) import matplotlib.pyplot as plt from ...
- 吴裕雄 python 神经网络TensorFlow实现LeNet模型处理手写数字识别MNIST数据集
import tensorflow as tf tf.reset_default_graph() # 配置神经网络的参数 INPUT_NODE = 784 OUTPUT_NODE = 10 IMAGE ...
- 吴裕雄 python 神经网络——TensorFlow实现AlexNet模型处理手写数字识别MNIST数据集
import tensorflow as tf # 输入数据 from tensorflow.examples.tutorials.mnist import input_data mnist = in ...
- 【问题解决方案】Keras手写数字识别-ConnectionResetError: [WinError 10054] 远程主机强迫关闭了一个现有的连接
参考:台大李宏毅老师视频课程-Keras-Demo 在载入数据阶段报错: ConnectionResetError: [WinError 10054] 远程主机强迫关闭了一个现有的连接 Google之 ...
随机推荐
- 无线Mesh网络技术基础与应用
无线Mesh网络主要包含三类节点,构成了Mesh的基本服务集. 1.与有线网络相连的节点(GateWay节点),其主要负责实现无线Mesh网络和有线网络的数据交换. 2.可以进行Mesh组网并拥有Ro ...
- L1-019 谁先倒
划拳是古老中国酒文化的一个有趣的组成部分.酒桌上两人划拳的方法为:每人口中喊出一个数字,同时用手比划出一个数字.如果谁比划出的数字正好等于两人喊出的数字之和,谁就输了,输家罚一杯酒.两人同赢或两人同输 ...
- Python 数值计算库之-[Pandas](六)
- DevExpress DateEdit 5 常见问题解决方法
1. 如何设置选择的日期大于当天? dateEdit1.Properties.MinValue = DateTime.Now.AddDays(1) 2. 如何做到只显示年.月? var formatS ...
- AVG Internet Security 2013 – 免费1年
AVG 是一款来自捷克的老牌的且非常优秀的免费杀毒软件,自推出以来就颇受用户好评!一直以来诸多的优点使其获得不少忠实用户,即便在中国也赢得了不少粉丝!AVG的安全产品广泛地被欧美以及大洋洲地区使用,并 ...
- Selenium+java上传文件
自动化调用: AutoIT脚本编译成可执行文件后,放在本地的某一个目录下 上传文件时,首先定位到[上传]字样文本,点击该按钮 执行编辑后的可执行文件,实现文件上传 一.安装AutoIT3,主要用到的工 ...
- 理解 js的 async/await
async 和await 在干什么? async 用于声明一个function是异步的 await用于等待一个异步方法执行完成(其实我理解的是等待的是一个表达式,就是一个结果), 其中 await ...
- 《DSP using MATLAB》Problem 4.13
代码: %% ---------------------------------------------------------------------------- %% Output Info a ...
- 【mysql】修改数据时候,抛出safe mode相关错误,处理方法
在mysql5中,可以设置safe mode,比如在一个更新语句中 UPDATE table_name SET bDeleted=0; 执行时会错误,报: You are using safe upd ...
- SolrCloud6.3 单机、集群、内置jetty、tomcat搭建、对collection操作
参考:https://my.oschina.net/u/1416405/blog/821187 1.Solr 单机 1.1.Solr下载 1.solr官网:http://lucene.apache.o ...