Run P4 without P4factory - A Simple Example In Tutorials.
前言
本文是我运行P4社区于Github开源教程Tutorials中的P4 SIGCOMM 2015 Tutorial一些实战小结,Github链接:
测试的例子:P4 SIGCOMM 2015 - Source Routing
实验环境:
Linux,Ubuntu 14.04 64bit。
实验步骤:
准备工作:
安装 bmv2 和 p4c-bm:
请移步我的另外一篇博客:
上面给出的博文中,还有一个小bug还在处理中。
安装pip:
请移步:
安装Mininet:
请移步:
安装其他工具:
命令:
sudo pip install scapy thrift networkx
关于thrift的安装遇到的一些问题:
准备完毕之后:
bmv2:/home/wasdns/bmv2
p4c-bm:/home/wasdns/p4c-bmv2
java -version(比较老的版本):
java version "1.7.0_79"

Java(TM) SE Runtime Environment (build 1.7.0_79-b15)

Java HotSpot(TM) 64-Bit Server VM (build 24.79-b02, mixed mode)
python -V:
Python 2.7.6
thrift -version:
Thrift version 1.0.0-dev
就不一一列举了。
实验步骤
1.将Github上的Tutorials下载下来:
git clone https://github.com/p4lang/tutorials.git
2.更改env.sh脚本中的路径信息:
命令:
vim env.sh
env.sh脚本:
THIS_DIR=$( cd "$( dirname "${BASH_SOURCE[0]}" )" && pwd )

# ---------------- EDIT THIS ------------------

BMV2_PATH=$THIS_DIR/../bmv2

# e.g. BMV2_PATH=$THIS_DIR/../bmv2

P4C_BM_PATH=$THIS_DIR/../p4c-bmv2

# e.g P4C_BM_PATH=$THIS_DIR/../p4c-bm

# ---------------- END ------------------
我没有使用THIS_DIR的路径,直接修改为:
THIS_DIR=$( cd "$( dirname "${BASH_SOURCE[0]}" )" && pwd )

# ---------------- EDIT THIS ------------------

BMV2_PATH=/home/wasdns/bmv2

# e.g. BMV2_PATH=$THIS_DIR/../bmv2

P4C_BM_PATH=/home/wasdns/p4c-bmv2

# e.g P4C_BM_PATH=$THIS_DIR/../p4c-bm

# ---------------- END ------------------
:wq保存退出。
3.进入source_routing目录
root@ubuntu:/home/wasdns/tutorials# cd SIGCOMM_2015

root@ubuntu:/home/wasdns/tutorials/SIGCOMM_2015# cd source_routing/
4.对本实验的简单介绍
请参考:
5.解压solution.tar.gz
tar -zxvf solution.tar.gz
这里借用了barefoot提供的现成的解决方案,p4源程序source_routing.p4如下:
/*

Copyright 2013-present Barefoot Networks, Inc.

Licensed under the Apache License, Version 2.0 (the "License");

you may not use this file except in compliance with the License.

You may obtain a copy of the License at

    http://www.apache.org/licenses/LICENSE-2.0

Unless required by applicable law or agreed to in writing, software

distributed under the License is distributed on an "AS IS" BASIS,

WITHOUT WARRANTIES OR CONDITIONS OF ANY KIND, either express or implied.

See the License for the specific language governing permissions and

limitations under the License.

*/

header_type easyroute_head_t {

    fields {

        preamble: 64;

        num_valid: 32;

    }

}

header easyroute_head_t easyroute_head;

header_type easyroute_port_t {

    fields {

        port: 8;

    }

}

header easyroute_port_t easyroute_port;

parser start {

    return select(current(0, 64)) {

        0: parse_head;

        default: ingress;

    }

}

parser parse_head {

    extract(easyroute_head);

    return select(latest.num_valid) {

        0: ingress;

        default: parse_port;

    }

}

parser parse_port {

    extract(easyroute_port);

    return ingress;

}

action _drop() {

    drop();

}

action route() {

    modify_field(standard_metadata.egress_spec, easyroute_port.port);

    add_to_field(easyroute_head.num_valid, -1);

    remove_header(easyroute_port);

}

table route_pkt {

    reads {

        easyroute_port: valid;

    }

    actions {

        _drop;

        route;

    }

    size: 1;

}

control ingress {

    apply(route_pkt);

}

control egress {

    // leave empty

}
并将该p4程序及其目录p4src拷贝至source_routing目录下:
mv /home/wasdns/tutorials/SIGCOMM_2015/source_routing/p4src /home/wasdns/tutorials/SIGCOMM_2015/source_routing/p4src1

cp -r /home/wasdns/tutorials/SIGCOMM_2015/source_routing/solution/p4src /home/wasdns/tutorials/SIGCOMM_2015/source_routing
6.将env.sh拷贝至source_routing目录下:
cp -r /home/wasdns/tutorials/env.sh /home/wasdns/tutorials/SIGCOMM_2015/source_routing
7.修改run_demo.sh脚本内容:
run_demo.sh脚本:
#!/bin/bash

# Copyright 2013-present Barefoot Networks, Inc.

#

# Licensed under the Apache License, Version 2.0 (the "License");

# you may not use this file except in compliance with the License.

# You may obtain a copy of the License at

#

#    http://www.apache.org/licenses/LICENSE-2.0

#

# Unless required by applicable law or agreed to in writing, software

# distributed under the License is distributed on an "AS IS" BASIS,

# WITHOUT WARRANTIES OR CONDITIONS OF ANY KIND, either express or implied.

# See the License for the specific language governing permissions and

# limitations under the License.

THIS_DIR=$( cd "$( dirname "${BASH_SOURCE[0]}" )" && pwd )

source $THIS_DIR/../../env.sh

P4C_BM_SCRIPT=$P4C_BM_PATH/p4c_bm/__main__.py

SWITCH_PATH=$BMV2_PATH/targets/simple_switch/simple_switch

CLI_PATH=$BMV2_PATH/tools/runtime_CLI.py

$P4C_BM_SCRIPT p4src/source_routing.p4 --json source_routing.json

# This gives libtool the opportunity to "warm-up"

sudo $SWITCH_PATH >/dev/null 2>&1

sudo PYTHONPATH=$PYTHONPATH:$BMV2_PATH/mininet/ python topo.py \

    --behavioral-exe $SWITCH_PATH \

    --json source_routing.json \

--cli $CLI_PATH
将
source $THIS_DIR/../../env.sh
改为:
source $THIS_DIR/env.sh
8.添加python模块p4_mininet:
请移步:
9.修改command.txt:
在我第一次做这个实验的时候,h1发送的数据报是到达不了h3的,RunTimeCmd报错如下:
/home/wasdns/bmv2/tools/runtime_CLI.py --json source_routing.json --thrift-port 22222

Control utility for runtime P4 table manipulation

RuntimeCmd: Error: Invalid table name (ecmp_group)

RuntimeCmd: Error: Invalid table name (ecmp_nhop)

RuntimeCmd: Error: Invalid table name (forward)

RuntimeCmd: Error: Invalid table name (send_frame)

RuntimeCmd: Error: Invalid table name (ecmp_group)

RuntimeCmd: Error: Invalid table name (ecmp_nhop)

RuntimeCmd: Error: Invalid table name (ecmp_nhop)

RuntimeCmd: Error: Invalid table name (forward)

RuntimeCmd: Error: Invalid table name (forward)

RuntimeCmd: Error: Invalid table name (send_frame)

RuntimeCmd: Error: Invalid table name (send_frame)

RuntimeCmd:
原因是因为我没有仔细阅读ReadMe,直接把另外一个P4程序的command.txt拿来用了,本实验的P4程序没有这个表的定义,自然报错。
依照ReadMe,了解以下两种command即可:
1. table_set_default <table_name> <action_name> [action_data]: this is used to set the default action of a given table

2. table_add <table_name> <action_name> <match_fields> => [action_data]: this is used to add an entry to a table
ReadMe中也给出了一个具体的依照P4程序编写命令的model:
于是,我依照上面的model以及本次实验所用的source_routing.p4程序,写了一个命令来修改command.txt,内容如下。
command.txt:
table_set_default route_pkt route
我也在Github中询问了这个问题,最后自己解决了:)A ping problem in SIGCOMM2015/source_routing
10.启动虚拟端口:
sh /home/wasdns/bmv2/tools/veth_setup.sh
可以使用ifconfig命令验证是否开启。
11.运行脚本:
./run_demo.sh
12.在启动的mininet中打开h1和h3的终端:
xterm h1

xterm h3
13.分别在h1和h3终端上运行脚本:
先执行h3终端上的脚本:
./receive.py
再执行h1终端上的脚本:
./send.py h1 h3
实验结果:
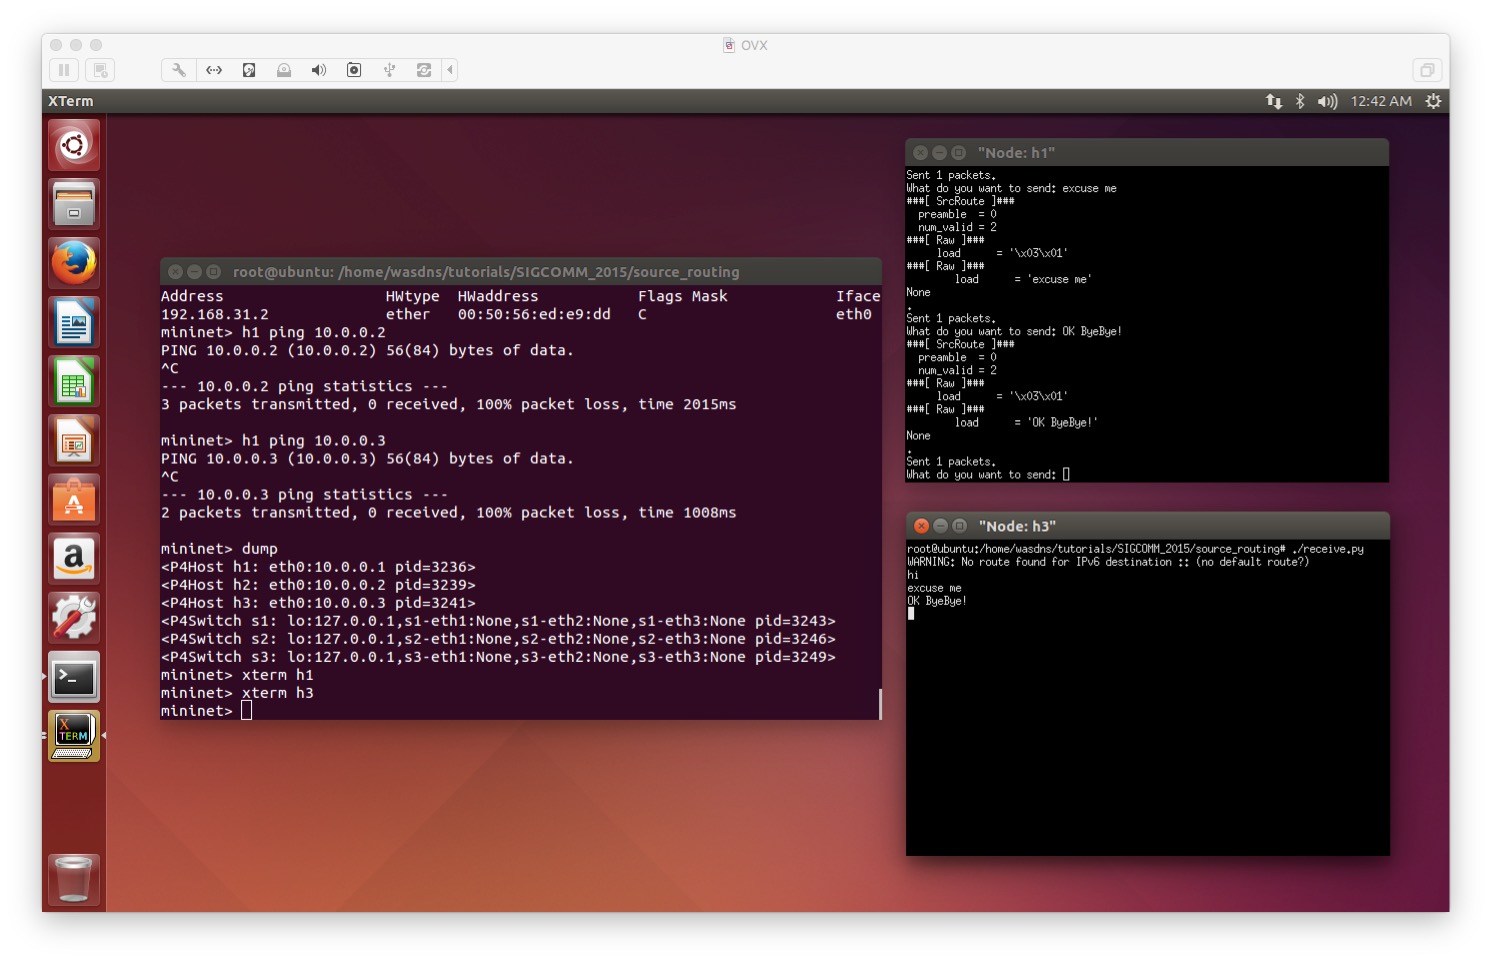
在h1的xterm上输入文本信息,在h3的xterm上能够接收。但是在mininet中执行h1 ping h3是没有办法ping通的,由此可以证实P4交换机在处理数据报的过程中,进行了协议匹配:当easyroute_port与valid相匹配时,执行route()动作。
总结:
1.勤奋搜索。
2.要理解每一个操作步骤在整个实验中的作用,能够解决很多搜索解决不了的问题。
参考:
2016/12/19
Run P4 without P4factory - A Simple Example In Tutorials.的更多相关文章
- Run P4 without P4factory - A Simple Example In Tutorials. -2
Reference:Github-Tutorial Exercise 2: Implementing TCP flowlet switching 实验准备: 参考之前的博客:Run P4 withou ...
- Run P4 without P4factory - A Simple Example In Tutorials. -2 附 simple_router源码
/* Copyright 2013-present Barefoot Networks, Inc. Licensed under the Apache License, Version 2.0 (th ...
- NSP4——Network Simulator for P4
NSP4--Network Simulator for P4 一.前言 NSP4旨在为P4开发者,创建一个可视化的P4流表管理及拓扑建立工具,帮助P4开发者,更好的调试自己的P4程序.此开发工具是基于 ...
- Run JavaScript on your PeopleSoft pages conditionally
Here, PeopleCode sets the logic that determines when the JavaScript code will run. This is not as si ...
- Pascal编译器大全(非常难得)
http://www.pascaland.org/pascall.htm Some titles (french) : Compilateurs Pascal avec sources = compi ...
- [Intel Edison开发板] 04、Edison开发基于nodejs和redis的服务器搭建
一.前言 intel-iot-examples-datastore 是Intel提供用于所有Edison开发板联网存储DEMO所需要的服务器工程.该工程是基于nodejs和redis写成的一个简单的工 ...
- 【GOF23设计模式】工厂模式
来源:http://www.bjsxt.com/ 一.[GOF23设计模式]_简单工厂模式详解.面向对象设计原则.开闭原则.依赖反转原则.迪米特法则 没有工厂模式的情况 package com.te ...
- 一步一步了解Cocos2dx 3.0 正式版本开发环境搭建(Win32/Android)
cocos2d-x 3.0发布有一段时间了,作为一个初学者,我一直觉得cocos2d-x很坑.每个比较大的版本变动,都会有不一样的项目创建方式,每次的跨度都挺大…… 但是凭心而论,3.0RC版本开始 ...
- 加州大学伯克利分校Stat2.3x Inference 统计推断学习笔记: Section 4 Dependent Samples
Stat2.3x Inference(统计推断)课程由加州大学伯克利分校(University of California, Berkeley)于2014年在edX平台讲授. PDF笔记下载(Acad ...
随机推荐
- php中几个字符串替换函数详解
在php中字符替换函数有几个如有:str_replace.substr_replace.preg_replace.preg_split.str_split等函数,下面我来给大家总结介绍介绍. 一.st ...
- 分布式中Redis实现Session终结篇
上一篇使用Redis实现Session共享方式虽然可行,但是实际操作起来却很麻烦,现有代码已经是这个样子了,总不可能全部换掉吧!好吧,这是个很实际的问题,那么能不能实现无侵入式的分布式Session共 ...
- Java 内部类
1.成员内部类 成员内部类,就是作为外部类的成员,可以直接使用外部类的所有成员和方法,即使是private的.同时外部类要访问内部类的所有成员变量/方法,则需要通过内部类的对象来获取. 2.局部内部类 ...
- GET和POST
Ajax与Comet 1. Ajax Asynchronous Javascript+xml :能够向服务器请求额外的数据而无需卸载页面. Ajax技术的核心是XMLHttpRequest 对象(简称 ...
- 将csv文件读入数据库
USE LHJTest create table #temp6//创建临时表 ( A nvarchar(max) NOT NULL, B nvarchar(max), C nvarchar(max ...
- iOS 获取沙盒路径方法
//获取家目录路径的函数: NSString *homeDir = NSHomeDirectory(); //获取Documents目录路径的方法: NSArray *paths = NSSearch ...
- Excel 回归分析
1 分析两个变量和一个因变量的关系 降水,温度与生长的关系曲线 降水是连续的数,温度有三个温室,每个温室一个温度,生长也是连续的数. 作图的方法是将降水放在一列,然后生长根据温度放三列,同一个温度的放 ...
- android 第三方登录---新浪微博
1.AndroidManiFest.xml设置,这里我只是简单的用授权,获取基本信息,所以只用了这一个 <!--微博--> <!-- 必须注册在微博授权,分享微博时候用到 --> ...
- 【Python】 属性的 get 与 set 方法
在C#里面,属性的get 与 set 非常简单方便. public class bird { public int age { get;set; } public bool isadult { get ...
- Pyqt5 获取命令行参数sys.argv
大家有没有注意到,很多软件都能接收第三方应用触发命令行参数,根据参数打开想要的效果. 在windows任务管理器调取命令行列,我们同样能看到进程中有好多是带有参数的. 现在,我们用Pyqt5 (Py3 ...