3.SpringBoot整合Thymeleaf模板
一、前言
SrpingBoot支持如JSP、Thymeleaf、FreeMarker、Mustache、Velocity等各种模板引擎,同时还为开发者提供了自定义模板扩展的支持。
使用嵌入式Servlet容器时,请避免使用JSP,因为使用JSP打包后会存在一些限制。
在SpringBoot使用上述模板,默认从src/main/resources/templates下加载。
二、thymeleaf介绍
Thymeleaf是现代化服务器端的Java模板引擎,不同与其它几种模板的是Thymeleaf的语法更加接近HTML,并且具有很高的扩展性。详细资料可以浏览官网。
特点
- 支持无网络环境下运行,由于它支持 html 原型,然后在 html 标签里增加额外的属性来达到模板+数据的展示方式。浏览器解释 html 时会忽略未定义的标签属性,所以 thymeleaf 的模板可以静态地运行;当有数据返回到页面时,Thymeleaf 标签会动态地替换掉静态内容,使页面动态显示。所以它可以让前端小姐姐在浏览器中查看页面的静态效果,又可以让程序员小哥哥在服务端查看带数据的动态页面效果。
- 开箱即用,为
Spring提供方言,可直接套用模板实现JSTL、 OGNL表达式效果,避免每天因套用模板而修改JSTL、 OGNL标签的困扰。同时开发人员可以扩展自定义的方言。 SpringBoot官方推荐模板,提供了可选集成模块(spring-boot-starter-thymeleaf),可以快速的实现表单绑定、属性编辑器、国际化等功能。
三、使用
3.1 首先要在pom.xml中添加对thymeleaf模板依赖
 <dependency>

     <groupId>org.springframework.boot</groupId>

     <artifactId>spring-boot-starter-thymeleaf</artifactId>

 </dependency>

 <dependency>

   <groupId>org.springframework.boot</groupId>

   <artifactId>spring-boot-starter-web</artifactId>

 </dependency>
3.2 添加完thymeleaf模板依赖的pom.xml文件内容如下
 <?xml version="1.0" encoding="UTF-8"?>

 <project xmlns="http://maven.apache.org/POM/4.0.0" xmlns:xsi="http://www.w3.org/2001/XMLSchema-instance"

     xsi:schemaLocation="http://maven.apache.org/POM/4.0.0 http://maven.apache.org/xsd/maven-4.0.0.xsd">

     <modelVersion>4.0.0</modelVersion>

     <groupId>cn.kgc</groupId>

     <artifactId>springboot1</artifactId>

     <version>0.0.1-SNAPSHOT</version>

     <packaging>jar</packaging>

     <name>springboot1</name>

     <description>我用的第一个maven工程</description>

     <!--版本采用的是最新的 2.0.1.RELEASE

     TODO 开发中请记得版本一定要选择 RELEASE ,因为是稳定版本且BUG少-->

     <parent>

         <groupId>org.springframework.boot</groupId>

         <artifactId>spring-boot-starter-parent</artifactId>

         <version>2.0.5.RELEASE</version>

         <relativePath/> <!-- lookup parent from repository -->

     </parent>

     <properties>

         <project.build.sourceEncoding>UTF-8</project.build.sourceEncoding>

         <project.reporting.outputEncoding>UTF-8</project.reporting.outputEncoding>

         <java.version>1.8</java.version>

     </properties>

     <dependencies>

         <!--模块(spring-boot-starter-thymeleaf),可以快速的实现表单绑定、属性编辑器、国际化等功能。-->

         <dependency>

             <groupId>org.springframework.boot</groupId>

             <artifactId>spring-boot-starter-thymeleaf</artifactId>

         </dependency>

         <!-- 默认就内嵌了Tomcat 容器,如需要更换容器也极其简单-->

         <dependency>

             <groupId>org.springframework.boot</groupId>

             <artifactId>spring-boot-starter-web</artifactId>

         </dependency>

         <!-- 测试包,当我们使用 mvn package 的时候该包并不会被打入,因为它的生命周期只在 test 之内-->

         <dependency>

             <groupId>org.springframework.boot</groupId>

             <artifactId>spring-boot-starter-test</artifactId>

             <scope>test</scope>

         </dependency>

         <!--该依赖可以不添加,但是在 IDEA 和 STS 中不会有属性提示,

         没有提示的配置就跟你用记事本写代码一样苦逼,出个问题弄哭你去-->

         <dependency>

             <groupId>org.springframework.boot</groupId>

             <artifactId>spring-boot-configuration-processor</artifactId>

             <optional>true</optional>

         </dependency>

     </dependencies>

     <build>

         <plugins>

             <!-- 编译插件 -->

             <plugin>

                 <groupId>org.springframework.boot</groupId>

                 <artifactId>spring-boot-maven-plugin</artifactId>

             </plugin>

         </plugins>

     </build>

 </project>
3.3 创建ThymeleafController.java
创建一个ThymeleafController用来映射HTTP请求与页面的跳转,下面写了两种方式,第一种比较直观和优雅,第二种相对普遍且代码较少,且迎合从struts2跳坑的朋友们…
Spring4.3以后为简化@RequestMapping(method = RequestMethod.XXX)的写法,故而将其做了一层包装,也就是现在的GetMapping、PostMapping、PutMapping、DeleteMapping、PatchMapping
package cn.kgc.controller;
import org.springframework.stereotype.Controller;
import org.springframework.web.bind.annotation.GetMapping;
import org.springframework.web.bind.annotation.RequestMapping;
import org.springframework.web.servlet.ModelAndView;
import javax.servlet.http.HttpServletRequest;
/**
* ThymeleafController用来映射HTTP请求与页面的跳转
*/
@Controller
@RequestMapping
public class ThymeleafController {
/**
* 方法1:返回ModelAndView对象,
* 将视图名称封装到该对象的viewName属性中
* 将页面所需要的数据封装到该对象的addObject对象中
* @return
*/
@GetMapping("/index.do")
public ModelAndView index() {
ModelAndView view = new ModelAndView();
// 设置跳转的视图 默认映射到 src/main/resources/templates/{viewName}.html
view.setViewName("index");
// 设置属性
view.addObject("title", "我的第一个ThymeleafWEB页面");
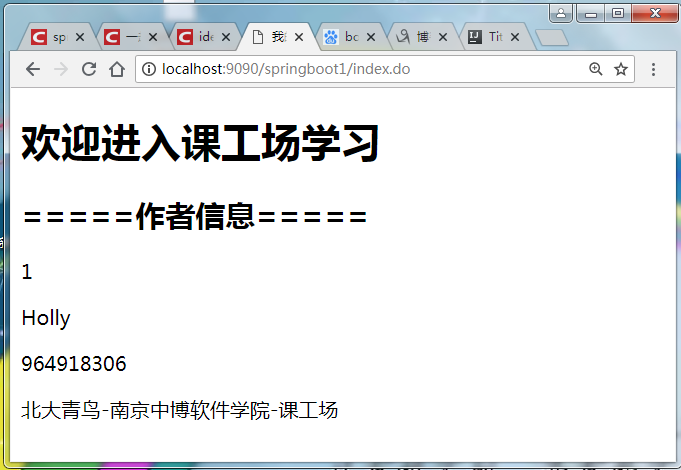
view.addObject("desc", "欢迎进入课工场学习");
Teacher teacher=new Teacher(1,"Holly","964918306","北大青鸟-南京中博软件学院-课工场");
view.addObject("teacher", teacher);
return view;
} @GetMapping("/index1")
public String index1(HttpServletRequest request) {
// TODO 与上面的写法不同,但是结果一致。
// 设置属性
Teacher teacher=new Teacher(1,"Holly","964918306","北大青鸟-南京中博软件学院-课工场");
request.setAttribute("teacher", teacher);
request.setAttribute("title", "我的第一个ThymeleafWEB页面");
request.setAttribute("desc", "欢迎进入课工场学习");
// 返回的 index 默认映射到 src/main/resources/templates/xxxx.html
return "index";
} class Teacher {
private int tid;
private String tname;
private String qq;
private String address; public Teacher() {
} public Teacher(int tid, String tname, String qq, String address) {
this.tid = tid;
this.tname = tname;
this.qq = qq;
this.address = address;
} public int getTid() {
return tid;
} public void setTid(int tid) {
this.tid = tid;
} public String getTname() {
return tname;
} public void setTname(String tname) {
this.tname = tname;
} public String getQq() {
return qq;
} public void setQq(String qq) {
this.qq = qq;
} public String getAddress() {
return address;
} public void setAddress(String address) {
this.address = address;
}
}
}
3.4 创建index.html的模板文件
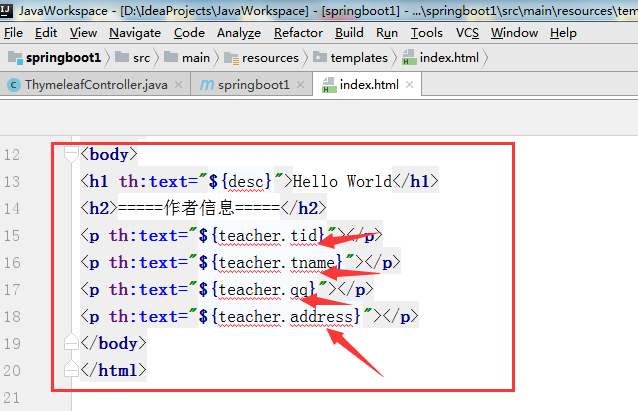
在src/main/resources/templates目录下创建一个名index.html的模板文件,可以看到thymeleaf是通过在标签中添加额外属性动态绑定数据的
 <!DOCTYPE html>

 <html xmlns="http://www.w3.org/1999/xhtml"

       xmlns:th="http://www.thymeleaf.org">

 <head>

     <meta charset="UTF-8">

     <!-- 可以看到 thymeleaf 是通过在标签里添加额外属性来绑定动态数据的 -->

     <!--/*@thymesVar id="title" type=""*/-->

     <title th:text="${title}">Title</title>

     <!-- 在/resources/static/js目录下创建一个hello.js 用如下语法依赖即可-->

     <script type="text/javascript" th:src="@{/js/hello.js}"></script>

 </head>

 <body>

 <h1 th:text="${desc}">Hello World</h1>

 <h2>=====作者信息=====</h2>

 <p th:text="${teacher.tid}"></p>

 <p th:text="${teacher.tname}"></p>

 <p th:text="${teacher.qq}"></p>

 <p th:text="${teacher.address}"></p>

 </body>

 </html>
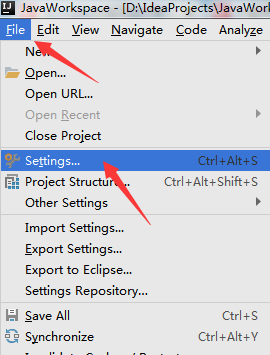
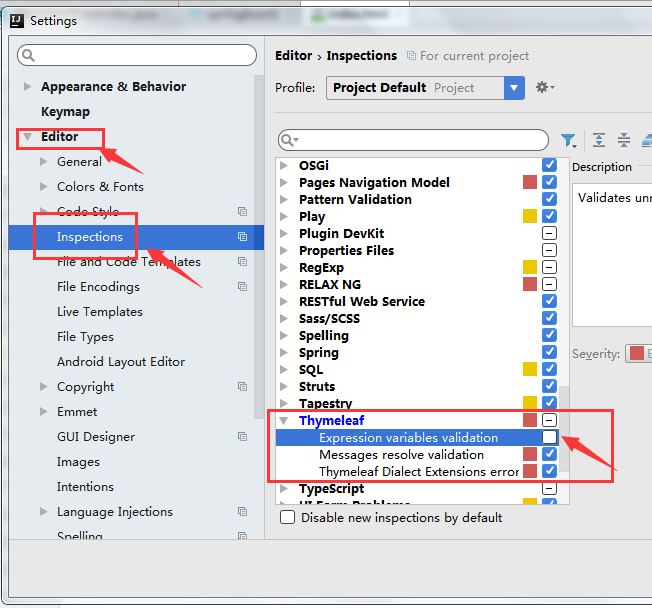
停一下,在你的机器上看到的是报错的情况,如下图所示,但是页面却可以展示数据,这个我们稍加配置就可以解决错误问题
我们在idea中设置一下就ok

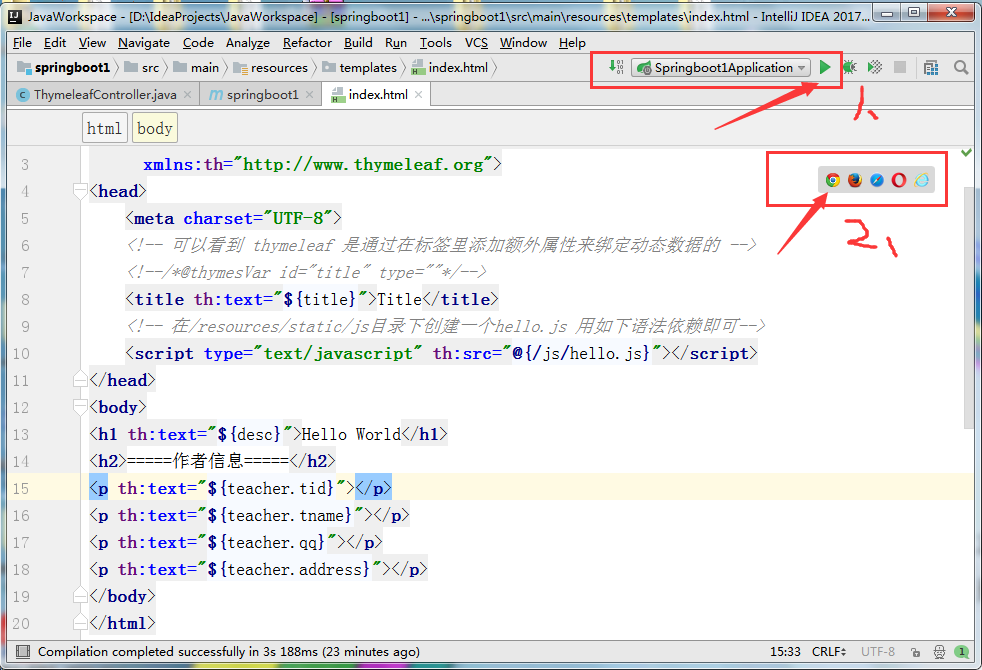
3.5 静态效果: 运行index.html既可以看到如下的静态效果


3.5 动态效果:
在浏览器输入:http://localhost:9090/springboot1/index.do可以看到渲染后的效果,真正意义上的动静分离了
总结:
Thymeleaf参考手册:https://blog.csdn.net/zrk1000/article/details/72667478
参考文章出处:
- 本文作者:唐亚峰
- 本文链接:http://blog.battcn.com/2018/04/28/springboot/v2-web-thymeleaf/
- 版权声明:本博客所有文章除特别声明外,均采用CC BY-NC-SA 3.0许可协议。转载请注明出处!
3.SpringBoot整合Thymeleaf模板的更多相关文章
- Springboot整合thymeleaf模板
Thymeleaf是个XML/XHTML/HTML5模板引擎,可以用于Web与非Web应用. Thymeleaf的主要目标在于提供一种可被浏览器正确显示的.格式良好的模板创建方式,因此也可以用作静态建 ...
- 【Springboot】Springboot整合Thymeleaf模板引擎
Thymeleaf Thymeleaf是跟Velocity.FreeMarker类似的模板引擎,它可以完全替代JSP,相较与其他的模板引擎,它主要有以下几个特点: 1. Thymeleaf在有网络和无 ...
- springboot整合Thymeleaf模板引擎
引入依赖 需要引入Spring Boot的Thymeleaf启动器依赖. <dependency> <groupId>org.springframework.boot</ ...
- SpringBoot:2.SpringBoot整合Thymeleaf模板引擎渲染web视图
在Web开发过程中,Spring Boot可以通过@RestController来返回json数据,那如何渲染Web页面?Spring Boot提供了多种默认渲染html的模板引擎,主要有以下几种: ...
- (二)springboot整合thymeleaf模板
在我们平时的开发中,用了很久的jsp作view显示层,但是标签库和JSP缺乏良好格式的一个副作用就是它很少能够与其产生的HTML类似.所以,在Web浏览器或HTML编辑器中查看未经渲染的JSP模板是非 ...
- springboot整合 Thymeleaf模板
首先引入maven jar依赖 <dependency> <groupId>org.springframework.boot</groupId> <artif ...
- SpringBoot 整合 Thymeleaf & 如何使用后台模板快速搭建项目
如果你和我一样,是一名 Java 道路上的编程男孩,其实我不太建议你花时间学 Thymeleaf,当然他的思想还是值得借鉴的.但是他的本质在我看来就是 Jsp 技术的翻版(Jsp 现在用的真的很少很少 ...
- springboot整合thymeleaf+tiles示例
网上关于此框架的配置实在不多,因此想记录下来以防忘记 因为公司框架基于上述(公司采用gradle构建项目,楼主采用的是maven),所以楼主能少走些弯路: 1.创建springboot-maven项目 ...
- 三、SpringBoot整合Thymeleaf视图
目录 3.1 Thymeleaf视图介绍 3.2 创建SpringBoot项目 3.2 配置Thymeleaf 3.3 编写Demo 3.4 小结 3.1 Thymeleaf视图介绍 先看下官网的介绍 ...
随机推荐
- ANDROID窗体管理服务实现机制和架构分析
一.功能 窗体管理是ANDROID框架一个重要部分,主要包含例如以下功能: )Z-ordered的维护 )窗体的创建.销毁 )窗体的绘制.布局 )Token管理,AppToken )活动窗体管理 ...
- hdu 4941 Magical Forest (map容器)
Magical Forest Time Limit: 24000/12000 MS (Java/Others) Memory Limit: 131072/131072 K (Java/Other ...
- Window.open()打开一个窗体不被拦截
Window.open()打开一个窗体不被拦截 在DataGrid中建一个模板列,在模板列中放一个客户端的Button,或者直接写你要的字句,然后用<a href>连接例:< ...
- 更新svn时出错,大概的意思是项目被锁定了
- Help Me with the Game(模拟)
http://poj.org/problem?id=2996 #include<stdio.h> #include<string.h> ][]; void find1(char ...
- mysql如何查询最新插入的数据
在MySQL中,使用auto_increment类型的id字段作为表的主键,并用它作为其他表的外键,形成“主从表结构”,这是数据库设计中常见的用法.但是在具体生成id的时候,我们的操作顺序一般是:先在 ...
- Vue Element-ui table只展开一行
直接上代码了哈~ <template> <div class="app-content"> <div class="table_expand ...
- Unity5.3.6升级到Unity5.4.4 NGUI出现Ignoring menu item NGUI because it is in no submenu!问题解决方案
目录Assets/Plugins/NGUI/Scripts/Editor/NGUIMenu.cs文件中找到下图(左)所示,改成(右)图所示
- mysql数据库的介绍及安装
一.什么是数据库 1.什么是数据(Data) 描述事物的符号记录成为数据,描述事物的符号既可以是文字.图片.图像.声音.语言等,数据有多种表现形式,他们都可以经过数字化后存入计算机 在计算机中描述一个 ...
- Ubuntu下搭建repo服务器(一): 配置gitosis
1. 说明 服务器端IP: 192.168.1.126,下文简称:A端: 客户端IP: 192.168.130.19,下文简称:B端: Android工程代号:17435. 2. 安装必要软件(A端) ...