XPS to Blender 2.7x
Things we are gonna need are
- Blender 2.7x www.blender.org/
- XPS tools addon for Blender
- A Model for XPS/XNALara (Binary or ASCII)
Safari automatically unzips downloaded files and deletes the original ZIP file.
Try disabling this function (I don't know how, I never used a Mac) or download using another browser like Firefox.
Preparation
First thing we have to do is to installing the addon.
Go to the provided link and download the latest version of the addon. DO NOT UNZIP IT.
Open Blender and go to File > User Preferences
Select the Addons tab and click the "Install fom File..." button
Find the downloaded addon zip file and click the "Install fom File..." button
The XPS tools addon should be de only addon diplayed on the list, if not type "XPS" in the search dialog.
Now Check the checkbox to the right to enable the addon.
Click the "Save User Settings" button and close the window.
A new tab called XPS should have appeared in the toolshelf
Importing the model
Now open your backdrop.
We are ready to import the XPS/XNALara model. In the 3DView show the toolshelf (Shrotcut: T) and go to the XPS tab. Select the Import Model Button an import the model.
The addon will create all the materials and import the armature of the model.
To preview the model without having to setup lighting, click the Shadeless button in the XPS toolshelf.
Posing
If your model had a armature in XPS/XNALara, the addon created an armature in Blender and you can pose it or import a pose just like in XPS.
To manualy pose the model select the armature. Change to Pose mode. You can make a second 3Dview and set its display mode to "Render Only" to make the results easier to see. The CheckBox "Render Only" will hide fom the view ani object that is not displayed in the render.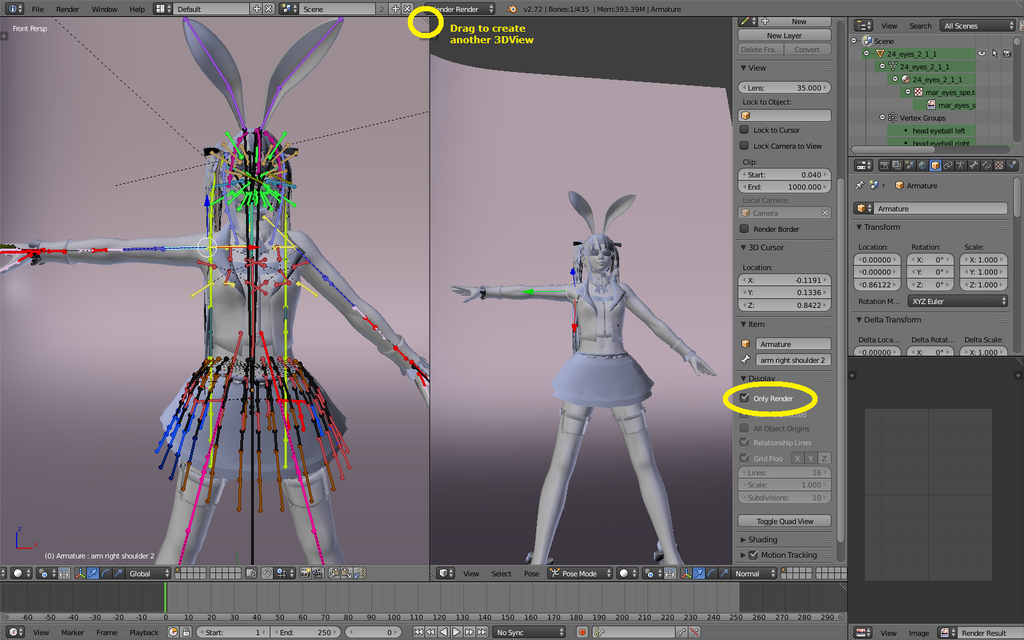
To import a pose: Select the armature. In the XPS toolshelf click the Import: Pose button. Select the pose file and... done.
Lighting the scene
Create a Area Light (SHIFT A). This will be out main light, it will provide most of the light to our model. 
If you have trouble selecting the light or any object in your scene hold ALT while selecting. Blender will display a list of all the objects under the cursor for you to elect from.
Position the light.
Now we are going to aim the light. With the light selected press CTRL 0 (Zero, Insert from the keypad). This will set the light as the active camera and the view will change to the lamps perspective.
Press SHIFT F to enter Walk navigation mode. In this mode you can move just like in a FPS game
Look around with the mouse.
Walk with WASD.
Q and E go up and down.
SHIFT sprint.
ALT walk.
Mouse scroll wheel up and down control the movement speed.
SPACE or middle mouse button teleport to the cursor position.
WARNING: TAB will activate gravity and the camera will fall down if there nothing under it.
Aim the lamp to the model then left click or hit enter to end the Walk navigation mode.

Duplicate the light by pressing SHIFT D. The new light will be our "Fill light". It's purpose is to make the shadows of the main light not so dark but allowing some shading so the model doesn't look flat. Set it's energy to 0.2. Position the same way that the main light.

Camera Positioning
Select the camera and position it just like you did with the lights
CTRL 0 (Zero, Insert from the keypad): set the camera as the active camera
SHIFT F: Walk Navigation mode.
You can also press CTRL ALT 0 (Zero, Insert from the keypad) to place the active camera at the same position as the current 3DView.
Change the resolution to the desired size. The percentage under the resolution will reduce the resolution to make preview renders faster. We will change this to 100% when we make the final render.
Rendering
We are ready to see our creation in all it's glory, press F12
This render is not our final render. It's a little lower quality but a lot faster.
Now you can tweak the pose of the model, the lights, etcs. Once you are happy with the results we are ready for the final render.
Increase the fill light Samples to 5 and the main light to 10.
set the resolution to 100%.
enable indirect lighting.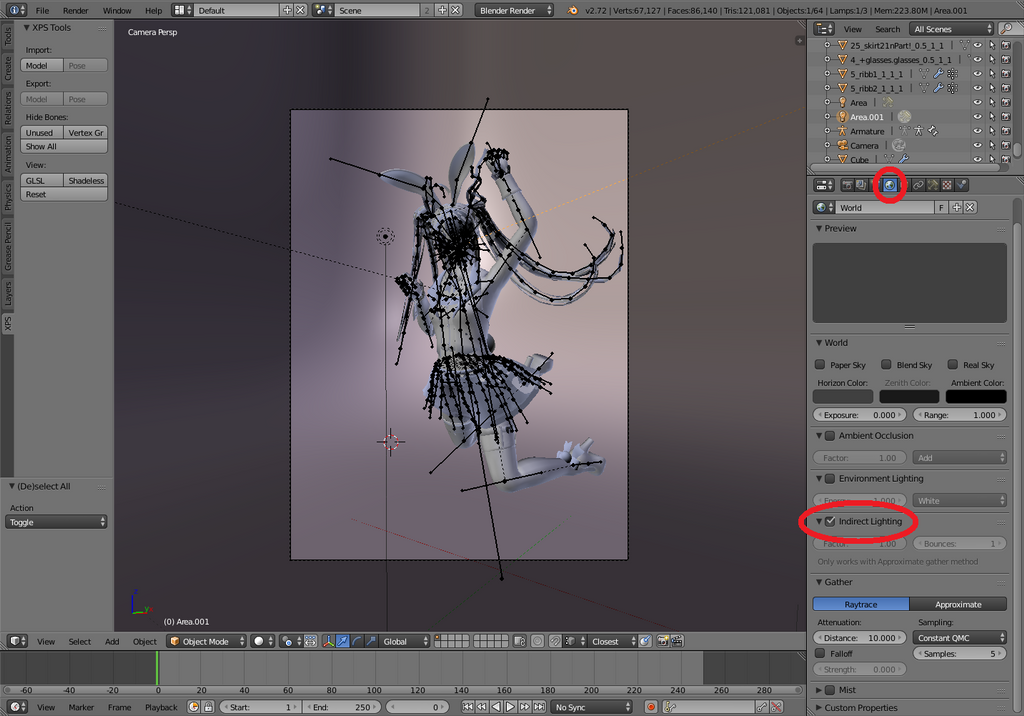
All is ready for the final render, Press F12 again. Depending on your machine and the complexity of the scene this may take a while. Once the render is ready save it. Go to Image > Save as Image.
Enjoy your work and don't forget to share!

XPS to Blender 2.7x的更多相关文章
- Blender to XPS(blender 2.7x Internal materials)
Things we are gonna need are Blender 2.7x www.blender.org/ XPS tools addon for Blender A model made ...
- Blender 之 Splash 代码分析
注:以下内容基于 Blender 2.7x 版本工程,其它低版本可能有改动. Blender启动完成时,会出现一个画面,英文叫Splash.默认是打开的,可以在设置里关闭.在文件菜单里点击用户首选项( ...
- Threejs 使用的3D格式
3D格式你可以通过任意软件导出(.3ds,dae等),但是threejs 无法使用, 1,http://www.blender.org/ 下载这款开源的3d软件 2,https://github.co ...
- Blender 工具使用——显示键盘和鼠标操作
Blender 工具使用--显示键盘和鼠标操作 Blender自己本身就带有显示按键和鼠标的功能,就是3D View: Screencast Keys插件. 打开 File(文件) -> Use ...
- PPT转化成Image、PPTX、XPS、EMF
最近工作经常用到演示文稿,接触到了一款不错的免费软件—Free Spire.Presentation.使用之后发现这款软件非常轻巧,功能还挺齐全.这款软件的转化功能也是非常不错的,平时遇到的各种转换难 ...
- Blender 之修改器代码分析
Blender的修改器(modifier)模块,默认界面右下块(Property)面板的扳手,分类(修改.生成.形变.模拟)列出所有的修改器.也可以空格键 ...
- Blender 脚本之 Operator 初探
addon(插件)用来扩展 Blender 的功能,跟其他软件里的 plugin(插件)一样,去掉不会影响软件的运行.插件可以加到 Blender 的用户偏好设置目录里,或者就在你所编辑的.blend ...
- Blender使用基础
快捷键 -- 鼠标放在“大纲视图” -- .(小键盘) 定位到所选对象(该键的英文为period) -- 鼠标放在“3D视图” -- n 打开3D视图右面属性面板(把鼠标放在面板上,按F5可以左右切 ...
- blender源代码编译
blender源码路径(svn):https://svn.blender.org/svnroot/bf-blender/trunk/blender/ 依赖外部Lib(svn):https://svn. ...
随机推荐
- 【现代程序设计】homework-06
1) 把程序编译通过, 跑起来. 读懂程序,在你觉得比较难懂的地方加上一些注释,这样大家就能比较容易地了解这些程序在干什么. 把正确的 playPrev(GoMove) 的方法给实现了. 如果大家不会 ...
- 代码实现UI控件
参考 Android 用纯代码实现复杂界面
- Activity启动方式
Activity启动方式有四种,分别是: standard singleTop singleTask singleInstance 可以根据实际的需求为Activity设置对应的启动模式,从而可以避免 ...
- ember.js:使用笔记8 加载测试与集成测试
emberjs使用的测试工具为qunit.js: 加载:将runner.js添加到Index.html:大致内容: if (window.location.search.indexOf("? ...
- POJ1699 Best Sequence(AC自动机+状压DP)
题目,求包含所有的给定的n个DNA片段的序列的最短长度. AC自动机上的DP题. dp[S][u]表示已经包含的DNA片段集合为S,且当前后缀状态是自动机第u个结点的最短长度 dp[0][0]=0 我 ...
- 算法教程(3)zz
First off, we can use our Line-Point Distance code to test for the "BOUNDARY" case. If the ...
- 在本地(Eclipse)运行第一个strom-starter例子
一.在Eclipse中建立storm项目: 具体步骤如下: 1.在Eclipse中新建java project项目并导入jar包: File-> New -> Java Project - ...
- HDU 3853(期望DP)
题意: 在一个r*c的网格中行走,在每个点分别有概率向右.向下或停止不动.每一步需要的时间为2,问从左上角走到右下角的期望时间. SOL: 非常水一个DP...(先贴个代码挖个坑 code: /*== ...
- robotium 新建 android 测试项目:
注意:新建项目后再运行前一定要修改Manifest文件中的instrumentation 中的target package, 这个是测试的入口 1. 程序开始要通知系统我要测的app是什么 如何知道a ...
- silverlinght 项目
silverlinght项目演示: 打开点击其中一个: