
慢牛系列四:好玩的React Native
在上次随笔(系列三)中,我试着用RN实现了一个Demo,感觉很不错,当时遇到的问题这篇文章里基本都解决了,比如导航动画问题,这篇文章里主要介绍RN的动画,学会动画以后,各种小创意都可以实现了^^
下面是我自己做的效果:
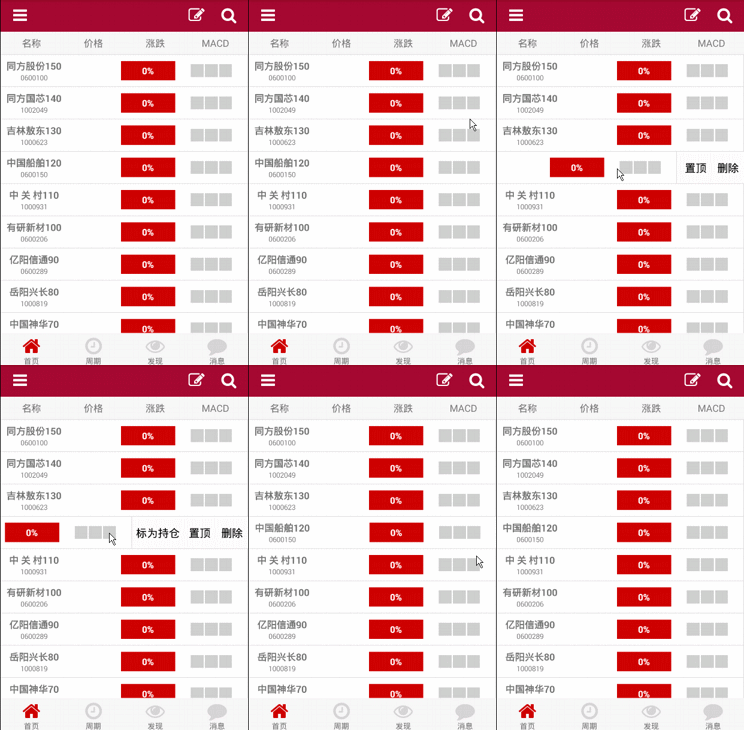
1、列表项滑动显示操作按钮
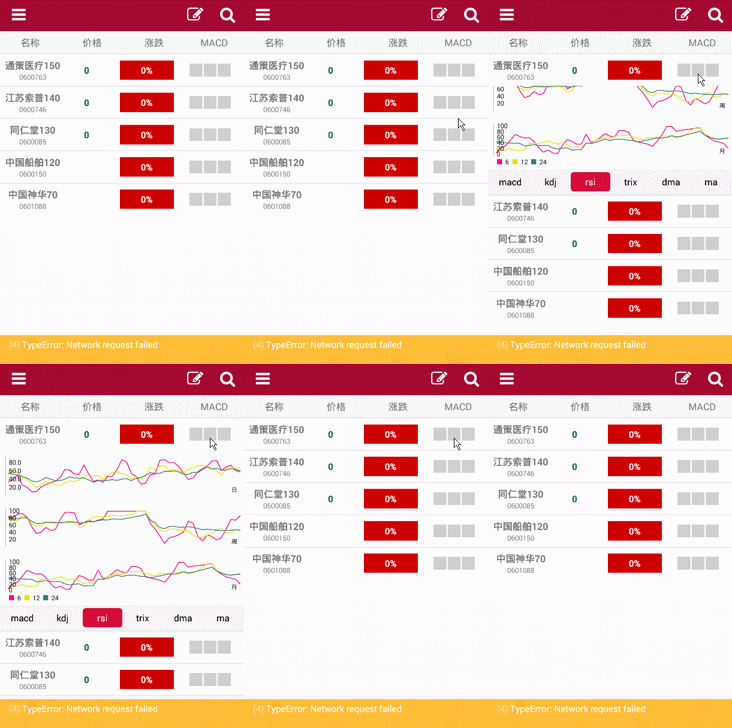
2、列表行滑出
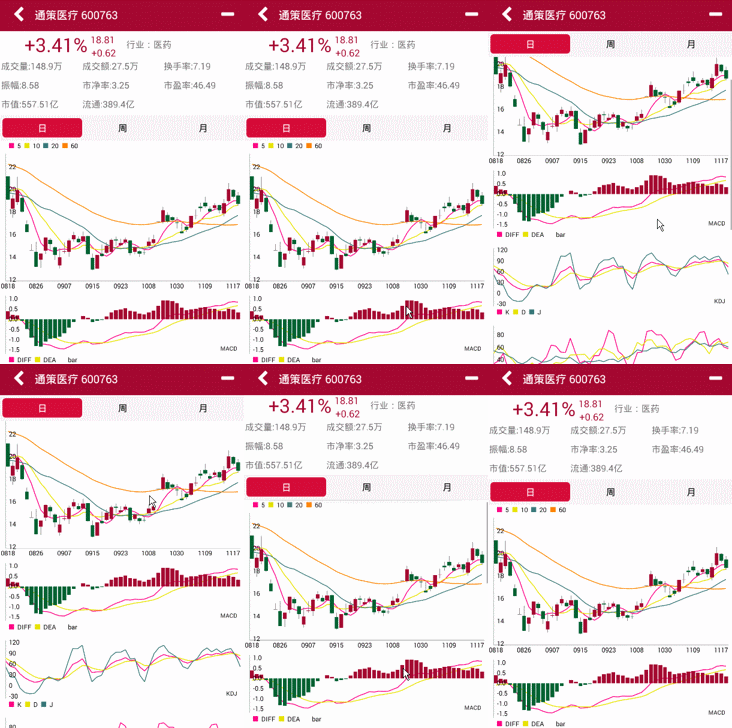
3、K线页面
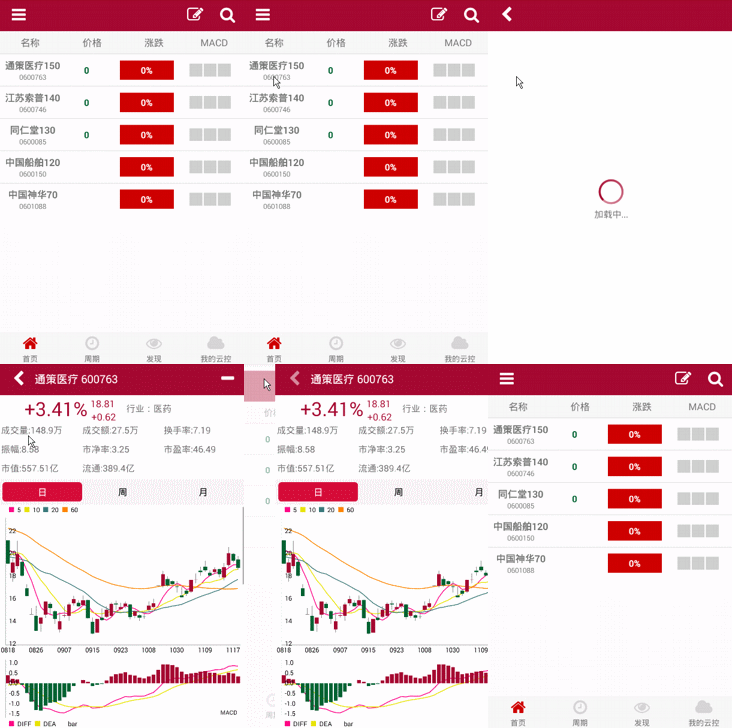
4、转场动画
一、React Native动画
RN的动画实现类似Jquery和CSS3的动画实现,设定某一属性的输入和输出值,后台实现相关的动画计算,简化了动画的开发,下面是一段代码,可以直观感受下
class Playground extends React.Component {

  constructor(props: any) {

    super(props);

    this.state = {

      bounceValue: new Animated.Value(0), //设定初始值

    };

  }

  render(): ReactElement {

    return (

      <Animated.Image                         // Base: Image, Text, View,这三个标签可以实现动画,必须是Animate.开头,普通的Image不能实现动画。

        source={{uri: 'http://i.imgur.com/XMKOH81.jpg'}}

        style={{

          flex: 1,

          transform: [                        // `transform` 类似CSS3

            {scale: this.state.bounceValue},  // 设置 `bounceValue` 给 `scale`,注意,这里要使用上面再state里创建的对象,不能重新实例一个对象赋值。

          ]

        }}

      />

    );

  }

 //UI渲染结束后执行该方法

  componentDidMount() {

    this.state.bounceValue.setValue(1.5);     // 设定初始大小,使用的依旧是在state中创建的对象。

    Animated.spring(                          // Base: spring, decay, timing,这个三个方法是三种动画,spring是类似弹簧的动画

      this.state.bounceValue,                 // Animate `bounceValue`初始输入值

      {

        toValue: 0.8,                         // Animate to smaller size,动画目标值

        friction: 1,                          // Bouncier spring,这个值类似设置弹簧的弹性。

      }

    ).start();                                // Start the animation,开始动画,start的参数是一个动画结束的callback。

  }

}
RN动画的主要类库是Animated库,Animated库包括Value和ValueXY两个类型,Value是单值的动画,比较简单,就是某个属性值的改变,ValueXY是向量的动画,就是两个值的改变,参数X,Y是元素的坐标,根据XY的变化计算运动方向。目前支持动画的元素View, Text, and Image,用户可以自己创建动画元素,通过Animated.createAnimatedComponent来创建。
目前主要有三种动画实现:spring, decay, timing,
spring: 类似弹簧的实现,动画结束时会有个渐弱的摆动,上面的第一个和第二个动画就是用spring实现。friction: 数值越小,弹的越厉害,默认是7。tension: 动画的速度,默认是40。
decay: 动画的速度逐渐变慢,最后停止,类似上面的转场动画。velocity: 初始速度。deceleration: 减速度,默认是 0.997.
timing:线性动画,在设定时间内移动到终点,中间的动画可以设置,类似CSS3的animation-timing-functionduration: 动画持续时间 500.easing:类似css3的animation-timing-function,具体的实现在Easing模块里,是贝塞尔曲线(Bézier curve)的一个实现,这样使用 Easing.bezier(0.42, 0, 1, 1),参数设置参考这个网址:http://cubic-bezier.com/,默认的实现Easing.in和Easing.out和Easing.inOut。delay: 动画延迟开始时间。
组合动画:
如果需要同时执行多个动画,或者按顺序执行动画,就需要将动画组合执行,RN提供了parallel, sequence, stagger, delay, 这个四个方法组合动画,这些方法的参数都是一个动画的数组,使用起来很简单,parallel是并行执行, sequence是顺序执行, stagger是每个动画延迟一段时间执行, delay是延时,下面是代码示例:
Animated.sequence([            // spring to start and twirl after decay finishes

  Animated.decay(position, {   // coast to a stop

    velocity: {x: gestureState.vx, y: gestureState.vy}, // velocity from gesture release

    deceleration: 0.997,

  }),

  Animated.parallel([          // after decay, in parallel:

    Animated.spring(position, {

      toValue: {x: 0, y: 0}    // return to start

    }),

    Animated.timing(twirl, {   // and twirl

      toValue: 360,

    }),

  ]),

]).start();                    // start the sequence group
关于RN动画更多内容参考:http://facebook.github.io/react-native/docs/animations.html#content
二、动画demo
我做了一个动画的demo,这里只是改变了元素的left属性,大家体验下:

/* @flow */

'use strict';

var React = require('react-native');

var Easing = require('Easing');

var {

  TouchableWithoutFeedback,

  StyleSheet,

  View,

  Image,

  Text,

  Animated,

  Dimensions,

  InteractionManager

} = React;

var SCREEN_WIDTH = Dimensions.get('window').width;

var Component = React.createClass({

    getInitialState: function() {

        return {

            first:new Animated.Value(0),

            second:new Animated.Value(0),

            three:new Animated.Value(0)

        };

    },

    reset:function (argument) {

        this.state.first.setValue(0);

        this.state.second.setValue(0);

        this.state.three.setValue(0);

    },

    getAnimations:function (argument) {

        return[

            Animated.spring(                          // Base: spring, decay, timing

              this.state.first,                 // Animate `bounceValue`

              {

                toValue: SCREEN_WIDTH-50,                         // Animate to smaller size

                friction: 7,

                tension:40                      // Bouncier spring

              }

            ),

           Animated.decay(                          // Base: spring, decay, timing

              this.state.second,                 // Animate `bounceValue`

              {

                //toValue: SCREEN_WIDTH-50,                         // Animate to smaller size

                velocity: 1,

                deceleration:0.997               // Bouncier spring

              }

            ),

            Animated.timing(                          // Base: spring, decay, timing

              this.state.three,                 // Animate `bounceValue`

              {

                toValue: SCREEN_WIDTH-50,                         // Animate to smaller size

                easing: Easing.inOut(Easing.ease),

                delay:0                  // Bouncier spring

              }

            )

        ];

    },

    onStagger:function (argument) {

        this.reset();

        Animated.stagger(150,this.getAnimations()).start();

    },

    onParallel:function (argument) {

        this.reset();

        Animated.parallel(this.getAnimations()).start();

    },

    onSequence:function (argument) {

        this.reset();

        Animated.sequence(this.getAnimations()).start();

    },

    onAll:function (argument) {

        var me=this;

        this.reset();

        Animated.sequence([

            Animated.stagger(50,me.getAnimations()),

            Animated.sequence([

                Animated.spring(                          // Base: spring, decay, timing

                  this.state.first,                 // Animate `bounceValue`

                  {

                    toValue: 0,                         // Animate to smaller size

                    friction: 7,

                    tension:40                      // Bouncier spring

                  }

                ),

                   Animated.decay(                          // Base: spring, decay, timing

                  this.state.second,                 // Animate `bounceValue`

                  {

                    //toValue: SCREEN_WIDTH-50,                         // Animate to smaller size

                    velocity: -1,

                    deceleration:0.997               // Bouncier spring

                  }

                ),

                Animated.timing(                          // Base: spring, decay, timing

                  this.state.three,                 // Animate `bounceValue`

                  {

                    toValue: 0,                         // Animate to smaller size

                    easing: Easing.bezier(.13,.93,.79,.07),

                    delay:0                  // Bouncier spring

                  }

                )

        ]),

        Animated.parallel(me.getAnimations())

        ]).start();

    },

    render: function() {

        return (

          <View style={styles.container}>

              <View style={{flex:1}}>

                  <Animated.View style={[styles.view,{top:50,left:this.state.first}]}><Text>spring</Text></Animated.View>

                  <Animated.View style={[styles.view,{top:150,left:this.state.second}]}><Text>decay</Text></Animated.View>

                  <Animated.View style={[styles.view,{top:250,left:this.state.three}]}><Text>timing</Text></Animated.View>

              </View>

              <View style={{flexDirection:'row',height:80,justifyContent :'center',alignItems: 'center'}}>

                  <TouchableWithoutFeedback onPress={this.onStagger}>

                      <View style={styles.btn}><Text>stagger</Text></View>

                  </TouchableWithoutFeedback>

                  <TouchableWithoutFeedback onPress={this.onParallel}>

                      <View style={styles.btn}><Text>parallel</Text></View>

                  </TouchableWithoutFeedback>

                  <TouchableWithoutFeedback onPress={this.onSequence}>

                      <View style={styles.btn}><Text>sequence</Text></View>

                  </TouchableWithoutFeedback>

                  <TouchableWithoutFeedback onPress={this.onAll}>

                      <View style={styles.btn}><Text>组合</Text></View>

                  </TouchableWithoutFeedback>

              </View>

          </View>

        );

    }

});

var styles = StyleSheet.create({

    container:{

        flex:1

    },

    view:{

        position:'absolute',

        backgroundColor:'red',

        width:50,

        height:50,

        justifyContent :'center',

        alignItems: 'center',

    },

    btn:{

        width:100,

        height:50,

        backgroundColor:'red',

        justifyContent :'center',

        alignItems: 'center',

        margin:5

    }

});

module.exports = Component;
RN动画示例
三、性能优化
主要是在执行动画时,避免执行其他工作量比较大的代码,比如,最好不要一边渲染,一边执行动画,而是先执行动画,等动画执行结束后在渲染,可以setTimeout来延时执行渲染,最好是用官方推荐的做法,利用InteractionManager,下面是代码示例:
  componentDidMount() {

    InteractionManager.runAfterInteractions(() => {

      this.setState({renderPlaceholderOnly: false});

    });

  }
InteractionManager.runAfterInteractions是在动画或者操作结束后执行,还有其他两种方法:
- requestAnimationFrame(): H5的标准,RN实现了它,下一帧渲染时执行,更好的利用浏览器的刷新频率,避免丢帧。
- setImmediate/setTimeout(): 定时执行,有可能影响动画的流畅度。
另外,这个项目里用了MPAndroidChart组件,我对MPAndroidChart做了桥接,有想用的用户可以试试这个项目:
https://github.com/hongyin163/react-native-chart-android
如果有想体验React Native的用户,可以下载慢牛APP的APK体验:
关注慢牛的公众号:发送react,返回apk下载链接,apk大小8M,最好连接WiFi下载。

最后,欢迎园友提出好的想法,评论留名!谢谢!
慢牛系列四:好玩的React Native的更多相关文章
- React-Native(四):React Native之View学习
React Native实现以下布局效果:携html5(http://m.ctrip.com/html5/) 基于HelloWord修改项目代码: /** * Sample React Native ...
- React Native Android入门实战及深入源代码分析系列(2)——React Native源代码编译
本文为老曾原创.转载需注明出处:viewmode=contents">http://blog.csdn.net/minimicall?viewmode=contents 在上一节中,我 ...
- React Native入门指南
转载自:http://www.jianshu.com/p/b88944250b25 前言 React Native 诞生于 2015 年,名副其实的富二代,主要使命是为父出征,与 Apple 和 Go ...
- 写给移动开发者的 React Native 指南
本文原创版权归 简书 wingjay 所有,如有转载,请于文章篇头位置显示标注原创作者及出处,以示尊重! 作者:wingjay 出处:http://www.jianshu.com/p/b8894425 ...
- 一起来点React Native——你必须要会点FlexBox布局
一.FlexBox布局 1.1 FlexBox是什么意思呢? flexible(形容词):能够伸缩或者很容易变化,以适应外界条件的变化 box(名词):通用的矩形容器 1.2 什么是FlexBox布 ...
- React Native混合开发中必须要学会点FlexBox布局
在前面的案例中,界面的搭建都是采用CSS的布局,基于盒子模型,依赖 display属性 , position属性, float属性.但对于那些特殊布局非常不方便,比如,垂直居中. 一种全新的针对web ...
- 慢牛系列三:React Native实践
上次发布了我的慢牛股票APP之后,有园友反馈有点卡,这个APP是基于Sencha Touch + Cordova开发的,Sencha本身是一个比较重的框架,在Chrome里运行性能还是不错的,但是在A ...
- React Native 系列(四) -- 布局
前言 本系列是基于React Native版本号0.44.3写的.RN支持CSS中的布局属性,因此可以使用CSS布局属性,这里就不详细地讲解了,这篇文章的重点主要是讲述一下RN中的Flex布局. CS ...
- React Native 系列(四)
前言 本系列是基于React Native版本号0.44.3写的.RN支持CSS中的布局属性,因此可以使用CSS布局属性,这里就不详细地讲解了,这篇文章的重点主要是讲述一下RN中的Flex布局. CS ...
随机推荐
- 【MySQL】MySQL忘记root密码解决方案
转眼间从实习到现在已经快两年了.两年的工作做遇到过很多很多的拦路虎,大部分也通过搜索引擎找到了解决的方案.奈何大脑不是硬盘,偶尔有的问题第二次遇到还是有点抓蒙...所以决定把这些东西记录在博客上.这样 ...
- PHP模拟发送POST请求之四、加强file_get_contents()发送POST请求
使用了笨重fsockopen()方法后,我们开始在PHP函数库里寻找更简单的方式来进行POST请求,这时,我们发现了PHP的文件函数也具有与远程URL交互的功能. 最简单的是fopen()和fread ...
- PL/SQL之--函数
一.函数 函数是作为数据库对象存储在oracle数据库中,函数又被称为PL/SQL子程序.oracle处理使用系统提供的函数之外,用户还可以自己定义函数.函数通常被作为一个表达式来调用或存储过程的一个 ...
- 【嵌入式开发板】8月终极暑促迅为Cortex-a9四核入门开发板
核心板参数 尺寸 50mm*60mm 高度 连同连接器在内0.26cm CPU Exynos4412,四核Cortex-A9,主频为1.4GHz-1.6GHz 内存 1GB 双通道 DDR3(2GB ...
- uva 120 stacks of flapjacks ——yhx
Stacks of Flapjacks Background Stacks and Queues are often considered the bread and butter of data ...
- MIT jos 6.828 Fall 2014 训练记录(lab 4)
源代码参见我的github: https://github.com/YaoZengzeng/jos Part A: Multiprocessor Support and Cooperative Mul ...
- Java 嵌套解析 json
1.首先需要安装org.json.jar 2.类JSONObject用于创建一个json对象.其中的JSONObject.put(KEY, VALUE)用于向其中添加条目 3.JSONObject.g ...
- Windows事件ID大全
51 Windows 无法找到网络路径.请确认网络路径正确并且目标计算机不忙或已关闭.如果 Windows 仍然无法找到网络路径,请与网络管理员联系. 52 由于网络上有重名,没有连接.请到“控制面板 ...
- 搜索+剪枝 POJ 1416 Shredding Company
POJ 1416 Shredding Company Time Limit: 1000MS Memory Limit: 10000K Total Submissions: 5231 Accep ...
- Zookeeper C API 指南一(转)
Zookeeper 监视(Watches) 简介 Zookeeper C API 的声明和描述在 include/zookeeper.h 中可以找到,另外大部分的 Zookeeper C API 常量 ...