springboot-rabbitmq的使用
一.RabbitMQ的介绍
RabbitMQ是消息中间件的一种,消息中间件即分布式系统中完成消息的发送和接收的基础软件.这些软件有很多,包括ActiveMQ(apache公司的),RocketMQ(阿里巴巴公司的,现已经转让给apache).
消息中间件的工作过程可以用生产者消费者模型来表示.即,生产者不断的向消息队列发送信息,而消费者从消息队列中消费信息.具体过程如下:
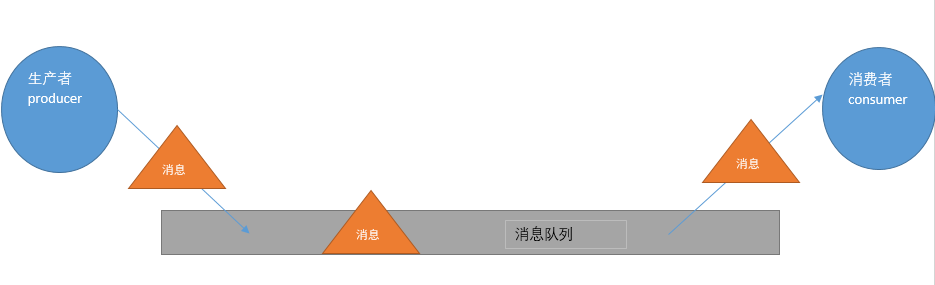
从上图可看出,对于消息队列来说,生产者,消息队列,消费者是最重要的三个概念,生产者发消息到消息队列中去,消费者监听指定的消息队列,并且当消息队列收到消息之后,接收消息队列传来的消息,并且给予相应的处理.消息队列常用于分布式系统之间互相信息的传递.
对于RabbitMQ来说,除了这三个基本模块以外,还添加了一个模块,即交换机(Exchange).它使得生产者和消息队列之间产生了隔离,生产者将消息发送给交换机,而交换机则根据调度策略把相应的消息转发给对应的消息队列.那么RabitMQ的工作流程如下所示:
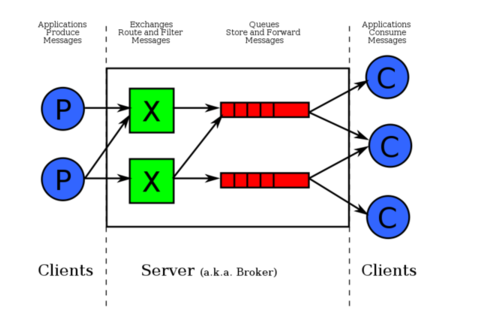
紧接着说一下交换机.交换机的主要作用是接收相应的消息并且绑定到指定的队列.交换机有四种类型,分别为Direct,topic,headers,Fanout.
Direct是RabbitMQ默认的交换机模式,也是最简单的模式.即创建消息队列的时候,指定一个BindingKey.当发送者发送消息的时候,指定对应的Key.当Key和消息队列的BindingKey一致的时候,消息将会被发送到该消息队列中.
topic转发信息主要是依据通配符,队列和交换机的绑定主要是依据一种模式(通配符+字符串),而当发送消息的时候,只有指定的Key和该模式相匹配的时候,消息才会被发送到该消息队列中.
headers也是根据一个规则进行匹配,在消息队列和交换机绑定的时候会指定一组键值对规则,而发送消息的时候也会指定一组键值对规则,当两组键值对规则相匹配的时候,消息会被发送到匹配的消息队列中.
Fanout是路由广播的形式,将会把消息发给绑定它的全部队列,即便设置了key,也会被忽略.
二.项目工程的依赖
<parent>

        <groupId>org.springframework.boot</groupId>

        <artifactId>spring-boot-starter-parent</artifactId>

        <version>2.1..RELEASE</version>

    </parent>

    <properties>

        <java.version>1.7</java.version>

        <project.build.sourceEncoding>UTF-</project.build.sourceEncoding>

    </properties>

    <dependencies>

        <dependency>

            <groupId>org.springframework.boot</groupId>

            <artifactId>spring-boot-starter</artifactId>

        </dependency>

        <dependency>

            <groupId>org.springframework.boot</groupId>

            <artifactId>spring-boot-devtools</artifactId>

            <optional>true</optional>

            <scope>true</scope>

        </dependency>

        <dependency>

            <groupId>org.springframework.boot</groupId>

            <artifactId>spring-boot-starter-test</artifactId>

            <scope>test</scope>

        </dependency>

        <dependency>

            <groupId>org.springframework.boot</groupId>

            <artifactId>spring-boot-starter-actuator</artifactId>

        </dependency>

        <!-- 添加springboot对amqp的支持 -->

        <dependency>

            <groupId>org.springframework.boot</groupId>

            <artifactId>spring-boot-starter-amqp</artifactId>

        </dependency>

        <dependency>

            <groupId>org.springframework.boot</groupId>

            <artifactId>spring-boot-starter-tomcat</artifactId>

            <scope>provided</scope>

        </dependency>

        <dependency>

            <groupId>org.apache.tomcat.embed</groupId>

            <artifactId>tomcat-embed-jasper</artifactId>

            <scope>provided</scope>

        </dependency>

    </dependencies>
三、配置文件
spring:

    rabbitmq:

    host: 115.29.140.222

    port: 5672

    username: guest

    password: guest

    virtualHost: /

    publisher-returns: true #开启发送失败退回

    publisher-confirms: true #开启发送确认

    listener:

      direct:

        prefetch: 1000

        concurrency: 2000

        max-concurrency: 5000
四、依次写rabbitmq的 Direct模式、top、Fanout的模式
(1)Direct模式:此模式是点对点模式,即:发送消息的队列名称和接收队列的名称一致,否则接收方接收不到消息;例: 发送者队列A 接收者只能接收A
Direct的配置:
@Configuration

public class DirectConfig {

           @Bean

         public Queue queueA() {

              return new Queue("queueA");

         }

           @Bean

         public Queue queueB() {

              return new Queue("queueB");

         }

           @Bean

         public Queue queueC() {

              return new Queue("queueC");

         }

}
(2) Direct 发送消息端
import org.springframework.amqp.core.AmqpTemplate;

import org.springframework.beans.factory.annotation.Autowired;

import org.springframework.stereotype.Component;

@Component

public class DirectSend {

    @Autowired

    private AmqpTemplate rabbitTemplate;

    public void send() {

        for(int i=0;i<3;i++) {

            if(i==0) {

                rabbitTemplate.convertAndSend("queueA","a");

            }else if(i==1) {

                rabbitTemplate.convertAndSend("queueB","b");

            } if(i==2) {

                rabbitTemplate.convertAndSend("queueC","c");

            }

        }

    }

}
(2) Direct 接收消息端
import org.springframework.amqp.rabbit.annotation.RabbitListener;

import org.springframework.stereotype.Component;

@Component

public class DirectReceiver {

    @RabbitListener(queues="queueA")

    public void processA(String str) {

        System.out.println("processA"+str);

    }

    @RabbitListener(queues="queueB")

    public void processB(String str) {

        System.out.println("queueB"+str);

    }

    @RabbitListener(queues="queueC")

    public void processC(String str) {

        System.out.println("queueC"+str);

    }

}
(3)测试
import org.junit.Test;

import org.junit.runner.RunWith;

import org.springframework.beans.factory.annotation.Autowired;

import org.springframework.boot.test.context.SpringBootTest;

import org.springframework.test.context.junit4.SpringRunner;

import com.supers.system.SystemApp;

import com.supers.system.rabbitmq.DirectSend;

import com.supers.system.rabbitmq.FanoutSender;

import com.supers.system.rabbitmq.TopSend;

@RunWith(SpringRunner.class)

@SpringBootTest(classes = SystemApp.class)  //自己的启动类

public class RabbitMqHelloTest {

    @Autowired

    private DirectSend directSend;

    @Test

    public void directSend() throws Exception {

        directSend.send();

    }

}

(2)Fanout Exchange形式 : 需要配置队列Queue,再配置交换机(Exchange),再把队列按照相应的规则绑定到交换机上:
@Configuration

public class TopConfig {

        @Bean(name="message")

        public Queue queueMessage() {

            return new Queue("topic.message");

        }

        @Bean(name="messages")

        public Queue queueMessages() { //队列绑定的路由键规则

            return new Queue("topic.messages");

        }

        //交换机

        @Bean

        public TopicExchange exchange() {

            return new TopicExchange("exchange");

        }

        @Bean //将队列绑定此交换机上,路由的键是topic

        Binding bindingExchangeMessage(@Qualifier("message") Queue queueMessage, TopicExchange exchange) {

            return BindingBuilder.bind(queueMessage).to(exchange).with("topic.message"); //topic.message 路由键

        }

        @Bean

        Binding bindingExchangeMessages(@Qualifier("messages") Queue queueMessages, TopicExchange exchange) {

            return BindingBuilder.bind(queueMessages).to(exchange).with("topic.#");//*表示一个词,#表示零个或多个词

        }

}
发送端的配置:
@Component

public class TopSend {

    @Autowired

    private AmqpTemplate rabbitTemplate;

    public void send() {

        rabbitTemplate.convertAndSend("exchange","topic.message","hello,topic.message");

        rabbitTemplate.convertAndSend("exchange","topic.messages","hello,topic.messages");

    }

}
接收端的:
@Component

public class TopReceiver {

    @RabbitListener(queues="topic.message")

    public void process1(String str) {

        System.out.println("message:"+str);

    }

    @RabbitListener(queues="topic.messages")

    public void process2(String str) {

        System.out.println("messages:"+str);

    }

}
测试:
@RunWith(SpringRunner.class)

@SpringBootTest(classes = SystemApp.class)

public class RabbitMqHelloTest {

    @Autowired

    private DirectSend directSend;

    @Autowired

    private TopSend topSend;

    @Test

    public void directSend() throws Exception {

        directSend.send();

    }

    @Test

    public void TopSend() throws Exception {

        topSend.send();

    }

}

rabbitTemplate.convertAndSend("exchange","topic.message","hello,topic.message");
rabbitTemplate.convertAndSend("exchange","topic.messages","hello,topic.messages");
方法的第一个参数是交换机名称,第二个参数是发送的key,第三个参数是发送的消息;由于messages的路由键的规则为topic.# ,所以messages队列可以接收到message的消息,#的意思匹配零个或多个;
Fanout Exchange: 广播式,们发送到路由器的消息会使得绑定到该路由器的每一个Queue接收到消息,发送端配置如下:
@Configuration

public class FanoutConfig {

    @Bean(name="debugMessage")

    public Queue debugMessage() {

        return new Queue("fanout.debug");

    }

    @Bean(name="infoMessage")

    public Queue infoMessage() {

        return new Queue("fanout.info");

    }

    @Bean(name="WarnMessage")

    public Queue WarnMessage() {

        return new Queue("fanout.warn");

    }

    @Bean

    FanoutExchange fanoutExchange() {

        return new FanoutExchange("fanoutExchange");//配置广播路由器

    }

    @Bean

    Binding bindingExchangeDebug(@Qualifier("debugMessage") Queue debugMessage, FanoutExchange fanoutExchange) {

        return BindingBuilder.bind(debugMessage).to(fanoutExchange());

    }

    @Bean

    Binding bindingExchangeInfo(@Qualifier("infoMessage") Queue infoMessage, FanoutExchange fanoutExchange) {

        return BindingBuilder.bind(infoMessage).to(fanoutExchange());

    }

    @Bean

    Binding bindingExchangeWarn(@Qualifier("WarnMessage") Queue WarnMessage, FanoutExchange fanoutExchange) {

        return BindingBuilder.bind(WarnMessage).to(fanoutExchange());

    }

}
发送端的代码
@Component

public class FanoutSender {

    @Autowired

    private AmqpTemplate rabbitTemplate;

    public void send() {

        rabbitTemplate.convertAndSend("fanoutExchange","","abcdefg");

    }

}
接收端的代码
@Component

public class FanoutReceiver {

    @RabbitListener(queues="fanout.debug")

    public void processA(String str1) {

        System.out.println("ReceiveA:"+str1);

    }

    @RabbitListener(queues="fanout.info")

    public void processB(String str) {

        System.out.println("ReceiveB:"+str);

    }

    @RabbitListener(queues="fanout.warn")

    public void processC(String str) {

        System.out.println("ReceiveC:"+str);

    }

}
测试:
@RunWith(SpringRunner.class)

@SpringBootTest(classes = SystemApp.class)

public class RabbitMqHelloTest {

    @Autowired

    private DirectSend directSend;

    @Autowired

    private TopSend topSend;

    @Autowired

    FanoutSender fanoutSender;

    @Test

    public void directSend() throws Exception {

        directSend.send();

    }

    @Test

    public void TopSend() throws Exception {

        topSend.send();

    }

    @Test

    public void fanoutSend() throws Exception {

        fanoutSender.send();

    }

}

以上三种模式:top模式最为灵活
springboot-rabbitmq的使用的更多相关文章
- springboot+rabbitmq整合示例程
关于什么是rabbitmq,请看另一篇文: http://www.cnblogs.com/boshen-hzb/p/6840064.html 一.新建maven工程:springboot-rabbit ...
- SpringBoot RabbitMQ 延迟队列代码实现
场景 用户下单后,如果30min未支付,则删除该订单,这时候就要可以用延迟队列 准备 利用rabbitmq_delayed_message_exchange插件: 首先下载该插件:https://ww ...
- springboot rabbitmq 死信队列应用场景和完整demo
何为死信队列? 死信队列实际上就是,当我们的业务队列处理失败(比如抛异常并且达到了retry的上限),就会将消息重新投递到另一个Exchange(Dead Letter Exchanges),该Exc ...
- springboot + rabbitmq 做智能家居,我也没想到会这么简单
本文收录在个人博客:www.chengxy-nds.top,共享技术资源,共同进步 前一段有幸参与到一个智能家居项目的开发,由于之前都没有过这方面的开发经验,所以对智能硬件的开发模式和技术栈都颇为好奇 ...
- springboot + rabbitmq 用了消息确认机制,感觉掉坑里了
本文收录在个人博客:www.chengxy-nds.top,技术资源共享,一起进步 最近部门号召大伙多组织一些技术分享会,说是要活跃公司的技术氛围,但早就看穿一切的我知道,这 T M 就是为了刷KPI ...
- 带着新人学springboot的应用07(springboot+RabbitMQ 下)
说一两句废话,强烈推荐各位小伙伴空闲时候也可以写写自己的博客!不管水平高低,不管写的怎么样,不要觉得写不好或者水平不够就不写了(咳,我以前就是这样的想法...自我反省!). 但是开始写博客之后,你会发 ...
- 带着新人学springboot的应用06(springboot+RabbitMQ 中)
上一节说了这么多废话,看也看烦了,现在我们就来用鼠标点点点,来简单玩一下这个RabbitMQ. 注意:这一节还是不用敲什么代码,因为上一节我们设置了那个可视化工具,我们先用用可视化工具熟悉一下流程. ...
- springboot rabbitmq整合
这一篇我们来把消息中间件整合到springboot中 ===================================================================== 首先在 ...
- springboot + rabbitmq 整合示例
几个概念说明:Broker:简单来说就是消息队列服务器实体.Exchange:消息交换机,它指定消息按什么规则,路由到哪个队列.Queue:消息队列载体,每个消息都会被投入到一个或多个队列.Bindi ...
- SpringBoot RabbitMQ 整合使用
 ### 前提 上次写了篇文章,[<SpringBoot ...
随机推荐
- PowerDesigner通过SQL语句生成PDM文件并将name和comment进行互相转换
本篇文章主要介绍了PowerDesigner通过SQL语句生成PDM文件并将name和comment进行互相转换 超详细过程(图文),具有一定的参考价值,感兴趣的小伙伴们可以参考一下 1.软件准备 软 ...
- Linux-android 模拟器使用
1.把sdcard挂载到一个文件夹 mkdir sdcard sudo mount -o loop sdcard.img sdcard 日志在sdcard下lm-kill文件下查看 注解: http: ...
- 安装部署FastDFS
安装部署FastDFS 此篇博文是在安装好虚拟机和CentOS7的前提和转自以下几篇博客得来: 1.开启CentOS的网络连接: 1.1.网址:http://blog.csdn.net/white ...
- 代码中 方法 处提示:This method has a constructor name
“此方法具有构造方法的名字” package classpackage; public class Puppy { public void Puppy(String name) { System.ou ...
- spark-初阶①(介绍+RDD)
spark-初阶①(介绍+RDD) Spark是什么? Apache Spark 是一个快速的, 多用途的集群计算系统, 相对于 Hadoop MapReduce 将中间结果保存在磁盘中, Spark ...
- js报Uncaught SyntaxError: Unexpected token <错误 解决方法
js报Uncaught SyntaxError: Unexpected token <错误 解决方法 错因 js被shiro的拦截器拦下,访问不了 #shiro的配置 shiro: hash-a ...
- linux内核钩子--khook
简介 本文介绍github上的一个项目khook,一个可以在内核中增加钩子函数的框架,支持x86.项目地址在这里:https://github.com/milabs/khook 本文先简单介绍钩子函数 ...
- Ruby Rails学习中:调试信息和 Rails 的三种环境,Users 资源,调试器,Gravatar 头像和侧边栏
注册 一.调试信息和 Rails 环境 现在咱们要实现的用户资料页面是我们这个应用中第一个真正意义上的动态页面.虽然视图的代码不会动态改变, 不过每个用户资料页面显示的内容却是从数据库中读取的.添加动 ...
- C - 简易贪吃蛇的编写
不多废话,直接进入正题——用C编写简易贪吃蛇.附上拙劣的源码 * c-snake * 首先说明使画面动起来的原理:通过 system("cls"); 清除当前控制台的显示,再pri ...
- HUD 4507 吉哥系列故事——恨7不成妻
传送门 三个限制都可以数位 $dp$ , $dfs$ 是维护当前位,之前各位总和模 $7$ 意义下的值,之前填的数模 $7$ 意义下的值,是否贴着限制 主要现在求的是各个合法数的平方的和,比较恶心 开 ...