Qt-QML-ComboBox-自定义,实现状态表示,内容可以动态正价,使用ListModel
哎呀呀呀,
问:杀死一个程序员一个程序要需要进步?
答:改三次需求
我感觉我就要再这需求的变更中被杀死了。不管怎么说,总是要跟着需求走的的,客户才是第一么(要不是因为钱,我才不会了)
下面先上个效果
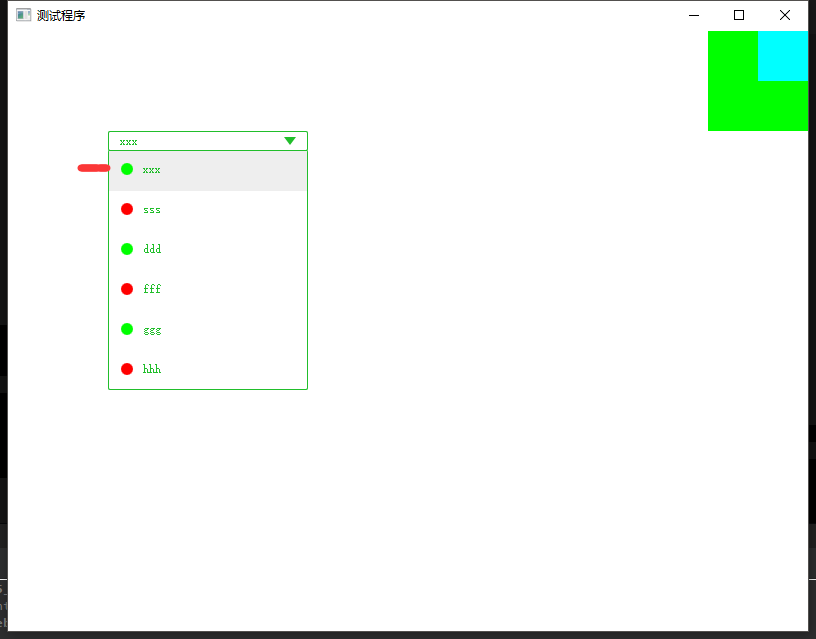
如图中显示一样,我需要再再这个Item前面用来显示一个我的当前设备的状态,这里的状态是有底层数据提供,这里试试做出相应的显示,
绿色标识可以设备可用,而红色表示设备故障,不能使用。
找啊找啊,最好还是找到了Qt的帮助文档,这里有自定义的ComboBox的Demo
先吧人家的源代码贴上来
import QtQuick 2.6

  import QtQuick.Controls 2.1

  ComboBox {

      id: control

      model: ["First", "Second", "Third"]

      delegate: ItemDelegate {

          width: control.width

          contentItem: Text {

              text: modelData

              color: "#21be2b"

              font: control.font

              elide: Text.ElideRight

              verticalAlignment: Text.AlignVCenter

          }

          highlighted: control.highlightedIndex == index

      }

      indicator: Canvas {

          id: canvas

          x: control.width - width - control.rightPadding

          y: control.topPadding + (control.availableHeight - height) / 2

          width: 12

          height: 8

          contextType: "2d"

          Connections {

              target: control

              onPressedChanged: canvas.requestPaint()

          }

          onPaint: {

              context.reset();

              context.moveTo(0, 0);

              context.lineTo(width, 0);

              context.lineTo(width / 2, height);

              context.closePath();

              context.fillStyle = control.pressed ? "#17a81a" : "#21be2b";

              context.fill();

          }

      }

      contentItem: Text {

          leftPadding: 0

          rightPadding: control.indicator.width + control.spacing

          text: control.displayText

          font: control.font

          color: control.pressed ? "#17a81a" : "#21be2b"

          horizontalAlignment: Text.AlignLeft

          verticalAlignment: Text.AlignVCenter

          elide: Text.ElideRight

      }

      background: Rectangle {

          implicitWidth: 120

          implicitHeight: 40

          border.color: control.pressed ? "#17a81a" : "#21be2b"

          border.width: control.visualFocus ? 2 : 1

          radius: 2

      }

      popup: Popup {

          y: control.height - 1

          width: control.width

          implicitHeight: listview.contentHeight

          padding: 1

          contentItem: ListView {

              id: listview

              clip: true

              model: control.popup.visible ? control.delegateModel : null

              currentIndex: control.highlightedIndex

              ScrollIndicator.vertical: ScrollIndicator { }

          }

          background: Rectangle {

              border.color: "#21be2b"

              radius: 2

          }

      }

  }
这里了,大家可以看到,这里的model就是一个简单的ListModel,这里我所卡住的难点就是这个“modelData”
这个之所以困扰我,就是因为再这里,我是没法当我自己定义自己的数据类型的时候,我第一个名字开始是没有想到MOdedata,我所想到的是吧text的内容设置成为这个内容,但是了,由于自己现在对QMl还是不怎么深入了解,所以也没法重新高太底层的,所以,好烦啊。
看到网友的启发,说默认的QStringList咋QLisview中,默认的键值就是modelData。所以,小脑瓜灵机一抖,把我的ListModel第一个参数就设置成为modelData,哈哈哈,是不是很聪明,就是这样,就可以实现我默认的功能了,而生下的功能就是自己加的的,后面就好实现了,当然,好实现是我心想的,但是实现起来,坑是必然的,所以我要接着去挖坑,天坑。。。。。。
下面附上我的自己的代码
import QtQuick 2.6

  import QtQuick.Controls 2.1

  ComboBox {

      id: control

//      model: ["First", "Second", "Third"]

      delegate: ItemDelegate {

          width: control.width

          contentItem: Rectangle

          {

              color:"transparent"

              Row

              {

                  spacing: 10

                  Rectangle

                  {

                      width: parent.height

                      height: parent.height

                      radius: parent.height/2

                      color:

                      {

                          if(model.value == "true")

                          {

                              "#00FF00"

                          }

                          else if(model.value == "false")

                          {

                              "#FF0000"

                          }

                      }

                  }

                  Text {

                  id:myText

                  text: modelData

                  color: "#21be2b"

                  font: control.font

                  elide: Text.ElideRight

                  verticalAlignment: Text.AlignVCenter

              }

              }

          }

          highlighted: control.highlightedIndex == index

      }

      indicator: Canvas {

          id: canvas

          x: control.width - width - control.rightPadding

          y: control.topPadding + (control.availableHeight - height) / 2

          width: 12

          height: 8

          contextType: "2d"

          Connections {

              target: control

              onPressedChanged: canvas.requestPaint()

          }

          onPaint: {

              context.reset();

              context.moveTo(0, 0);

              context.lineTo(width, 0);

              context.lineTo(width / 2, height);

              context.closePath();

              context.fillStyle = control.pressed ? "#17a81a" : "#21be2b";

              context.fill();

          }

      }

      contentItem: Text {

          leftPadding: 0

          rightPadding: control.indicator.width + control.spacing

          text: control.displayText

          font: control.font

          color: control.pressed ? "#17a81a" : "#21be2b"

          horizontalAlignment: Text.AlignLeft

          verticalAlignment: Text.AlignVCenter

          elide: Text.ElideRight

      }

      background: Rectangle {

          implicitWidth: 120

          implicitHeight: 40

          border.color: control.pressed ? "#17a81a" : "#21be2b"

          border.width: control.visualFocus ? 2 : 1

          radius: 2

      }

      popup: Popup {

          y: control.height - 1

          width: control.width

          implicitHeight: listview.contentHeight

          padding: 1

          contentItem: ListView {

              id: listview

              clip: true

              model: control.popup.visible ? control.delegateModel : null

              currentIndex: control.highlightedIndex

              ScrollIndicator.vertical: ScrollIndicator { }

          }

          background: Rectangle {

              border.color: "#21be2b"

              radius: 2

          }

      }

  }
调用部分
DLComboBox

    {

        x: 100

        y:100

        width: 200

        height: 20

        model: listmodel

    }

    ListModel

    {

        id:listmodel

        ListElement{modelData:"xxx";value:"true"}

        ListElement{modelData:"sss";value:"false"}

        ListElement{modelData:"ddd";value:"true"}

        ListElement{modelData:"fff";value:"false"}

        ListElement{modelData:"ggg";value:"true"}

        ListElement{modelData:"hhh";value:"false"}

    }

Qt-QML-ComboBox-自定义,实现状态表示,内容可以动态正价,使用ListModel的更多相关文章
- Qt qml listview 列表视图控件(下拉刷新、上拉分页、滚动轴)
Qt qml listview下拉刷新和上拉分页主要根据contentY来判断.但要加上顶部下拉指示器.滚动条,并封装成可简单调用的组件,着实花了我不少精力:) [先看效果] [功能] 下拉刷新 ...
- qt qml中PropertyAnimation的几种使用方法
qml文章 qt qml中PropertyAnimation的几种使用方法 动画应用场景有以下几种: 首先如果一个Rectangle.动画是要改变它的x和y值 1,Rectangle一旦被创建,就要移 ...
- Qt信号之自定义数据类型
[1]为什么需要自定义数据类型? 内置类型毕竟很有局限性,否则为什么还需要类呢.总之,有时候,我们多么希望信号能发送自定义数据类型. 幸哉~ Qt是支持自定义信号,且自定义信号可以发送自定义数据类型的 ...
- Qt之创建自定义类型
摘要: 简述 当使用Qt创建用户界面时,特别是那些带有特殊控制和特征的界面时,开发者通常需要创建新数据类型来扩展或替换Qt现有的的值类型集合. 标准类型,比如:QSize.QColor和QString ...
- Qt QML referenceexamples attached Demo hacking
/********************************************************************************************* * Qt ...
- 云监控自定义HTTP状态码说明
您在使用站点监控时,返回的6XX状态码均为云监控自定义HTTP状态码,具体含义如下表所示: 状态码 含义 备注 610 HTTP连接超时 监测点探测您的网站时出现连接超 ...
- QT使用提升自定义组件
QT使用提升自定义组件 QTC++QT自定义 QT 组件提升来实现自定义功能 介绍 我们在使用QT设置界面之后,往往需要自己实现一些方法,如果是单独 的还好,但是如果遇到很多同类型的都有需求, 比如 ...
- Qt qml 单例模式
Qt qml 单例模式,没什么好说的,看代码吧.单例模式很适合做全局的配置文件. [示例下载] http://download.csdn.net/detail/surfsky/8539313 [以下是 ...
- qt qml qchart 图表组件
qt qml qchart 图表组件 * Author: Julien Wintz * Created: Thu Feb 13 23:41:59 2014 (+0100) 这玩意是从chart.js迁 ...
随机推荐
- xampp安装及使用时的问题总结
本文主要介绍易错点,具体安装过程可参考链接1 1.首先要以管理员身份运行,否则报错. 2.如果你的网站首页名字不是index,那么你在访问的时候就必须输入你首页的全称. 3.htdocs就是网站的根目 ...
- sourcetree创建分支与分支合并
一.Sourcetree简单介绍 通过Git可以进行对项目的版本管理,但是如果直接使用Git的软件会比较麻烦,因为是通过一条一条命令进行操作的. Sourcetree则可以与Git结合,提供图形界面 ...
- springboot之热部署
一.介绍: spring为开发者提供了一个名为spring-boot-devtools的模块来使Spring Boot应用支持热部署,提高开发者的开发效率,无需手动重启Spring Boot应用. 二 ...
- js 模拟百度关键字搜索与跳转
测试效果: css样式: ul{ display:none; } html代码: <input type="text" id="text" /> & ...
- TCP Flow Control and Data Transfer
TCP Flow Control TCP Data Transfer Selective Repeat ARQ with Positive ACK Window slides a byte basis ...
- ORA-04044: 此处不允许过程, 函数, 程序包或类型和
用Orale代码建表时,出现 SQL> comment on column SCORE.cno 2 is '学号(外键)';comment on column SCORE.cno is '学号( ...
- iis服务器php环境 failed to open stream: No such file or directory解决办法
项目主机用的windows系统,iis服务器:远程连接桌面—>本地资源->映射D盘驱动器,将本地d盘修改后的文件放在远程主机项目目录里,访问报出failed to open stream: ...
- GoBelieve IM 服务端编译
#部署im1. 安装go编译环境参考链接:https://golang.org/doc/install 2. 下载im_service代码 cd $GOPATH/src/github.com/GoBe ...
- 史上最简单的SpringCloud教程 | 第十三篇: 断路器聚合监控(Hystrix Turbine)(Finchley版本)
转载请标明出处: 原文首发于:https://www.fangzhipeng.com/springcloud/2018/08/30/sc-f13-turbine/ 本文出自方志朋的博客 上一篇文章讲述 ...
- DML-修改
一, 修改单表的记录 语法: update 表名 set 字段=值[where 筛选条件] 二,修改多表 update 表名 别名 inner/left/rigth join 表二 on 连接条件 s ...