Android编程 控件与布局
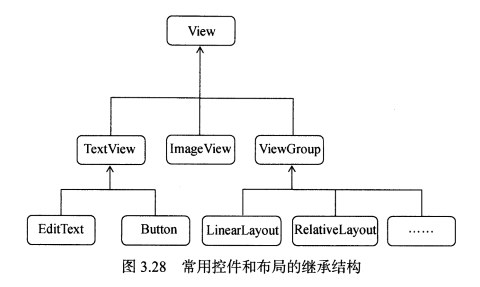
控件和布局的继承结构
常用控件
1.TextView
<?xml version="1.0" encoding="utf-8"?>

<LinearLayout xmlns:android="http://schemas.android.com/apk/res/android"

    android:orientation="vertical"

    android:layout_width="match_parent"

    android:layout_height="match_parent">

    <TextView

        android:id="@+id/text_view"

        android:layout_width="match_parent"

        android:layout_height="wrap_content"

        android:text="I'm a TextView"

        android:gravity="center"

        android:textSize="24sp"

        android:textColor="#00ff00" />

    <!-- 字体大小以sp为单位 -->

</LinearLayout>

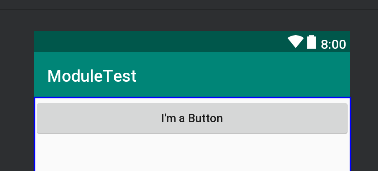
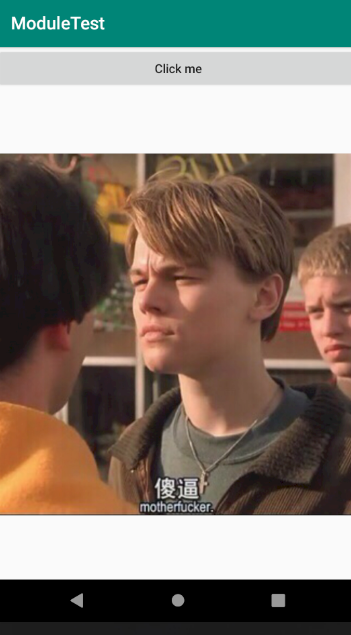
2. Button
<?xml version="1.0" encoding="utf-8"?>

<LinearLayout xmlns:android="http://schemas.android.com/apk/res/android"

    android:orientation="vertical"

    android:layout_width="match_parent"

    android:layout_height="match_parent">

    <Button

        android:id="@+id/button"

        android:layout_width="match_parent"

        android:layout_height="wrap_content"

        android:text="I'm a Button"

        />


</LinearLayout>
运行结果:

图中界面按钮显示的文字为text属性内内容的大写形式。通过设置textAllCaps属性,可以让界面按钮显示的文字和实际设置的text内容相同
<Button

        android:id="@+id/button"

        android:layout_width="match_parent"

        android:layout_height="wrap_content"

        android:text="I'm a Button"

        android:textAllCaps="false"

        />
运行结果:
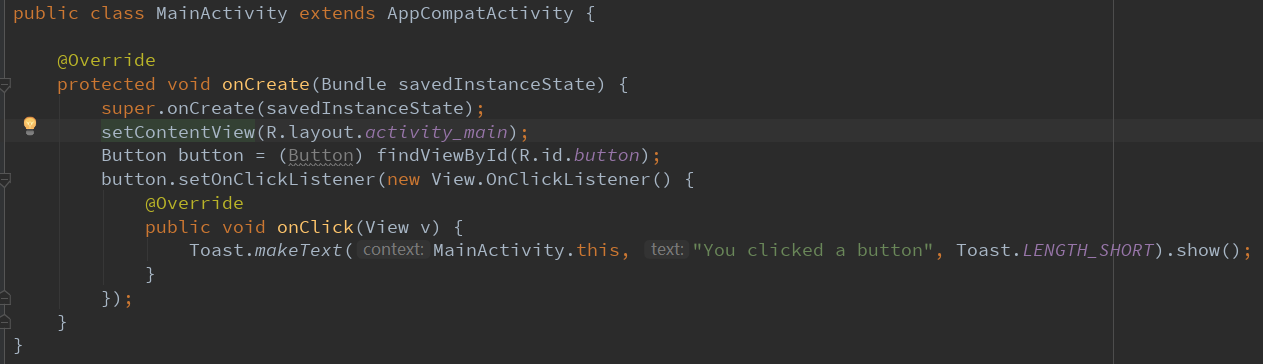
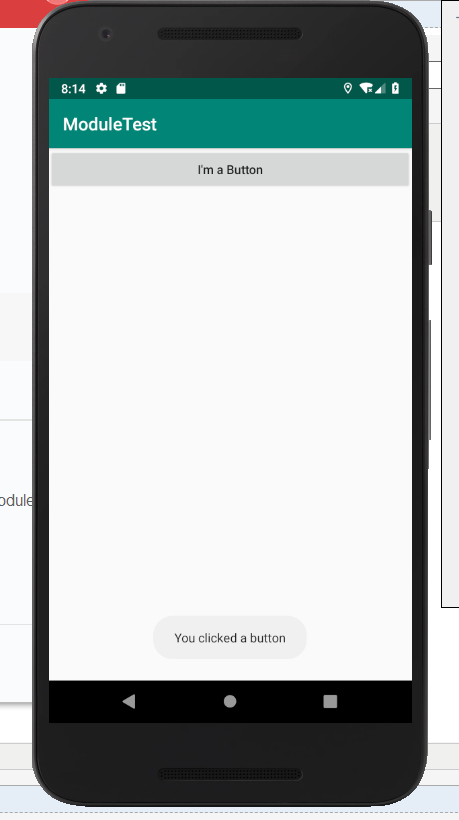
2.1 注册按钮监听器
按钮监听器有两种注册方式,一种是使用匿名类注册:
按下按钮,出现一个Toast
运行结果:
另一种则是通过实现接口的方法来注册:
public class MainActivity extends AppCompatActivity implements View.OnClickListener {

    @Override

    protected void onCreate(Bundle savedInstanceState) {

        super.onCreate(savedInstanceState);

        setContentView(R.layout.activity_main);

        Button button = (Button) findViewById(R.id.button);

        button.setOnClickListener(this);

    }

    @Override

    public void onClick(View v){

        switch(v.getId()) {

            case R.id.button:

                // 在此处添加逻辑

                break;

            default:

                break;

        }

    }

}
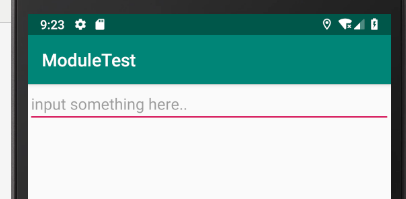
3. EditText
<EditText

        android:id="@+id/edit_text"

        android:layout_width="match_parent"

        android:layout_height="wrap_content"

        android:hint="input something here.." />
运行结果:

如上所示,输入框的高度会随着键入内容的增多而不断变大。通过设置maxLines属性可以避免这种情况
<EditText

        android:id="@+id/edit_text"

        android:layout_width="match_parent"

        android:layout_height="wrap_content"

        android:hint="input something here.."

        android:maxLines="2"/>
3.1 getText()方法
public class MainActivity extends AppCompatActivity {

    @Override

    protected void onCreate(Bundle savedInstanceState) {

        super.onCreate(savedInstanceState);

        setContentView(R.layout.activity_main);

        Button button = (Button) findViewById(R.id.button);

        button.setOnClickListener(new View.OnClickListener() {

            @Override

            public void onClick(View v) {

                EditText editText = (EditText) findViewById(R.id.edit_text);

                String text = editText.getText().toString();

                Toast.makeText(MainActivity.this, text, Toast.LENGTH_SHORT).show();

            }

        });

    }

}
运行结果:

4. ImageView
<ImageView

        android:id="@+id/image"

        android:layout_width="wrap_content"

        android:layout_height="wrap_content"

        android:src="@drawable/img_1"/>
@drawable/img_1表示从drawable文件夹中取出img_1图片
运行结果:

4.1 setImageResource()方法
public class MainActivity extends AppCompatActivity {

    @Override

    protected void onCreate(Bundle savedInstanceState) {

        super.onCreate(savedInstanceState);

        setContentView(R.layout.activity_main);

        Button button = (Button) findViewById(R.id.button);

        final ImageView imageView = (ImageView) findViewById(R.id.image_view);

        button.setOnClickListener(new View.OnClickListener() {

            @Override

            public void onClick(View v) {

                imageView.setImageResource(R.drawable.img_2);

            }

        });

    }

}
运行结果:
点击前: 点击后:

5. ProcessBar(进度条)
<ProgressBar

        android:id="@+id/progress_bar"

        android:layout_width="wrap_content"

        android:layout_height="wrap_content" />
运行结果:

右下角出现红色圆形进度条
5.1 setVisibility()方法
实现功能:点击按钮,进度条消失

setVisibility()的可选值有三个:visible、invisible、gone。invisible仅表示组件不可见,gone表示组件消失,并且不再占用任何空间。
5.2 改变ProgressBar的样式
<ProgressBar

        android:id="@+id/progress_bar"

        android:layout_width="wrap_content"

        android:layout_height="wrap_content"

        style="?android:attr/progressBarStyleHorizontal"

        android:max="100" />
上面代码将原来的圆形进度条更改为水平条状进度条
下面代码实现通过点击按钮来增加进度条进度
@Override

    protected void onCreate(Bundle savedInstanceState) {

        super.onCreate(savedInstanceState);

        setContentView(R.layout.activity_main);

        Button button = (Button) findViewById(R.id.button);

        final ProgressBar progressBar = (ProgressBar) findViewById(R.id.progress_bar);

        button.setOnClickListener(new View.OnClickListener() {

            @Override

            public void onClick(View v) {

                int progress = progressBar.getProgress();

                progress = progress + 10;

                progressBar.setProgress(progress);

            }

        });

    }
运行结果:

点一次:

点十次:

6. AlertDialog

运行结果:
public class MainActivity extends AppCompatActivity {

    @Override

    protected void onCreate(Bundle savedInstanceState) {

        super.onCreate(savedInstanceState);

        setContentView(R.layout.activity_main);

        Button button = (Button) findViewById(R.id.button);

        final ProgressBar progressBar = (ProgressBar) findViewById(R.id.progress_bar);

        button.setOnClickListener(new View.OnClickListener() {

            @Override

            public void onClick(View v) {

                AlertDialog.Builder dialog = new AlertDialog.Builder(MainActivity.this); // AlertDialog.Builder创建了一个AlertDialog实例

                dialog.setTitle("This is Dialog");

                dialog.setMessage("Something important.");

                dialog.setCancelable(false);

                dialog.setPositiveButton("OK", new DialogInterface.OnClickListener() {

                    @Override

                    public void onClick(DialogInterface dialog, int which) {

                    }

                });

                dialog.setNegativeButton("Cancel", new DialogInterface.OnClickListener() {

                    @Override

                    public void onClick(DialogInterface dialog, int which) {

                    }

                });

                dialog.show();

            }

        });

    }

}
7. ProgressDialog
能屏蔽其他控件的交互功能。一般用于表示当前操作比较耗时,让用户耐心等待。
public class MainActivity extends AppCompatActivity {
@Override
protected void onCreate(Bundle savedInstanceState) {
super.onCreate(savedInstanceState);
setContentView(R.layout.activity_main);
Button button = (Button) findViewById(R.id.button);
button.setOnClickListener(new View.OnClickListener() {
@Override
public void onClick(View v) {
ProgressDialog progressDialog = new ProgressDialog(MainActivity.this);
progressDialog.setTitle("This is ProgressDialog");
progressDialog.setMessage("Loading...");
progressDialog.setCancelable(true); // 如果在setCancelable中传入了false,则ProgressDialog不能通过Back键取消,这时要用代码做好控制当数据加载完成时必须调用ProgressDialog的dismiss()方法来关闭对话框
Android编程 控件与布局的更多相关文章
- android之控件与布局
基本控件:TextViewButtonEditTextImageViewAlertDialog.BubliderProgressDialog 四种基本布局的特殊属性: LinerLayout andr ...
- Android之控件与布局,结构知识点,基础完结
版权声明:未经博主允许不得转载 在Android中我们常常用到很多UI控件,如TextView,EditText,ImageView,Button,ImageButton,ToggleButton,C ...
- Android 手机卫士--自定义组合控件构件布局结构
由于设置中心条目中的布局都很类似,所以可以考虑使用自定义组合控件来简化实现 本文地址:http://www.cnblogs.com/wuyudong/p/5909043.html,转载请注明源地址. ...
- Android:控件布局(相对布局)RelativeLayout
RelativeLayout是相对布局控件:以控件之间相对位置或相对父容器位置进行排列. 相对布局常用属性: 子类控件相对子类控件:值是另外一个控件的id android:layout_above-- ...
- Android:控件布局(线性布局)LinearLayout
LinearLayout是线性布局控件:要么横向排布,要么竖向排布 决定性属性:必须有的! android:orientation:vertical (垂直方向) .horizontal(水平方向) ...
- Android:控件布局(相对布局)RelativeLayout(转)
相对布局常用属性: 子类控件相对子类控件:值是另外一个控件的id android:layout_above----------位于给定DI控件之上android:layout_below ------ ...
- Android 开源控件与常用开发框架开发工具类
Android的加载动画AVLoadingIndicatorView 项目地址: https://github.com/81813780/AVLoadingIndicatorView 首先,在 bui ...
- android 基础控件(EditView、SeekBar等)的属性及使用方法
android提供了大量的UI控件,本文将介绍TextView.ImageView.Button.EditView.ProgressBar.SeekBar.ScrollView.WebView ...
- Android基本控件之Menus
在我们的手机中有很多样式的菜单,比如:我们的短信界面,每条短信,我们长按都会出现一个菜单,还有很多的种类.那么现在,我们就来详细的讨论一下安卓中的菜单 Android的控件中就有这么一个,叫做Menu ...
随机推荐
- 源码安装zabbix遇到的报错集锦
报错1:checking for mysql_config... configure: error: MySQL library not found 解决办法:查找mysql_config #find ...
- js分析 天_眼_查 字体文件
0. 参考 js分析 猫_眼_电_影 字体文件 @font-face 1. 分析 1.1 定位目标元素 1.2 查看网页源代码 1.3 requests 请求提取得到大量错误信息 对比猫_眼_电_影抓 ...
- 【Android】webview javascript 注入方法
Android中向webview注入js代码可以通过webview.loadUrl("javascript:xxx")来实现,然后就会执行javascript后面的代码. 但是当需 ...
- 必须知道的Linux内核常识详解
一.内核功能.内核发行版 1.到底什么是操作系统 (1)linux.windows.android.ucos就是操作系统: (2)操作系统本质上是一个程序,由很多个源文件构成,需要编译连接成操作系统程 ...
- mybatis循环、mybatis传map
mybatis中使用循环.mybatis传入map案例 <!-- 根据id修改商户提成配置--> <update id="editStopAll" paramet ...
- Python协程与asyncio
asyncio(解决异步io编程的一整套解决方案,它主要用于异步网络操作.并发和协程)协程(Coroutine一种用户态的轻量级微线程,它是程序级别的,在执行过程中可以中断去执行其它的子程序,别的子程 ...
- 关于getchar-scanf函数的相关坑!
首先,我们编写如下所示的代码: #include <stdio.h> void test(int n) { ; ; ; a = b; b = c; c = n; printf(" ...
- mfc简单框架的分析和原理记录
由于最近在准备考试,可能博客的更新有点慢(呵,我又为自己的懒惰和拖延找借口,总之有时间就更新) 一.菜单 1.在windows中,菜单资源的识别通过HMENU句柄识别 ,但是这个开发过程比较繁琐 2. ...
- 潭州课堂25班:Ph201805201 tornado 项目 第七课 界面美化和静态文件处理(课堂笔记)
tornado 相关说明 使用 Bootstrap 前端框架 可以在 bootCDN 这里找 jquery ,poppe.js 文件 美化项目 twittel 的开源项目, 在 static 目录下 ...
- [nodemon] clean exit - waiting for changes before restart
出现上述日志信息,程序就不能往下运行了. 原因:node程序在初始化的时候就报错了,仔细debug吧...