HTML5_canvas 画布
<canvas></canvas> 画布
<canvas id="my_canvas" width="400" height="400">
    您的浏览器不支持 canvas,建议更换浏览器
</canvas>
用于在网页上绘制图形
canvas 是一个 inline-block 行内块元素
canvas 默认宽高:width: 300px; height: 150px;
canvas 不能使用 css 设置 width 和 height,会导致后面绘画发生变形
canvas 必须使用标签上的属性设置 width 和 height
- 基本使用
- 获取画布
var myCanvas = document.getElementById("my_canvas");
- 获取画笔(也叫“获取上下文”)
var painting = myCanvas.getContext("2d");
- 画矩形
- 填充矩形
- 看到这个 fill 一定和 填充 有关系
- 看到这个 rect 一定是一个 矩形
painting.fillRect(0, 0, 100, 100);

// 或者
padding.rect(0, 0, 100, 100);
padding.fill();- 填充颜色
padding.fillStyle = "red";

padding.fillStyle = "rgba(255, 255, 0, 0.4)";
- 描边矩形
- 看到这个 stroke 一定和 描边 有关系
painting.strokeRect(100, 100, 100, 100);

// 或者
padding.rect(100, 100, 100, 100);
padding.stroke();- 设置线描边的颜色
padding.strikeStyle = "yellow";
- 设置线的宽度
padding.lineWidth = 20;

padding.lineWidth = "10";- 在原有盒子的基础上,描边 会 里外均等分布
- 填充矩形
- 参数1,参数2
- 矩形的 左上角 坐标
- 参数3,参数4
- 矩形的 width 和 height
- 再开始绘制新图形(类似绘画的 "抬笔" 动作)
padding.beginPath();
- 橡皮擦
- 矩形橡皮擦
painting.clearRect(0, 0, 100, 100);
- 清除整个画布
padding.clearRect(0, 0, myCanvas.width, myCanvas.height);
- 画 线段
- 画笔移动到画布起始点
painting.moveTo(100, 100);
- 设置画笔的终点
padding.lineTo(200, 100);
/**** 除了 .fillRect 和 .strokeRect
      其他绘制,都必须加 .fill(),或者 .stroke()
          才能看见图形
 ****/
painting.stroke();    // 线宽lineWidth 总是 线两侧均等分配
- 设置 线段两端 风格
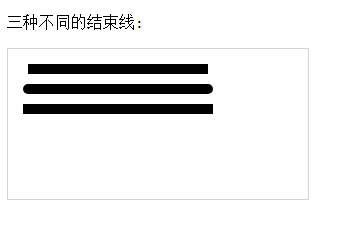
painting.lineCap = "butt";    // 默认值,方形结束

painting.lineCap = "round";    // 圆形结束

painting.lineCap = "square";    // 方形结束,但是当??????????????
<!DOCTYPE html>

<html>

    <head>

        <meta charset="utf-8">

        <title>菜鸟教程(runoob.com)</title>

    </head>

    <body>

        <p>三种不同的结束线:</p>

        <canvas id="myCanvas" width="300" height="150" style="border:1px solid #d3d3d3;">

            您的浏览器不支持 HTML5 canvas 标签。

        </canvas>

        <script>

            var c=document.getElementById("myCanvas");

            var ctx=c.getContext("2d");

            ctx.beginPath();

            ctx.lineWidth=10;

            ctx.lineCap="butt";

            ctx.moveTo(20,20);

            ctx.lineTo(200,20);

            ctx.stroke();

            ctx.beginPath();

            ctx.lineCap="round";

            ctx.moveTo(20,40);

            ctx.lineTo(200,40);

            ctx.stroke();

            ctx.beginPath();

            ctx.lineCap="square";

            ctx.moveTo(20,60);

            ctx.lineTo(200,60);

            ctx.stroke();

        </script>

    </body>

</html>
- 连续线段 绘制
painting.moveTo(100, 100);    // 起点

painting.lineTo(100, 200);

painting.lineTo(200, 200);

// 线段连接处 样式设置

painting.lineJoin = "bevel";    // 斜角    默认值

painting.lineJoin = "round";    // 圆角

painting.lineJoin = "miter";    // 直角

// 手动 绘制三角形    不好,会在连接处缺一个角

painting.lineTo(100, 100);    // 手动连接 终点,起点,缺点: 会在连接处有一个缺角,且不会被 lineJoin() 设置样式

// 闭合路径 绘制三角形    一定要使用这个函数,来连接 终点,起点,且会所有角都会被 lineJoin() 设置到样式

painting.closePath();


painting.fill();    // 有填充

painting.stroke();    // 同时描边
注意: 从 获取画板 开始,到最终 .stroke() 临摹,只要有一个错误,结果就不会显示。console 控制台并不会报错
- pen.save() 和 pen.restore()
- 之间的样式被包裹,类似函数变量作用域
练习1.
<!DOCTYPE html>

<html>

    <head>

        <meta charset="UTF-8" />

        <title></title>

        <link rel="stylesheet" type="text/css" href="./css/index.css" />

        <script type="text/javascript" src="./js/kjfFunctions.js"></script>

        <script type="text/javascript" src="./js/index.js"></script>

        <style type="text/css">

            body {

                width: 100%;

                color: #000;

                background: #96b377;

                font: 14px Helvetica, Arial, sans-serif;

                text-align: center;

            }

        </style>

    </head>

    <body>

        <canvas id="my_canvas" width="600" height="600">

            您的浏览器不支持 canvas,建议更新或者更换浏览器。

        </canvas>

        <!-- javascript 代码 -->

        <script type="text/javascript">

            // 1. 获取画板

            var myCanvas = document.getElementById("my_canvas");

            /* 不能 使用 css 设置 canvas 的 width 和 height */

            // 给画布一个颜色

            myCanvas.style.backgroundColor = "#eee";

            // 2. 获取画笔

            var pen = myCanvas.getContext("2d");

            // 画一个填充矩形

            pen.beginPath();

            pen.fillStyle = 'red';    // 一定要在绘制之前设置好 颜色

            pen.fillRect(100, 100, 200, 200);

            // 画一个描边矩形

            pen.beginPath();

            pen.strokeStyle = 'blue';    // 一定要在绘制之前设置好 颜色

            pen.lineWidth = 20;    // 一定要在绘制之前设置好 笔宽

            pen.strokeRect(150, 150, 100, 100);    // 宽高从 线的中线开始算

        </script>

    </body>

</html>
练习2.
<!DOCTYPE html>

<html>

    <head>

        <meta charset="UTF-8" />

        <title></title>

        <link rel="stylesheet" type="text/css" href="./css/index.css" />

        <script type="text/javascript" src="./js/kjfFunctions.js"></script>

        <script type="text/javascript" src="./js/index.js"></script>

        <style type="text/css">

            body {

                width: 100%;

                color: #000;

                background: #96b377;

                font: 14px Helvetica, Arial, sans-serif;

                text-align: center;

            }

        </style>

    </head>

    <body>

        <canvas id="my_canvas" width="600" height="600">

            您的浏览器不支持 canvas,建议更新或者更换浏览器。

        </canvas>

        <!-- javascript 代码 -->

        <script type="text/javascript">

            // 1. 获取画板

            var myCanvas = document.getElementById("my_canvas");

            /* 不能 使用 css 设置 canvas 的 width 和 height */

            // 给画布一个颜色

            myCanvas.style.backgroundColor = "#eee";

            // 2. 获取画笔

            var pen = myCanvas.getContext("2d");

            // 3. 一次绘画的开始

            pen.beginPath();

            // 4. 一定要在绘制之前 设置好(可以在 pen.beginPath()之前设置)

            pen.fillStyle = 'red';    // 填充的颜色

            pen.strokeStyle = 'blue';    //  笔的颜色

            pen.lineWidth = 4;    // 笔宽

            pen.lineCap = "round";    // 圆形结束

            pen.lineJoin = "round";    // 圆角

           // 5. 终于可以开始画了

            pen.moveTo(100, 100);

            pen.lineTo(100, 200);

            pen.lineTo(150, 250);

            pen.closePath();

            // 画布 总是显示 .beginPath() 和 .closePath() 之间的绘画____所以,需要的话,要成对出现
            pen.beginPath();
            pen.moveTo(300, 300);
            pen.lineTo(500, 300);
            pen.lineTo(500, 500);
            pen.lineTo(300, 500);
            pen.closePath();    // 闭合路径
/**** 6. 一定要记得的 .stroke()临摹 ****/

        pen.stroke();

        </script>

    </body>

</html>
签名,DIY 画板 案例

<!DOCTYPE html>

<html>

    <head>

        <meta charset="UTF-8" />

        <title></title>

        <link rel="stylesheet" type="text/css" href="./css/index.css" />

        <script type="text/javascript" src="./js/kjfFunctions.js"></script>

        <script type="text/javascript" src="./js/index.js"></script>

        <style type="text/css">

            /**** btns ****/

            #btns button {

                padding: 0 10px;

                background-color: #565628;

                width: 116px;

                height: 30px;

                color: #c0cea7;

                font-size: 18px;

                line-height: 30px;

                text-align: center;

                outline: none;

                border: 0 none;

            }

            #btns button:hover {

                color: #bda0f1;

                font-size: 24px;

            }

            #btns button:active {

                color: #bda0f1;

                font-size: 18px;

            }

            body {

                width: 100%;

                color: #000;

                background: #96b377;

                font: 14px Helvetica, Arial, sans-serif;

            }

            #wrap {

                display: flex;

                flex-direction: column;

                justify-content: center;

                align-items: center;

            }

            #wrap #btns{

                width: 600px;

                height: 100px;

                display: flex;

                justify-content: space-around;

                align-items: space-around;

            }

        </style>

    </head>

    <body>

        <div id="wrap">

            <canvas id="my_canvas" width="600" height="600">

                您的浏览器不支持 canvas,建议更新或者更换浏览器。

            </canvas>

            <div id="btns">

                <button id="eraser">橡皮擦</button>

                <button id="the_black">画笔</button>

                <input id="chg_color" type="color" name="penColor" />

                <button id="add_width">笔粗</button>

                <button id="dec_width">笔细</button>

            </div>

        </div>

        <!-- javascript 代码 -->

        <script type="text/javascript">

            // 1. 获取画板

            var myCanvas = document.getElementById("my_canvas");

            /* 不能 使用 css 设置 canvas 的 width 和 height */

            // 给画布一个颜色

            myCanvas.style.backgroundColor = "#eee";

            // 2. 获取画笔

            var pen = myCanvas.getContext("2d");

            var chgColor = document.getElementById("chg_color");

            // 3. 一定要在绘制之前 设置好

            pen.fillStyle = 'red';    // 填充的颜色

            pen.strokeStyle = chgColor.value;    //  笔的颜色

            pen.lineWidth = 4;    // 笔宽

            pen.lineCap = "round";    // 圆形结束

            pen.lineJoin = "round";    // 圆角

            chgColor.addEventListener("change", watchColorPicker, false);

            function watchColorPicker(event) {

                pen.strokeStyle = chgColor.value;

            };

            var eraser = document.getElementById("eraser");

            eraser.onclick = function(){

                pen.strokeStyle = myCanvas.style.backgroundColor;

            };

            var theBlack = document.getElementById("the_black");

            theBlack.onclick = function(){

                pen.strokeStyle = chgColor.value;

            };

            var add_width = document.getElementById("add_width");

            add_width.onclick = function(){

                pen.lineWidth++;

            };

            var dec_width = document.getElementById("dec_width");

            dec_width.onclick = function(){

                pen.lineWidth--;

                if(pen.lineWidth <= 0){

                    pen.lineWidth = 1;

                }

            };

            myCanvas.onmousedown = function(e){

                e = e || window.event;

                myCanvas.setCapture && myCanvas.setCapture();

                var canvasX = myCanvas.getBoundingClientRect().left;

                var canvasY = myCanvas.getBoundingClientRect().top;

                // 4. 一次绘画的开始

                pen.beginPath();

                pen.moveTo(e.clientX-canvasX, e.clientY-canvasY);

                myCanvas.onmousemove = function(e){

                    e = e || window.event;

                    pen.lineTo(e.clientX-canvasX, e.clientY-canvasY);

                    /**** 5. 一定要记得的 临摹 ****/

                    pen.stroke();

                };

                myCanvas.onmouseup = function(){

                    myCanvas.onmousemove = null;

                    myCanvas.onmouseup = null;

                    myCanvas.releaseCapture && myCanvas.releaseCapture();

                };

                e.preventDefault && e.preventDefault();

                return false;

            };

        </script>

    </body>

</html>
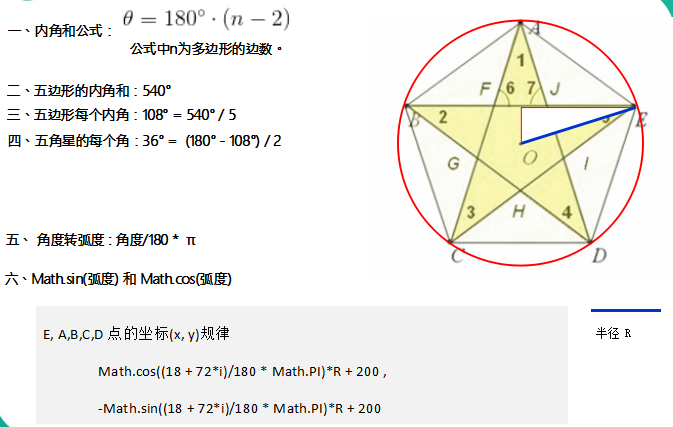
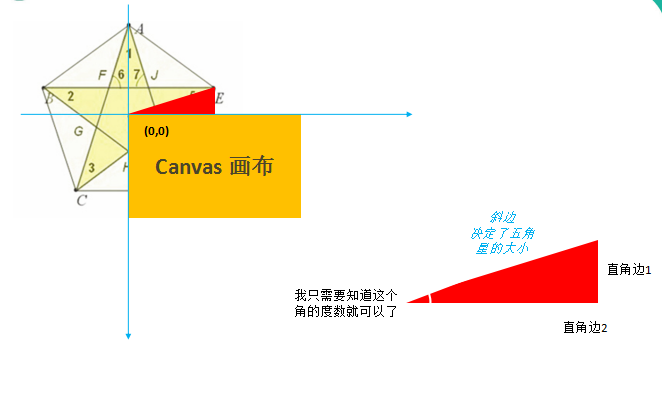
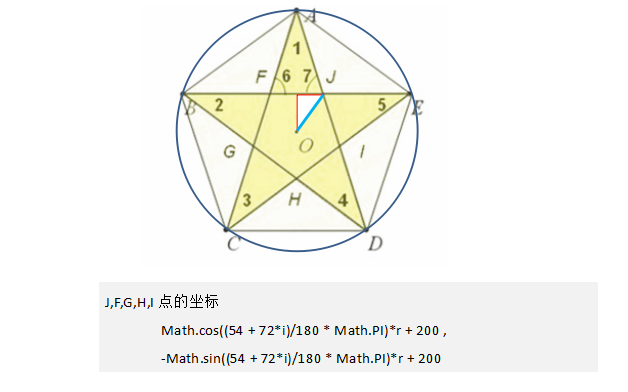
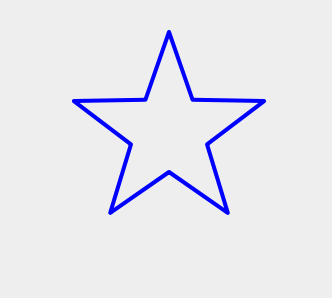
五角星 案例
- 画布原点(0, 0) 位移 painting.translate(100, 100);
<!DOCTYPE html>

<html>

    <head>

        <meta charset="UTF-8" />

        <title></title>

        <link rel="stylesheet" type="text/css" href="./css/index.css" />

        <script type="text/javascript" src="./js/kjfFunctions.js"></script>

        <script type="text/javascript" src="./js/index.js"></script>

        <style type="text/css">

            /**** btns ****/

            #btns button {

                padding: 0 10px;

                background-color: #565628;

                width: 116px;

                height: 30px;

                color: #c0cea7;

                font-size: 18px;

                line-height: 30px;

                text-align: center;

                outline: none;

                border: 0 none;

            }

            #btns button:hover {

                color: #bda0f1;

                font-size: 24px;

            }

            #btns button:active {

                color: #bda0f1;

                font-size: 18px;

            }

            body {

                width: 100%;

                color: #000;

                background: #96b377;

                font: 14px Helvetica, Arial, sans-serif;

            }

            #wrap {

                display: flex;

                flex-direction: column;

                justify-content: center;

                align-items: center;

            }

            #wrap #btns{

                width: 600px;

                height: 100px;

                display: flex;

                justify-content: space-around;

                align-items: space-around;

            }

        </style>

    </head>

    <body>

        <div id="wrap">

            <canvas id="my_canvas" width="1000" height="900">

                您的浏览器不支持 canvas,建议更新或者更换浏览器。

            </canvas>

        </div>

        <!-- javascript 代码 -->

        <script type="text/javascript">

            // 1. 获取画板

            var myCanvas = document.getElementById("my_canvas");

            /* 不能 使用 css 设置 canvas 的 width 和 height */

            // 给画布一个颜色

            myCanvas.style.backgroundColor = "#eee";

            // 2. 获取画笔

            var pen = myCanvas.getContext("2d");

            // 3. 一定要在绘制之前 设置好

            pen.fillStyle = 'olive';    // 填充的颜色

            pen.strokeStyle = "blue";    //  笔的颜色

            pen.lineWidth = 4;    // 笔宽

            pen.lineCap = "round";    // 圆形结束

            pen.lineJoin = "round";    // 圆角

            // 4. 一次绘画的开始

            pen.beginPath();

            drawStar(pen, 300, 300, 100,40);

            pen.closePath();

            /* 5. 一定要记得的 临摹 */

            pen.stroke();

            /**** 封装函数 ****/

            function drawStar(pen, centerX, centerY, R, r){

                pen.beginPath(centerX, centerY+R);

                pen.moveTo(centerX+R*Math.cos(18*Math.PI/180),centerY-R*Math.sin(18*Math.PI/180));

                for(var i=0;i<5;i++){

                    pen.lineTo(centerX+R*Math.cos((72*i+18)*Math.PI/180),centerY-R*Math.sin((72*i+18)*Math.PI/180))

                    pen.lineTo(centerX+r*Math.cos((72*i+54)*Math.PI/180),centerY-r*Math.sin((72*i+54)*Math.PI/180))

                };

            };

        </script>

    </body>

</html>
圆形 绘制
- painting.arc(圆形点, 弧度, 起始弧度, 终点弧度, false 顺时针);
- painting.arc(200, 200, 100, 0, 2*Math.PI);
- painting.arc(200, 200, 100, 0, 0.5*Math.PI); // 顺时针 画 1/4 个圆弧
- painting.arc(200, 200, 100, 0, 0.5*Math.PI, true); // 逆时针 画 3/4 个圆弧

圆弧 绘制

HTML5_canvas 画布的更多相关文章
- 06. Web大前端时代之:HTML5+CSS3入门系列~HTML5 画布
Web大前端时代之:HTML5+CSS3入门系列:http://www.cnblogs.com/dunitian/p/5121725.html 我们先看看画布的魅力: 初始画布 canvas默认是宽3 ...
- 如何快速清除ZBrush画布中多余图像
ZBrush是一款数字雕刻与绘画软件,它以强大的功能和直观的工作流程彻底改变了整个三维行业.它的简洁化.智能化和人性化的设计无不让众多用户所折服.刚接触它的用户可能会因为找不到相关命令或不熟悉而觉得它 ...
- 矢量图绘制工具Svg-edit调整画布的大小
矢量图绘制工具Svg-edit调整画布的大小 ------------------------------ ------------------------
- HTML5 中的 canvas 画布(一)
---恢复内容开始--- 在HTML5中新添加的元素,canvas 现在支持 IE9+的版本 注意:HTML5 <canvas> 元素用于图形的绘制,通过脚本 (通常是JavaScript ...
- html 5 canvas画布整理
1. 创建canvas画布<canvas id="myCanvas" width="800" height="800" >< ...
- Quartz 2D在ios中的使用简述二:创建画布
在iOS中使用Quartz画图时,第一步就是要获取画布(图形上下文),然后再画布上做各种操作.先看下CoreGraphics.h这个头文件,就可以知道能够创建多少种上下文类型. #include &l ...
- HTML5 Canvas 画布
一.Canvas是什么? canvas,是一个画布,canvas元素用于在网页上绘制图形. canvas 拥有多种绘制路径.矩形.圆形.字符以及添加图像的方法. 二.创建Canvas元素 加上基本的属 ...
- 解决CHROME中画布中无法显示图片的方法
最终效果图如下 我按照W3SCHOOL里面的方法,代码如下 <!DOCTYPE html> <html> <body> <script type=" ...
- HTML5 canvas画布写炫彩动态的倒计时效果
html代码如下,插入了2个js代码. <!DOCTYPE html> <html> <head> <title>canvas</title> ...
随机推荐
- Java实现AES加密
一)什么是AES? 高级加密标准(英语:Advanced Encryption Standard,缩写:AES),是一种区块加密标准.这个标准用来替代原先的DES,已经被多方分析且广为全世界所使用. ...
- ASP.NET WebApi 自带Json返回日期带T无法格式化的问题
WebApi自带json序列化对遇到时间日期字段的时候,到前端获取的格式总是为“ 2016-07-14T15:32:44”,中间总是会带一个T,显然不是很友好.先是偷懒在园子里边去找一些解决方案,尝试 ...
- vue-cli3.X 打包后上传服务器刷新报 404的问题
vue-cli3.X 默认配置 比2.X体验好很多,比如路由 如图,本地正常,传到服务器,因为二级目录,刷新就404,或 502等,找不到文件 nginx解决: location /{ error_p ...
- 如何使用多数据源,同时使用jpa和jdbctemplate
spring: datasource: first: type: com.alibaba.druid.pool.DruidDataSource url: jdbc:mysql://xx.xx.xx.x ...
- React Router v4 页面传值的三种方法
传值方法 1.props.params 使用React router定义路由时,我们可以给指定一个path,然后指定通配符可以携带参数到指定的path: <Route path='/user/: ...
- cmake find_package 命令
1. find_package(<Name>)命令首先会在模块路径中寻找 Find<name>.cmake,这是查找库的一个典型方式. 具体查找路径依次为CMake: 变量$ ...
- 一文掌握 Linux 性能分析之 CPU 篇
本文首发于我的公众号 Linux云计算网络(id: cloud_dev),专注于干货分享,号内有 10T 书籍和视频资源,后台回复「1024」即可领取,欢迎大家关注,二维码文末可以扫. 平常工作会涉及 ...
- 题解 P4692 【[Ynoi2016]谁的梦】
Ynoi 中少见的不卡常题呢....虽说有 50 个数据点... 果然还是道好题 noteskey 总之就是补集转化的思想,算出每种颜色选点的总方案减去不可行方案(就是不包含 该种颜色的点的区间选取方 ...
- java 数组复制
http://www.cnblogs.com/zhengbin/p/5671403.html http://www.cnblogs.com/jjdcxy/p/5870524.html Java数组拷贝 ...
- memcached性能测试之Twemperf
Twemperf又名mcperf,是一款memcached的性能测试工具.Mcperf就像httperf,但它基于memcached的协议,它使用memcached的ASCII协议并且能够快速的产生大 ...