ROSIntegration ROSIntegrationVision与虚幻引擎4(Unreal Engine 4)的配置
ROSIntegration ROSIntegrationVision与虚幻引擎4(Unreal Engine 4)的配置
操作系统:Ubuntu 18.04
虚幻引擎:4.26.2
一、虚幻引擎源代码下载与编译运行
参照官方文档:虚幻引擎Linux快速入门
二、ROSIntegration下载与配置运行
1、配置ROSBridge
要启用虚幻和ROS之间的通信,需要一个正在运行的ROSBridge和bson_mode
注意:请使用 rosbridge 版本=>0.8.0 以获得完整的 BSON 支持
安装rosbridge的推荐方法是在ROS工作空间使用源代码进行编译,即把rosbridge作为其中一个功能包,按照如下命令顺序执行
sudo apt-get install ros-ROS1_DISTRO-rosauth # 将 ROS1_DISTRO 替换为ROS对应的版本名称
cd ~/ros_workspace/ # 替换 ros_workspace 为工作空间目录名称

source devel/setup.bash

cd src/

git clone -b ros1 https://github.com/RobotWebTools/rosbridge_suite.git

cd ..

catkin_make

source devel/setup.bash
此外,ROSIntegration使用包含在PyMongo包中的BSON,可以单独安装
sudo pip3 install pymongo
2、配置ROSIntegration
使用git命令下载ROSIntegration,放置在虚幻引擎项目文件Plugins文件夹下
cd unreal_engine_project # 替换 unreal_engine_project 为项目目录文件夹路径

mkdir Plugins # 如果没有 Plugins 文件夹则手动创建

cd Plugins

git clone https://github.com/code-iai/ROSIntegration.git
此时,ROSIntegration在虚幻项目中的文件结构如下:
unreal_engine_project/Plugins/ROSIntegration/ROSIntegration.uplugin
在虚幻引擎源代码UnrealEngine下的Engine/Source/Developer/DesktopPlatform/Private/DesktopPlatformBase.cpp文件中执行此操作
查找此行:
Arguments += " -Progress -NoEngineChanges -NoHotReloadFromIDE";
替换为:
Arguments += " -Progress";
然后重新编译引擎:
cd UnrealEngine

./Setup.sh

./GenerateProjectFiles.sh

make
编译完成后,启动项目并接受重建
(如果不进行上述步骤可能会遇到虚幻引擎自建项目打不开或遇到engine modules are out of date and cannot be compiled while the engine is running的情况)
创建一个新的C++虚幻项目,或打开现有项目
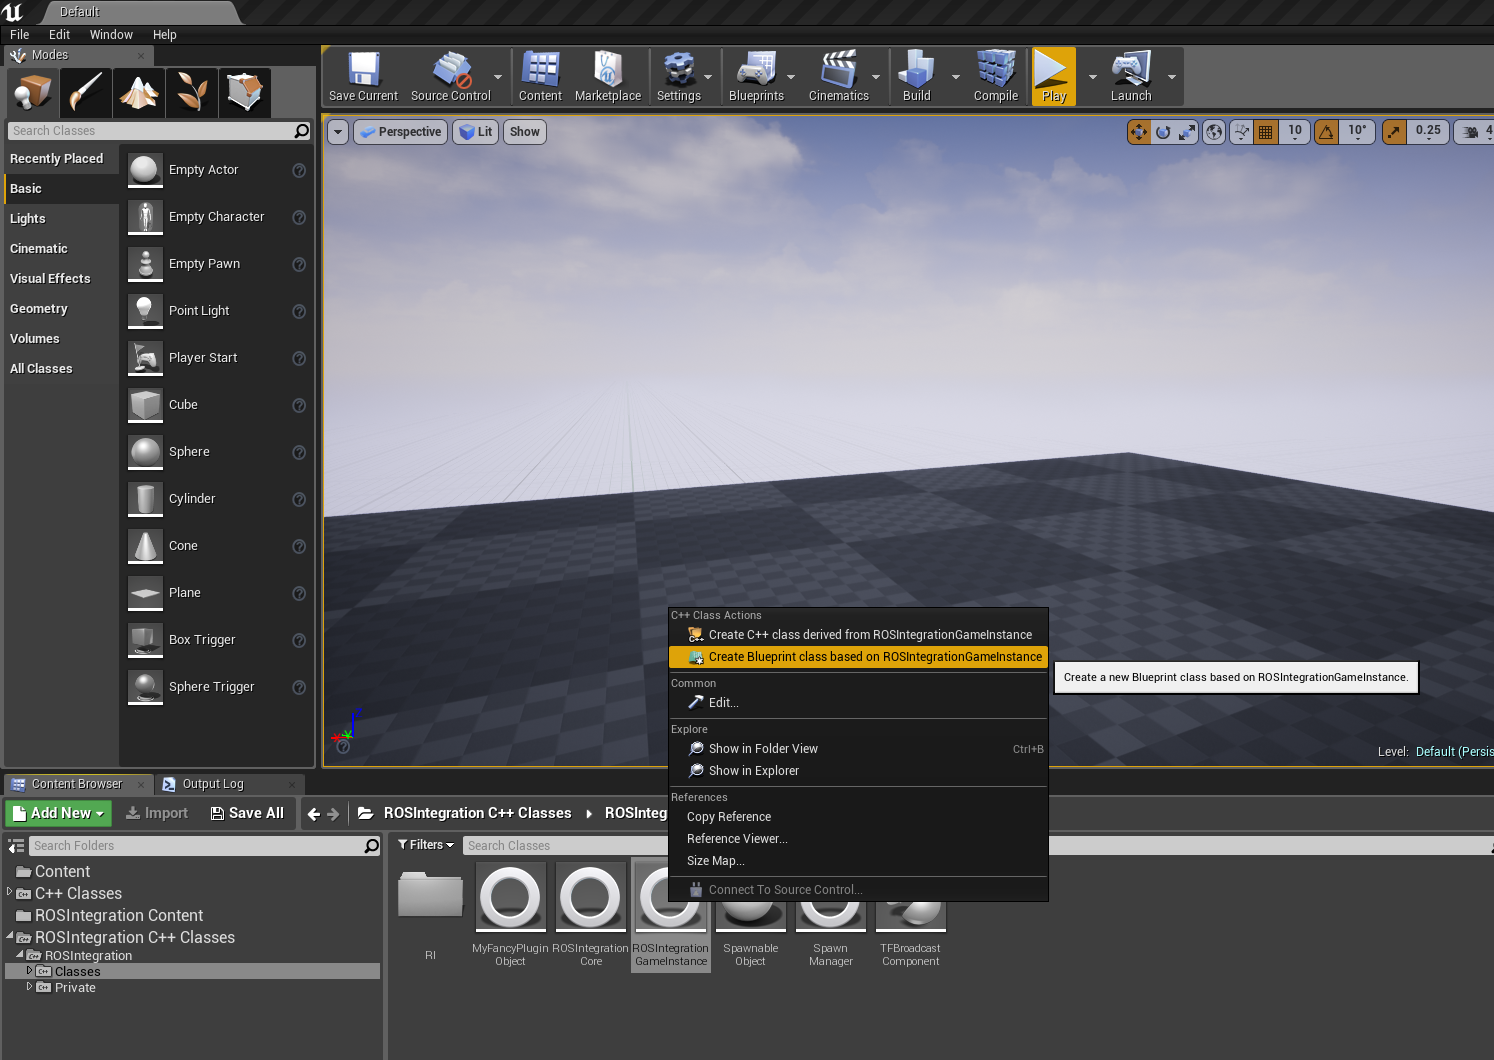
在内容浏览器中查找(在内容浏览器的右下角启用“查看选项”>“显示插件内容”)
点击“添加/导入”按钮下方的三条线按钮,展开左侧区域
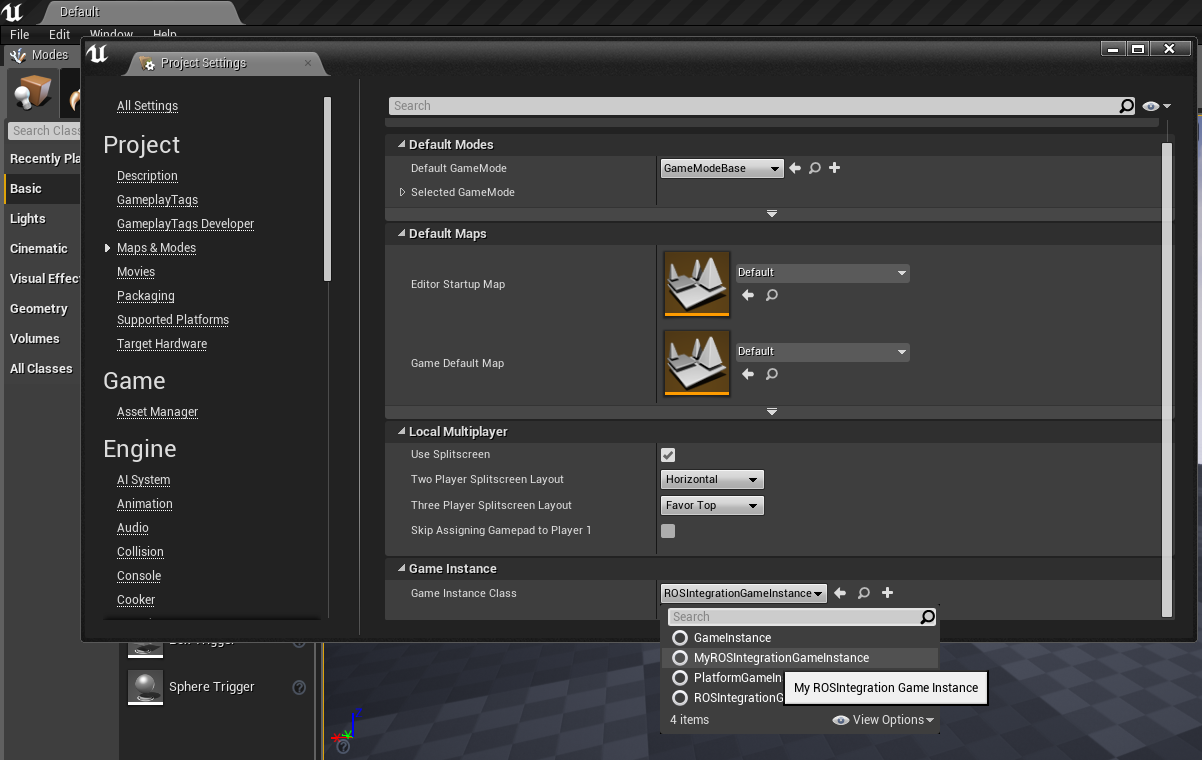
选中“ROSIntegration“>“Classes”,右键ROSIntegrationGameInstance,点击下图黄色选项
打开新的C++类/蓝图对象,并更改ROSBridgeSeverHost 和ROSBridgeServerPort,如果是本地运行的ROSBridge,则改为127.0.0.1即可
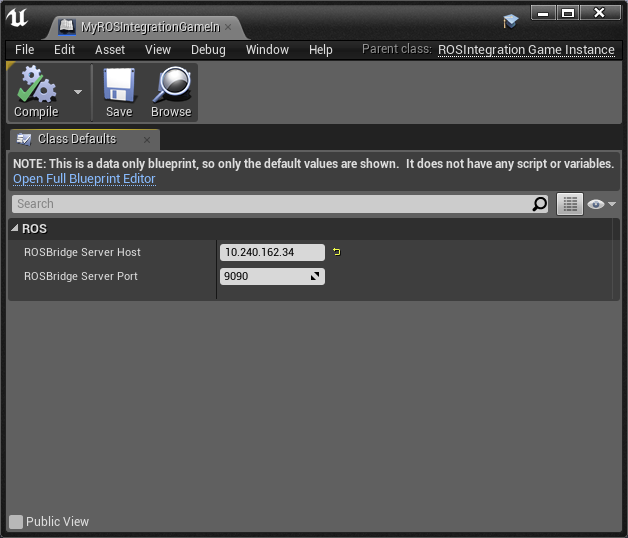
打开“地图和模式”>“项目设置”,并将游戏实例设置为与新的游戏实例对象匹配,比如MyROSIntegrationGameInstance,而不是插件中的ROSIntegrationGameInstance
使用Ctrl + Shift + S保存所有更改
3、使用ROSIntegration
要进行与 ROS 的简单发布/订阅通信,需要在创建一个新的C++ Actor,而非中文的角色(Charactor)。
接着创建 SamplePubliser
SamplePublisher.h
#include "ROSIntegration/Classes/RI/Topic.h"

#include "ROSIntegration/Classes/ROSIntegrationGameInstance.h"

#include "ROSIntegration/Public/std_msgs/String.h"
注意:上述代码必须在#include "SamplePublisher.generated.h"之前,否则会报错
SamplePublisher.cpp
// Initialize a topic

UTopic *ExampleTopic = NewObject<UTopic>(UTopic::StaticClass());

UROSIntegrationGameInstance* rosinst = Cast<UROSIntegrationGameInstance>(GetGameInstance());

ExampleTopic->Init(rosinst->ROSIntegrationCore, TEXT("/example_topic"), TEXT("std_msgs/String"));

// (Optional) Advertise the topic

ExampleTopic->Advertise();

// Publish a string to the topic

TSharedPtr<ROSMessages::std_msgs::String> StringMessage(new ROSMessages::std_msgs::String("This is an example"));

ExampleTopic->Publish(StringMessage);
注意:上述代码放置在BeginPlay()函数中
进入unreal_engine_project/Source/unreal_engine_project目录(替换 unreal_engine_project 为真实的项目名称),打开unreal_engine_project.Build.cs文件
找到:
PublicDependencyModuleNames.AddRange(new string[] { "Core", "CoreUObject", "Engine", "InputCore" });
添加ROSIntegrationy依赖,形如:
PublicDependencyModuleNames.AddRange(new string[] { "Core", "CoreUObject", "Engine", "InputCore", "ROSIntegration" });
进入ROS工作空间的src目录,创建测试功能包:
catkin_create_pkg ue_test std_msgs rospy roscpp
编译并source:
catkin_make

source devel/setup.bash
创建一个监听者cpp文件:
cd ue_test/src

touch listener.cpp
打开cpp并键入如下代码:
#include "ros/ros.h"

#include "std_msgs/String.h"

/**

 * This tutorial demonstrates simple receipt of messages over the ROS system.

 */

void chatterCallback(const std_msgs::String::ConstPtr& msg)

{

  ROS_INFO("I heard: [%s]", msg->data.c_str());

}

int main(int argc, char **argv)

{

  /**

   * The ros::init() function needs to see argc and argv so that it can perform

   * any ROS arguments and name remapping that were provided at the command line.

   * For programmatic remappings you can use a different version of init() which takes

   * remappings directly, but for most command-line programs, passing argc and argv is

   * the easiest way to do it.  The third argument to init() is the name of the node.

   *

   * You must call one of the versions of ros::init() before using any other

   * part of the ROS system.

   */

  ros::init(argc, argv, "listener");

  /**

   * NodeHandle is the main access point to communications with the ROS system.

   * The first NodeHandle constructed will fully initialize this node, and the last

   * NodeHandle destructed will close down the node.

   */

  ros::NodeHandle n;

  /**

   * The subscribe() call is how you tell ROS that you want to receive messages

   * on a given topic.  This invokes a call to the ROS

   * master node, which keeps a registry of who is publishing and who

   * is subscribing.  Messages are passed to a callback function, here

   * called chatterCallback.  subscribe() returns a Subscriber object that you

   * must hold on to until you want to unsubscribe.  When all copies of the Subscriber

   * object go out of scope, this callback will automatically be unsubscribed from

   * this topic.

   *

   * The second parameter to the subscribe() function is the size of the message

   * queue.  If messages are arriving faster than they are being processed, this

   * is the number of messages that will be buffered up before beginning to throw

   * away the oldest ones.

   */

  ros::Subscriber sub = n.subscribe("/example_topic", 1000, chatterCallback);

  /**

   * ros::spin() will enter a loop, pumping callbacks.  With this version, all

   * callbacks will be called from within this thread (the main one).  ros::spin()

   * will exit when Ctrl-C is pressed, or the node is shutdown by the master.

   */

  ros::spin();

  return 0;

}
在CMakeLists.txt添加:
add_executable(listener src/listener.cpp)

target_link_libraries(listener ${catkin_LIBRARIES})

add_dependencies(listener listener)
4、测试ROSIntegration
启动rosbridge
roslaunch rosbridge_server rosbridge_tcp.launch bson_only_mode:=True
运行新建功能包的监听者
# rosrun <your package> talker

# 比如

rosrun ue_test talker
将在UE中新建的SamplePublisher托入三维世界中,并点击运行
此时可以看到:
[INFO] [1588662504.536355639]: I heard: [This is an example]
恭喜你成功配置并运行了ROSIntegration!!!
三、ROSIntegrationVision下载与配置运行
1、虚幻引擎配置修改
在PATH_TO_UNREAL/Engine/Source/Programs/UnrealBuildTool/Platform/Linux/LinuxToolChain.cs中找到GetCLArguments_Global函数,并在其中添加语句Result += " -mf16c";,形如:
		protected virtual string GetCLArguments_Global(CppCompileEnvironment CompileEnvironment)

		{

			string Result = "";

			// build up the commandline common to C and C++

			Result += " -c";

			Result += " -pipe";

            Result += " -mf16c";

			if (ShouldUseLibcxx(CompileEnvironment.Architecture))

			{

				Result += " -nostdinc++";

				Result += " -I" + "ThirdParty/Linux/LibCxx/include/";

				Result += " -I" + "ThirdParty/Linux/LibCxx/include/c++/v1";

			}
而后重新编译虚幻引擎(注意如下语句必须都执行才算是重新编译):
cd UnrealEngine

./Setup.sh

./GenerateProjectFiles.sh

make
2、配置ROSIntegrationVision
使用git命令下载ROSIntegrationVision,放置在虚幻引擎项目文件Plugins文件夹下
cd unreal_engine_project # 替换 unreal_engine_project 为项目目录文件夹路径

mkdir Plugins # 如果没有 Plugins 文件夹则手动创建

cd Plugins

git clone https://github.com/code-iai/ROSIntegrationVision/.git
如果你是在Linux上编译虚幻引擎4而非Windows,则在打开项目时可能会遇到
Building forest2Editor...

Performing 3 actions (6 in parallel)

[1/3] Compile Module.ROSIntegrationVision.cpp

In file included from .../Plugins/ROSIntegrationVision/Intermediate/Build/Linux/B4D820EA/UE4Editor/Development/ROSIntegrationVision/Module.ROSIntegrationVision.cpp:6:

.../Plugins/ROSIntegrationVision/Source/ROSIntegrationVision/Private/VisionComponent.cpp:754:4: error: use of undeclared identifier '_mm_div_epi16'; did you mean '_mm_min_epi16'?

_mm_div_epi16(

^~~~~~~~~~~~~

_mm_min_epi16

/home/pisces/Gitware/UnrealEngine/Engine/Extras/ThirdPartyNotUE/SDKs/HostLinux/Linux_x64/v17_clang-10.0.1-centos7/x86_64-unknown-linux-gnu/lib/clang/10.0.1/include/emmintrin.h:2412:1: note: '_mm_min_epi16' declared here

_mm_min_epi16(__m128i __a, __m128i __b)

^

1 error generated.

LogInit: Warning: Still incompatible or missing module: ROSIntegrationVision
这是由于官方参考了Windows for UVisionComponent上的编译问题::convertDepth #28这一问题的回答,将源码改为了适配Windows的环境,但在Ubuntu18.04中并不存在_mm_div_epi16这一函数
因而,改变代码
void UVisionComponent::convertDepth(const uint16_t *in, __m128 *out) const

{

  const size_t size = (Width * Height) / 4;

  for (size_t i = 0; i < size; ++i, in += 4, ++out)

  {

    // Divide by 100 here in order to convert UU (cm) into ROS units (m)

    *out = _mm_cvtph_ps(

      _mm_div_epi16(

        _mm_set_epi16(0, 0, 0, 0, *(in + 3), *(in + 2), *(in + 1), *(in + 0)),

        _mm_set_epi16(100, 100, 100, 100, 100, 100, 100, 100)

      )

    );// / 100;

  }

}
为
void UVisionComponent::convertDepth(const uint16_t *in, __m128 *out) const

{

  const size_t size = (Width * Height) / 4;

  for (size_t i = 0; i < size; ++i, in += 4, ++out)

  {

    // Divide by 100 here in order to convert UU (cm) into ROS units (m)

    *out = _mm_cvtph_ps(_mm_set_epi16(

      0, 0, 0, 0, *(in + 3), *(in + 2), *(in + 1), *(in + 0))) / 100;

  }

}
即可成功自动编译打开项目
3、使用ROSIntegrationVision
在内容浏览器ROSIntegrationVision/ROSIntegrationVision/Private中包含VisionActor C++文件,将其托入三维世界中即可现实摄像头图像信息
4、问题
注意:使用时需要先在VisionActor.cpp中作如下修改
AVisionActor::AVisionActor() : AActor()

{

	UE_LOG(LogTemp, Warning, TEXT("VisionActor CTOR"));

	// Set this actor to call Tick() every frame.  You can turn this off to improve performance if you don't need it.

	PrimaryActorTick.bCanEverTick = true;

    RootComponent = CreateDefaultSubobject<USceneComponent>(TEXT("Root"));

    SetRootComponent(RootComponent);

    vision = CreateDefaultSubobject<UVisionComponent>(TEXT("Vision"));

    vision->DisableTFPublishing = true;   // 添加

    //vision->ParentLink = "/world";   注释掉

    vision->ParentLink = "desired_link";  // 添加

    vision->SetupAttachment(RootComponent);

}
将ROSIntegrationVision插件中的Binaries和Intermediate文件夹删除,重新打开项目,使引擎重新编译插件
如果在运行rosbridge时遇到如下问题
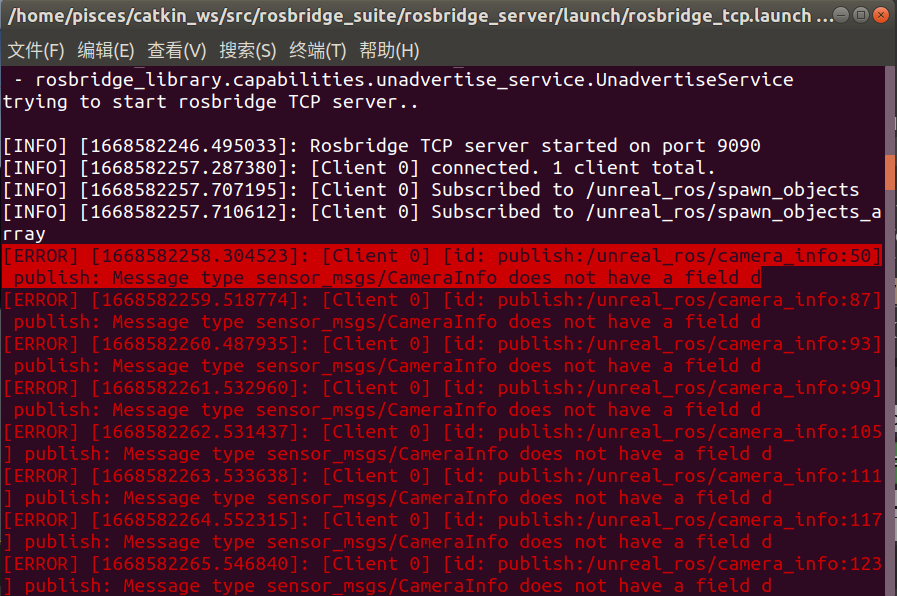
可以修改ROSIntegration/Source/ROSIntegration/Private/Conversion/Messages/sensor_msgs/SensorMsgsCameraInfoConverter.h文件
替换
	static void _bson_append_camera_info(bson_t *b, const ROSMessages::sensor_msgs::CameraInfo *msg)

	{

		// assert(CastMsg->D.Num() == 5); // TODO: use Unreal assertions

		assert(CastMsg->K.Num() == 9); // TODO: use Unreal assertions

		assert(CastMsg->R.Num() == 9);

		assert(CastMsg->P.Num() == 12);

		UStdMsgsHeaderConverter::_bson_append_child_header(b, "header", &msg->header);

		BSON_APPEND_INT32(b, "height", msg->height);

		BSON_APPEND_INT32(b, "width", msg->width);

		BSON_APPEND_UTF8(b, "distortion_model", TCHAR_TO_UTF8(*msg->distortion_model));

		_bson_append_double_tarray(b, "d", msg->D);

		_bson_append_double_tarray(b, "k", msg->K);

		_bson_append_double_tarray(b, "r", msg->R);

		_bson_append_double_tarray(b, "p", msg->P);

		BSON_APPEND_INT32(b, "binning_x", msg->binning_x);

		BSON_APPEND_INT32(b, "binning_y", msg->binning_y);

		USensorMsgsRegionOfInterestConverter::_bson_append_child_roi(b, "roi", &msg->roi);

	}
为
	static void _bson_append_camera_info(bson_t *b, const ROSMessages::sensor_msgs::CameraInfo *msg)

	{

		// assert(CastMsg->D.Num() == 5); // TODO: use Unreal assertions

		assert(CastMsg->K.Num() == 9); // TODO: use Unreal assertions

		assert(CastMsg->R.Num() == 9);

		assert(CastMsg->P.Num() == 12);

		UStdMsgsHeaderConverter::_bson_append_child_header(b, "header", &msg->header);

		BSON_APPEND_INT32(b, "height", msg->height);

		BSON_APPEND_INT32(b, "width", msg->width);

		BSON_APPEND_UTF8(b, "distortion_model", TCHAR_TO_UTF8(*msg->distortion_model));

		_bson_append_double_tarray(b, "D", msg->D); // 替换

		_bson_append_double_tarray(b, "K", msg->K); // 替换

		_bson_append_double_tarray(b, "R", msg->R); // 替换

		_bson_append_double_tarray(b, "P", msg->P);	// 替换

		BSON_APPEND_INT32(b, "binning_x", msg->binning_x);

		BSON_APPEND_INT32(b, "binning_y", msg->binning_y);

		USensorMsgsRegionOfInterestConverter::_bson_append_child_roi(b, "roi", &msg->roi);

	}
如果相机图象FPS较低,可以考虑修改VisionComponent.cpp中 Framerate(1) 为 Framerate(100)
UVisionComponent::UVisionComponent() :

Width(640),

Height(480),

Framerate(100),    // change 1 to 100

UseEngineFramerate(false),

ServerPort(10000),

FrameTime(1.0f / Framerate),

TimePassed(0),

ColorsUsed(0)
四、参考资料
[1] code-iai/ROSIntegration markdown说明文档及issues
[2] code-iai/ROSIntegrationVision markdown说明文档及issues
[3] ROS Communication Sample on Unreal Engine Using ROSIntegration
[4] upgrade c++ project from ue 4.24 to 4.25 under Linux
部分图片来源于网络
转载请注明出处!
本篇发布在以下博客或网站:
双鱼座羊驼 的个人主页 - 动态 - 掘金 (juejin.cn)
ROSIntegration ROSIntegrationVision与虚幻引擎4(Unreal Engine 4)的配置的更多相关文章
- 游戏音频技术备忘 (三) 集成Wwise到Unreal Engine
当前受众较广的商业游戏引擎有 Unreal Engine.Unity.cocos2d-x等,在音频领域的第三方中间件则有Wwise.FMOD.Criware等,言多且烦,我们首先集成Wwise到 Un ...
- [原][unreal][UE][spark]分析unreal engine 虚幻引擎的粒子编辑器:Cascade
参考:https://www.raywenderlich.com/270-unreal-engine-4-particle-systems-tutorial (使用了一个飞机射击游戏的粒子来展示,全英 ...
- Unreal Engine 虚幻引擎宣布对开发者免费
虚幻引擎4现在可供每个人免费使用,而且所有未来的更新都将免费!您可以下载引擎并将其用于游戏开发的各个方面,包括教育.建筑以及可视化,甚至虚拟现 实.电影和动画. 当您发布游戏或应用时,在您的每个游戏在 ...
- Unreal Engine 4(虚幻UE4) GameplayAbilities插件入门教程(一)
本文系笔者的实习生分享会内容预备兼GameplayAbilities的初学者教程. 本文适合已有四十天UE4开发经验的初学者. 参考资料:https://wiki.unrealengine.com/G ...
- HTC Vive 基础入门 基于Unreal Engine 4引擎
主要以讲解介绍HTC Vive设备以及Unreal继承的Steam VR Plugin为主 使用最新的虚幻引擎与Plugin完成VR环境的搭建 然后完成一个基本的VR Games. 任务5: 04-配 ...
- 开源自动驾驶仿真平台 AirSim (1) - Unreal Engine
AirSim 官方Github: https://github.com/Microsoft/AirSim AirSim 是微软的开源自动驾驶仿真平台(其实它还能做很多事情,这里主要用于自动驾驶仿真研究 ...
- 虚幻引擎4设置Visual Studio
转自:http://www.unrealchina.net/portal.php?mod=view&aid=149 设置Visual Studio和虚幻引擎4协同工作有利于提高开发人员使用UE ...
- 剖析Unreal Engine超真实人类的渲染技术Part 1 - 概述和皮肤渲染
一.概述 1.1 数字人类的概要 数字人类(Digital Human)是利用计算机模拟真实人类的一种综合性的渲染技术.也被称为虚拟人类.超真实人类.照片级人类. 它是一种技术和艺术相结合的综合性模拟 ...
- 剖析Unreal Engine超真实人类的渲染技术Part 2 - 眼球渲染
目录 三.眼球渲染 3.1 眼球的构造及理论 3.1.1 眼球的构造 3.1.2 眼球的渲染理论 3.2 眼球的渲染技术 3.2.1 角膜的半透和光泽反射 3.2.2 瞳孔的次表面散射 3.2.3 瞳 ...
- Unreal Engine 4 优化教程
本教程旨在帮助开发人员提升基于虚幻引擎(Unreal Engine*4 (UE4))开发的游戏性能.在教程中,我们对引擎内部及外部使用的一系列工具,以及面向编辑器的最佳实践加以概述,还提供了有助于提高 ...
随机推荐
- iOS 组件化及二进制化的探索
组件化的优缺点 组件化的拆分 组件与组件之间如何进行通讯(路由) 从Cocopods拉取代码的过程 远程索引库里很多的.spec文件,该文件记录了很多内容,如用户名,框架名称,描述,框架的地址 Pod ...
- 基于ELK Nginx日志分析
配置Nginx 日志 Nginx 默认的access 日志为log格式,需要logstash 进行正则匹配和清洗处理,从而极大的增加了logstash的压力 所以我们Nginx 的日志修改为json ...
- Git pull 强制拉取并覆盖本地代码
git fetch --all git reset --hard origin/master git pull
- Ubuntu20.04本地安装Redash中文版
一.安装基础环境: # 1.更换APT国内源 sudo sed -i s@/cn.archive.ubuntu.com/@/mirrors.aliyun.com/@g /etc/apt/sources ...
- ASP.NET Core GRPC 和 Dubbo 互通
一.前言 Dubbo 是比较流行的服务治理框架,国内不少大厂都在使用.以前的 Dubbo 使用的是私有协议,采集用的 hessian 序列化,对于多语言生态来说是极度的不友好.现在 Dubbo 发布了 ...
- Tableau Server 常用命令
Tableau Server 常用命令 1> 停止tableau server服务 tabadmin stop 2> 恢复tableau server数据 tabadmin restore ...
- if、where、trim、choose、when、otherwise、foreach
1.if if标签可通过test属性的表达式进行判断,若表达式的结果为true,则标签中的内容会执行:反之标签中 的内容不会执行 <!--List<Emp> getEmpListBy ...
- [Mysql] 页结构
什么是页? 页是InnoDB中管理数据的最小单元 页与页之间是通过一个双向链表连接起来. 页的组成 FileHeader 上一页下一页的指针 FIL_PAGE_PREV FIL_PAGE_NEXT P ...
- 生成随机数的几种方法、Math.random()随机数的生成、Random()的使用
第一种方法使用:System.currentTimeMillis(); final long l = System.currentTimeMillis(); final int rs = (int) ...
- 靶机: medium_socnet
靶机: medium_socnet 准备工作 需要你确定的事情: 确定 kali 已经安装,并且能正常使用[本文不涉及 kali 安装配置] VirtualBox 以前能正常导入虚拟文件 ova 能正 ...