一起来学Spring Cloud | 第八章:消息总线(Spring Cloud Bus)
上一章节,我们讲解了分布式配置中心spring cloud config,我们把配置项存放在git或者本地,当我们修改配置时,需要重新启动服务才能生效。但是在生产上,一个服务部署了多台机器,重新启动比较麻烦且会短暂影响用户体验。spring cloud生态在发展,肯定有对应的解决之法,接下来将要讲解的Spring Cloud Bus就是为了解决这一难题而存在的。
Spring Cloud Bus(消息总线)通过一个轻量级的消息中间件可以连接分布式系统中的各个节点。使用该总线来广播某些状态的改变(比如配置信息发生变更)或其他管理指令。可以说,消息总线是spring boot应用扩展“道路”上的推进器,而且也把它用来作应用间相互通信的消息管道。
一、项目搭建:
1. 环境准备
本章还是基于上一章来实现的,上一章讲解了git和本地配置两种方式,配置刷新原理都是一样的,这次我们只讲git配置修改后进行刷新。
上一章节内容可以参考:一起来学Spring Cloud | 第七章:分布式配置中心(Spring Cloud Config)
<?xml version="1.0" encoding="UTF-8"?>

<project xmlns="http://maven.apache.org/POM/4.0.0" xmlns:xsi="http://www.w3.org/2001/XMLSchema-instance"

	xsi:schemaLocation="http://maven.apache.org/POM/4.0.0 http://maven.apache.org/xsd/maven-4.0.0.xsd">

	<modelVersion>4.0.0</modelVersion>

	<parent>

		<groupId>com.haly</groupId>

		<artifactId>springcloud</artifactId>

		<version>0.0.1-SNAPSHOT</version>

	</parent>

	<groupId>com.haly</groupId>

	<artifactId>springcloud-feign-client</artifactId>

	<version>0.0.1-SNAPSHOT</version>

	<name>springcloud-ribbon-client</name>

	<description>新建一个springcloud项目</description>

	<dependencies>

		<dependency>

            <groupId>org.springframework.cloud</groupId>

            <artifactId>spring-cloud-starter-netflix-eureka-client</artifactId>

        </dependency>

        <dependency>

            <groupId>org.springframework.boot</groupId>

            <artifactId>spring-boot-starter-web</artifactId>

        </dependency>

           <dependency>

            <groupId>org.springframework.cloud</groupId>

            <artifactId>spring-cloud-starter-openfeign</artifactId>

        </dependency>

        <dependency>

            <groupId>com.haly</groupId>

            <artifactId>springcloud-config</artifactId>

            <version>0.0.1-SNAPSHOT</version>

        </dependency>

        <dependency>

			<groupId>org.springframework.cloud</groupId>

			<artifactId>spring-cloud-starter-config</artifactId>

		</dependency>

		<dependency>

			<groupId>org.springframework.cloud</groupId>

			<artifactId>spring-cloud-starter-bus-amqp</artifactId>

		</dependency>

		<dependency>

	     <groupId>org.springframework.boot</groupId>

	     <artifactId>spring-boot-starter-actuator</artifactId>

	   </dependency>

	</dependencies>

	<build>

		<plugins>

			<plugin>

				<groupId>org.springframework.boot</groupId>

				<artifactId>spring-boot-maven-plugin</artifactId>

			</plugin>

		</plugins>

	</build>

</project>
3. 在springcloud-feign-client模块的application.properties中加上RabbitMq的配置,包括RabbitMq的地址、端口,用户名、密码。并加上spring.cloud.bus的三个配置:
spring.rabbitmq.host=localhost

spring.rabbitmq.port=5672

spring.rabbitmq.username=young

spring.rabbitmq.password=young

spring.cloud.bus.enabled=true

spring.cloud.bus.trace.enabled=true

management.endpoints.web.exposure.include=bus-refresh
4. springcloud-feign-client模块的启动类上加上注解:@RefreshScope
package com.haly;

import org.springframework.boot.SpringApplication;

import org.springframework.boot.autoconfigure.SpringBootApplication;

import org.springframework.cloud.client.discovery.EnableDiscoveryClient;

import org.springframework.cloud.context.config.annotation.RefreshScope;

import org.springframework.cloud.openfeign.EnableFeignClients;

@SpringBootApplication

@EnableFeignClients

@EnableDiscoveryClient

@RefreshScope

public class SpringcloudFeignClientApplication {

	public static void main(String[] args) {

		SpringApplication.run(SpringcloudFeignClientApplication.class, args);

	}

}
5. springcloud-feign-client模块的测试类FeignController,测试上一章节的/testconfig方法,具体内容可以参考:一起来学Spring Cloud | 第七章:分布式配置中心(Spring Cloud Config)
package com.haly.controller;

import org.springframework.beans.factory.annotation.Autowired;

import org.springframework.beans.factory.annotation.Value;

import org.springframework.web.bind.annotation.GetMapping;

import org.springframework.web.bind.annotation.RequestParam;

import org.springframework.web.bind.annotation.RestController;

import com.haly.romote.FeignRemoteService;

@RestController

public class FeignController {

    @Autowired

    FeignRemoteService feignRemoteService;

    @Value("${configword}")

    String configword;

    @GetMapping(value = "/getHello")

    public String getHello(@RequestParam String name) {

        return feignRemoteService.hello(name);

    }

    @GetMapping(value = "/testzuul")

    public String testzuul(@RequestParam String name) {

        return name +",这是springcloud-feign-client的服务接口";

    }

    @GetMapping(value = "/testconfig")

    public String testconfig(@RequestParam String name) {

        return name +",git配置值:" + configword ;

    }

}
6. 运行项目
启动springcloud-eureka-server,启动springcloud-config-server,启动springcloud-config,最后启动springcloud-feign-client模块
为了测试配置修改,多个服务实例都能更新,就启动两个 springcloud-feign-client 实例,端口分别是9600,9601,sts启动两个实例(端口为9600时启动项目,然后将端口改成9601,再启动项目)。
浏览器输入:http://localhost:9600/testconfig?name=young码农 或者输入 http://localhost:9601/testconfig?name=young码农
页面展示结果:young码农,git配置值:NewConfig !
7. 修改git配置,重新运行项目
这时我们去代码仓库将configword的值改为“update config”,即改变配置文件configword的值。如果是传统的做法,需要重启服务,才能达到配置文件的更新。
现在,我们只需要发送post请求:http://localhost:8881/actuator/bus-refresh,你会发现springcloud-feign-client会重新读取配置文件,接着我们查看页面运行结果。
浏览器输入:http://localhost:9600/testconfig?name=young码农 或者输入 http://localhost:9601/testconfig?name=young码农
页面展示结果:young码农,git配置值:update config !
二、总结:
使用"destination"参数,/actuator/bus-refresh接口可以指定服务,例如 “/actuator/bus-refresh?destination=client:**”, 即刷新服务名为client的所有服务。
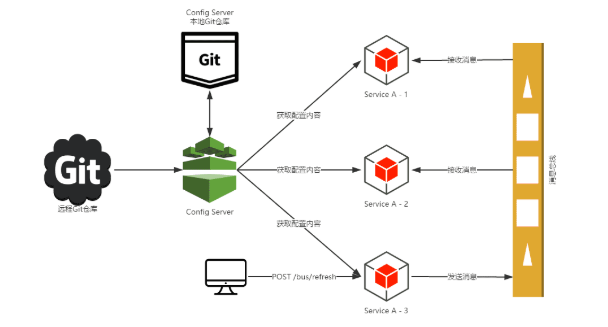
通过上面的测试,我们可以知道当git文件更改的时候,用post 向端口为8882的config-client发送请求/bus/refresh/;此时8882端口会发送一个消息,由消息总线向其他服务传递,从而使整个微服务集群都达到更新配置文件。
引入程序猿DD 画的一张图片,简单理解一下刷新原理:
最后项目目录结构:

一起来学Spring Cloud | 第八章:消息总线(Spring Cloud Bus)的更多相关文章
- 第七篇: 消息总线(Spring Cloud Bus)
Spring Cloud Bus 将分布式的节点用轻量的消息代理连接起来.它可以用于广播配置文件的更改或者服务之间的通讯,也可以用于监控.本文要讲述的是用Spring Cloud Bus实现通知微服务 ...
- 【SpringCloud 】第八篇: 消息总线(Spring Cloud Bus)
前言: 必需学会SpringBoot基础知识 简介: spring cloud 为开发人员提供了快速构建分布式系统的一些工具,包括配置管理.服务发现.断路器.路由.微代理.事件总线.全局锁.决策竞选. ...
- 原 史上最简单的SpringCloud教程 | 第八篇: 消息总线(Spring Cloud Bus)(Finchley版本)
转载请标明出处: 原文首发于:https://www.fangzhipeng.com/springcloud/2018/08/30/sc-f8-bus/ 本文出自方志朋的博客 转载请标明出处: Spr ...
- 史上最简单的SpringCloud教程 | 第八篇: 消息总线(Spring Cloud Bus)
转载请标明出处: 原文首发于:https://www.fangzhipeng.com/springcloud/2017/07/12/sc08-bus/ 本文出自方志朋的博客 最新Finchley版本请 ...
- 通过消息总线Spring Cloud Bus实现配置文件刷新(使用Kafka或RocketMQ)
如果需要客户端获取到最新的配置信息需要执行refresh,我们可以利用webhook的机制每次提交代码发送请求来刷新客户端,当客户端越来越多的时候,需要每个客户端都执行一遍,这种方案就不太适合了.使用 ...
- SpringCloud学习(八)消息总线(Spring Cloud Bus)(Finchley版本)
Spring Cloud Bus 将分布式的节点用轻量的消息代理连接起来.它可以用于广播配置文件的更改或者服务之间的通讯,也可以用于监控.本文要讲述的是用Spring Cloud Bus实现通知微服务 ...
- SpringCloud 教程 (一) 消息总线(Spring Cloud Bus)
Spring Cloud Bus 将分布式的节点用轻量的消息代理连接起来.它可以用于广播配置文件的更改或者服务之间的通讯,也可以用于监控.本文要讲述的是用Spring Cloud Bus实现通知微服务 ...
- SpringCloud教程 | 第八篇: 消息总线(Spring Cloud Bus)
一.安装rabbitmq 二.pom父文件 <?xml version="1.0" encoding="UTF-8"?> <project x ...
- Spring Cloud 入门教程(十):和RabbitMQ的整合 -- 消息总线Spring Cloud Netflix Bus
在本教程第三讲Spring Cloud 入门教程(三): 配置自动刷新中,通过POST方式向客户端发送/refresh请求, 可以让客户端获取到配置的最新变化.但试想一下, 在分布式系统中,如果存在很 ...
随机推荐
- window对象方法(alert-confirm-prompt)
<!DOCTYPE html> <html lang="en"> <head> <meta charset="UTF-8&quo ...
- Python爬虫 | IP池的使用
一.简介 - 爬虫中为什么需要使用代理 一些网站会有相应的反爬虫措施,例如很多网站会检测某一段时间某个IP的访问次数,如果访问频率太快以至于看起来不像正常访客,它可能就会禁止这个IP的访问.所以我们需 ...
- Windbg的主题---Theme
主题是预配置的windbg工作区,其中包含调试信息窗口的有用配置.任何主题都可以保存为基本工作区.Windows调试工具包中的主题作为一组注册表文件(扩展名为.reg)提供.当您积累更多的调试会话时, ...
- REdis之maxmemory解读
redis.conf中的maxmemory定义REdis可用最大物理内存,有多种书写方式,以下均为合法: maxmemory 1048576 maxmemory 1048576B maxmemory ...
- manjaro系统的回滚操作
作为linux系统的爱好者,自从使用linux后,就喜欢追求新的软件,连系统都换成了滚动升级的版本.manjaro基于arch linux,同时也是kde的支持系统,升级非常频繁.使用了几年,很少碰到 ...
- Nessus简单使用
1.更新插件 上次搭建完后总觉得不踏实,因为老是提示插件多久没更新了,然后果断花了1.25美刀买了台vps,终于把最新的插件下载下来了,总共190M,需要的QQ私信我.
- #C++初学记录(算法效率与度量)
时间性能 算法复杂性函数: \[ f(n)=n^2 +1000n+\log_{10}n+1000 \] 当n的数据规模逐渐增大时,f(n)的增长趋势: 当n增大到一定值以后,计算公式中影响最大的就是n ...
- 第09组 Alpha冲刺(3/4)
队名:软工9组 组长博客:https://www.cnblogs.com/cmlei/ 作业博客:https://edu.cnblogs.com/campus/fzu/SoftwareEngineer ...
- 以SQL命令方式调用存储过程
string str = "Data Source=.;Initial Catalog=***;Integrated Security=True"; using (SqlConne ...
- SpringMVC @SessionAttribute 使用说明
百度搜索 @SessionAttribute 这一句绝大多数文章中不存在: 如果Model中没有name参数,而session中存在一个name参数,那么SessionAttribute会讲这个参数塞 ...