十、Spring的@Profile注解
首先我们来看看spring官方文档对这个注解的解释:
The
@Profileannotation allows you to indicate that a component is eligible for registration when one or more specified profiles are active
这个注解可以根据当前的环境,动态的激活和切换一系列组件的功能
结合之前的一些知识,做一个例子,在我们开发的时候,可能在开发的时候连接的是开发环境的数据库,在测试的时候连接测试环境,生产环境连接的是生产数据库,不同环境下使用的数据库是不同的,如何动态的切换数据源的注入呢?
配置类讲解
首先看一下配置类MainConfigProfile类
import javax.sql.DataSource;

import org.springframework.beans.factory.annotation.Value;

import org.springframework.context.EmbeddedValueResolverAware;

import org.springframework.context.annotation.Bean;

import org.springframework.context.annotation.Configuration;

import org.springframework.context.annotation.Profile;

import org.springframework.context.annotation.PropertySource;

import org.springframework.util.StringValueResolver;

import com.atguigu.bean.Yellow;

import com.mchange.v2.c3p0.ComboPooledDataSource;

/**

 * Profile:

 * 		Spring为我们提供的可以根据当前环境,动态的激活和切换一系列组件的功能;

 *

 * 开发环境、测试环境、生产环境;

 * 数据源:(/A)(/B)(/C);

 *

 *

 * @Profile:指定组件在哪个环境的情况下才能被注册到容器中,不指定,任何环境下都能注册这个组件

 *

 * 1)、加了环境标识的bean,只有这个环境被激活的时候才能注册到容器中。默认是default环境

 * 2)、写在配置类上,只有是指定的环境的时候,整个配置类里面的所有配置才能开始生效

 * 3)、没有标注环境标识的bean在,任何环境下都是加载的;

 */

@PropertySource("classpath:/dbconfig.properties")

@Configuration

public class MainConfigOfProfile implements EmbeddedValueResolverAware{

	@Value("${db.user}")

	private String user;

	private StringValueResolver valueResolver;

	private String  driverClass;

	@Bean

	public Yellow yellow(){

		return new Yellow();

	}

	@Profile("test")

	@Bean("testDataSource")

	public DataSource dataSourceTest(@Value("${db.password}")String pwd) throws Exception{

		ComboPooledDataSource dataSource = new ComboPooledDataSource();

		dataSource.setUser(user);

		dataSource.setPassword(pwd);

		dataSource.setJdbcUrl("jdbc:mysql://localhost:3306/test"); // 测试库

		dataSource.setDriverClass(driverClass);

		return dataSource;

	}

	@Profile("dev")

	@Bean("devDataSource")

	public DataSource dataSourceDev(@Value("${db.password}")String pwd) throws Exception{

		ComboPooledDataSource dataSource = new ComboPooledDataSource();

		dataSource.setUser(user);

		dataSource.setPassword(pwd);

		dataSource.setJdbcUrl("jdbc:mysql://localhost:3306/ssm_crud"); // 开发库

		dataSource.setDriverClass(driverClass);

		return dataSource;

	}

	@Profile("prod")

	@Bean("prodDataSource")

	public DataSource dataSourceProd(@Value("${db.password}")String pwd) throws Exception{

		ComboPooledDataSource dataSource = new ComboPooledDataSource();

		dataSource.setUser(user);

		dataSource.setPassword(pwd);

		dataSource.setJdbcUrl("jdbc:mysql://localhost:3306/scw_0515");  // 生产库

		dataSource.setDriverClass(driverClass);

		return dataSource;

	}

	@Override

	public void setEmbeddedValueResolver(StringValueResolver resolver) {

		// TODO Auto-generated method stub

		this.valueResolver = resolver;

		driverClass = valueResolver.resolveStringValue("${db.driverClass}");

	}

}
在配置类中我们注入了三个Bean,分别对应测试环境、开发环境、生产环境。
我们知道数据源的注入需要四大金刚:user、password、driver、url。
注意:这里,三种环境连接的都不是相同的数据库,我们这里只以url作为区分。每个环境下的url是不同的。
其他三个参数,我们都配置在类路径下的db.properties中,如下
db.user=root

db.password=123456

db.driverClass=com.mysql.jdbc.Driver
这里结合之前我学习的知识点,使用不同的方式注入db.properties中的值
使用是加载资源文件,这个用法可参阅:Spring中使用@Value和@PropertySource为属性赋值
@PropertySource("classpath:/dbconfig.properties")
那如何为
dataSource.setUser(user);

dataSource.setPassword(pwd);
这两句中的方法赋值呢?
第一个我们构造了一个
private String user;属性,然后在属性上通过@Value("${db.user}")然后再
dataSource.setUser(user);就拿到值了。
其次呢,
public DataSource dataSourceDev(@Value("${db.password}")String pwd) throws Exception{...}我们在方法上添加了一个参数,在参数前加上了@Value("${db.password}")便可以从资源文件db.properties中拿到值,赋给这个参数
小结:以上是@Value的用法,可参考上面的链接
进行到这里,我们换一种方式,来取得资源文件中的driverClass,
我们可以通过实现EmbeddedValueResolverAware接口,spring中有很多aware接口,是提供给我们使用spring底层功能的途径。
这里的EmbeddedValueResolverAware就是值解析器 ,实现该接口,即实现其抽象方法
	@Override

	public void setEmbeddedValueResolver(StringValueResolver resolver) {

		// TODO Auto-generated method stub

		this.valueResolver = resolver;

		driverClass = valueResolver.resolveStringValue("${db.driverClass}");

	}
在容器启动的时候 ,这个方法会被调用,
我们定义 了一个属性,用以接收方法中参数的值,也即StringValueResolver resolver
private StringValueResolver valueResolver;
然后解析
driverClass = valueResolver.resolveStringValue("${db.driverClass}");
并赋值给我们自定义的属性driverClass。这样这个属性就拿到了资源文件中的值
以上和@Profile没有太大的关系,但可以很好的复习
另外我们还在配置类中,定义 了一个叫做yellow的bean。
测试,并激活对应的环境
首先我们全部不加入@Profile注解
测试一下,观察控制台输出,该方法我们就称为测试方法1
package com.atguigu.test;

import javax.sql.DataSource;

import org.junit.Test;

import org.springframework.context.annotation.AnnotationConfigApplicationContext;

import com.atguigu.bean.Yellow;

import com.atguigu.config.MainConfigOfProfile;

public class IOCTest_Profile {

	@Test

	public void test01(){

		AnnotationConfigApplicationContext applicationContext = new AnnotationConfigApplicationContext(MainConfigOfProfile.class);

		String[] definitionNames = applicationContext.getBeanDefinitionNames();

		for (String name : definitionNames) {

			System.out.println(name);

		}

	}

}
mainConfigOfProfile

yellow

testDataSource

devDataSource

prodDataSource
可以看到包含配置类本身所有的bean都被注入到了ioc容器中。
现在打开所有的@Profile注释
比如现在我们是在dev即开发环境下,如何只激活@Bean("devDataSource")这个组件呢?
我们写个测试类
package com.atguigu.test;
import javax.sql.DataSource;
import org.junit.Test;
import org.springframework.context.annotation.AnnotationConfigApplicationContext;
import com.atguigu.bean.Yellow;
import com.atguigu.config.MainConfigOfProfile;
public class IOCTest_Profile {
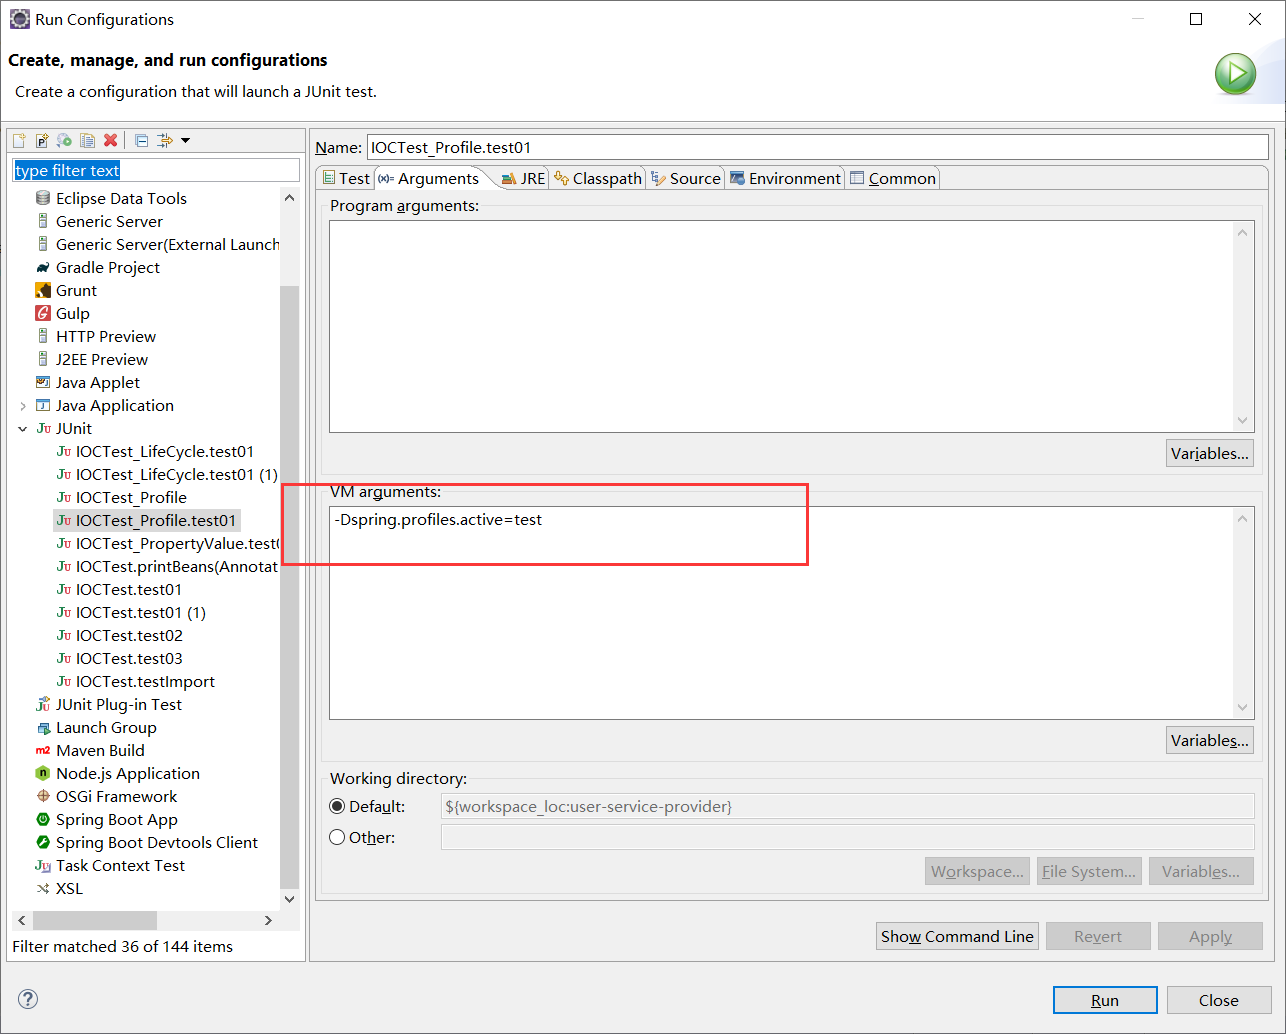
//1、使用命令行动态参数: 在虚拟机参数位置加载 -Dspring.profiles.active=test
@SuppressWarnings("resource")
//2、代码的方式激活某种环境;
@Test
public void test01(){
AnnotationConfigApplicationContext applicationContext =
new AnnotationConfigApplicationContext();
//1、创建一个applicationContext
//2、设置需要激活的环境
applicationContext.getEnvironment().setActiveProfiles("dev"); // 这里可以写多个值,
//3、注册主配置类
applicationContext.register(MainConfigOfProfile.class);
//4、启动刷新容器
applicationContext.refresh();
String[] namesForType = applicationContext.getBeanNamesForType(DataSource.class);
for (String string : namesForType) {
System.out.println(string);
}
Yellow bean = applicationContext.getBean(Yellow.class);
System.out.println(bean);
applicationContext.close();
// AnnotationConfigApplicationContext applicationContext = new AnnotationConfigApplicationContext(MainConfigOfProfile.class);
// String[] definitionNames = applicationContext.getBeanDefinitionNames();
// for (String name : definitionNames) {
// System.out.println(name);
// }
}
}
控制台打印:
devDataSource

com.atguigu.bean.Yellow@27ce24aa // 没有被@Profile修饰。
观察可以发现,确实只有开发环境的bean被注入了ioc容器中,
这里还有另外一种激活@Profile注解 的方式。
测试方法1:
	@Test

	public void test01(){

		AnnotationConfigApplicationContext applicationContext = new AnnotationConfigApplicationContext(MainConfigOfProfile.class);

		String[] definitionNames = applicationContext.getBeanDefinitionNames();

		for (String name : definitionNames) {

			System.out.println(name);

		}

	}
然后运行该方法,不过需要在运行时候加上虚拟机参数。=后面是我们需要激活的环境,多个值用逗号分隔开。
-Dspring.profiles.active=test
打印一下输出:
mainConfigOfProfile

yellow

testDataSource //测试环境被注入
@Profile注解 使用在类上,
保持配置类不变,我们在该配置类上加上@Profile("prod")
我们在来运行测试方法1(前面有提),控制台并没有输出,这表示配置类中的bean都没有被注入进容器中,
可以这样思考:@Profile注解标注在类上,如果你没有指定激活该环境,自然该配置类整个都不会被加载,配置类中的Bean(即使如Yellow,没有被@Profile注解),也不会被注入进容器中,
那我们以同样的方式,来正确的激活该环境后呢?(如何激活环境,参考前文)
控制台打印输出
mainConfigOfProfile

yellow

prodDataSource
这显然与我们预料的是一致的。
Tips
如果环境都没有被激活,那@Profile("default")会被激活,也就是说,默认就是default环境。
十、Spring的@Profile注解的更多相关文章
- 【译】Spring 4 @Profile注解示例
前言 译文链接:http://websystique.com/spring/spring-profile-example/ 本文将探索Spring中的@Profile注解,可以实现不同环境(开发.测试 ...
- 【转】Spring Boot Profile使用
http://blog.csdn.net/he90227/article/details/52981747 摘要: spring Boot使用@Profile注解可以实现不同环境下配置参数的切换,任何 ...
- 使用 spring.profiles.active 及 @profile 注解 动态化配置内部及外部配置
引言:使用 spring.profiles.active 参数,搭配@Profile注解,可以实现不同环境下(开发.测试.生产)配置参数的切换 一.根据springboot的配置文件命名约定,结合ac ...
- spring boot: 一般注入说明(四) Profile配置,Environment环境配置 @Profile注解
1.通过设定Environment的ActiveProfile来设置当前context所需要的环境配置,在开发中使用@Profile注解类或方法,达到不同情况下选择实例化不同的Bean. 2.使用jv ...
- 【Spring Cloud】Spring Cloud之自定义@SpringCloudProfile注解实现@Profile注解的功能
一.为什么会想到定义@SpringCloudProfile这样的注解 首页提一下@Profile注解:它主要用与Spring Boot多环境配置中,指定某个类只在指定环境中生效,比如swagger的配 ...
- spring切换环境变量——@Profile注解的使用
在容器中如果存在同一类型的多个组件,也可以使用@Profile注解标识要获取的是哪一个bean,这在不同的环境使用不同的变量的情景特别有用.例如,开发环境.测试环境.生产环境使用不同的数据源,在不改变 ...
- 【Spring】使用@Profile注解实现开发、测试和生产环境的配置和切换,看完这篇我彻底会了!!
写在前面 在实际的企业开发环境中,往往都会将环境分为:开发环境.测试环境和生产环境,而每个环境基本上都是互相隔离的,也就是说,开发环境.测试环境和生产环境是互不相通的.在以前的开发过程中,如果开发人员 ...
- Spring核心技术(十)——JSR-330标准注解
从Spring 3.0开始,Spring开始支持JSR-330标准的注解(依赖注入).这些注解和Spring注解扫描的方式是一直的,开发者只需要在classpath中配置相关的jar包即可. 如果开发 ...
- 朱晔和你聊Spring系列S1E9:聊聊Spring的那些注解
本文我们来梳理一下Spring的那些注解,如下图所示,大概从几方面列出了Spring的一些注解: 如果此图看不清楚也没事,请运行下面的代码输出所有的结果. Spring目前的趋势是使用注解结合Java ...
随机推荐
- Ubuntu 14.04.2升级openssh7.9
环境:Ubuntu 14.04.2 目的:openssh版本6.6升级为openssh7.9 准备以下3个包 http://www.zlib.net/ https://www.openssl.org/ ...
- nginx设置反向代理,获取真实客户端ip
upstream这个模块提供一个简单方法来实现在轮询和客户端IP之间的后端服务器负荷平衡. upstream abc.com { server 127.0.0.1:8080; server 127.0 ...
- nginx和ftp搭建图片服务器
一.需要的组件 图片服务器两个服务: Nginx(图片访问): 1.http服务:可以使用nginx做静态资源服务器.也可以使用apache.推荐使用nginx,效率更高. 2.反向代理 实现 负载均 ...
- sql语句的面试题
中科软的面试题:http://www.mayiwenku.com/p-5888480.html 中科软的面试题:https://blog.csdn.net/woolceo/article/detail ...
- janusgraph-mgmt中的一些操作
关闭事务 mgmt = graph.openManagement(); ids = mgmt.getOpenInstances(); for(String id : ids){if(!id.conta ...
- Build Post Office II
Description Given a 2D grid, each cell is either a wall 2, an house 1 or empty 0 (the number zero, o ...
- Git的个人总结
Git Git简史: 同生活中的许多伟大事物一样,Git 诞生于一个极富纷争大举创新的年代. Linux 内核开源项目有着为数众多的参与者. 绝大多数的 Linux 内核维护工作都花在了提交补丁和保存 ...
- siameseNet网络以及信号分类识别应用
初学siameseNet网络,希望可以用于信号的识别分类应用.此文为不间断更新的笔记. siameseNet简介 全连接孪生网络(siamese network)是一种相似性度量方法,适用于类别数目多 ...
- ServiceStack.OrmLite 基本操作
原文:https://www.cnblogs.com/wang2650/category/780821.html 原文:https://www.cnblogs.com/xxfcz/p/7045808. ...
- go与python的不同
go 开发中需要注意的与python的不同点 列出golang开发过程中与python的不同点,主要是在语法方面,golang的一些语法真是要人命啊. 1.golang可读性很强,与或对应&& ...