
大数据集群环境搭建之一 hadoop-ha高可用安装
1、如果你使用root用户进行安装。 vi /etc/profile 即可 系统变量
2、如果你使用普通用户进行安装。 vi ~/.bashrc 用户变量
export HADOOP_HOME=/export/servers/hadoop-2.8.5
export PATH=$PATH:$HADOOP_HOME/bin:$HADOOP_HOME/sbin:
同步配置文件
[root@jiang01 servers]# vi /etc/profile
[root@jiang01 servers]#
[root@jiang01 servers]# xrsync.sh /etc/profile
=========== jiang02 : /etc/profile ===========
命令执行成功
=========== jiang03 : /etc/profile ===========
命令执行成功
[root@jiang01 servers]#
刷新配置各个机器配置:
source /etc/profile
修改下面各个配置文件:
<?xml version="1.0" encoding="UTF-8"?>

<?xml-stylesheet type="text/xsl" href="configuration.xsl"?>

<!--

  Licensed under the Apache License, Version 2.0 (the "License");

  you may not use this file except in compliance with the License.

  You may obtain a copy of the License at

    http://www.apache.org/licenses/LICENSE-2.0

  Unless required by applicable law or agreed to in writing, software

  distributed under the License is distributed on an "AS IS" BASIS,

  WITHOUT WARRANTIES OR CONDITIONS OF ANY KIND, either express or implied.

  See the License for the specific language governing permissions and

  limitations under the License. See accompanying LICENSE file.

-->

<!-- Put site-specific property overrides in this file. -->

<configuration>

        <!-- 指定hdfs的nameservice为ns1 -->

    <property>

        <name>fs.defaultFS</name>

        <value>hdfs://myha01/</value>

    </property>

        <!-- 指定hadoop临时目录 -->

    <property>

        <name>hadoop.tmp.dir</name>

        <value>/export/servers/hadoop-2.8./hadoopDatas/tempDatas</value>

    </property>

        <!-- 指定zookeeper地址 -->

    <property>

        <name>ha.zookeeper.quorum</name>

        <value>jiang01:,jiang02:,jiang03:</value>

    </property>

</configuration>
core-site.xml
<?xml version="1.0" encoding="UTF-8"?>

<?xml-stylesheet type="text/xsl" href="configuration.xsl"?>

<!--

  Licensed under the Apache License, Version 2.0 (the "License");

  you may not use this file except in compliance with the License.

  You may obtain a copy of the License at

    http://www.apache.org/licenses/LICENSE-2.0

  Unless required by applicable law or agreed to in writing, software

  distributed under the License is distributed on an "AS IS" BASIS,

  WITHOUT WARRANTIES OR CONDITIONS OF ANY KIND, either express or implied.

  See the License for the specific language governing permissions and

  limitations under the License. See accompanying LICENSE file.

-->

<!-- Put site-specific property overrides in this file. -->

<configuration>

    <!--指定hdfs的nameservice为ns1,需要和core-site.xml中的保持一致 -->

    <property>

        <name>dfs.nameservices</name>

        <value>myha01</value>

    </property>

    <!-- ns1下面有两个NameNode,分别是nn1,nn2 -->

    <property>

        <name>dfs.ha.namenodes.myha01</name>

        <value>nn1,nn2</value>

    </property>

    <!-- nn1的RPC通信地址 -->

    <property>

        <name>dfs.namenode.rpc-address.myha01.nn1</name>

        <value>jiang01:</value>

    </property>

    <!-- nn1的http通信地址 -->

    <property>

        <name>dfs.namenode.http-address.myha01.nn1</name>

        <value>jiang01:</value>

    </property>

    <!-- nn2的RPC通信地址 -->

    <property>

        <name>dfs.namenode.rpc-address.myha01.nn2</name>

        <value>jiang02:</value>

    </property>

    <!-- nn2的http通信地址 -->

    <property>

        <name>dfs.namenode.http-address.myha01.nn2</name>

        <value>jiang02:</value>

    </property>

    <!-- 指定NameNode的元数据在JournalNode上的存放位置 -->

    <property>

        <name>dfs.namenode.shared.edits.dir</name>

        <value>qjournal://jiang01:8485;jiang02:8485;jiang03:8485/myha01</value>

    </property>

    <!-- 指定JournalNode在本地磁盘存放数据的位置 -->

    <property>

        <name>dfs.journalnode.edits.dir</name>

        <value>/opt/hadoop-2.8./journal</value>

    </property>

    <!-- 开启NameNode失败自动切换 -->

    <property>

        <name>dfs.ha.automatic-failover.enabled</name>

        <value>true</value>

    </property>

    <!-- 配置失败自动切换实现方式 -->

    <property>

        <name>dfs.client.failover.proxy.provider.myha01</name>

        <value>org.apache.hadoop.hdfs.server.namenode.ha.ConfiguredFailoverProxyProvider</value>

    </property>

    <!-- 配置隔离机制 -->

    <property>

        <name>dfs.ha.fencing.methods</name>

        <value>sshfence</value>

    </property>

    <!-- 使用隔离机制时需要ssh免登陆 -->

    <property>

        <name>dfs.ha.fencing.ssh.private-key-files</name>

        <value>/root/.ssh/id_dsa</value>

    </property>

</configuration>
hdfs-site.xml
<?xml version="1.0"?>

<!--

  Licensed under the Apache License, Version 2.0 (the "License");

  you may not use this file except in compliance with the License.

  You may obtain a copy of the License at

    http://www.apache.org/licenses/LICENSE-2.0

  Unless required by applicable law or agreed to in writing, software

  distributed under the License is distributed on an "AS IS" BASIS,

  WITHOUT WARRANTIES OR CONDITIONS OF ANY KIND, either express or implied.

  See the License for the specific language governing permissions and

  limitations under the License. See accompanying LICENSE file.

-->

<configuration>

   <!-- Site specific YARN configuration properties -->

<!-- 开启RM高可靠 -->

        <property>

            <name>yarn.resourcemanager.ha.enabled</name>

            <value>true</value>

        </property>

        <!-- 指定RM的cluster id -->

        <property>

            <name>yarn.resourcemanager.cluster-id</name>

            <value>yrc</value>

        </property>

        <!-- 指定RM的名字 -->

        <property>

            <name>yarn.resourcemanager.ha.rm-ids</name>

            <value>rm1,rm2</value>

        </property>

        <!-- 分别指定RM的地址 -->

        <property>

            <name>yarn.resourcemanager.hostname.rm1</name>

            <value>jiang02</value>

        </property>

        <property>

            <name>yarn.resourcemanager.hostname.rm2</name>

            <value>jiang03</value>

        </property>

        <!-- 指定zk集群地址 -->

        <property>

            <name>yarn.resourcemanager.zk-address</name>

            <value>jiang01:,jiang02:,jiang03:</value>

        </property>

        <property>

            <name>yarn.nodemanager.aux-services</name>

            <value>mapreduce_shuffle</value>

        </property>

</configuration>
yarn-site.xml
<?xml version="1.0"?>

<?xml-stylesheet type="text/xsl" href="configuration.xsl"?>

<!--

  Licensed under the Apache License, Version 2.0 (the "License");

  you may not use this file except in compliance with the License.

  You may obtain a copy of the License at

    http://www.apache.org/licenses/LICENSE-2.0

  Unless required by applicable law or agreed to in writing, software

  distributed under the License is distributed on an "AS IS" BASIS,

  WITHOUT WARRANTIES OR CONDITIONS OF ANY KIND, either express or implied.

  See the License for the specific language governing permissions and

  limitations under the License. See accompanying LICENSE file.

-->

<!-- Put site-specific property overrides in this file. -->

<configuration>

         <!-- 指定mr框架为yarn方式 -->

    <property>

        <name>mapreduce.framework.name</name>

        <value>yarn</value>

    </property>

</configuration>
mapred-site.xml
[root@jiang01 servers]#  hadoop version

Hadoop 2.8.

Subversion https://git-wip-us.apache.org/repos/asf/hadoop.git -r 0b8464d75227fcee2c6e7f2410377b3d53d3d5f8

Compiled by jdu on --10T03:32Z

Compiled with protoc 2.5.

From source with checksum 9942ca5c745417c14e318835f420733

This command was run using /export/servers/hadoop-2.8./share/hadoop/common/hadoop-common-2.8..jar

[root@jiang01 servers]#
查看hadoop版本
启动zk
[root@jiang01 servers]#

[root@jiang01 servers]# xcall.sh jps -l

============= jiang01 : jps -l ============

 org.apache.zookeeper.server.quorum.QuorumPeerMain

 sun.tools.jps.Jps

命令执行成功

============= jiang02 : jps -l ============

 sun.tools.jps.Jps

 org.apache.zookeeper.server.quorum.QuorumPeerMain

命令执行成功

============= jiang03 : jps -l ============

 org.apache.zookeeper.server.quorum.QuorumPeerMain

 sun.tools.jps.Jps

命令执行成功

[root@jiang01 servers]# xcall.sh zkServer.sh status

============= jiang01 : zkServer.sh status ============

ZooKeeper JMX enabled by default

Using config: /export/servers/zookeeper-3.4./bin/../conf/zoo.cfg

Mode: follower

命令执行成功

============= jiang02 : zkServer.sh status ============

ZooKeeper JMX enabled by default

Using config: /export/servers/zookeeper-3.4./bin/../conf/zoo.cfg

Mode: leader

命令执行成功

============= jiang03 : zkServer.sh status ============

ZooKeeper JMX enabled by default

Using config: /export/servers/zookeeper-3.4./bin/../conf/zoo.cfg

Mode: follower

命令执行成功

[root@jiang01 servers]#
启动zk
在你配置的各个journalnode节点启动该进程
[root@jiang01 servers]#

[root@jiang01 servers]# xcall.sh hadoop-daemon.sh start journalnode

============= jiang01 : hadoop-daemon.sh start journalnode ============

starting journalnode, logging to /export/servers/hadoop-2.8./logs/hadoop-root-journalnode-jiang01.out

命令执行成功

============= jiang02 : hadoop-daemon.sh start journalnode ============

starting journalnode, logging to /export/servers/hadoop-2.8./logs/hadoop-root-journalnode-jiang02.out

命令执行成功

============= jiang03 : hadoop-daemon.sh start journalnode ============

starting journalnode, logging to /export/servers/hadoop-2.8./logs/hadoop-root-journalnode-jiang03.out

命令执行成功

[root@jiang01 servers]#
启动journalnode
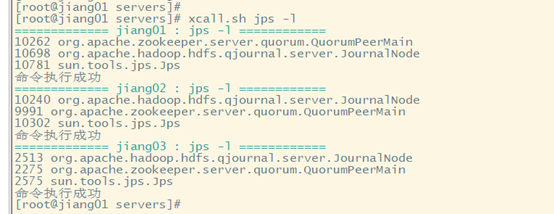
先选取一个namenode(jiang01)节点进行格式化
[root@jiang01 servers]# hadoop namenode -format
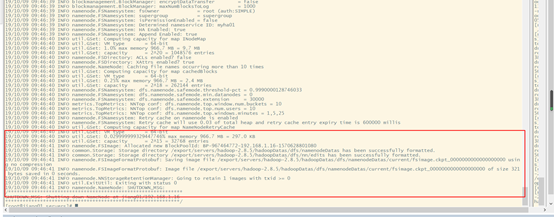
格式化zkfc,只能在nameonde节点进行
主节点上面启动 dfs文件系统:
[root@jiang01 dfs]# start-dfs.sh
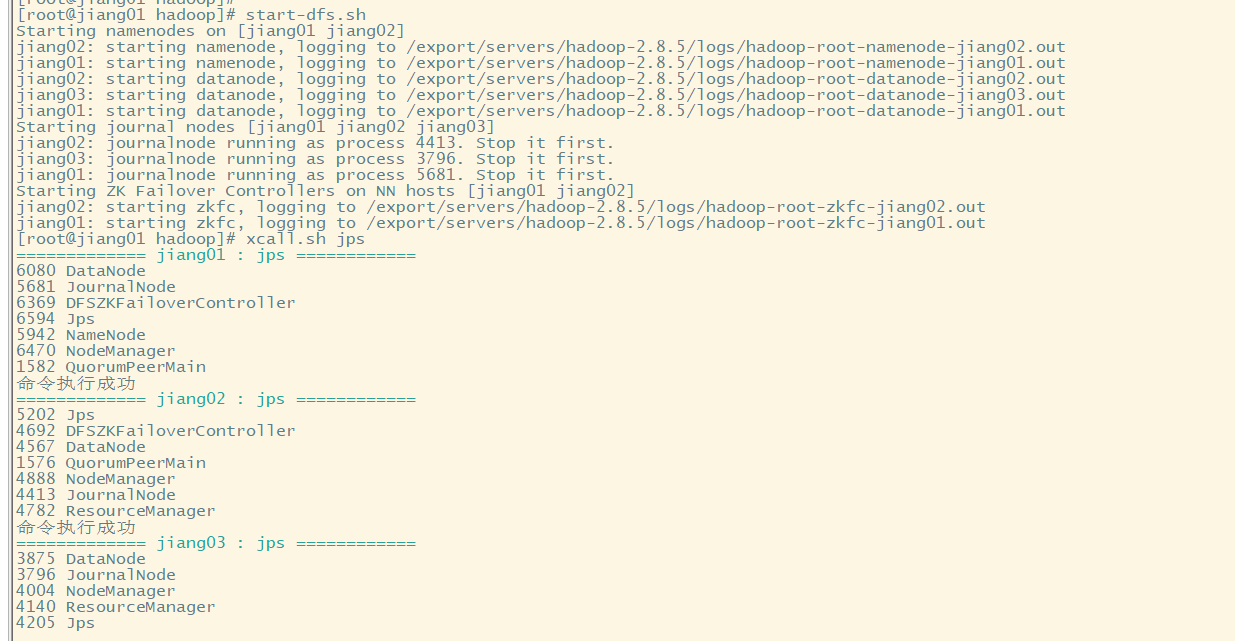
jiang002启动yarm
[root@jiang02 mapreduce]# start-yarn.sh

starting yarn daemons

starting resourcemanager, logging to /export/servers/hadoop-2.8./logs/yarn-root-resourcemanager-jiang02.out

jiang03: starting nodemanager, logging to /export/servers/hadoop-2.8./logs/yarn-root-nodemanager-jiang03.out

jiang01: starting nodemanager, logging to /export/servers/hadoop-2.8./logs/yarn-root-nodemanager-jiang01.out

jiang02: starting nodemanager, logging to /export/servers/hadoop-2.8./logs/yarn-root-nodemanager-jiang02.out

[root@jiang02 mapreduce]#
jiang03启动:resourcemanager
[root@jiang03 hadoopDatas]#  yarn-daemon.sh start resourcemanager

starting resourcemanager, logging to /export/servers/hadoop-2.8./logs/yarn-root-resourcemanager-jiang03.out
hadoop wordcount程序启动:
1 cd /export/servers/hadoop-2.8.5/share/hadoop/mapreduce/
2 生成数据文件:
touch word.txt

echo "hello world" >> word.txt

echo "hello hadoop" >> word.txt

echo "hello hive" >> word.txt
3 创建hadoop 文件目录
hdfs dfs -mkdir -p /work/data/input
4 向hadoop上传数据文件
hdfs dfs -put ./word.txt /work/data/input
5 计算例子
hadoop jar hadoop-mapreduce-examples-2.8..jar wordcount /work/data/input /work/data/output
6 查看结果:
[root@jiang01 mapreduce]# hadoop jar hadoop-mapreduce-examples-2.8..jar wordcount /work/data/input /work/data/output

// :: INFO input.FileInputFormat: Total input files to process :

// :: INFO mapreduce.JobSubmitter: number of splits:

// :: INFO mapreduce.JobSubmitter: Submitting tokens for job: job_1570635804389_0001

// :: INFO impl.YarnClientImpl: Submitted application application_1570635804389_0001

// :: INFO mapreduce.Job: The url to track the job: http://jiang02:8088/proxy/application_1570635804389_0001/

// :: INFO mapreduce.Job: Running job: job_1570635804389_0001

// :: INFO mapreduce.Job: Job job_1570635804389_0001 running in uber mode : false

// :: INFO mapreduce.Job:  map % reduce %

// :: INFO mapreduce.Job:  map % reduce %

// :: INFO mapreduce.Job:  map % reduce %

// :: INFO mapreduce.Job: Job job_1570635804389_0001 completed successfully

// :: INFO mapreduce.Job: Counters:

        File System Counters

                FILE: Number of bytes read=

                FILE: Number of bytes written=

                FILE: Number of read operations=

                FILE: Number of large read operations=

                FILE: Number of write operations=

                HDFS: Number of bytes read=

                HDFS: Number of bytes written=

                HDFS: Number of read operations=

                HDFS: Number of large read operations=

                HDFS: Number of write operations=

        Job Counters

                Launched map tasks=

                Launched reduce tasks=

                Data-local map tasks=

                Total time spent by all maps in occupied slots (ms)=

                Total time spent by all reduces in occupied slots (ms)=

                Total time spent by all map tasks (ms)=

                Total time spent by all reduce tasks (ms)=

                Total vcore-milliseconds taken by all map tasks=

                Total vcore-milliseconds taken by all reduce tasks=

                Total megabyte-milliseconds taken by all map tasks=

                Total megabyte-milliseconds taken by all reduce tasks=

        Map-Reduce Framework

                Map input records=

                Map output records=

                Map output bytes=

                Map output materialized bytes=

                Input split bytes=

                Combine input records=

                Combine output records=

                Reduce input groups=

                Reduce shuffle bytes=

                Reduce input records=

                Reduce output records=

                Spilled Records=

                Shuffled Maps =

                Failed Shuffles=

                Merged Map outputs=

                GC time elapsed (ms)=

                CPU time spent (ms)=

                Physical memory (bytes) snapshot=

                Virtual memory (bytes) snapshot=

                Total committed heap usage (bytes)=

        Shuffle Errors

                BAD_ID=

                CONNECTION=

                IO_ERROR=

                WRONG_LENGTH=

                WRONG_MAP=

                WRONG_REDUCE=

        File Input Format Counters

                Bytes Read=

        File Output Format Counters

                Bytes Written=

大数据集群环境搭建之一 hadoop-ha高可用安装的更多相关文章
- 大数据集群环境搭建之一 Centos基本环境准备
首先需要准备的软件都有:Centos系统.SecureCRT 8.5.VMware Workstation Pro.jdk-8u172-linux-x64.tar.gz基本上这个软件就是今天的战场. ...
- Cloudera Manager大数据集群环境搭建
笔者安装CDH集群是参照官方文档:https://www.cloudera.com/documentation/enterprise/latest/topics/cm_ig_install_path_ ...
- 【Hadoop离线基础总结】大数据集群环境准备
大数据集群环境准备 三台虚拟机关闭防火墙 centOS 7 service firewalld stop ->关闭防火墙 chkconfig firewalld off ->开机关闭防火墙 ...
- 全网最详细的大数据集群环境下多个不同版本的Cloudera Hue之间的界面对比(图文详解)
不多说,直接上干货! 为什么要写这么一篇博文呢? 是因为啊,对于Hue不同版本之间,其实,差异还是相对来说有点大的,具体,大家在使用的时候亲身体会就知道了,比如一些提示和界面. 安装Hue后的一些功能 ...
- Hadoop HA高可用集群搭建(Hadoop+Zookeeper+HBase)
声明:作者原创,转载注明出处. 作者:帅气陈吃苹果 一.服务器环境 主机名 IP 用户名 密码 安装目录 master188 192.168.29.188 hadoop hadoop /home/ha ...
- 全网最详细的大数据集群环境下如何正确安装并配置多个不同版本的Cloudera Hue(图文详解)
不多说,直接上干货! 为什么要写这么一篇博文呢? 是因为啊,对于Hue不同版本之间,其实,差异还是相对来说有点大的,具体,大家在使用的时候亲身体会就知道了,比如一些提示和界面. 全网最详细的大数据集群 ...
- CDH版本大数据集群下搭建的Hue详细启动步骤(图文详解)
关于安装请见 CDH版本大数据集群下搭建Hue(hadoop-2.6.0-cdh5.5.4.gz + hue-3.9.0-cdh5.5.4.tar.gz)(博主推荐) Hue的启动 也就是说,你Hue ...
- 大数据集群环境 zookeeper集群环境安装
大数据集群环境 zookeeper集群环境准备 zookeeper集群安装脚本,如果安装需要保持zookeeper保持相同目录,并且有可执行权限,需要准备如下 编写脚本: vi zkInstall.s ...
- linux -- 基于zookeeper搭建yarn的HA高可用集群
linux -- 基于zookeeper搭建yarn的HA高可用集群 实现方式:配置yarn-site.xml配置文件 <configuration> <property> & ...
随机推荐
- [PHP] layui实现多图上传,图片自由排序,自由删除
实现效果如下图所示: 实现代码: css代码 <style> .layui-upload-img { width: 90px; height: 90px; margin: ; } .pic ...
- Web项目中使用Log4net 案例
简介: 几乎所有的大型应用都会有自己的用于跟踪调试的API.因为一旦程序被部署以后,就不太可能再利用专门的调试工具了.然而一个管理员可能需要有一套强大的日志系统来诊断和修复配置上的问题. 经验表明,日 ...
- [BZ1925] [SDOI2010]地精部落
[BZ1925] [SDOI2010]地精部落 传送门 一道很有意思的DP题. 我们发现因为很难考虑每个排列中的数是否使用过,所以我们想到只维护相对关系. 当我们考虑新的一个位置时,给新的位置的数分配 ...
- [Gamma]Scrum Meeting#10
github 本次会议项目由PM召开,时间为6月5日晚上10点30分 时长15分钟 任务表格 人员 昨日工作 下一步工作 木鬼 撰写博客,组织例会 撰写博客,组织例会 swoip 前端显示屏幕,翻译坐 ...
- Lab2:物理内存管理
前言 现在内存管理的方法都是非连续内存管理,也就是结合段机制和分页机制 段机制 段地址空间 进程的段地址空间由多个段组成,比如代码段.堆栈段和符号表段等等 段对应一个连续的内存"块" ...
- java 获取类路径
package com.jason.test; import java.io.File; import java.io.IOException; import java.net.URL; public ...
- Navicat 连接远程数据库报错:2003 - Can‘’t connect to MySQL server on 'XX.XX.XX.XX' (10061)
Navicat 连接远程数据库报错:2003 - Can‘’t connect to MySQL server on '172.22.69.190' (10061) 一.原因 远程数据库使用了默认设 ...
- 什么是 ZFS文件系统?ZFS概念及特点简介
什么是 ZFS? ZFS(Zettabyte File System)是由SUN公司的Jeff Bonwick领导设计的一种基于Solaris的文件系统,最初发布于20014年9月14日. SUN被O ...
- slf4j log4j logback
最先大家写日志都用log4j,后来作者勇于创新,又搞了个logback,又为了统一江湖,来了个slf4j,所以目前在代码中进行日志输出,推荐使用slf4j,这样在运行时,你可以决定到底是用log4j还 ...
- Java安装 --- jdk 和eclipse tomcat
本文主要使用win7进行安装 安装jdk jdk: 这里面有四个版本78910,会持续增加 链接:https://pan.baidu.com/s/1LTauKbBJKQVOvlbHx2dTwQ提取 ...