从源码角度一步一步来修改PreferenceActivity界面


PreferenceActivity给我们封装好了一个数据存储对象,我们只需要在xml文件中写上控件即可完成简单的设置界面。但是系统提供的设置界面十分的简陋,要想做的好看必须要自己来进行修改。本文就是一步一步教大家如何定义自己的PreferenceActivity界面。
一、创建模块一(选择模块组)

先在res/xml文件夹中定义一个customer_prefs.xml文件(名字自定),建立根节点
<PreferenceScreen xmlns:android="http://schemas.android.com/apk/res/android" >

  ……

</PreferenceScreen>
我们的每一个选项组都是一个PreferenceCategory,所以我们在节点中定义这个标签。
<PreferenceCategory

        android:layout="@layout/prefs_category_widget"

        android:title="选择模块组" >

        <!-- 开关:定义了自定义的widget -->

        <CheckBoxPreference

            android:defaultValue="true"

            android:icon="@drawable/appstore"

            android:key="checkbox_preference"

            android:layout="@layout/prefs_list_s_item"

            android:title="开关"

            android:widgetLayout="@layout/checkbox_prefs_widget" />

        <!-- 单选:弹出一个单选list,选中的值会出现在摘要中 -->

        <com.kale.preference.MyListPreference

            android:dialogTitle="dialog_title_list_preference"

            android:entries="@array/floatColor"

            android:entryValues="@array/floatColor_value"

            android:icon="@drawable/itunes"

            android:key="list_preference"

            android:layout="@layout/prefs_list_s_item"

            android:summary="用单选列表来选择数据"

            android:title="单选列表" />

        <!-- 多选:弹出多选列表,选中的项目会出现在摘要中。这里的摘要由代码控制,所以请不要书写 -->

        <com.kale.preference.MyMultiSelectListPreference

            android:entries="@array/floatColor"

            android:entryValues="@array/floatColor_value"

            android:key="mult_preference"

            android:layout="@layout/prefs_list_s_item"

            android:title="多选列表" />

    </PreferenceCategory>
我们注意到在PreferenceCategory节点中有android:layout属性,这个属性就是定义这个模块组的头部视图的。在这个layout中的textview的id必须是安卓自己的id,也就是title,这样我们在xml中设置的title就会对应到这个布局的文字上,才能有效!
<PreferenceCategory

        android:layout="@layout/prefs_category_widget"

        android:title="选择模块组" >

    </PreferenceCategory>
prefs_category_widget
 对应到布局就是->
<?xml version="1.0" encoding="UTF-8"?>

<LinearLayout xmlns:android="http://schemas.android.com/apk/res/android"

    android:layout_width="fill_parent"

    android:layout_height="wrap_content"

    android:background="#ededed"

    android:orientation="vertical" >

    <ImageView

        android:layout_width="match_parent"

        android:layout_height="1dp"

        android:src="#d9d9d9" />

    <ImageView

        android:layout_width="match_parent"

        android:layout_height="1dp"

        android:layout_marginBottom="16dp"

        android:src="#e2e2e2" />

    <TextView

        android:id="@android:id/title"

        android:layout_width="match_parent"

        android:layout_height="wrap_content"

        android:layout_marginBottom="2dp"

        android:paddingLeft="6dp"

        android:text="title"

        android:textColor="#939393"

        android:textSize="14sp" />

    <ImageView

        android:layout_width="match_parent"

        android:layout_height="0.5dp"

        android:src="#e9e9e9" />

</LinearLayout>
接下来我们在PreferenceCategory里面写上了我们的控件,这里我们放的是一个checkbox,一个单选list,一个多选List
title:控件上的主文字
defaultValue:默认的值
icon:左边的图标
key:这个控件的key(必须有),系统是通过这个key来存放数据的
layout:这个控件的布局文件

<?xml version="1.0" encoding="UTF-8"?>

<LinearLayout xmlns:android="http://schemas.android.com/apk/res/android"

    android:layout_width="match_parent"

    android:layout_height="wrap_content"

    android:background="@drawable/selector_item"

    android:gravity="center_vertical"

    android:minHeight="50dp"

    android:orientation="horizontal"

    android:paddingLeft="16dp"

    android:paddingRight="16dp" >

    <ImageView

        android:id="@android:id/icon"

        android:layout_width="40dp"

        android:layout_height="40dp"

        android:layout_gravity="center_vertical"

        android:layout_marginRight="6dp"

        android:scaleType="fitCenter"

        android:src="@drawable/appstore" />

    <RelativeLayout

        android:layout_width="wrap_content"

        android:layout_height="wrap_content"

        android:layout_marginBottom="4dp"

        android:layout_marginTop="4dp" >

        <TextView

            android:id="@android:id/title"

            android:layout_width="wrap_content"

            android:layout_height="wrap_content"

            android:layout_centerVertical="true"

            android:ellipsize="marquee"

            android:fadingEdge="horizontal"

            android:singleLine="true"

            android:text="title"

            android:textColor="#4d4d4d"

            android:textSize="18.0sp" />

        <TextView

            android:id="@android:id/summary"

            android:layout_width="wrap_content"

            android:layout_height="wrap_content"

            android:layout_centerVertical="true"

            android:layout_alignParentRight="true"

            android:layout_toLeftOf="@android:id/widget_frame"

            android:maxLines="2"

            android:text="summary"

            android:textColor="#AAAAAA"

            android:textSize="14sp" />

        <FrameLayout

            android:id="@android:id/widget_frame"

            android:layout_width="wrap_content"

            android:layout_height="wrap_content"

            android:layout_alignParentRight="true"

            android:layout_centerVertical="true"

            android:layout_marginLeft="4dp"

            android:gravity="center_vertical" >

        </FrameLayout>


    </RelativeLayout>

</LinearLayout>
widgetLayout:这个控件右边的一个布局中的布局文件,就是上面layout布局中,id为widget_frame的布局中要填入的布局。我在checkboxpreference中就定义了这个属性,放上了自定义的checkbox。这是布局文件:
checkbox_prefs_widget.xml


<?xml version="1.0" encoding="UTF-8"?>

<!-- 这里放上系统的id -->

<CheckBox xmlns:android="http://schemas.android.com/apk/res/android"

    android:id="@android:id/checkbox"

    android:layout_width="wrap_content"

    android:layout_height="wrap_content"

    android:layout_gravity="center_vertical"

    android:button="@drawable/selector_checkbox"

    android:clickable="false"

    android:focusable="false" />
summary:控件的摘要(说明)文字
entries:在单选/多选列表中,显示的选项信息。功能:给用户看
entryValues:在单选/多选列表中,选项信息对应的值。系统最后户把这个控件的key和这个值,以键值对的形式进行存放。
 <string-array name="floatColor">

        <item>白</item>

        <item>蓝</item>

        <item>灰</item>

        <item>胖丁</item>

        <item>布丁</item>

        <item>皮卡丘</item>

    </string-array>

    <string-array name="floatColor_value">

        <item>white</item>

        <item>blue</item>

        <item>gray</item>

        <item>pangding</item>

        <item>buding</item>

        <item>pikaqiu</item>

    </string-array>
第一个模块的全部布局
    <PreferenceCategory

        android:layout="@layout/prefs_category_widget"

        android:title="选择模块组" >

        <!-- 开关:定义了自定义的widget -->

        <CheckBoxPreference

            android:defaultValue="true"

            android:icon="@drawable/appstore"

            android:key="checkbox_preference"

            android:layout="@layout/prefs_list_s_item"

            android:title="开关"

            android:widgetLayout="@layout/checkbox_prefs_widget" />

        <!-- 单选:弹出一个单选list,选中的值会出现在摘要中 -->

        <com.kale.preference.MyListPreference

            android:dialogTitle="dialog_title_list_preference"

            android:entries="@array/floatColor"

            android:entryValues="@array/floatColor_value"

            android:icon="@drawable/itunes"

            android:key="list_preference"

            android:layout="@layout/prefs_list_s_item"

            android:summary="用单选列表来选择数据"

            android:title="单选列表" />

        <!-- 多选:弹出多选列表,选中的项目会出现在摘要中。这里的摘要由代码控制,所以请不要书写 -->

        <com.kale.preference.MyMultiSelectListPreference

            android:entries="@array/floatColor"

            android:entryValues="@array/floatColor_value"

            android:key="mult_preference"

            android:layout="@layout/prefs_list_s_item"

            android:title="多选列表" />

    </PreferenceCategory>
这里面用到了我自定的两个类,一个是单选菜单,一个是多选菜单。其实我就是继承了原本的类,然后让原本的summary中显示我们选中的值而已。下面是两个类的代码,很简单。
MyListPreference
package com.kale.preference;

import android.content.Context;

import android.preference.ListPreference;

import android.util.AttributeSet;

import android.view.View;

public class MyListPreference extends ListPreference{

    public MyListPreference(Context context, AttributeSet attrs) {

        super(context, attrs);

    }

    public MyListPreference(Context context) {

        this(context, null);

    }

    @Override

    protected void onBindView(View view) {

        super.onBindView(view);

        setSummary(getEntry() == null?getSummary():getEntry());

        //setSummary(getEntry());

    }

}
MyMultiSelectListPreference
package com.kale.preference;

import java.util.Set;

import android.content.Context;

import android.preference.MultiSelectListPreference;

import android.util.AttributeSet;

import android.view.View;

public class MyMultiSelectListPreference extends MultiSelectListPreference {

    public MyMultiSelectListPreference(Context context) {

        super(context);

    }

    public MyMultiSelectListPreference(Context context, AttributeSet attrs) {

        super(context, attrs);

    }

    /**

     * @return 列表选中状态的数组

     */

    private boolean[] getSelectedItems() {

        final CharSequence[] entries = getEntryValues();

        final int entryCount = entries.length;

        final Set<String> values = getValues();

        boolean[] result = new boolean[entryCount];

        for (int i = 0; i < entryCount; i++) {

            result[i] = values.contains(entries[i].toString());

        }

        return result;

    }

    private void updateSummary() {

        setSummary(" ");

        CharSequence[] c = getEntries();// 得到列表值数组

        String str = (String) getSummary();// 得到列表选择状态数组

        for (int i = 0; i < getSelectedItems().length; i++) {

            if (getSelectedItems()[i]) {

                str += (String) c[i] + ",";

            }

        }

        str = str.substring(0, str.length() - 1);// 去除最后一个逗号

        // 设置摘要的内容

        setSummary(str);

    }

    @Override

    protected void onBindView(View view) {

        super.onBindView(view);

        int i;

        for (i = 0; i < getSelectedItems().length; i++) {

            if (getSelectedItems()[i] == true) {

                updateSummary();

                break;

            }

        }

        if (i == getSelectedItems().length) {

            setSummary("");

        }

    }

    @Override

    protected void onDialogClosed(boolean positiveResult) {

        super.onDialogClosed(positiveResult);

        int i;

        for (i = 0; i < getSelectedItems().length; i++) {

            if (getSelectedItems()[i] == true) {

                updateSummary();

                break;

            }

        }

        if (i == getSelectedItems().length) {

            setSummary("");

        }

    }

}
于是我们第一个模块组就大功告成了!

--------------------------------------------------------------------------------------------
二、创建模块二(特殊模块组)

这个模块中有两个新的属性
negativeButtonText:设置对话框中取消按钮的文字
positiveButtonText:设置对话框中确定按钮的文字,点击确定后会将值保存下来
通过前面的铺垫,我们现在可以直接看懂以下的代码了
 <PreferenceCategory

        android:layout="@layout/prefs_category_widget"

        android:title="特殊模块组" >

        <!-- 输入框模块:输入的文字出现在摘要中 -->

        <com.kale.preference.MyEditTextPreference

            android:dialogIcon="@drawable/itunes"

            android:dialogTitle="请输入要保存的文字"

            android:key="edittext_preference"

            android:layout="@layout/prefs_list_s_item"

            android:negativeButtonText="cancel"

            android:positiveButtonText="ok"

            android:summary="点击输入文字"

            android:title="文本输入" />

        <!-- 滑动条模块:点击后出现滑动条对话框 -->

        <com.kale.preference.MySeekBarDialogPreference

            android:dialogLayout="@layout/seekbar_dialog_prefs_widget"

            android:dialogTitle="滑动来选择数值"

            android:key="seekbar_dialog_preference"

            android:layout="@layout/prefs_list_s_item"

            android:negativeButtonText="cancel"

            android:positiveButtonText="ok"

            android:summary="点击选择大小"

            android:title="滑动选择" />

        <com.kale.preference.MySeekBarPreference

            android:key="seekbar_preference"

            android:layout="@layout/prefs_list_s_item"

            android:summary="点击选择大小"

            android:title="滑动条"

            android:widgetLayout="@layout/arrow_widget" />

    </PreferenceCategory>
MyEditTextPreference,MySeekBarDialogPreference,MySeekBarPreference都是我自己定义的类,功能还是将所输入的/所选择的值显示到summary中。
MyEditTextPreference
package com.kale.preference;

import android.content.Context;

import android.preference.EditTextPreference;

import android.util.AttributeSet;

import android.view.View;

public class MyEditTextPreference extends EditTextPreference {

    public MyEditTextPreference(Context context, AttributeSet attrs,

            int defStyle) {

        super(context, attrs, defStyle);

    }

    public MyEditTextPreference(Context context, AttributeSet attrs) {

        super(context, attrs);

    }

    @Override

    protected void onBindView(View view) {

        super.onBindView(view);

        setSummary(getText() == null?getSummary():getText());

    }

}
MySeekBarDialogPreference
/*

 * Copyright (C) 2007 The Android Open Source Project

 *

 * Licensed under the Apache License, Version 2.0 (the "License");

 * you may not use this file except in compliance with the License.

 * You may obtain a copy of the License at

 *

 *      http://www.apache.org/licenses/LICENSE-2.0

 *

 * Unless required by applicable law or agreed to in writing, software

 * distributed under the License is distributed on an "AS IS" BASIS,

 * WITHOUT WARRANTIES OR CONDITIONS OF ANY KIND, either express or implied.

 * See the License for the specific language governing permissions and

 * limitations under the License.

 */

package com.kale.preference;

import android.content.Context;

import android.content.SharedPreferences;

import android.graphics.drawable.Drawable;

import android.preference.DialogPreference;

import android.util.AttributeSet;

import android.view.View;

import android.widget.ImageView;

import android.widget.SeekBar;

import android.widget.TextView;

import android.widget.SeekBar.OnSeekBarChangeListener;

import com.kale.shared.R;

public class MySeekBarDialogPreference extends DialogPreference implements

        OnSeekBarChangeListener {

    //private static final String TAG = "SeekBarDialogPreference";

    private Drawable mMyIcon;

    private TextView value;

    private SeekBar seekBar;

    // 如果要修改最大值和最小值的话,那么可以在这里修改。或者是调用函数setMax、setMin

    private int mMax = 100, mMin = 0;

    private int mProgress;

    public MySeekBarDialogPreference(Context context, AttributeSet attrs) {

        super(context, attrs);

        setDialogLayoutResource(R.layout.seekbar_dialog_prefs_widget);

        // Steal the XML dialogIcon attribute's value

        mMyIcon = getDialogIcon();

        setDialogIcon(null);

    }

    public MySeekBarDialogPreference(Context context) {

        this(context, null);

    }

    public void setMax(int max) {

        if (max != mMax) {

            mMax = max;

            notifyChanged();

        }

    }

    public void setMin(int min) {

        if (min != mMin) {

            mMin = min;

            notifyChanged();

        }

    }

    /**

     * Saves the progress to the {@link SharedPreferences}.

     *

     * @param text

     *            The progress to save

     */

    public void setProgress(int progress) {

        final boolean wasBlocking = shouldDisableDependents();

        mProgress = progress;

        persistInt(mProgress);

        final boolean isBlocking = shouldDisableDependents();

        if (isBlocking != wasBlocking) {

            notifyDependencyChange(isBlocking);

        }

    }

    /**

     * Gets the text from the {@link SharedPreferences}.

     *

     * @return The current preference value.

     */

    public int getProgress() {

        return mProgress;

    }

    @Override

    protected void onBindView(View view) {

        super.onBindView(view);

        mProgress = getPersistedInt(getProgress());

        setSummary(String.valueOf(mProgress));

    }

    @Override

    protected void onBindDialogView(View view) {

        super.onBindDialogView(view);

        final ImageView iconView = (ImageView) view.findViewById(android.R.id.icon);

        value = (TextView)view.findViewById(R.id.value);

        if (mMyIcon != null) {

            iconView.setImageDrawable(mMyIcon);

        } else {

            iconView.setVisibility(View.GONE);

        }

        seekBar = getSeekBar(view);

        seekBar.setMax(mMax-mMin);

        seekBar.setProgress(mProgress);

        seekBar.setOnSeekBarChangeListener(this);

        value.setText(String.valueOf(mProgress));

    }

    @Override

    protected void onDialogClosed(boolean positiveResult) {

        super.onDialogClosed(positiveResult);

        // 如果没按下确定按钮就返回null

        if (!positiveResult) {

            return;

        }

        if (shouldPersist()) {

            persistInt(mProgress);

            setSummary(String.valueOf(mProgress));

        }

        // 提交数据

        notifyChanged();

    }

    protected static SeekBar getSeekBar(View dialogView) {

        return (SeekBar) dialogView.findViewById(R.id.seekbar);

    }

    @Override

    public CharSequence getSummary() {

        String summary = super.getSummary().toString();

        int value = getPersistedInt(mProgress);

        return String.format(summary, value);

    }

    @Override

    public void onProgressChanged(SeekBar seekBar, int progress,

            boolean fromUser) {

        value.setText(String.valueOf(progress));

    }

    @Override

    public void onStartTrackingTouch(SeekBar seekBar) {

        // TODO 自动生成的方法存根

    }

    @Override

    public void onStopTrackingTouch(SeekBar seekBar) {

        // TODO 自动生成的方法存根

        mProgress = seekBar.getProgress() + mMin;

    }

}
用到的布局文件:seekbar_dialog_prefs_widget.xml

<?xml version="1.0" encoding="UTF-8"?>

<!--

     Copyright (C) 2008 The Android Open Source Project

     Licensed under the Apache License, Version 2.0 (the "License");

     you may not use this file except in compliance with the License.

     You may obtain a copy of the License at

          http://www.apache.org/licenses/LICENSE-2.0

     Unless required by applicable law or agreed to in writing, software

     distributed under the License is distributed on an "AS IS" BASIS,

     WITHOUT WARRANTIES OR CONDITIONS OF ANY KIND, either express or implied.

     See the License for the specific language governing permissions and

     limitations under the License.

-->

<LinearLayout xmlns:android="http://schemas.android.com/apk/res/android"

    android:layout_width="match_parent"

    android:layout_height="match_parent"

    android:gravity="center_horizontal"

    android:orientation="vertical" >

    <ImageView

        android:id="@android:id/icon"

        android:layout_width="wrap_content"

        android:layout_height="wrap_content"

        android:paddingTop="20dp" />

    <TextView

        android:id="@+id/value"

        android:paddingTop="20dp"

        android:layout_width="wrap_content"

        android:layout_height="wrap_content"

        android:layout_centerHorizontal="true"

        android:text="value"

        android:textSize="20sp"

        android:textColor="#aaaaaa" />

    <SeekBar

        android:id="@+id/seekbar"

        android:layout_width="match_parent"

        android:layout_height="wrap_content"

        android:padding="20dp" />

</LinearLayout>
MySeekBarPreference
/*

 * Copyright (C) 2011 The Android Open Source Project

 *

 * Licensed under the Apache License, Version 2.0 (the "License");

 * you may not use this file except in compliance with the License.

 * You may obtain a copy of the License at

 *

 *      http://www.apache.org/licenses/LICENSE-2.0

 *

 * Unless required by applicable law or agreed to in writing, software

 * distributed under the License is distributed on an "AS IS" BASIS,

 * WITHOUT WARRANTIES OR CONDITIONS OF ANY KIND, either express or implied.

 * See the License for the specific language governing permissions and

 * limitations under the License.

 */

package com.kale.preference;

import android.content.Context;

import android.os.Parcel;

import android.os.Parcelable;

import android.preference.Preference;

import android.util.AttributeSet;

import android.view.View;

import android.widget.SeekBar;

import android.widget.SeekBar.OnSeekBarChangeListener;

import android.widget.TextView;

import com.kale.shared.R;

public class MySeekBarPreference extends Preference implements OnSeekBarChangeListener {

    private TextView value;

    private int mProgress;

    private int mMax = 100;

    private boolean mTrackingTouch;

    public MySeekBarPreference(

            Context context, AttributeSet attrs, int defStyle) {

        super(context, attrs, defStyle);

        setMax(mMax);

        setLayoutResource(R.layout.seekbar_prefs);

    }

    public MySeekBarPreference(Context context, AttributeSet attrs) {

        this(context, attrs, 0);

    }

    public MySeekBarPreference(Context context) {

        this(context, null);

    }

    @Override

    protected void onBindView(View view) {

        super.onBindView(view);

        SeekBar seekBar = (SeekBar) view.findViewById(R.id.seekbar);

        seekBar.setMax(mMax);

        seekBar.setProgress(mProgress);

        seekBar.setEnabled(isEnabled());

        seekBar.setOnSeekBarChangeListener(this);

        value = (TextView)view.findViewById(R.id.value);

        value.setText(String.valueOf(mProgress));

    }

    @Override

    protected void onSetInitialValue(boolean restoreValue, Object defaultValue) {

        setProgress(restoreValue ? getPersistedInt(mProgress): (Integer) defaultValue);

    }

    public void setMax(int max) {

        if (max != mMax) {

            mMax = max;

            notifyChanged();

        }

    }

    public void setProgress(int progress) {

        setProgress(progress, true);

    }

    private void setProgress(int progress, boolean notifyChanged) {

        if (progress > mMax) {

            progress = mMax;

        }

        if (progress < 0) {

            progress = 0;

        }

        if (progress != mProgress) {

            mProgress = progress;

            persistInt(progress);

            if (notifyChanged) {

                notifyChanged();

            }

        }

    }

    public int getProgress() {

        return mProgress;

    }

    /**

     * Persist the seekBar's progress value if callChangeListener

     * returns true, otherwise set the seekBar's progress to the stored value

     */

    void syncProgress(SeekBar seekBar) {

        int progress = seekBar.getProgress();

        if (progress != mProgress) {

            if (callChangeListener(progress)) {

                setProgress(progress, false);

            } else {

                seekBar.setProgress(mProgress);

            }

        }

    }

    @Override

    public void onProgressChanged(SeekBar seekBar, int progress, boolean fromUser) {

        if (fromUser) {

            System.err.println("now value = "+progress);

        }

        if (fromUser && !mTrackingTouch) {

            syncProgress(seekBar);

        }

    }

    @Override

    public void onStartTrackingTouch(SeekBar seekBar) {

        mTrackingTouch = true;

    }

    @Override

    public void onStopTrackingTouch(SeekBar seekBar) {

        mTrackingTouch = false;

        if (seekBar.getProgress() != mProgress) {

            syncProgress(seekBar);

            value.setText(seekBar.getProgress()+"");

        }

    }

    @Override

    protected Parcelable onSaveInstanceState() {

        /*

         * Suppose a client uses this preference type without persisting. We

         * must save the instance state so it is able to, for example, survive

         * orientation changes.

         */

        final Parcelable superState = super.onSaveInstanceState();

        if (isPersistent()) {

            // No need to save instance state since it's persistent

            return superState;

        }

        // Save the instance state

        final SavedState myState = new SavedState(superState);

        myState.progress = mProgress;

        myState.max = mMax;

        return myState;

    }

    @Override

    protected void onRestoreInstanceState(Parcelable state) {

        if (!state.getClass().equals(SavedState.class)) {

            // Didn't save state for us in onSaveInstanceState

            super.onRestoreInstanceState(state);

            return;

        }

        // Restore the instance state

        SavedState myState = (SavedState) state;

        super.onRestoreInstanceState(myState.getSuperState());

        mProgress = myState.progress;

        mMax = myState.max;

        notifyChanged();

    }

    /**

     * SavedState, a subclass of {@link BaseSavedState}, will store the state

     * of MyPreference, a subclass of Preference.

     * <p>

     * It is important to always call through to super methods.

     */

    private static class SavedState extends BaseSavedState {

        int progress;

        int max;

        public SavedState(Parcel source) {

            super(source);

            // Restore the click counter

            progress = source.readInt();

            max = source.readInt();

        }

        @Override

        public void writeToParcel(Parcel dest, int flags) {

            super.writeToParcel(dest, flags);

            // Save the click counter

            dest.writeInt(progress);

            dest.writeInt(max);

        }

        public SavedState(Parcelable superState) {

            super(superState);

        }

    }

}
所用到的布局文件:seekbar_prefs.xml

<?xml version="1.0" encoding="utf-8"?>

<!--

     Copyright (C) 2011 The Android Open Source Project

     Licensed under the Apache License, Version 2.0 (the "License");

     you may not use this file except in compliance with the License.

     You may obtain a copy of the License at

          http://www.apache.org/licenses/LICENSE-2.0

     Unless required by applicable law or agreed to in writing, software

     distributed under the License is distributed on an "AS IS" BASIS,

     WITHOUT WARRANTIES OR CONDITIONS OF ANY KIND, either express or implied.

     See the License for the specific language governing permissions and

     limitations under the License.

-->

<!--

     Layout for a Preference in a PreferenceActivity. The

     Preference is able to place a specific widget for its particular

     type in the "widget_frame" layout.

-->

<LinearLayout xmlns:android="http://schemas.android.com/apk/res/android"

    android:layout_width="match_parent"

    android:layout_height="wrap_content"

    android:baselineAligned="false"

    android:gravity="center_vertical"

    android:background="@drawable/selector_item"

    android:minHeight="50dp"

    android:paddingLeft="16dp" >

    <LinearLayout

        android:layout_width="wrap_content"

        android:layout_height="match_parent"

        android:gravity="center"

        android:minWidth="0dp"

        android:orientation="horizontal" >

        <ImageView

            android:id="@+android:id/icon"

            android:layout_width="40dp"

            android:layout_height="40dp"

            android:layout_gravity="center"

            android:layout_marginRight="6dp"

            android:scaleType="fitCenter"

            android:src="@drawable/appstore" />

        <TextView

            android:id="@+android:id/title"

            android:layout_width="wrap_content"

            android:layout_height="wrap_content"

            android:ellipsize="marquee"

            android:fadingEdge="horizontal"

            android:singleLine="true"

            android:text="title"

            android:textAppearance="?android:attr/textAppearanceMedium" />

    </LinearLayout>

    <RelativeLayout

        android:layout_width="wrap_content"

        android:layout_height="wrap_content"

        android:layout_marginBottom="3dip"

        android:layout_marginLeft="16dip"

        android:layout_marginRight="6dip"

        android:layout_marginTop="3dip"

        android:layout_weight="1" >

        <!-- 注意:一定得设置进度条的高度,不然进度条会很高。  -->

        <TextView

            android:id="@+id/value"

            android:layout_width="wrap_content"

            android:layout_height="wrap_content"

            android:layout_alignParentTop="true"

            android:layout_centerHorizontal="true"

            android:maxLines="1"

            android:text="value"

            android:textAppearance="?android:attr/textAppearanceSmall"

            android:textColor="#aaaaaa" />

        <SeekBar

            android:id="@+id/seekbar"

            android:layout_width="match_parent"

            android:layout_height="wrap_content"

            android:maxHeight="3dp"

            android:minHeight="1dp"

            android:layout_below="@id/value"

            android:progressDrawable="@drawable/layer_list_progress"

            android:thumb="@drawable/thumb" />

    </RelativeLayout>

</LinearLayout>
于是,我们就完成了第二个模块的设置。

--------------------------------------------------------------------------------------------
三、第三个模块组的(触发模块组)
这个组里面有一个点击触发动作和自定义preference

<PreferenceCategory android:layout="@layout/prefs_category_widget" >

        <PreferenceScreen

            android:icon="@drawable/ic_launcher"

            android:layout="@layout/prefs_list_s_item"

            android:title="点击触发Intent动作" >

            <intent

                android:action="android.intent.action.VIEW"

                android:data="http://www.android.com" />

        </PreferenceScreen>

        <Preference

            android:key="my_prefs_key"

            android:layout="@layout/prefs_list_s_item"

            android:title="自定义Preference" >

        </Preference>

    </PreferenceCategory>
intent模块中我们设置一个action和data属性,这样点击它后,与之对应的Activity将被启动。这里实现的效果是启动浏览器来展示网页。
        <activity android:name="com.kale.shared.SecondLevelActivity" >

            <intent-filter>

                <action android:name="com.kale.intent.action.MY_ACTION" />

                <category android:name="android.intent.category.DEFAULT" />

            </intent-filter>

        </activity>
我们还自定义了一个preference,用来做一些特殊的操作。这个preference不用写什么自定义类,直接在这个的Activity中找到它既可。
package com.kale.shared;

import android.content.Intent;

import android.content.SharedPreferences;

import android.os.Bundle;

import android.preference.Preference;

import android.preference.Preference.OnPreferenceClickListener;

import android.preference.PreferenceActivity;

import android.widget.Toast;

public class MainActivity extends PreferenceActivity implements

        OnPreferenceClickListener {

    /** 自定义布局 **/

    Preference myPrefers = null;

    @SuppressWarnings("deprecation")

    @Override

    protected void onCreate(Bundle savedInstanceState) {

        super.onCreate(savedInstanceState);

        // 设置背景图,给activity设置后。所有fragment的背景都会改了,十分方便!

        // getWindow().setBackgroundDrawable(getResources().getDrawable(R.color.bgColor));

        // setContentView(R.layout.activity_main); 这里就不能设置布局了

        setContentView(R.layout.prefs_list_content);

        addPreferencesFromResource(R.xml.customer_prefs);

        // 初始化控件

        myPrefers = findPreference("my_prefs_key");

        myPrefers.setSummary("可以自定义布局和点击事件");

        myPrefers.setOnPreferenceClickListener(this);

    }

    @Override

    public boolean onPreferenceClick(Preference preference) {

        if (preference == myPrefers) {

            Toast.makeText(MainActivity.this, "自定义Preference被按下",

                    Toast.LENGTH_SHORT).show();

        }

        return false;

    }

}
现在,这个模块也定义好了。
--------------------------------------------------------------------------------------------
四、子父依赖模块组

这个模块存在一个依赖关系,子控件必须在父控件开启的时候才能进行操作,否则不可用。也就是说只有上面的父控件的开关开启,下面的子控件的开关才能用。
这里的关键属性是:android:dependency="parent_checkbox_preference",设置这个属性的控件表明自己是依托于parent_checkbox_preference这个控件的
  <PreferenceCategory

        android:layout="@layout/prefs_category_widget"

        android:title="子父依赖模块组" >

        <CheckBoxPreference

            android:icon="@drawable/camera"

            android:key="parent_checkbox_preference"

            android:layout="@layout/prefs_list_s_item"

            android:title="父选择控件"

            android:widgetLayout="@layout/checkbox_prefs_widget" />

        <!-- The visual style of a child is defined by this styled theme attribute. -->

        <!-- 子控件关联父控件,在父控件选中后子控件才可用 -->

        <!-- android:layout="?android:attr/preferenceLayoutChild" -->

        <CheckBoxPreference

            android:dependency="parent_checkbox_preference"

            android:icon="@drawable/calculator"

            android:key="child_checkbox_preference"

            android:layout="@layout/prefs_list_s_item"

            android:title="子控件(依托于父控件)"

            android:widgetLayout="@layout/checkbox_prefs_widget" />

    </PreferenceCategory>
--------------------------------------------------------------------------------------------
五、二级菜单模块组

点击任何一个栏目,就会跳到另一个Activity中进行操作,最后系统会将选择的值返回到这个Activity中。
<PreferenceCategory

        android:layout="@layout/prefs_category_widget"

        android:title="二级菜单模块组" >

        <PreferenceScreen

            android:layout="@layout/prefs_list_s_item"

            android:summary="点击进入二级菜单"

            android:title="传统方式的二级菜单" >

            <PreferenceCategory android:layout="@layout/prefs_category_widget" >

                <CheckBoxPreference

                    android:defaultValue="true"

                    android:key="cb21"

                    android:layout="@layout/prefs_list_item"

                    android:summaryOff="关闭"

                    android:summaryOn="开启"

                    android:title="功能1" />

                <SwitchPreference

                    android:defaultValue="true"

                    android:dialogTitle="点击后触发的功能"

                    android:key="autoScroll"

                    android:layout="@layout/prefs_list_item"

                    android:summaryOff="关闭"

                    android:summaryOn="开启"

                    android:title="自动滚动" />

                <ListPreference

                    android:dialogTitle="请选择"

                    android:entries="@array/onTouch"

                    android:entryValues="@array/onTouch_value"

                    android:key="list1"

                    android:layout="@layout/prefs_list_item"

                    android:summary="单选框"

                    android:title="android forum" />

                <EditTextPreference

                    android:defaultValue="Hello EditTextPreference"

                    android:dialogTitle="输入设置"

                    android:key="et1"

                    android:layout="@layout/prefs_list_item"

                    android:summary="点击输入"

                    android:title="EditTextPreference Sample" />

            </PreferenceCategory>

        </PreferenceScreen>

        <PreferenceScreen

            android:layout="@layout/prefs_list_s_item"

            android:title="启动一个Activity作二级菜单"

            android:widgetLayout="@layout/arrow_widget" >

            <intent android:action="com.kale.intent.action.MY_ACTION" />

        </PreferenceScreen>

        <Preference

            android:key="getValue_single_prefers"

            android:layout="@layout/prefs_list_s_item"

            android:summary="这是选择的值"

            android:title="有返回值的单选菜单" >

        </Preference>

        <Preference

            android:key="getValue_multi_prefers"

            android:layout="@layout/prefs_list_s_item"

            android:summary="这是选择的值"

            android:title="有返回值的多选菜单" >

        </Preference>

    </PreferenceCategory>
下面这种嵌套产生二级菜单的方式是系统给出的,很简单,但是扩展性很差。↓
    <PreferenceScreen

            android:layout="@layout/prefs_list_s_item"

            android:summary="点击进入二级菜单"

            android:title="传统方式的二级菜单" >

            <PreferenceCategory android:layout="@layout/prefs_category_widget" >

                <CheckBoxPreference

                    android:defaultValue="true"

                    android:key="cb21"

                    android:layout="@layout/prefs_list_item"

                    android:summaryOff="关闭"

                    android:summaryOn="开启"

                    android:title="功能1" />

                <SwitchPreference

                    android:defaultValue="true"

                    android:dialogTitle="点击后触发的功能"

                    android:key="autoScroll"

                    android:layout="@layout/prefs_list_item"

                    android:summaryOff="关闭"

                    android:summaryOn="开启"

                    android:title="自动滚动" />

                <ListPreference

                    android:dialogTitle="请选择"

                    android:entries="@array/onTouch"

                    android:entryValues="@array/onTouch_value"

                    android:key="list1"

                    android:layout="@layout/prefs_list_item"

                    android:summary="单选框"

                    android:title="android forum" />

                <EditTextPreference

                    android:defaultValue="Hello EditTextPreference"

                    android:dialogTitle="输入设置"

                    android:key="et1"

                    android:layout="@layout/prefs_list_item"

                    android:summary="点击输入"

                    android:title="EditTextPreference Sample" />

            </PreferenceCategory>

        </PreferenceScreen>
下面这个就是一个intent,点击后跳转到指定的Activity中去。是intent的隐式跳转。↓
     <PreferenceScreen

            android:layout="@layout/prefs_list_s_item"

            android:title="启动一个Activity作二级菜单"

            android:widgetLayout="@layout/arrow_widget" >

            <intent android:action="com.kale.intent.action.MY_ACTION" />

        </PreferenceScreen>
我定义了这样一个Activity来相应这个intent。
需要注意的是:这里面category节点必须定义,否则会出现找不到action的情况!
        <activity android:name="com.kale.shared.SecondLevelActivity" >

            <intent-filter>

                <action android:name="com.kale.intent.action.MY_ACTION" />

                <category android:name="android.intent.category.DEFAULT" />

            </intent-filter>

        </activity>
下面这种其实就是自定义了preference,点击后跳转到一个Activity中去。↓
      <Preference

            android:key="getValue_single_prefers"

            android:layout="@layout/prefs_list_s_item"

            android:summary="这是选择的值"

            android:title="有返回值的单选菜单" >

        </Preference>

        <Preference

            android:key="getValue_multi_prefers"

            android:layout="@layout/prefs_list_s_item"

            android:summary="这是选择的值"

            android:title="有返回值的多选菜单" >

        </Preference>
MainActivity
package com.kale.shared;

import android.content.Intent;

import android.content.SharedPreferences;

import android.os.Bundle;

import android.preference.Preference;

import android.preference.Preference.OnPreferenceClickListener;

import android.preference.PreferenceActivity;

import android.widget.Toast;

public class MainActivity extends PreferenceActivity implements

        OnPreferenceClickListener {

    /** 自定义布局 **/

    Preference myPrefers = null;

    Preference getValueSingPrefs,getValueMultiPrefs;

    SharedPreferences sp;

    SharedPreferences.Editor editor;

    @SuppressWarnings("deprecation")

    @Override

    protected void onCreate(Bundle savedInstanceState) {

        super.onCreate(savedInstanceState);

        // 设置背景图,给activity设置后。所有fragment的背景都会改了,十分方便!

        // getWindow().setBackgroundDrawable(getResources().getDrawable(R.color.bgColor));

        // setContentView(R.layout.activity_main); 这里就不能设置布局了

        sp = getSharedPreferences("kaleShared", MODE_PRIVATE);

        editor = sp.edit();

        editor.putString("KEY", "value");

        editor.commit();

        if (sp.contains("KEY")) {

            System.out.println("have a key");

        }

        setContentView(R.layout.prefs_list_content);

        addPreferencesFromResource(R.xml.customer_prefs);

        // 初始化控件

        initPrefers();

        myPrefers.setSummary("可以自定义布局和点击事件");

        myPrefers.setOnPreferenceClickListener(this);

        getValueSingPrefs.setOnPreferenceClickListener(this);

        getValueMultiPrefs.setOnPreferenceClickListener(this);

    }

    @Override

    public boolean onPreferenceClick(Preference preference) {

        if (preference == myPrefers) {

            Toast.makeText(MainActivity.this, "自定义Preference被按下",

                    Toast.LENGTH_SHORT).show();

        } else if (preference == getValueSingPrefs) {

            Intent intent = new Intent(MainActivity.this, SingleActivity.class);

            startActivityForResult(intent, 100);

        }

        else if (preference == getValueMultiPrefs) {

            Intent intent = new Intent(MainActivity.this, MultiActivity.class);

            startActivityForResult(intent, 120);

        }

        return false;

    }

    @Override

    protected void onActivityResult(int requestCode, int resultCode, Intent data) {

        //如果返回码表示RESULT_OK,那么说明是从SecondActivity返回的intent

        if (resultCode == RESULT_OK) {

            //如果是100表示是返回给启动activity的intent(这里是我们的getValuePreference)的值

            switch (requestCode) {

            case 100:

                getValueSingPrefs.setSummary(data.getExtras().getString("osNameKey"));

                break;

            case 120:

                getValueMultiPrefs.setSummary(data.getExtras().getString("languageKey"));

                break;

            default:

                break;

            }

        }

    }

    @SuppressWarnings("deprecation")

    private void initPrefers() {

        myPrefers = findPreference("my_prefs_key");

        getValueSingPrefs = findPreference("getValue_single_prefers");

        getValueMultiPrefs = findPreference("getValue_multi_prefers");

    }

}
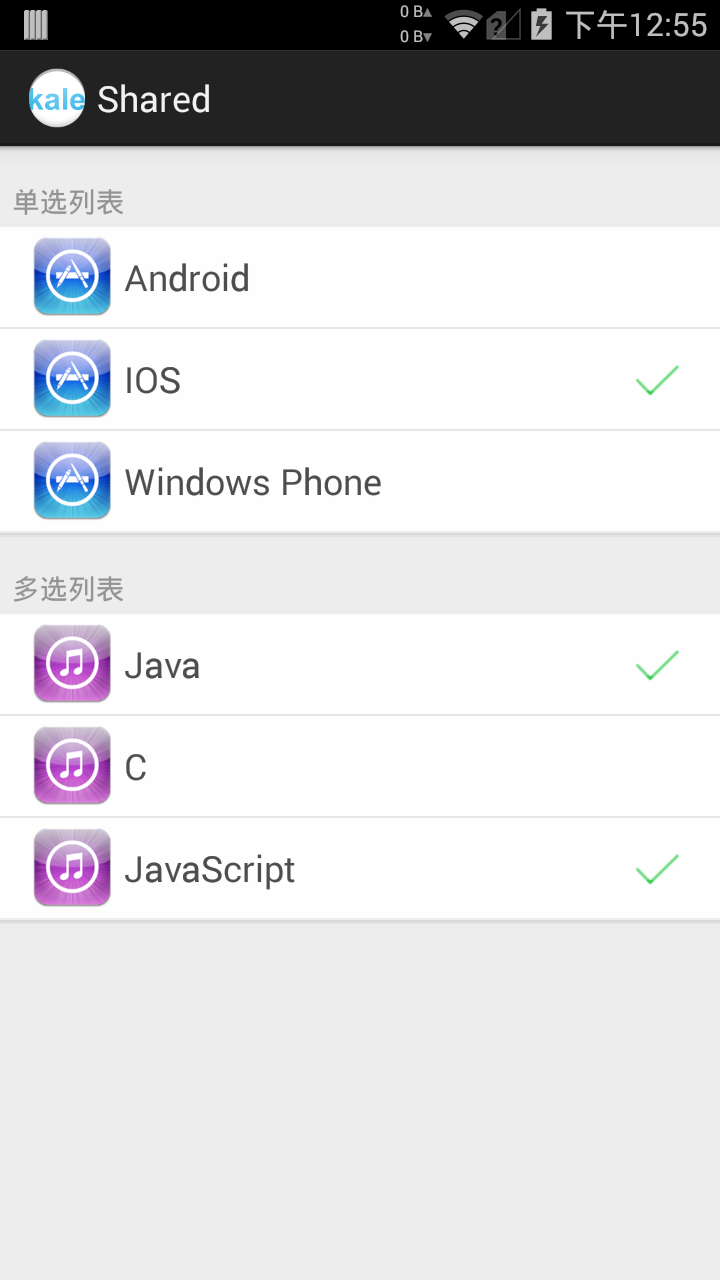
跳转的界面如下:

上面是单选列表,下面是多选列表。我已经写好了一个类,大家只需要找到这个activity中的所有checkboxpreference,然后通过一个方法就能设置为单选组和多选组了。很简单吧~
//添加到单选列表中
addToSingleChoiceList(android,ios,wp);
// 添加到多选列表中
addToMultiChoiceList("languageKey",java, c, js);
package com.kale.shared;

import android.os.Bundle;

import android.preference.CheckBoxPreference;

import com.kale.preference.ChoicePrefsActivity;

/**

 * @author:Jack Tony

 * @tips  :展现多选列表的界面

 * 初始化后将preference添加到多选列表中即可

 * addToSingleChoiceList(android,ios,wp);

 * @date  :2014-8-6

 */

@SuppressWarnings("deprecation")

public class MultiActivity extends ChoicePrefsActivity {

    CheckBoxPreference android,ios,wp;

    CheckBoxPreference java, c, js;

    @Override

    protected void onCreate(Bundle savedInstanceState) {

        super.onCreate(savedInstanceState);

        getWindow().setBackgroundDrawableResource(R.color.bgColor);

        setContentView(R.layout.prefs_list_content);

        addPreferencesFromResource(R.xml.second_level_prefs);

        initPreference();

        //添加到单选列表中

        addToSingleChoiceList(android,ios,wp);

        // 添加到多选列表中

        addToMultiChoiceList("languageKey",java, c, js);

    }

    private void initPreference() {

        android = (CheckBoxPreference) findPreference("android_prefs");

        ios = (CheckBoxPreference) findPreference("ios_prefs");

        wp = (CheckBoxPreference) findPreference("wp_prefs");

        java = (CheckBoxPreference) findPreference("java_prefs");

        c = (CheckBoxPreference) findPreference("c_prefs");

        js = (CheckBoxPreference) findPreference("js_prefs");

    }

}
在MainActivity中我用onActivityResult()取得在二级菜单中选中的值,并且赋值给summary。
package com.kale.shared;

import android.content.Intent;

import android.content.SharedPreferences;

import android.os.Bundle;

import android.preference.Preference;

import android.preference.Preference.OnPreferenceClickListener;

import android.preference.PreferenceActivity;

import android.widget.Toast;

public class MainActivity extends PreferenceActivity implements

        OnPreferenceClickListener {

    /** 自定义布局 **/

    Preference myPrefers = null;

    Preference getValueSingPrefs,getValueMultiPrefs;

    SharedPreferences sp;

    SharedPreferences.Editor editor;

    @SuppressWarnings("deprecation")

    @Override

    protected void onCreate(Bundle savedInstanceState) {

        super.onCreate(savedInstanceState);

        // 设置背景图,给activity设置后。所有fragment的背景都会改了,十分方便!

        // getWindow().setBackgroundDrawable(getResources().getDrawable(R.color.bgColor));

        // setContentView(R.layout.activity_main); 这里就不能设置布局了

        sp = getSharedPreferences("kaleShared", MODE_PRIVATE);

        editor = sp.edit();

        editor.putString("KEY", "value");

        editor.commit();

        if (sp.contains("KEY")) {

            System.out.println("have a key");

        }

        setContentView(R.layout.prefs_list_content);

        addPreferencesFromResource(R.xml.customer_prefs);

        // 初始化控件

        initPrefers();

        myPrefers.setSummary("可以自定义布局和点击事件");

        myPrefers.setOnPreferenceClickListener(this);

        getValueSingPrefs.setOnPreferenceClickListener(this);

        getValueMultiPrefs.setOnPreferenceClickListener(this);

    }

    @Override

    public boolean onPreferenceClick(Preference preference) {

        if (preference == myPrefers) {

            Toast.makeText(MainActivity.this, "自定义Preference被按下",

                    Toast.LENGTH_SHORT).show();

        } else if (preference == getValueSingPrefs) {

            Intent intent = new Intent(MainActivity.this, SingleActivity.class);

            startActivityForResult(intent, 100);

        }

        else if (preference == getValueMultiPrefs) {

            Intent intent = new Intent(MainActivity.this, MultiActivity.class);

            startActivityForResult(intent, 120);

        }

        return false;

    }

    @Override

    protected void onActivityResult(int requestCode, int resultCode, Intent data) {

        //如果返回码表示RESULT_OK,那么说明是从SecondActivity返回的intent

        if (resultCode == RESULT_OK) {

            //如果是100表示是返回给启动activity的intent(这里是我们的getValuePreference)的值

            switch (requestCode) {

            case 100:

                getValueSingPrefs.setSummary(data.getExtras().getString("osNameKey"));

                break;

            case 120:

                getValueMultiPrefs.setSummary(data.getExtras().getString("languageKey"));

                break;

            default:

                break;

            }

        }

    }

    @SuppressWarnings("deprecation")

    private void initPrefers() {

        myPrefers = findPreference("my_prefs_key");

        getValueSingPrefs = findPreference("getValue_single_prefers");

        getValueMultiPrefs = findPreference("getValue_multi_prefers");

    }

}
好啦,主要的讲解就到这里,下面附上源码。
源码下载:http://download.csdn.net/detail/shark0017/7726083
从源码角度一步一步来修改PreferenceActivity界面的更多相关文章
- 从源码角度深入理解Toast
Toast这个东西我们在开发中经常用到,使用也很简单,一行代码就能搞定: 1: Toast.makeText(", Toast.LENGTH_LONG).show(); 但是我们经常会遇到这 ...
- 从template到DOM(Vue.js源码角度看内部运行机制)
写在前面 这篇文章算是对最近写的一系列Vue.js源码的文章(https://github.com/answershuto/learnVue)的总结吧,在阅读源码的过程中也确实受益匪浅,希望自己的这些 ...
- 【react】什么是fiber?fiber解决了什么问题?从源码角度深入了解fiber运行机制与diff执行
壹 ❀ 引 我在[react] 什么是虚拟dom?虚拟dom比操作原生dom要快吗?虚拟dom是如何转变成真实dom并渲染到页面的?一文中,介绍了虚拟dom的概念,以及react中虚拟dom的使用场景 ...
- Android -- 带你从源码角度领悟Dagger2入门到放弃
1,以前的博客也写了两篇关于Dagger2,但是感觉自己使用的时候还是云里雾里的,更不谈各位来看博客的同学了,所以今天打算和大家再一次的入坑试试,最后一次了,保证最后一次了. 2,接入项目 在项目的G ...
- Android -- 带你从源码角度领悟Dagger2入门到放弃(二)
1,接着我们上一篇继续介绍,在上一篇我们介绍了简单的@Inject和@Component的结合使用,现在我们继续以老师和学生的例子,我们知道学生上课的时候都会有书籍来辅助听课,先来看看我们之前的Stu ...
- 从源码角度入手实现RecyclerView的Item点击事件
RecyclerView 作为 ListView 和 GridView 的替代产物,相信在Android界已广为流传. RecyclerView 本是不会有类似 ListView 的那种点击事件,但是 ...
- Android布局性能优化—从源码角度看ViewStub延迟加载技术
在项目中,难免会遇到这种需求,在程序运行时需要动态根据条件来决定显示哪个View或某个布局,最通常的想法就是把需要动态显示的View都先写在布局中,然后把它们的可见性设为View.GONE,最后在代码 ...
- Android进阶:二、从源码角度看透 HandlerThread 和 IntentService 本质
上篇文章我们讲日志的存储策略的时候用到了HandlerThread,它适合处理"多而小的任务"的耗时任务的时候,避免产生太多线程影响性能,那这个HandlerThread的原理到底 ...
- Android -- 带你从源码角度领悟Dagger2入门到放弃(一)
1,以前的博客也写了两篇关于Dagger2,但是感觉自己使用的时候还是云里雾里的,更不谈各位来看博客的同学了,所以今天打算和大家再一次的入坑试试,最后一次了,保证最后一次了. 2,接入项目 在项目的G ...
- 从JDK源码角度看Short
概况 Java的Short类主要的作用就是对基本类型short进行封装,提供了一些处理short类型的方法,比如short到String类型的转换方法或String类型到short类型的转换方法,当然 ...
随机推荐
- Storm目录树和任务提交过程
Storm组件本地目录树 Storm zookeeper目录树 Storm任务提交的过程
- 【笔试题】在 Java 中,如何跳出当前的多重嵌套循环?
笔试题 在 Java 中,如何跳出当前的多重嵌套循环? public class Demo { public static void main(String[] args) { System.out. ...
- 使用SOCKET获取网页的内容
使用fsockopen()函数来实现获取页面信息,完整代码如下 //设置字符集(由于要抓取的网易网站字符集编码是gbk编码) header("content-type:text/html;c ...
- miniblink+golang开发windows gui应用
golang的优点自不必说了,这么好的语言怎么能缺少界面库呢?所以我使用miniblink开发了一个可以用html,css,js开发界面的浏览器,通过它你能为你的golang开发简单的界面.说白了其实 ...
- Java反射初探 ——“当类也学会照镜子”
反射的作用 开门见山地说说反射的作用 1.为我们提供了全面的分析类信息的能力 2.动态加载类 我理解的“反射”的意义 (仅个人理解哈) 我理解的java反射机制就是: 提供一套完善而强大的 ...
- springmvc springJDBC 简单实训银行账户管理系统
springmvc springJDBC 简单实训银行账户管理系统 1.简单介绍一下,在校时每周结束都会有一次学习总结,简称“实训”,这次实训内容是spring,因为是最近热门框架,我就先从基础方面开 ...
- Android-认识Service
Android-认识Service 学习自 郭霖的博客 https://developer.android.google.cn/reference/android/app/Service#WhatIs ...
- Codeforces.566F.Clique in the Divisibility Graph(DP)
题目链接 \(Description\) 给定集合\(S=\{a_1,a_2,\ldots,a_n\}\),集合中两点之间有边当且仅当\(a_i|a_j\)或\(a_j|a_i\). 求\(S\)最大 ...
- BZOJ.1923.[SDOI2010]外星千足虫(高斯消元 异或方程组 bitset)
题目链接 m个方程,n个未知量,求解异或方程组. 复杂度比较高,需要借助bitset压位. 感觉自己以前写的(异或)高斯消元是假的..而且黄学长的写法都不需要回代. //1100kb 324ms #i ...
- BZOJ.4517.[SDOI2016]排列计数(错位排列 逆元)
题目链接 错位排列\(D_n=(n-1)*(D_{n-1}+D_{n-2})\),表示\(n\)个数都不在其下标位置上的排列数. 那么题目要求的就是\(C_n^m*D_{n-m}\). 阶乘分母部分的 ...