bootstrap 怎么制作好看的表格
bootstrap 怎么制作表格
bootstrap 制作表格带有图文形式。主要知识点有以下几点
- 第一点肯定是写出一个普通的表格,这一点可以去菜鸟复制它的案例。添加tr和td就可以了
- 在表格放入图片加上class="img-circle" 变成圆形,自己写个css设置图片统一大小。图片高度50px,这时要设置行高也为50px。要不然文字不能垂直对齐,由于优先级问题,我们选择器不能直接选着tr标签,要不然没有作用,可以在父标签创建一个id,用后代选择器去选择。
- 操作下面的修改和删除按钮可以参照菜鸟的案例,要记得把bootstarp的font文件夹引用到自己的项目中。笔和垃圾桶不是图标是字体,要明白这一点,只需要在空的span加上class名称就可以了,他们都是字体图标,每个图标下都有相对应的class类名,我们直接复制类名就,可以了。
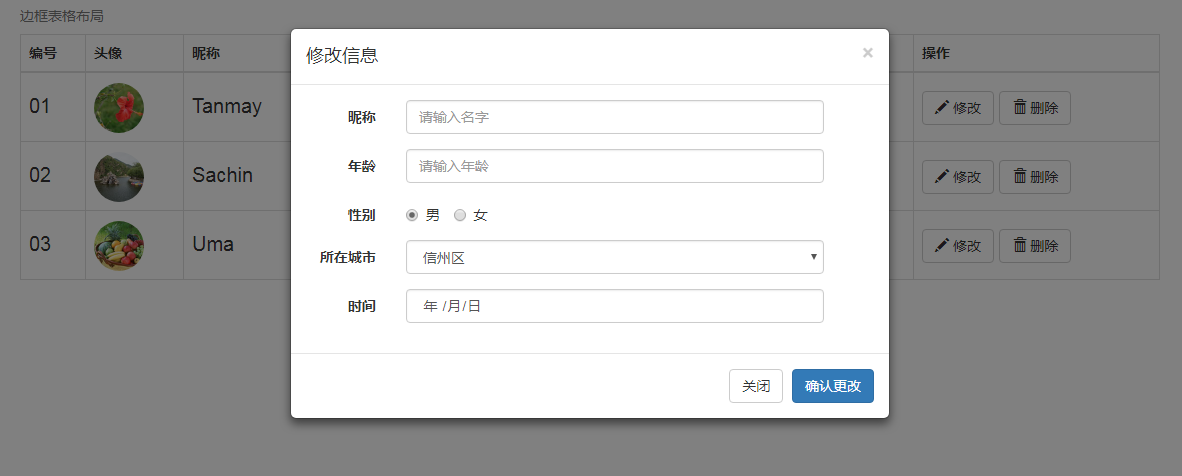
- 修改按钮弹出框在bootstarp有个叫模态框的可以把案例复制过来,修改一下h4的标题,和在modal-body的div添加我们的内容就可以了。
- 弹出框的表单可以复制菜鸟的表单案例,案例的输入框col-sm-10占用10列,我们可以修改成col-sm-9占用9列,这样输入框就不会很宽了。
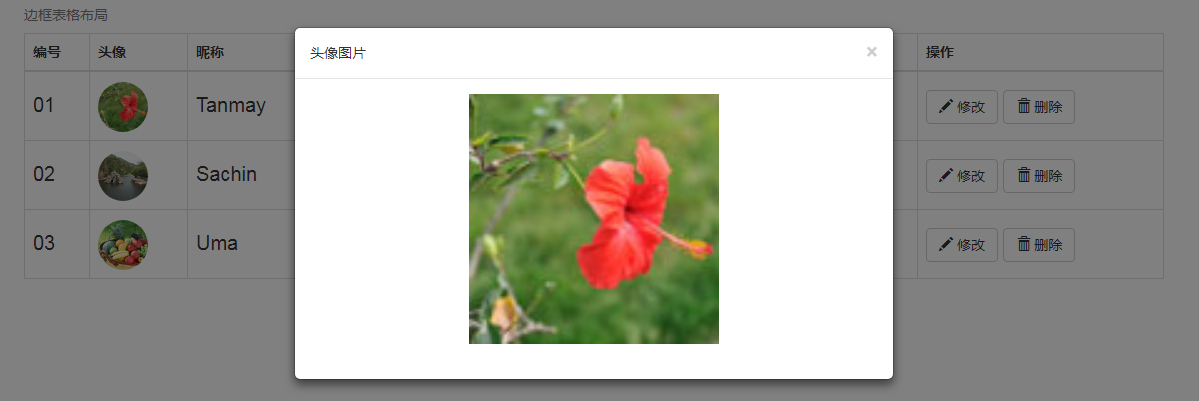
- 我给图片加了个点击事件,当点击某张图片时,弹出框显示放大的图片。这里弹出框仍然可以用模态框,值不够特别注意的是当页面存在两个以上模态框时,要在每个模态框加个div标签,div也不需要写什么属性。然后就是修改模态框的id就是了这里id改成id="myModal2"。自己写的jQuery也是比较简单的,获取当前图片的src,然后赋值给模态框的图片的src。

复制代码时自己项目要有自己的bootstarp.css和font文件
<!DOCTYPE html>
<html> <head>
<meta charset="utf-8" />
<title></title>
<link rel="stylesheet" type="text/css" href="css/bootstrap.css" />
<script src="https://cdn.staticfile.org/jquery/2.1.1/jquery.min.js"></script>
<script src="https://cdn.staticfile.org/twitter-bootstrap/3.3.7/js/bootstrap.min.js"></script>
<style type="text/css">
#a td{
line-height: 50px;
font-size: 20px;
}
img{
height: 50px;
}
#a tr:hover{
background:#D4E3E5;
}
</style>
</head> <body> <div class="container" >
<table class="table table-hover table-bordered"> <caption>边框表格布局</caption>
<thead>
<tr>
<th>编号</th>
<th>头像</th>
<th>昵称</th>
<th>年龄</th>
<th>性别</th>
<th>地址</th>
<th>时间</th>
<th>操作</th> </tr>
</thead>
<tbody id="a">
<tr>
<td>01</td>
<td>
<img src="data:images/tou01.jpg" class="img-circle" data-toggle="modal" data-target="#myModal2"> </td>
<td>Tanmay</td>
<td>Bangalore</td>
<td>560001</td>
<td>Bangalore</td>
<td>560001</td>
<td>
<button type="button" class="btn btn-default btn-xm" data-toggle="modal" data-target="#myModal">
<span class="glyphicon glyphicon-pencil"></span> 修改
</button>
<button type="button" class="btn btn-default btn-xm">
<span class="glyphicon glyphicon-trash"></span> 删除
</button>
</td>
</tr>
<tr>
<td>02</td>
<td>
<img src="data:images/tou02.jpg" class="img-circle" data-toggle="modal" data-target="#myModal2"/>
</td>
<td>Sachin</td>
<td>Mumbai</td>
<td>400003</td>
<td>Bangalore</td>
<td>560001</td>
<td>
<button type="button" class="btn btn-default btn-xm" data-toggle="modal" data-target="#myModal">
<span class="glyphicon glyphicon-pencil"></span> 修改
</button>
<button type="button" class="btn btn-default btn-xm">
<span class="glyphicon glyphicon-trash"></span> 删除
</button>
</td>
</tr>
<tr>
<td>03</td>
<td>
<img src="data:images/tou03.jpg" class="img-circle" data-toggle="modal" data-target="#myModal2"/>
</td>
<td>Uma</td>
<td>Pune</td>
<td>411027</td>
<td>Bangalore</td>
<td>Bangalore</td>
<td>
<button type="button" class="btn btn-default btn-xm" data-toggle="modal" data-target="#myModal">
<span class="glyphicon glyphicon-pencil"></span> 修改
</button>
<button type="button" class="btn btn-default btn-xm">
<span class="glyphicon glyphicon-trash"></span> 删除
</button>
</td>
</tr>
</tbody> </table> <!--修改弹出框-->
<div id="">
<div class="modal fade" id="myModal" tabindex="-1" role="dialog" aria-labelledby="myModalLabel" aria-hidden="true">
<div class="modal-dialog">
<div class="modal-content">
<div class="modal-header">
<button type="button" class="close" data-dismiss="modal" aria-hidden="true">
×
</button>
<h4 class="modal-title" id="myModalLabel">
修改信息
</h4>
</div>
<div class="modal-body"> <form class="form-horizontal" role="form">
<div class="form-group">
<label for="firstname" class="col-sm-2 control-label">昵称</label>
<div class="col-sm-9">
<input type="text" class="form-control" id="firstname"
placeholder="请输入名字">
</div>
</div>
<div class="form-group">
<label for="old" class="col-sm-2 control-label">年龄</label>
<div class="col-sm-9">
<input type="number" class="form-control" id="old"
placeholder="请输入年龄">
</div>
</div>
<div class="form-group">
<label class="col-sm-2 control-label">性别</label>
<div class="col-sm-9">
<label class="radio-inline">
<input type="radio" name="optionsRadiosinline" id="optionsRadios3" value="option1" checked> 男
</label>
<label class="radio-inline">
<input type="radio" name="optionsRadiosinline" id="optionsRadios4" value="option2"> 女
</label> </div>
</div>
<div class="form-group">
<label for="city" class="col-sm-2 control-label">所在城市</label>
<div class="col-sm-9">
<select class="form-control">
<option>信州区</option>
<option>高新区</option>
<option>广丰区</option>
<option>婺源县</option>
<option>铅山县</option>
</select> </div>
</div>
<div class="form-group">
<label for="timer" class="col-sm-2 control-label">时间</label>
<div class="col-sm-9">
<input type="date" class="form-control" id="timer"
placeholder="请输入时间">
</div>
</div> </form> </div>
<div class="modal-footer">
<button type="button" class="btn btn-default" data-dismiss="modal">关闭
</button>
<button type="button" class="btn btn-primary">
确认更改
</button>
</div>
</div>
</div> </div>
<!--图片-->
<div id=""> <div class="modal fade" id="myModal2" tabindex="-1" role="dialog" aria-labelledby="myModalLabel" aria-hidden="true">
<div class="modal-dialog">
<div class="modal-content">
<div class="modal-header">
<button type="button" class="close" data-dismiss="modal" aria-hidden="true">×</button>
<h5 class="modal-title" id="myModalLabel">头像图片</h5>
</div>
<div class="modal-body" style="height: 300px;text-align: center;"> <img src="data:images/tou01.jpg" style="height: 250px;" id="touimg"/> </div>
<!--<div class="modal-footer">
<button type="button" class="btn btn-default" data-dismiss="modal">关闭</button>
<button type="button" class="btn btn-primary">提交更改</button>
</div>-->
</div>
</div>
</div>
</div> </div>
<script type="text/javascript">
$("img").click(function(){
var at=$(this).attr("src")
$("#touimg").attr("src",at)
}) </script>
</body> </html>
bootstrap 怎么制作好看的表格的更多相关文章
- 利用Bootstrap框架制作查询页面的界面
UI设计实战篇——利用Bootstrap框架制作查询页面的界面 Bootstrap框架是一个前端UI设计的框架,它提供了统一的UI界面,简化了设计界面UI的过程(缺点是定制了界面,调整的余地不是太 ...
- Bootstrap入门(四)表格
Bootstrap入门(四)表格 <table>标签 首先,引入bootstrap的css文件,然后表格内容放在一个class为table的<table>标签中(class=& ...
- 在Bootstrap开发框架中使用bootstrapTable表格插件和jstree树形列表插件时候,对树列表条件和查询条件的处理
在我Boostrap框架中,很多地方需要使用bootstrapTable表格插件和jstree树形列表插件来共同构建一个比较常见的查询界面,bootstrapTable表格插件主要用来实现数据的分页和 ...
- Bootstrap历练实例:带表格的面板
带表格的面板 为了在面板中创建一个无边框的表格,我们可以在面板中使用 class .table.假设有个 <div> 包含 .panel-body,我们可以向表格的顶部添加额外的边框用来分 ...
- Css制作table细线表格
制作细线表格,我想应该是最基本的css知识了,记录下来巩固下. 推荐: table{ border-collapse:collapse; border: 1px solid #000000; } td ...
- Bootstrap入门(2)表格
Bootstrap入门(四)表格 <table>标签 首先,引入bootstrap的css文件,然后表格内容放在一个class为table的<table>标签中(class=& ...
- 制作的excel表格如何放到微信公众号文章中?
制作的excel表格如何放到微信公众号文章中? 我们都知道创建一个微信公众号,在公众号中发布一些文章是非常简单的,但公众号添加附件下载的功能却被限制,如今可以使用小程序“微附件”进行在公众号中添加附件 ...
- UI设计实战篇——利用Bootstrap框架制作查询页面的界面
Bootstrap框架是一个前端UI设计的框架,它提供了统一的UI界面,简化了设计界面UI的过程(缺点是定制了界面,调整的余地不是太大).尤其是现在的响应时布局(我的理解是页面根据不同的分辨率,采用不 ...
- bootstrap table简洁扁平的表格
使用方法 1.在html页面的head标签中引入Bootstrap库(假如你的项目还没使用)和bootstrap-table.css. <link rel="stylesheet&qu ...
随机推荐
- vue项目中使用bpmn-流程图预览篇
前情提要 上文已经实现了节点操作的前进.后退.导入.导出等操作,今日来实现“流程图预览”,以及视图的放大缩小 前提:项目安装过bpmn,安装可见上篇文章 实现要点 bpmn提供了两个神器:Modele ...
- Win10安装Keras+Tensorflow+Opencv
Win10安装keras 安装 Anaconda 清华加速下载链接: https://mirrors.tuna.tsinghua.edu.cn/anaconda/archive/ 我选择的版本是: A ...
- Thinking in Java,Fourth Edition(Java 编程思想,第四版)学习笔记(八)之Polymorphism
Polymorphism is the third essential feature of an object-oriented programming language,after data ab ...
- Mac 下 brew 切换为国内源
简介 Homebrew 是一款自由及开放源代码的软件包管理系统,用以简化 macOS 和 linux 系统上的软件安装过程.它拥有安装.卸载.更新.查看.搜索等很多实用的功能,通过简单的一条指令,就可 ...
- 【three.js第五课】光线的添加和感光材料
材料分类: MeshBasicMaterial:基础网孔材料,一个以简单着色(平面或线框)方式来绘制几何形状的材料.MeshLambertMaterial:兰伯特网孔材料,一种非发光材料(兰伯特)的表 ...
- Python-气象-大气科学-可视化绘图系列(一)——利用xarray读取netCDF文件并画图(代码+示例)
本文原创链接:https:////www.cnblogs.com/zhanling/p/12192978.html 1 import numpy as np import xarray as xr i ...
- Maven+JSP+Servlet+JDBC+Redis+Mysql实现的黑马旅游网
项目简介 项目来源于:https://gitee.com/haoshunyu/travel 本系统是基于Maven+JSP+Servlet+JdbcTemplate+Redis+Mysql实现的旅游网 ...
- [php代码审计]bluecms v1.6 sp1
一.环境搭建 bluecms v1.6 sp1源码 windows 7 phpstudy2016(php 5.4.45) seay源代码审计系统 源码在网上很容易下载,很多教程说访问地址 http:/ ...
- 转载-linux内核长什么样
来源:Linux中国 今天,我来为大家解读一幅来自 TurnOff.us 的漫画 "InSide The Linux Kernel" . TurnOff.us是一个极客漫画网站,作 ...
- Python 七步捉虫法
了解一些技巧助你减少代码查错时间. -- Maria Mckinley 在周五的下午三点钟(为什么是这个时间?因为事情总会在周五下午三点钟发生),你收到一条通知,客户发现你的软件出现一个错误.在有了初 ...