
py-faster-rcnn:在windows上配置
0.先说一下本机配置
opencv2+cuda7.5+cudnn+anaconda,这些基础的之前都是配置好了的,python环境建议使用anaconda,用到的库基本都有了,好像没有easydict,自己装一下就好。
1.下载py-faster-rcnn
rbg大神github上的py-faster-rcnn
使用以下命令下载,直接download的话不完整
git clone --recursive https://github.com/rbgishick/py-faster-rcnn.git
2.编译lib
因为原版是在linux中使用的,在linux里可以直接编译,在windows下需要修改lib/setup.py,以下是修改后的
# --------------------------------------------------------

# Fast R-CNN

# Copyright (c) 2015 Microsoft

# Licensed under The MIT License [see LICENSE for details]

# Written by Ross Girshick

# --------------------------------------------------------

import numpy as np

import os

from os.path import join as pjoin

#from distutils.core import setup

from setuptools import setup

from distutils.extension import Extension

from Cython.Distutils import build_ext

import subprocess

#change for windows, by MrX

nvcc_bin = 'nvcc.exe'

lib_dir = 'lib/x64'

def find_in_path(name, path):

    "Find a file in a search path"

    # Adapted fom

    # http://code.activestate.com/recipes/52224-find-a-file-given-a-search-path/

    for dir in path.split(os.pathsep):

        binpath = pjoin(dir, name)

        if os.path.exists(binpath):

            return os.path.abspath(binpath)

    return None

def locate_cuda():

    """Locate the CUDA environment on the system

    Returns a dict with keys 'home', 'nvcc', 'include', and 'lib64'

    and values giving the absolute path to each directory.

    Starts by looking for the CUDAHOME env variable. If not found, everything

    is based on finding 'nvcc' in the PATH.

    """

    # first check if the CUDAHOME env variable is in use

    if 'CUDA_PATH' in os.environ:

        home = os.environ['CUDA_PATH']

        print("home = %s\n" % home)

        nvcc = pjoin(home, 'bin', nvcc_bin)

    else:

        # otherwise, search the PATH for NVCC

        default_path = pjoin(os.sep, 'usr', 'local', 'cuda', 'bin')

        nvcc = find_in_path(nvcc_bin, os.environ['PATH'] + os.pathsep + default_path)

        if nvcc is None:

            raise EnvironmentError('The nvcc binary could not be '

                'located in your $PATH. Either add it to your path, or set $CUDA_PATH')

        home = os.path.dirname(os.path.dirname(nvcc))

        print("home = %s, nvcc = %s\n" % (home, nvcc))

    cudaconfig = {'home':home, 'nvcc':nvcc,

                  'include': pjoin(home, 'include'),

                  'lib64': pjoin(home, lib_dir)}

    for k, v in cudaconfig.iteritems():

        if not os.path.exists(v):

            raise EnvironmentError('The CUDA %s path could not be located in %s' % (k, v))

    return cudaconfig

CUDA = locate_cuda()

# Obtain the numpy include directory.  This logic works across numpy versions.

try:

    numpy_include = np.get_include()

except AttributeError:

    numpy_include = np.get_numpy_include()

def customize_compiler_for_nvcc(self):

    """inject deep into distutils to customize how the dispatch

    to cl/nvcc works.

    If you subclass UnixCCompiler, it's not trivial to get your subclass

    injected in, and still have the right customizations (i.e.

    distutils.sysconfig.customize_compiler) run on it. So instead of going

    the OO route, I have this. Note, it's kindof like a wierd functional

    subclassing going on."""

    # tell the compiler it can processes .cu

    #self.src_extensions.append('.cu')

    # save references to the default compiler_so and _comple methods

    #default_compiler_so = self.spawn

    #default_compiler_so = self.rc

    super = self.compile

    # now redefine the _compile method. This gets executed for each

    # object but distutils doesn't have the ability to change compilers

    # based on source extension: we add it.

    def compile(sources, output_dir=None, macros=None, include_dirs=None, debug=0, extra_preargs=None, extra_postargs=None, depends=None):

        postfix=os.path.splitext(sources[0])[1]

        if postfix == '.cu':

            # use the cuda for .cu files

            #self.set_executable('compiler_so', CUDA['nvcc'])

            # use only a subset of the extra_postargs, which are 1-1 translated

            # from the extra_compile_args in the Extension class

            postargs = extra_postargs['nvcc']

        else:

            postargs = extra_postargs['cl']

        return super(sources, output_dir, macros, include_dirs, debug, extra_preargs, postargs, depends)

        # reset the default compiler_so, which we might have changed for cuda

        #self.rc = default_compiler_so

    # inject our redefined _compile method into the class

    self.compile = compile

# run the customize_compiler

class custom_build_ext(build_ext):

    def build_extensions(self):

        customize_compiler_for_nvcc(self.compiler)

        build_ext.build_extensions(self)

ext_modules = [

    # unix _compile: obj, src, ext, cc_args, extra_postargs, pp_opts

    Extension(

        "utils.cython_bbox",

        sources=["utils\\bbox.pyx"],

        #define_macros={'/LD'},

        #extra_compile_args={'cl': ['/link', '/DLL', '/OUT:cython_bbox.dll']},

        #extra_compile_args={'cl': ['/LD']},

        extra_compile_args={'cl': []},

        include_dirs = [numpy_include]

    ),

    Extension(

        "nms.cpu_nms",

        sources=["nms\\cpu_nms.pyx"],

        extra_compile_args={'cl': []},

        include_dirs = [numpy_include],

    ),

     Extension(

        'pycocotools._mask',

        sources=['pycocotools\\maskApi.c', 'pycocotools\\_mask.pyx'],

        include_dirs = [numpy_include, 'pycocotools'],

        extra_compile_args={'cl': []},

    ),

    #Extension(   # just used to get nms\gpu_nms.obj

    #    "nms.gpu_nms",

    #    sources=['nms\\gpu_nms.pyx'],

    #    language='c++',

    #    extra_compile_args={'cl': []},

    #    include_dirs = [numpy_include]

    #),

]

setup(

    name='fast_rcnn',

    ext_modules=ext_modules,

    # inject our custom trigger

    cmdclass={'build_ext': custom_build_ext},

)
在lib文件夹中添加setup_cuda.py,内容如下:
#!/usr/bin/env python

import numpy as np

import os

# on Windows, we need the original PATH without Anaconda's compiler in it:

PATH = os.environ.get('PATH')

from distutils.spawn import spawn, find_executable

from setuptools import setup, find_packages, Extension

from setuptools.command.build_ext import build_ext

import sys

# CUDA specific config

# nvcc is assumed to be in user's PATH

nvcc_compile_args = ['-O', '--ptxas-options=-v', '-arch=sm_35', '-c', '--compiler-options=-fPIC']

nvcc_compile_args = os.environ.get('NVCCFLAGS', '').split() + nvcc_compile_args

cuda_libs = ['cublas']

# Obtain the numpy include directory.  This logic works across numpy versions.

try:

    numpy_include = np.get_include()

except AttributeError:

    numpy_include = np.get_numpy_include()

cudamat_ext = Extension('nms.gpu_nms',

                        sources=[

                                'nms\\gpu_nms.cu'

                                ],

                        language='c++',

                        libraries=cuda_libs,

                        extra_compile_args=nvcc_compile_args,

                        include_dirs = [numpy_include, 'C:\\Programming\\CUDA\\v7.5\\include'])

class CUDA_build_ext(build_ext):

    """

    Custom build_ext command that compiles CUDA files.

    Note that all extension source files will be processed with this compiler.

    """

    def build_extensions(self):

        self.compiler.src_extensions.append('.cu')

        self.compiler.set_executable('compiler_so', 'nvcc')

        self.compiler.set_executable('linker_so', 'nvcc --shared')

        if hasattr(self.compiler, '_c_extensions'):

            self.compiler._c_extensions.append('.cu')  # needed for Windows

        self.compiler.spawn = self.spawn

        build_ext.build_extensions(self)

    def spawn(self, cmd, search_path=1, verbose=0, dry_run=0):

        """

        Perform any CUDA specific customizations before actually launching

        compile/link etc. commands.

        """

        if (sys.platform == 'darwin' and len(cmd) >= 2 and cmd[0] == 'nvcc' and

                cmd[1] == '--shared' and cmd.count('-arch') > 0):

            # Versions of distutils on OSX earlier than 2.7.9 inject

            # '-arch x86_64' which we need to strip while using nvcc for

            # linking

            while True:

                try:

                    index = cmd.index('-arch')

                    del cmd[index:index+2]

                except ValueError:

                    break

        elif self.compiler.compiler_type == 'msvc':

            # There are several things we need to do to change the commands

            # issued by MSVCCompiler into one that works with nvcc. In the end,

            # it might have been easier to write our own CCompiler class for

            # nvcc, as we're only interested in creating a shared library to

            # load with ctypes, not in creating an importable Python extension.

            # - First, we replace the cl.exe or link.exe call with an nvcc

            #   call. In case we're running Anaconda, we search cl.exe in the

            #   original search path we captured further above -- Anaconda

            #   inserts a MSVC version into PATH that is too old for nvcc.

            cmd[:1] = ['nvcc', '--compiler-bindir',

                       os.path.dirname(find_executable("cl.exe", PATH))

                       or cmd[0]]

            # - Secondly, we fix a bunch of command line arguments.

            for idx, c in enumerate(cmd):

                # create .dll instead of .pyd files

                #if '.pyd' in c: cmd[idx] = c = c.replace('.pyd', '.dll')  #20160601, by MrX

                # replace /c by -c

                if c == '/c': cmd[idx] = '-c'

                # replace /DLL by --shared

                elif c == '/DLL': cmd[idx] = '--shared'

                # remove --compiler-options=-fPIC

                elif '-fPIC' in c: del cmd[idx]

                # replace /Tc... by ...

                elif c.startswith('/Tc'): cmd[idx] = c[3:]

                # replace /Fo... by -o ...

                elif c.startswith('/Fo'): cmd[idx:idx+1] = ['-o', c[3:]]

                # replace /LIBPATH:... by -L...

                elif c.startswith('/LIBPATH:'): cmd[idx] = '-L' + c[9:]

                # replace /OUT:... by -o ...

                elif c.startswith('/OUT:'): cmd[idx:idx+1] = ['-o', c[5:]]

                # remove /EXPORT:initlibcudamat or /EXPORT:initlibcudalearn

                elif c.startswith('/EXPORT:'): del cmd[idx]

                # replace cublas.lib by -lcublas

                elif c == 'cublas.lib': cmd[idx] = '-lcublas'

            # - Finally, we pass on all arguments starting with a '/' to the

            #   compiler or linker, and have nvcc handle all other arguments

            if '--shared' in cmd:

                pass_on = '--linker-options='

                # we only need MSVCRT for a .dll, remove CMT if it sneaks in:

                cmd.append('/NODEFAULTLIB:libcmt.lib')

            else:

                pass_on = '--compiler-options='

            cmd = ([c for c in cmd if c[0] != '/'] +

                   [pass_on + ','.join(c for c in cmd if c[0] == '/')])

            # For the future: Apart from the wrongly set PATH by Anaconda, it

            # would suffice to run the following for compilation on Windows:

            # nvcc -c -O -o <file>.obj <file>.cu

            # And the following for linking:

            # nvcc --shared -o <file>.dll <file1>.obj <file2>.obj -lcublas

            # This could be done by a NVCCCompiler class for all platforms.

        spawn(cmd, search_path, verbose, dry_run)

setup(name="py_fast_rcnn_gpu",

      description="Performs linear algebra computation on the GPU via CUDA",

      ext_modules=[cudamat_ext],

      cmdclass={'build_ext': CUDA_build_ext},

)
修改之后就可以编译了,将CMD定位到py-faster-rcnn目录下的lib文件夹,运行一下命令:
python setup.py install

python setup_cuda.py install
如果提示Microsoft Visual C++ 9.0 is required ...,在CMD中输入以下命令:
SET VS90COMNTOOLS=%VS110COMNTOOLS% (如果电脑中装的是vs2012)

SET VS90COMNTOOLS=%VS120COMNTOOLS% (如果电脑中装的是vs2013)
然后最后出现Finished processing ...就编译成功了。
3.编译pycaffe并替换到py-faster-rcnn目录下
之前已经安装了caffe的windows版,然后要编译pycaffe,打开buildVS2013下的工程,在pycaffe的属性中的预编译器中添加 WITH_PYTHON_LAYER,这样才会有Python类型的layer可以用
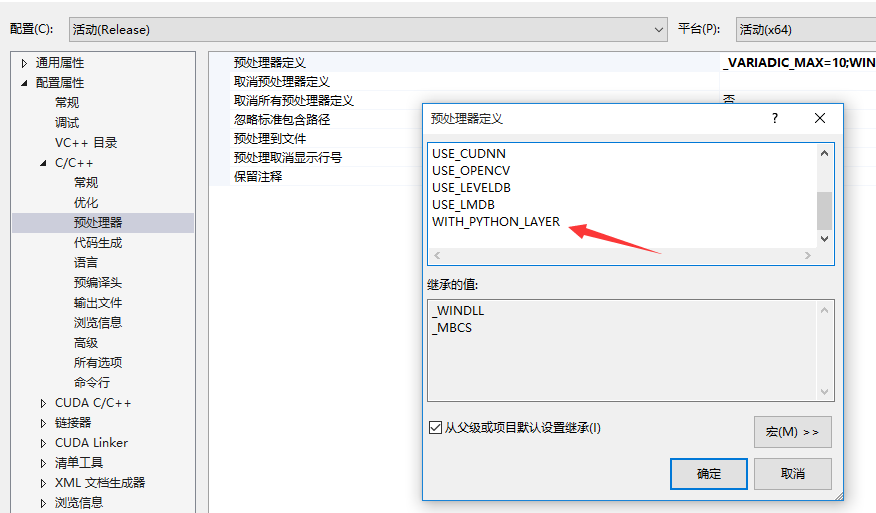
编译后将生成的文件,也就是caffe目录下python/caffe这个文件夹,整体复制到py-faster-rcnn目录下的caffe-fast-rcnn中python文件夹中并替换。
4.下载model文件
在data/scripts/fetch_faster_rcnn_models.sh中有个链接,可以在这里下载可用的models,文件600多兆,下完之后解压到data文件夹下(因为是.tar.gz压缩,记得解压两次),将解压完的文件夹
faster_rcnn_models文件夹放在data目录下
另外,如果想替换成自己的caffemodel,需要修改faster_rcnn_test.pt文件,(在models\pascal_voc\VGG16目录下)
5.运行demo.py
然后就可以运行tools下的demo.py了,将CMD定位到tools目录
python demo.py
因为会导入cv2库,所以之前需要将opencv2/build/python/2.7/x64(也可能是x86)下的cv2.pyd复制到当前python的库搜索路径,可以使用sys.path来查看当前的搜索路径。
然后在运行demo.py出现有param_str_这个错误的话,就将lib文件夹下的rpn和roid_data_layer中的所有.py文件中的param_str_改成param_str,因为新版本的caffe中没有最后的下划线。
py-faster-rcnn:在windows上配置的更多相关文章
- py faster rcnn+ 1080Ti+cudnn5.0
看了py-faster-rcnn上的issue,原来大家都遇到各种问题. 我要好好琢磨一下,看看到底怎么样才能更好地把GPU卡发挥出来.最近真是和GPU卡较上劲了. 上午解决了g++的问题不是. 然后 ...
- windows上配置git
windows上配置git1.下载mysisigit进入http://msysgit.github.io/,下载,安装,下一步下一步即可. 2.下载tortoisegit进入http://downlo ...
- Ubuntu安装SSH + Windows上配置Putty
1. Ubuntu安装SSH 命令: # sudo apt-get install openssh-server 2. 启动SSH Server 命令: # sudo /etc/init.d/ssh ...
- MongoDb进阶实践之二 如何在Windows上配置MongoDB
一.引言 上一篇文章,我介绍了如何在Linux系统上安装和配置MongoDB,其实都不是很难,不需要安装和编译,省去了Make && Make Install 命 ...
- Apache2.2+php5.4在windows上配置实例
这几天一直在win8.1上配置apache+php环境,网上看了很多文章,自己又犯了很多错误才配置成功,对新手来说真是有点小难. 自己打算把配置的详细过程写下来,好帮助其他新手快速配置. 在这里参考了 ...
- Windows上配置Mask R-CNN及运行示例demo.ipynb
最近做项目需要用到Mask R-CNN,于是花了几天时间配置.简单跑通代码,踩了很多坑,写下来分享给大家. 首先贴上官方Mask R-CNN的Github地址:https://github.com/m ...
- 三.jenkins 在windows上配置master 和 agent(slave)
参考链接: https://wiki.jenkins-ci.org/display/JENKINS/Step+by+step+guide+to+set+up+master+and+slave+mach ...
- windows上配置连接git
Windows7上安装Git 我首先是百度到了这个网站:https://git-scm.com/download/win 这个网站上有下载链接,你可以根据你的系统选择不同的下载链接,我的是Win7 ...
- py faster rcnn的lib编译出错问题
真是好事多磨啊,计算机系统依然是14.04,而cuda依然是8.0,唯一不同的是时间不一样,下载的各种库版本有差别,GPU的driver不一样. 但是这样就出问题了,py-faster rcnn的li ...
随机推荐
- 一步一步学EF系列四【升级篇 实体与数据库的映射】
之前的三张为基础篇,如果不考虑架构问题,做一般的小程序,以足够用了.基本的增删改查也都有了.但是作为学习显然是不够的.通过之前三章的学习,有没有发现这样写有什么问题,有没有觉得繁琐的?可能有人会说,之 ...
- spark examples 导入idea并测试
记录下自己使用idea导入spark examples项目的过程. spark examples 项目可以给我们提供很多有益的参考,经常看看这些代码有助于提高我们写scala代码的水平. 只导入spa ...
- RabbitMQ学习之(五)_一个基于PHP的RabbitMQ操作类
//amqp.php类文件 <?php class Amqp { public $e_name; public $q_name; public $k_route; public $channel ...
- MySQL-5.7 备份与恢复
一.备份分类 按介质分类: 物理备份 指通过拷贝数据库文件方式完成备份,适用于数据库很大,数据重要且需要快速恢复的数据库. 逻辑备份 指通过备份数据库的逻辑结构和数据内容的方式完成备份,适用于数据库不 ...
- Visual Studio 2015 初体验
据微软介绍每次发布的新版本,都承载着为开发者提供最高效的Visual Studio开发体验的使命.Visual Studio 2015亦延续了这一趋势,为开发者带来了进一步的生产力创新,包括调试和诊断 ...
- MVC通过服务端对数据进行验证(和AJAX验证一样)
在实体类中 添加 Remote属性,指定用某个View下的某个方法进行验证,如下面表示用User控制器中的UserExiting方法验证 public class User { [Remot ...
- make menuconfig错误的解决办法
如果使用make menuconfig的方式配置内核,又碰巧系统没有安装ncurses库(ubuntu系统默认就没有安装此库),就会出现错误,错误信息大体上如下: *** Unable to find ...
- linux 卸载jdk和安装
卸载JDK 1.先输入java -version 查看是否安装了jdk 2.如果安装了,检查下安装的路径 which java(查看JDK的安装路径) 3.卸载 rm -rf JDK地址(卸载JDK) ...
- C++ 读取文件所有内容的方法
方法一 #include <fstream> #include <string> #include <iostream> using namespace std; ...
- java.lang.IllegalArgumentException的解决方法
java.lang.IllegalArgumentException这个错误基本上就是jdk版本的问题 把jdk1.8换成jdk1.7就可以了 这里可以设置jdk最低版本 这里默认要选择jdk1.7 ...