SpringBoot2.0--- 多数据源配置
<link rel="stylesheet" href="https://csdnimg.cn/release/phoenix/template/css/ck_htmledit_views-cd6c485e8b.css">
<div id="content_views" class="markdown_views">
<!-- flowchart 箭头图标 勿删 -->
<svg xmlns="http://www.w3.org/2000/svg" style="display: none;">
<path stroke-linecap="round" d="M5,0 0,2.5 5,5z" id="raphael-marker-block" style="-webkit-tap-highlight-color: rgba(0, 0, 0, 0);"></path>
</svg>
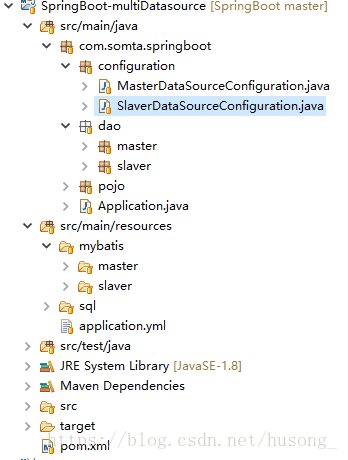
<p> 在开发的过程中我们可能都会遇到对接公司其他系统等需求,对于外部的系统可以采用接口对接的方式,对于一个公司开发的两个系统,并且知道相关数据库结构的情况下,就可以考虑使用多数据源来解决这个问题。SpringBoot为我们提供了相对简单的实现。</p>
一、建立如下结构的maven项目
二、添加相关数据库配置信息
server:

  port: 8080

spring:

  datasource:

    master:

      driver-class-name: com.mysql.jdbc.Driver

      url: jdbc:mysql://127.0.0.1:3306/test?useUnicode=true&characterEncoding=utf-8&useSSL=false

      username: root

      password: 123456

    slaver:

      driver-class-name: com.mysql.jdbc.Driver

      url: jdbc:mysql://127.0.0.1:3306/dev?useUnicode=true&characterEncoding=utf-8&useSSL=false

      username: root

      password: 123456
- 1
- 2
- 3
- 4
- 5
- 6
- 7
- 8
- 9
- 10
- 11
- 12
- 13
- 14
- 15
三、主库和从库的相关配置
1、主库数据源配置
@Configuration

@MapperScan(basePackages = "com.somta.springboot.dao.master", sqlSessionTemplateRef  = "masterSqlSessionTemplate")

public class MasterDataSourceConfiguration {

    @Value("${spring.datasource.master.driver-class-name}")

    private String driverClassName;

    @Value("${spring.datasource.master.url}")

    private String url;

    @Value("${spring.datasource.master.username}")

    private String username;

    @Value("${spring.datasource.master.password}")

    private String password;

    @Bean(name = "masterDataSource")

    @Primary

    public DataSource dataSource() {

        DruidDataSource dataSource = new DruidDataSource();

        dataSource.setDriverClassName(this.driverClassName);

        dataSource.setUrl(this.url);

        dataSource.setUsername(this.username);

        dataSource.setPassword(this.password);

        return dataSource;

    }

    @Bean(name = "masterSqlSessionFactory")

    @Primary

    public SqlSessionFactory sqlSessionFactory(@Qualifier("masterDataSource") DataSource dataSource) throws Exception {

        SqlSessionFactoryBean bean = new SqlSessionFactoryBean();

        bean.setDataSource(dataSource);

        bean.setMapperLocations(new PathMatchingResourcePatternResolver().getResources("classpath*:mybatis/master/**/Mysql_*Mapper.xml"));

        return bean.getObject();

    }

    @Bean(name = "masterTransactionManager")

    @Primary

    public DataSourceTransactionManager transactionManager(@Qualifier("masterDataSource") DataSource dataSource) {

        return new DataSourceTransactionManager(dataSource);

    }

    @Bean(name = "masterSqlSessionTemplate")

    @Primary

    public SqlSessionTemplate sqlSessionTemplate(@Qualifier("masterSqlSessionFactory") SqlSessionFactory sqlSessionFactory) throws Exception {

        return new SqlSessionTemplate(sqlSessionFactory);

    }

}
- 1
- 2
- 3
- 4
- 5
- 6
- 7
- 8
- 9
- 10
- 11
- 12
- 13
- 14
- 15
- 16
- 17
- 18
- 19
- 20
- 21
- 22
- 23
- 24
- 25
- 26
- 27
- 28
- 29
- 30
- 31
- 32
- 33
- 34
- 35
- 36
- 37
- 38
- 39
- 40
- 41
- 42
- 43
- 44
- 45
- 46
- 47
- 48
- 49
2、从库的数据源配置信息
@Configuration

@MapperScan(basePackages = "com.somta.springboot.dao.slaver", sqlSessionTemplateRef  = "slaverSqlSessionTemplate")

public class SlaverDataSourceConfiguration {

    @Value("${spring.datasource.slaver.driver-class-name}")

    private String driverClassName;

    @Value("${spring.datasource.slaver.url}")

    private String url;

    @Value("${spring.datasource.slaver.username}")

    private String username;

    @Value("${spring.datasource.slaver.password}")

    private String password;

    @Bean(name = "slaverDataSource")

    public DataSource dataSource() {

        DruidDataSource dataSource = new DruidDataSource();

        dataSource.setDriverClassName(this.driverClassName);

        dataSource.setUrl(this.url);

        dataSource.setUsername(this.username);

        dataSource.setPassword(this.password);

        return dataSource;

    }

    @Bean(name = "slaverSqlSessionFactory")

    public SqlSessionFactory sqlSessionFactory(@Qualifier("slaverDataSource") DataSource dataSource) throws Exception {

        SqlSessionFactoryBean bean = new SqlSessionFactoryBean();

        bean.setDataSource(dataSource);

        bean.setMapperLocations(new PathMatchingResourcePatternResolver().getResources("classpath*:mybatis/slaver/**/Mysql_*Mapper.xml"));

        return bean.getObject();

    }

    @Bean(name = "slaverTransactionManager")

    public DataSourceTransactionManager transactionManager(@Qualifier("slaverDataSource") DataSource dataSource) {

        return new DataSourceTransactionManager(dataSource);

    }

    @Bean(name = "slaverSqlSessionTemplate")

    public SqlSessionTemplate sqlSessionTemplate(@Qualifier("slaverSqlSessionFactory") SqlSessionFactory sqlSessionFactory) throws Exception {

        return new SqlSessionTemplate(sqlSessionFactory);

    }

}
- 1
- 2
- 3
- 4
- 5
- 6
- 7
- 8
- 9
- 10
- 11
- 12
- 13
- 14
- 15
- 16
- 17
- 18
- 19
- 20
- 21
- 22
- 23
- 24
- 25
- 26
- 27
- 28
- 29
- 30
- 31
- 32
- 33
- 34
- 35
- 36
- 37
- 38
- 39
- 40
- 41
- 42
- 43
- 44
- 45
- 46
注意在配置数据源的信息时,一定要通过@Primary配置一个主库,对于数据库配置部分与普通的数据源配置没有差异,新建一个DataSource,在创建一个SqlSessionTemplate,最后创建一个SqlSessionTemplate,分别以此注入即可,@MapperScan注解的扫描路径要分别对于相应的dao层
四、编写dao层和xml
public interface UserMasterDao {

    int addUser(User user);

    int deleteUserById(Long id);

    int updateUserById(User user);

    User queryUserById(Long id);

    List<User> queryUserList();

}
- 1
- 2
- 3
- 4
- 5
- 6
- 7
- 8
<?xml version="1.0" encoding="UTF-8"?>

<!DOCTYPE mapper

  PUBLIC "-//mybatis.org//DTD Mapper 3.0//EN"

  "http://mybatis.org/dtd/mybatis-3-mapper.dtd">

<mapper namespace="com.somta.springboot.dao.master.UserMasterDao" >

<!-- Result Map-->

<resultMap id="BaseResultMap" type="com.somta.springboot.pojo.User" >

    <result column="id" property="id"/>

    <result column="name" property="name"/>

    <result column="age" property="age"/>

</resultMap>

<!-- th_role_user table all fields -->

<sql id="Base_Column_List" >

    id, name, age

</sql>

<insert id="addUser" parameterType="com.somta.springboot.pojo.User" >

    insert into t_user (id, name, age)

    values (#{id},#{name},#{age});

</insert>

<delete id="deleteUserById" parameterType="java.lang.Long">

 delete from t_user where id=#{id}

</delete>

<update id="updateUserById" parameterType="com.somta.springboot.pojo.User" >

    update t_user set

    <trim  suffixOverrides="," >

    <if test="id != null and id != ''">

        id=#{id},

    </if>

    <if test="name != null and name != ''">

        name=#{name},

    </if>

    <if test="age != null and age != ''">

        age=#{age},

    </if>

    </trim> where id=#{id}

</update>

<select id="queryUserById" resultMap="BaseResultMap" parameterType="java.lang.Long">

    select <include refid="Base_Column_List" />

    from t_user where id = #{id}

</select>

<select id="queryUserList" resultMap="BaseResultMap">

    select <include refid="Base_Column_List" />

    from t_user

</select>

</mapper>
- 1
- 2
- 3
- 4
- 5
- 6
- 7
- 8
- 9
- 10
- 11
- 12
- 13
- 14
- 15
- 16
- 17
- 18
- 19
- 20
- 21
- 22
- 23
- 24
- 25
- 26
- 27
- 28
- 29
- 30
- 31
- 32
- 33
- 34
- 35
- 36
- 37
- 38
- 39
- 40
- 41
- 42
- 43
- 44
- 45
- 46
- 47
- 48
- 49
- 50
- 51
- 52
- 53
五、编写测试类进行测试
@RunWith(SpringJUnit4ClassRunner.class)

@SpringBootTest(classes = Application.class)

public class MultiDatasourceTest {

    @Autowired

    private UserMasterDao masterUserDao;

    @Autowired

    private UserSlaverDao slaverUserDao;

    /**

     * 查询用户

     * @throws Exception

     */

    @Test

    public void testQueryUser() throws Exception {

        User masterUser = masterUserDao.queryUserById(1L);

        System.out.println("masterUser==>"+masterUser.getName());

        User slaverUser = slaverUserDao.queryUserById(1L);

        System.out.println("slaverUser==>"+slaverUser.getName());

    }

}
- 1
- 2
- 3
- 4
- 5
- 6
- 7
- 8
- 9
- 10
- 11
- 12
- 13
- 14
- 15
- 16
- 17
- 18
- 19
- 20
- 21
当在控制台看到如下所示输出就代表我们的配置已经成功了

Git代码地址:https://gitee.com/Somta/SpringBoot/tree/master/SpringBoot-multiDatasource
原文地址:http://somta.com.cn/#/blog/view/05ef234aa6744aa4bc039869e2cfaffe
   </div>

      <link href="https://csdnimg.cn/release/phoenix/mdeditor/markdown_views-e44c3c0e64.css" rel="stylesheet">
SpringBoot2.0--- 多数据源配置的更多相关文章
- springboot2.0双数据源配置
题记:由于项目中不只是用一个数据库,所以记下以免忘记. 1.首先展示目录结构 2.pom配置文件 <?xml version="1.0" encoding="UTF ...
- SpringBoot(十一):springboot2.0.2下配置mybatis generator环境,并自定义字段/getter/settetr注释
Mybatis Generator是供开发者在mybatis开发时,快速构建mapper xml,mapper类,model类的一个插件工具.它相对来说对开发者是有很大的帮助的,但是它也有不足之处,比 ...
- springboot学习入门简易版八---springboot2.0多环境配置、整合mybatis mysql8+(19-20)
2.11 SpringBoot多环境配置(19) application.properties中配置 Spring.profiles.active=prd 配置环境: Application-dev ...
- SpringBoot2.0的CacheManager配置
http://rickgong.iteye.com/blog/2414263 @Configurationpublic class RedisConfig extends CachingConfigu ...
- IntelliJ IDEA 2017版 spring-boot2.0.2 自动配置Condition
描述: 编译器修改参数 -Dfile.encoding=GBK -Dstr.encoding=GBK Condition位置: 某一个类或注解存在的时候,装配,否则不装配 相关代码: ...
- springboot2.0动态多数据源切换
摘要:springboot1.x到springboot2.0配置变化有一点变化,网上关于springboot2.0配置多数据源的资料也比较少,为了让大家配置多数据源从springboot1.x升级到s ...
- SpringBoot2.0 基础案例(14):基于Yml配置方式,实现文件上传逻辑
本文源码 GitHub地址:知了一笑 https://github.com/cicadasmile/spring-boot-base 一.文件上传 文件上传是项目开发中一个很常用的功能,常见的如头像上 ...
- 升级项目版本:SpringBoot1.5.x到SpringBoot2.0.x
1.升级版本的选择 首先去spring的官网看一下最新的版本与版本之间的依赖
- SpringBoot2.0 基础案例(06):引入JdbcTemplate,和多数据源配置
一.JdbcTemplate对象 1.JdbcTemplate简介 在Spring Boot2.0框架下配置数据源和通过JdbcTemplate访问数据库的案例. SpringBoot对数据库的操作在 ...
- SpringBoot2.0之八 多数据源配置
在开发的过程中我们可能都会遇到对接公司其他系统等需求,对于外部的系统可以采用接口对接的方式,对于一个公司开发的两个系统,并且知道相关数据库结构的情况下,就可以考虑使用多数据源来解决这个问题.Spri ...
随机推荐
- LUOGU P2921 [USACO08DEC]在农场万圣节Trick or Treat on the Farm
传送门 解题思路 记忆化搜索,如果搜到环,就将环的大小处理出来. 代码 #include<iostream> #include<cstdio> #include<cstr ...
- leetcode 235-290 easy
235. Lowest Common Ancestor of a Binary Search Tree 公共的祖先必定大于左点小于右点,否则不断递归到合适. class Solution { publ ...
- Laravel 中 offset,limit 或 skip , take 的使用
laravel 本身有一个自带的快速分页方法 paginate,只需要传入每页显示多少条数据就可以 了,但是如果想使用自定义从哪里开始呢. 一.offset,limit (offset 设置从哪里开始 ...
- python pattern 类
- 51nod1040 矩阵相乘结果的判断
给出三个N*N的矩阵A, B, C,问A * B是否等于C?Input第1行,1个数N.(0 <= N <= 500)第2 - N + 1行:每行N个数,对应矩阵A的元素.(0 <= ...
- Mac上定时运行脚本工具--launchctl
在Mac上可以像在Linux上一样,使用crontab来定时运行脚本,但苹果并不推荐这个方法.苹果推荐使用Launchctl来完成定时任务. 首先,我们先写一个可执行的脚本,列子为php脚本,名字为t ...
- R语言与显著性检验学习笔记
R语言与显著性检验学习笔记 一.何为显著性检验 显著性检验的思想十分的简单,就是认为小概率事件不可能发生.虽然概率论中我们一直强调小概率事件必然发生,但显著性检验还是相信了小概率事件在我做的这一次检验 ...
- springboot security 安全
spring security几个概念 “认证”(Authentication) 是建立一个他声明的主体的过程(一个“主体”一般是指用户,设备或一些可以在你的应用程序中执行动作的其他系统) . “授权 ...
- 2019.10.24TCP协程处理
server from gevent import monkey,spawn monkey.patch_all() import socket server = socket.socket() ser ...
- iOS支付宝2.0 SDK集成整理
https://cshall.alipay.com/enterprise/help_detail.htm?help_id=473890 http://wenku.baidu.com/link?url= ...