
opencv学习之路(25)、轮廓查找与绘制(四)——正外接矩形
一、简介
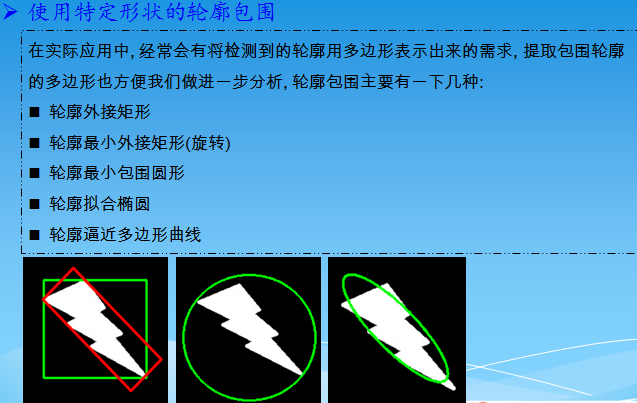

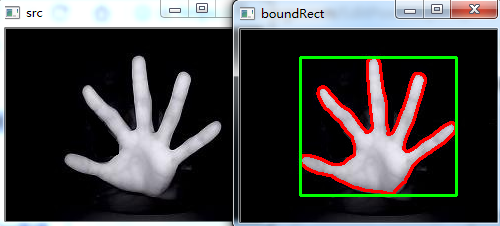
二、外接矩形的查找绘制
 #include "opencv2/opencv.hpp"

 using namespace cv;

 void main()

 {

     //外接矩形的查找绘制

     Mat srcImg =imread("E://12.jpg");

     imshow("src",srcImg);

     Mat dstImg = srcImg.clone();  //原图备份

     cvtColor(srcImg, srcImg, CV_BGR2GRAY); //转为灰度图

     threshold(srcImg, srcImg, , , CV_THRESH_BINARY); //二值化

     vector<vector<Point>> contours;

     vector<Vec4i> hierarcy;

     findContours(srcImg, contours, hierarcy, CV_RETR_EXTERNAL, CHAIN_APPROX_NONE); //查找轮廓

     vector<Rect> boundRect(contours.size()); //定义外接矩形集合

     //drawContours(dstImg, contours, -1, Scalar(0, 0, 255), 2, 8);  //绘制轮廓

     int x0=, y0=, w0=, h0=;

     for(int i=; i<contours.size(); i++)

     {

         boundRect[i] = boundingRect((Mat)contours[i]); //查找每个轮廓的外接矩形

         drawContours(dstImg, contours, i, Scalar(, , ), , );  //绘制轮廓

         x0 = boundRect[i].x;  //获得第i个外接矩形的左上角的x坐标

         y0 = boundRect[i].y; //获得第i个外接矩形的左上角的y坐标

         w0 = boundRect[i].width; //获得第i个外接矩形的宽度

         h0 = boundRect[i].height; //获得第i个外接矩形的高度

         rectangle(dstImg, Point(x0, y0), Point(x0+w0, y0+h0), Scalar(, , ), , ); //绘制第i个外接矩形

     }

     imshow("boundRect", dstImg);

     waitKey();

 }
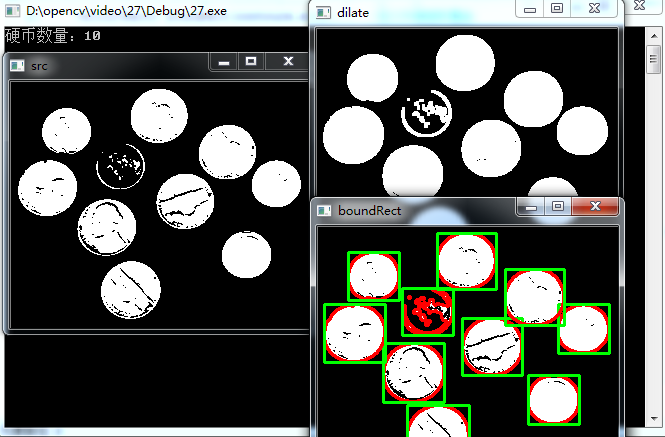
三、分割硬币轮廓并计数
 #include "opencv2/opencv.hpp"

 #include<iostream>

 using namespace cv;

 using namespace std;

 void main()

 {

     //分割硬币轮廓

     Mat srcImg =imread("E://33.png");

     imshow("src", srcImg);

     Mat dstImg = srcImg.clone();  //原图备份

     cvtColor(srcImg, srcImg, CV_BGR2GRAY); //转为灰度图

     threshold(srcImg, srcImg, , , CV_THRESH_BINARY); //二值化

     Mat element = getStructuringElement(MORPH_RECT, Size(, ), Point(-, -)); //获得结构元素

     dilate(srcImg, srcImg, element); //膨胀操作

     imshow("dilate",srcImg);

     vector<vector<Point>> contours;

     vector<Vec4i> hierarcy;

     findContours(srcImg, contours, hierarcy, CV_RETR_EXTERNAL, CHAIN_APPROX_NONE); //查找轮廓

     vector<Rect> boundRect(contours.size()); //定义外接矩形集合

     int x0=, y0=, w0=, h0=,num=;

     for(int i=; i<contours.size(); i++)

     {

         boundRect[i] = boundingRect((Mat)contours[i]); //查找每个轮廓的外接矩形

         drawContours(dstImg, contours, i, Scalar(, , ), , );  //绘制轮廓

         x0 = boundRect[i].x;

         y0 = boundRect[i].y;

         w0 = boundRect[i].width;

         h0 = boundRect[i].height;

         if(w0> && h0>)//筛选

         {

             rectangle(dstImg, Point(x0, y0), Point(x0+w0, y0+h0), Scalar(, , ), , ); //绘制第i个外接矩形

             num++;

         }

     }

     cout<<"硬币数量:"<<num;

     imshow("boundRect", dstImg);

     waitKey();

 }
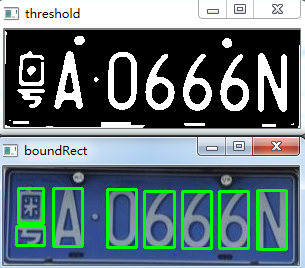
四、简单车牌字符分隔
 #include "opencv2/opencv.hpp"

 using namespace cv;

 void main()

 {

     //---简单车牌字符分隔

     Mat srcImg =imread("E://Car2.jpg");

     Mat dstImg = srcImg.clone();  //原图备份

     medianBlur(srcImg, srcImg, );  //中值滤波

     cvtColor(srcImg, srcImg, CV_BGR2GRAY); //转为灰度图

     threshold(srcImg, srcImg, , , CV_THRESH_BINARY); //二值化

     imshow("threshold", srcImg);

     imwrite("F://car0.jpg", srcImg);

     vector<vector<Point>> contours;

     vector<Vec4i> hierarcy;

     findContours(srcImg, contours, hierarcy, CV_RETR_TREE, CHAIN_APPROX_NONE); //查找所有轮廓

     vector<Rect> boundRect(contours.size()); //定义外接矩形集合

     int x0=, y0=, w0=, h0=;

     for(int i=; i<contours.size(); i++)

     {

         boundRect[i] = boundingRect((Mat)contours[i]); //查找每个轮廓的外接矩形

         x0 = boundRect[i].x;

         y0 = boundRect[i].y;

         w0 = boundRect[i].width;

         h0 = boundRect[i].height;

         if(w0>srcImg.cols/ && w0<srcImg.cols/ && h0>srcImg.rows/ && h0<srcImg.rows*/)

         {

             char pic_name[];

             sprintf(pic_name, "F:\\%d.bmp", i);

             Mat ROI = dstImg(Rect(x0, y0, w0, h0));

             imwrite(pic_name, ROI);

             rectangle(dstImg, Point(x0, y0), Point(x0+w0, y0+h0), Scalar(, , ), , ); //绘制第i个外接矩形

         }

     }

     imshow("boundRect", dstImg);

     waitKey();

 }
opencv学习之路(25)、轮廓查找与绘制(四)——正外接矩形的更多相关文章
- python学习之路网络编程篇(第四篇)
python学习之路网络编程篇(第四篇) 内容待补充
- opencv学习之路(23)、轮廓查找与绘制(二)——访问轮廓每个点
一.简介 二.画出每个轮廓的每个点 #include "opencv2/opencv.hpp" using namespace cv; void main() { Mat src= ...
- opencv学习之路(22)、轮廓查找与绘制(一)
一.简介 图2 二.代码 #include"opencv2/opencv.hpp" #include<iostream> using namespace std; us ...
- opencv学习之路(29)、轮廓查找与绘制(八)——轮廓特征属性及应用
一.简介 HSV颜色空间(hue色调,saturation饱和度,value亮度) 二.HSV滑动条 #include "opencv2/opencv.hpp" #include ...
- opencv学习之路(26)、轮廓查找与绘制(五)——最小外接矩形
一.简介 二.轮廓最小外接矩形的绘制 #include "opencv2/opencv.hpp" using namespace cv; void main() { //轮廓最小外 ...
- opencv学习之路(37)、运动物体检测(二)
一.运动物体轮廓椭圆拟合及中心 #include "opencv2/opencv.hpp" #include<iostream> using namespace std ...
- opencv学习之路(36)、运动物体检测(一)
一.简介 二.背景减法 图片说明 #include "opencv2/opencv.hpp"using namespace cv; void main() { Mat img1 = ...
- opencv学习之路(28)、轮廓查找与绘制(七)——位置关系及轮廓匹配
一.点与轮廓的距离及位置关系 #include "opencv2/opencv.hpp" #include <iostream> using namespace std ...
- opencv学习之路(27)、轮廓查找与绘制(六)——外接圆、椭圆拟合、逼近多边形曲线、计算轮廓面积及长度、提取不规则轮廓
一.最小外接圆 #include "opencv2/opencv.hpp" #include<iostream> using namespace std; using ...
随机推荐
- mysql存储emoji问题
前一段时间,项目中需要在数据库中存储emoji,由于编码格式不对,直接导致数据库报错,后来修改mysql的编码,就解决了 emoji符号实际上是文本,并不是图片,它们仅仅显示为图片 在mysql5.5 ...
- 14:CSS3 渐变(gradient)与 过度(transition)、CSS3 的2D动画
14:CSS3 渐变 CSS3 渐变(gradient)可以让你在两个或多个指定的颜色之间显示平稳的过渡. 以前,你必须使用图像来实现这些效果,现在通过使用 CSS3 的渐变(gradients)即可 ...
- 微信小程序开发笔记02
今天学习了微信小程序开发用到的语言,wxml与wxss语言基本语法与html和css基本语法相似,学习起来相对简单.在小程序主要的语言是js(javascript,跟准确的说是jqery) ,由于这种 ...
- Linux命令更新系统时间,更新所有文件的时间(转)
https://blog.csdn.net/ccj2020/article/details/76026606
- angularjs使用BUG收集和解决办法
此文章涉及到时1.X的版本.请注意! 1.关于checkbox和bootstrap不能选中BUG 在使用angularjs的时候,有个比较明显的bug ng-disabled无效的情况 这里是一种情况 ...
- vs防止编译不能连接生成pdb文件
问题的原因:debug和release版本生成的目标文件名称(Target Name)都一样,所以导致链接失败:
- C++11 使用异步编程std::async和std::future
先说明一点:std::asyanc是std::future的高级封装, 一般我们不会直接使用std::futrue,而是使用对std::future的高级封装std::async. 下面分别说一下. ...
- Linux下一台服务器Redis主从复制(master-slave)配置
主从概念 ⼀个master可以拥有多个slave,⼀个slave⼜可以拥有多个slave,如此下去,形成了强⼤的多级服务器集群架构 master用来写数据,slave用来读数据,经统计:网站的读写比率 ...
- ionic3.x版本-实现点击tab导航栏判断是否已经登陆然后加载不同页面,和退出登录功能。
html代码: <ion-tabs #myTabs> <ion-tab [root]="tab1Root" tabTitle="首页" tab ...
- git常用操作命令使用说明
设置用户名和邮箱 git config --global user.email 'xxx' git config --global user.name 'xxx' 创建分支 git branch xx ...