IdentityServer4(7)- 使用客户端认证控制API访问(客户端授权模式)
一.前言
本文已更新到 .NET Core 2.2
本文包括后续的Demo都会放在github:https://github.com/stulzq/IdentityServer4.Samples (QuickStart的几个Demo随着本系列的更新,目前为从官方Demo仓库的拷贝,防止本文和Demo不匹配,因为官方Demo和文档一直在更新,本系列更新速度可能会慢一步)。
这里特别说明一下:快速入门以及Topic系列为了保持到最新,目前几乎都是翻译的官方文档(以往的不适合最新版本就换掉了),需要深入一点的请看实战系列。
二.使用客户端认证保护API
此示例介绍了使用IdentityServer保护API的最基本场景。
在这种情况下,我们将定义一个API和要访问它的客户端。 客户端将在IdentityServer上请求访问令牌,并使用它来访问API。
三.准备
创建一个名为QuickstartIdentityServer的ASP.NET Core Web 空项目(asp.net core 2.2),端口5000
创建一个名为Api的ASP.NET Core Web Api 项目(asp.net core 2.2),端口5001
创建一个名为Client的控制台项目(.net core 2.2)
四.定义API、Identity资源
在QuickstartIdentityServer项目中添加一个Config.cs文件:
public static class Config

    {

        public static IEnumerable<IdentityResource> GetIdentityResources()

        {

            return new IdentityResource[]

            {

                new IdentityResources.OpenId()

            };

        }

        public static IEnumerable<ApiResource> GetApis()

        {

            return new List<ApiResource>

            {

                new ApiResource("api1", "My API")

            };

        }

        public static IEnumerable<Client> GetClients()

        {

            return new List<Client>

            {

                new Client

                {

                    ClientId = "client",

                    // no interactive user, use the clientid/secret for authentication

                    AllowedGrantTypes = GrantTypes.ClientCredentials,

                    // secret for authentication

                    ClientSecrets =

                    {

                        new Secret("secret".Sha256())

                    },

                    // scopes that client has access to

                    AllowedScopes = { "api1" }

                }

            };

        }

    }
五.定义客户端
对于这种情况,客户端将不具有交互式(人机交互)用户,并将使用IdentityServer的客户端模式进行身份验证。 将以下代码添加到Config.cs文件中:
public static IEnumerable<Client> GetClients()

{

    return new List<Client>

    {

        new Client

        {

            ClientId = "client",

            // no interactive user, use the clientid/secret for authentication

            AllowedGrantTypes = GrantTypes.ClientCredentials,

            // secret for authentication

            ClientSecrets =

            {

                new Secret("secret".Sha256())

            },

            // scopes that client has access to

            AllowedScopes = { "api1" }

        }

    };

}
六.配置 IdentityServer
要配置IdentityServer以使用Scope和客户端定义,您需要向ConfigureServices方法添加代码。
Startup.cs
public void ConfigureServices(IServiceCollection services)

{

    var builder = services.AddIdentityServer()

        .AddDeveloperSigningCredential()

        .AddInMemoryIdentityResources(Config.GetIdentityResources())

        .AddInMemoryApiResources(Config.GetApis())

        .AddInMemoryClients(Config.GetClients());

    // rest omitted

}

public void Configure(IApplicationBuilder app)

{

        if (Environment.IsDevelopment())

        {

            app.UseDeveloperExceptionPage();

        }

        // uncomment if you want to support static files

        //app.UseStaticFiles();

        app.UseIdentityServer();

        // uncomment, if you wan to add an MVC-based UI

        //app.UseMvcWithDefaultRoute();

}
运行此项目,打开浏览器访问http://localhost:5000/.well-known/openid-configuration你将会看到IdentityServer的各种元数据信息。
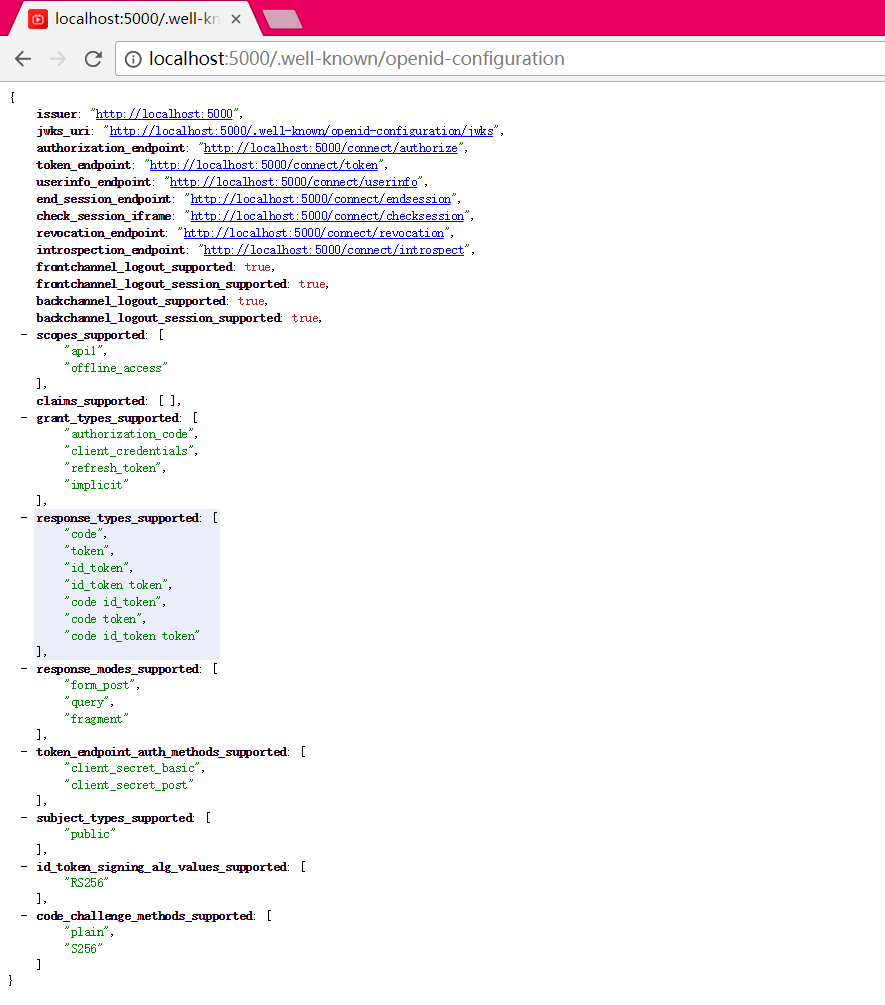
首次启动时,IdentityServer将为您创建一个开发人员签名密钥,它是一个名为tempkey.rsa的文件。 您不必将该文件检入源代码管理中,如果该文件不存在,将重新创建该文件。
七.添加API
在项目Api中添加一个Controller:IdentityController
[Route("identity")]

[Authorize]

public class IdentityController : ControllerBase

{

    [HttpGet]

    public IActionResult Get()

    {

        return new JsonResult(from c in User.Claims select new { c.Type, c.Value });

    }

}
最后一步是将身份验证服务添加到DI和身份验证中间件到管道。 这些将:
- 验证传入令牌以确保它来自受信任的颁发者
- 验证令牌是否有效用于此API(也称为 audience)
将Startup更新为如下所示:
public class Startup

{

    public void ConfigureServices(IServiceCollection services)

    {

        services.AddMvcCore()

            .AddAuthorization()

            .AddJsonFormatters();

        services.AddAuthentication("Bearer")

            .AddJwtBearer("Bearer", options =>

            {

                options.Authority = "http://localhost:5000";

                options.RequireHttpsMetadata = false;

                options.Audience = "api1";

            });

    }

    public void Configure(IApplicationBuilder app)

    {

        app.UseAuthentication();

        app.UseMvc();

    }

}
AddAuthentication 将身份认证服务添加到DI,并将“Bearer”配置为默认方案。 AddJwtBearer 将 JWT 认证处理程序添加到DI中以供身份认证服务使用。 UseAuthentication 将身份认证中间件添加到管道中,因此将在每次调用API时自动执行身份验证。
如果在浏览器访问(http:// localhost:5001/identity),你会得到HTTP 401的结果。 这意味着您的API需要凭据。
就是这样,API现在受 IdentityServer 保护。
八.创建客户端
为 "Client" 项目添加 Nuget 包:IdentityModel
IdentityModel 包括用于发现 IdentityServer 各个终结点(EndPoint)的客户端库。这样您只需要知道 IdentityServer 的地址 - 可以从元数据中读取实际的各个终结点地址:
// discover endpoints from metadata

var client = new HttpClient();

var disco = await client.GetDiscoveryDocumentAsync("http://localhost:5000");

if (disco.IsError)

{

    Console.WriteLine(disco.Error);

    return;

}
DiscoveryClient 已在最新版移除
接下来,您可以使用从 IdentityServer 元数据获取到的Token终结点请求令牌:
// request token

var tokenResponse = await client.RequestClientCredentialsTokenAsync(new ClientCredentialsTokenRequest

{

    Address = disco.TokenEndpoint,

    ClientId = "client",

    ClientSecret = "secret",

    Scope = "api1"

});

if (tokenResponse.IsError)

{

    Console.WriteLine(tokenResponse.Error);

    return;

}

Console.WriteLine(tokenResponse.Json);
九.调用API
要将Token发送到API,通常使用HTTP Authorization标头。 这是使用SetBearerToken扩展方法完成的:
// call api

var client = new HttpClient();

client.SetBearerToken(tokenResponse.AccessToken);

var response = await client.GetAsync("http://localhost:5001/identity");

if (!response.IsSuccessStatusCode)

{

    Console.WriteLine(response.StatusCode);

}

else

{

    var content = await response.Content.ReadAsStringAsync();

    Console.WriteLine(JArray.Parse(content));

}
输出应如下所示:
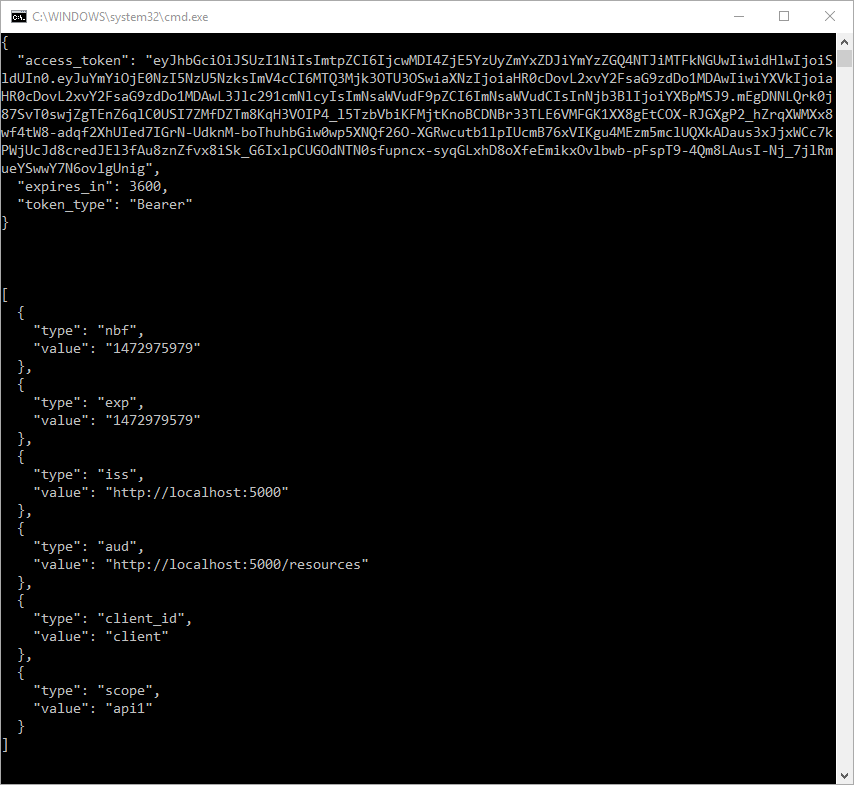
默认情况下,Token将包含有关 Scope,生命周期(nbf和exp),客户端ID(client_id)和颁发者名称(iss)的身份信息单元(Claim)。
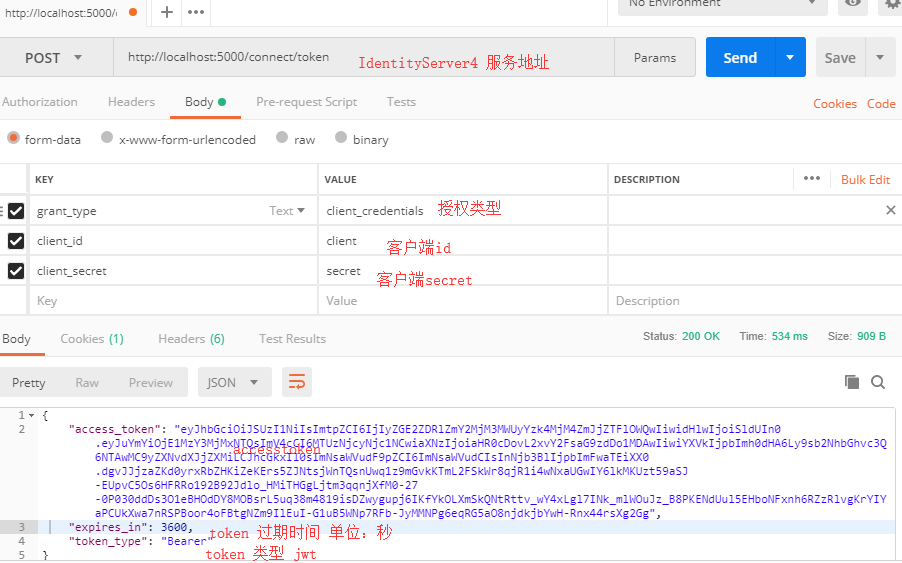
十.使用Postman调试
十一.项目所用代码
github地址: https://github.com/stulzq/IdentityServer4.Samples/tree/master/Quickstarts/1_ClientCredentials
IdentityServer4(7)- 使用客户端认证控制API访问(客户端授权模式)的更多相关文章
- IdentityServer4[3]:使用客户端认证控制API访问(客户端授权模式)
使用客户端认证控制API访问(客户端授权模式) 场景描述 使用IdentityServer保护API的最基本场景. 我们定义一个API和要访问API的客户端.客户端从IdentityServer请求A ...
- ASP.NET Core的身份认证框架IdentityServer4(7)- 使用客户端证书控制API访问
前言 今天(2017-9-8,写于9.8,今天才发布)一口气连续把最后几篇IdentityServer4相关理论全部翻译完了,终于可以进入写代码的过程了,比较累.目前官方的文档和Demo以及一些相关组 ...
- API访问客户端
API访问客户端(WebApiClient适用于MVC/WebForms/WinForm) 这几天没更新主要是因为没有一款合适的后端框架来支持我们的Web API项目Demo, 所以耽误了几天, 目前 ...
- Identity Server 4客户端认证控制访问API
项目源码: 链接:https://pan.baidu.com/s/1H3Y0ct8xgfVkgq4XsniqFA 提取码:nzl3 一.说明 我们将定义一个api和要访问它的客户端,客户端将在iden ...
- .NET Core IdentityServer4实战 第一章-入门与API添加客户端凭据
内容:本文带大家使用IdentityServer4进行对API授权保护的基本策略 作者:zara(张子浩) 欢迎分享,但需在文章鲜明处留下原文地址. 本文将要讲述如何使用IdentityServer4 ...
- ASP.NET Core的身份认证框架IdentityServer4(8)- 使用密码认证方式控制API访问
前言 本文及IdentityServer这个系列使用的都是基于.net core 2.0的.上一篇博文在API项目中我使用了icrosoft.AspNetCore.Authentication.Jwt ...
- IdentityServer4(8)- 使用密码认证方式控制API访问(资源所有者密码授权模式)
一.前言 本文已经更新到 .NET Core 2.2 OAuth 2.0 资源所有者密码模式允许客户端向令牌服务发送用户名和密码,并获取代表该用户的访问令牌. 除了通过无法浏览器进行交互的应用程序之外 ...
- 【WEB API项目实战干货系列】- API访问客户端(WebApiClient适用于MVC/WebForms/WinForm)(四)
这几天没更新主要是因为没有一款合适的后端框架来支持我们的Web API项目Demo, 所以耽误了几天, 目前最新的代码已经通过Sqlite + NHibernate + Autofac满足了我们基本的 ...
- Identity Server 4资源拥有者密码认证控制访问API
基于上一篇文章中的代码进行继续延伸,只需要小小的改动即可,不明白的地方可以先看看本人上一篇文章及源码: Identity Server 4客户端认证控制访问API 一.QuickStartIdenti ...
随机推荐
- Filter的介绍及使用
转:http://blog.csdn.net/zhaozheng7758/article/details/6105749 一.Filter的介绍及使用 什么是过滤器? 与Servlet相似,过滤器是一 ...
- mac mysql5.7.17修改root初始密码(知道初始密码)
最近在mac上装个mysql可以说是麻烦死了,在这里就说说修改初始密码吧! 刚开始的时候不知道怎么修改,于是上网百度,网上几乎都是说要先执行命令mysqld_safe --skip-grant-tab ...
- 前端ajax技术之跨域问题解决
这里我使用jquery框架的ajax技术 <script type="text/javascript" src="Assets/js/jquery.min.js&q ...
- 移动端比较好用的滑动条 vue-slider-component
安装: npm install vue-slider-component <template> <div> <vue-slider v-model="value ...
- CSS追加笔记
box-shadow 属性向框添加一个或多个阴影. 语法 box-shadow: h-shadow v-shadow blur spread color inset;注释:box-shadow 向框添 ...
- fastjson 序列化,反序列化Map对象的顺序问题
使用JSONObject 读取JSON字符串时,读取出来的数据,通过变量时是无序的. 但是业务希望返回是顺序的. String str="{name:\"A\",add ...
- 图像之王ImageMagick
这是我目前能想到的名字.很久前某图像群看到有人推荐过,试了一下确实厉害,支持的格式之多让人叹服. http://www.imagemagick.org/script/formats.php 一般用法 ...
- python删除文件和文件夹
python中删除文件:os.remove(path) path为文件的路径 import os os.remove(path) python中删除文件夹:shutil.rmtree(path) pa ...
- 【转】python3 内循环中遍历map,遍历一遍后再次进入内循环,map为空
今天在使用python map的过程中,发现了一个奇怪问题,map遍历完成后,再次访问map,发现map为空了,特记录下来,以备日后查看. 如下代码,期望的结果是每次从外循环进入内循环,map都从头开 ...
- Open/Close Port in Centos
1. Show status /etc/init.d/iptables status 2.Set Port iptables -I INPUT -p tcp --dport 80 -j ACCEPT ...