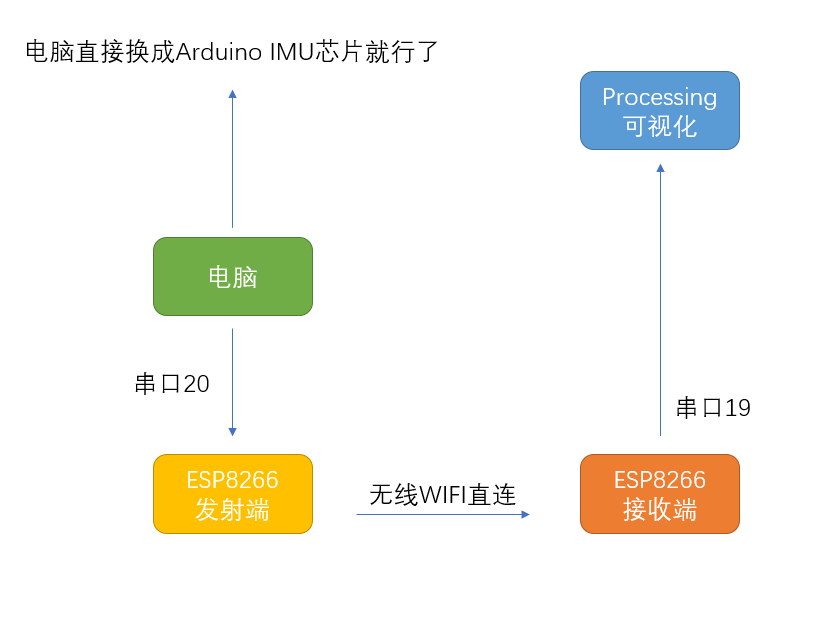
ARDUNIO IMU processing姿态数据可视化
https://www.arduino.cn/thread-42852-1-1.html

关键数据打包
float roll, pitch, heading;
 Serial.print("Orientation: ");

    Serial.print(heading);

    Serial.print(" ");

    Serial.print(pitch);

    Serial.print(" ");

    Serial.println(roll);
接受判断关键 13 ascll码 换行标志位
发射端
#include <ESP8266WiFi.h>

const char *ssid = "esp8266_666";

const char *password = "12345678";

WiFiServer server(8266);

void setup()

{

  Serial.begin(115200);

  Serial.println();

  Serial.print("Setting soft-AP ... ");

IPAddress softLocal(192,168,1,1);

IPAddress softGateway(192,168,1,1);

IPAddress softSubnet(255,255,255,0);

WiFi.softAPConfig(softLocal, softGateway, softSubnet);

WiFi.softAP(ssid, password);

IPAddress myIP = WiFi.softAPIP();

  Serial.print("AP IP address: ");

  Serial.println(myIP);

 server.begin();

 Serial.printf("Web server started, open %s in a web browser\n", WiFi.localIP().toString().c_str());

}

    float roll, pitch, heading;

void loop()

{

 WiFiClient client = server.available();

 if (client)

  {

    Serial.println("\n[Client connected]");

    while (client.connected())

    {

 //  将串口数据打印给TCP

  if(Serial.available()){

    size_t len = Serial.available();

    uint8_t sbuf[len];

    Serial.readBytes(sbuf, len);

    client.write(sbuf, len);

    delay(1);

    }

    roll=roll+10; pitch=pitch+10; heading=heading+10;

    Serial.print("Orientation: ");

    Serial.print(heading);

    Serial.print(" ");

    Serial.print(pitch);

    Serial.print(" ");

    Serial.println(roll);

     delay(1000);

  // 将TCP数据打印给串口

      if (client.available())

      {

       //  String line = client.readStringUntil(13);// arduino换行符号  ascll码 13

        String line = client.readStringUntil('\r');

        Serial.println(line);

      }

    }

    delay(1);

  //  client.stop();

    Serial.println("[Client disonnected]");

  }

 }
接收端
#include <ESP8266WiFi.h>

const char* ssid = "esp8266_666";

const char* password = "12345678";

const char* host = "192.168.1.1";

  const int httpPort = 8266;

IPAddress staticIP(192,168,1,22);

IPAddress gateway(192,168,1,1);

IPAddress subnet(255,255,255,0);

WiFiClient client;

void setup(void)

{

  Serial.begin(115200);

  Serial.println();

  Serial.printf("Connecting to %s\n", ssid);

  WiFi.config(staticIP, gateway, subnet);

  WiFi.begin(ssid, password);

  while (WiFi.status() != WL_CONNECTED)

  {

    delay(500);

    Serial.print(".");

  }

  Serial.println();

  Serial.print("Connected, IP address: ");

  Serial.println(WiFi.localIP());

  if (!client.connect(host, httpPort)) {

    Serial.println("connection failed");

    return;

  }

}

void loop() {

 // client.print("abc\r");

 // delay(1000);

   while(client.available()){

   //int newLine = 13;

    String line = client.readStringUntil(13);//结束标志 换行,新ascll码

   // String line = client.readStringUntil('\r');

    Serial.println(line);

  }

  }
IMU程序
注意修改波特率
]#include <CurieIMU.h>

#include <MadgwickAHRS.h>

Madgwick filter;

unsigned long microsPerReading, microsPrevious;

float accelScale, gyroScale;

void setup() {

  Serial.begin(115200);

  // 初始化IMU和滤波器

  CurieIMU.begin();

  CurieIMU.setGyroRate(25);

  CurieIMU.setAccelerometerRate(25);

  filter.begin(25);

  // 设置加速度计测量范围为2G

  CurieIMU.setAccelerometerRange(2);

  // 设置陀螺仪测量范围为+/-250°/s

  CurieIMU.setGyroRange(250);

  // 初始化用于调整更新速率的变量

  microsPerReading = 1000000 / 25;

  microsPrevious = micros();

  //陀螺仪校准

  Serial.print("Starting Gyroscope calibration and enabling offset compensation...");

  CurieIMU.autoCalibrateGyroOffset();

  Serial.println(" Done");

  //加速度计校准

  Serial.print("Starting Acceleration calibration and enabling offset compensation...");

  CurieIMU.autoCalibrateAccelerometerOffset(X_AXIS, 0);

  CurieIMU.autoCalibrateAccelerometerOffset(Y_AXIS, 0);

  CurieIMU.autoCalibrateAccelerometerOffset(Z_AXIS, 1);

  Serial.println(" Done");

}

void loop() {

  int aix, aiy, aiz;

  int gix, giy, giz;

  float ax, ay, az;

  float gx, gy, gz;

  float roll, pitch, heading;

  unsigned long microsNow;

  // 按设定读取频率,读取数据并更新滤波器

  microsNow = micros();

  if (microsNow - microsPrevious >= microsPerReading) {

    // 读取IMU原始数据

    CurieIMU.readMotionSensor(aix, aiy, aiz, gix, giy, giz);

    // convert from raw data to gravity and degrees/second units

    ax = convertRawAcceleration(aix);

    ay = convertRawAcceleration(aiy);

    az = convertRawAcceleration(aiz);

    gx = convertRawGyro(gix);

    gy = convertRawGyro(giy);

    gz = convertRawGyro(giz);

    // 更新滤波器,并进行相关运算

    filter.updateIMU(gx, gy, gz, ax, ay, az);

    // 获取并输出AHRS姿态数据

    roll = filter.getRoll();

    pitch = filter.getPitch();

    heading = filter.getYaw();

    Serial.print("Orientation: ");

    Serial.print(heading);

    Serial.print(" ");

    Serial.print(pitch);

    Serial.print(" ");

    Serial.println(roll);

    // 计时

    microsPrevious = microsPrevious + microsPerReading;

  }

}

float convertRawAcceleration(int aRaw) {

  float a = (aRaw * 2.0) / 32768.0;

  return a;

}

float convertRawGyro(int gRaw) {

  float g = (gRaw * 250.0) / 32768.0;

  return g;

}
上位机processing可视化
注意修改波特率和串口
myPort = new Serial(this, "COM19", 115200);
import processing.serial.*;

Serial myPort;

float yaw = 0.0;

float pitch = 0.0;

float roll = 0.0;

void setup()

{

  size(600, 500, P3D);

  // if you have only ONE serial port active

  //myPort = new Serial(this, Serial.list()[0], 9600); // if you have only ONE serial port active

  // if you know the serial port name

  myPort = new Serial(this, "COM19", 115200);                    // Windows

  //myPort = new Serial(this, "/dev/ttyACM0", 9600);             // Linux

  //myPort = new Serial(this, "/dev/cu.usbmodem1217321", 9600);  // Mac

  textSize(16); // set text size

  textMode(SHAPE); // set text mode to shape

}

void draw()

{

  serialEvent();  // read and parse incoming serial message

  background(255); // set background to white

  lights();

  translate(width/2, height/2); // set position to centre

  pushMatrix(); // begin object

  float c1 = cos(radians(roll));

  float s1 = sin(radians(roll));

  float c2 = cos(radians(pitch));

  float s2 = sin(radians(pitch));

  float c3 = cos(radians(yaw));

  float s3 = sin(radians(yaw));

  applyMatrix( c2*c3, s1*s3+c1*c3*s2, c3*s1*s2-c1*s3, 0,

               -s2, c1*c2, c2*s1, 0,

               c2*s3, c1*s2*s3-c3*s1, c1*c3+s1*s2*s3, 0,

               0, 0, 0, 1);

  drawArduino();

  popMatrix(); // end of object

  // Print values to console

  print(roll);

  print("\t");

  print(pitch);

  print("\t");

  print(yaw);

  println();

}

void serialEvent()

{

  int newLine = 13; //13 new line character in ASCII

  String message;

  do {

    message = myPort.readStringUntil(newLine); // read from port until new line

    if (message != null) {

      String[] list = split(trim(message), " ");

      if (list.length >= 4 && list[0].equals("Orientation:")) {

        yaw = float(list[1]); // convert to float yaw

        pitch = float(list[2]); // convert to float pitch

        roll = float(list[3]); // convert to float roll

      }

    }

  } while (message != null);

}

void drawArduino()

{

  /* function contains shape(s) that are rotated with the IMU */

  stroke(0, 90, 90); // set outline colour to darker teal

  fill(0, 130, 130); // set fill colour to lighter teal

  box(300, 10, 200); // draw Arduino board base shape

  stroke(0); // set outline colour to black

  fill(80); // set fill colour to dark grey

  translate(60, -10, 90); // set position to edge of Arduino box

  box(170, 20, 10); // draw pin header as box

  translate(-20, 0, -180); // set position to other edge of Arduino box

  box(210, 20, 10); // draw other pin header as box

}
ARDUNIO IMU processing姿态数据可视化的更多相关文章
- 基于Processing的数据可视化
虽然数据可视化领域有很多成熟.界面友好.功能强大的软件产品(例如Tableau.VIDI.NodeXL等),但是借助Processing我们可以基于Java语言框架进行丰富多元的可视化编程,熟悉了Pr ...
- 动态可视化 数据可视化之魅D3,Processing,pandas数据分析,科学计算包Numpy,可视化包Matplotlib,Matlab语言可视化的工作,Matlab没有指针和引用是个大问题
动态可视化 数据可视化之魅D3,Processing,pandas数据分析,科学计算包Numpy,可视化包Matplotlib,Matlab语言可视化的工作,Matlab没有指针和引用是个大问题 D3 ...
- 数据可视化之Processing【1】
说Processing之前得先说一下数据可视化. 数据可视化--顾名思义.是关于数据之视觉表现形式的研究,将数据用其它方式表现出来,使之更直观, 更清晰,更easy分析和处理.常见的表达方式如word ...
- 地理数据可视化:Simple,Not Easy
如果要给2015年的地理信息行业打一个标签,地理大数据一定是其中之一.在信息技术飞速发展的今天,“大数据”作为一种潮流铺天盖地的席卷了各行各业,从央视的春运迁徙图到旅游热点预测,从大数据工程师奇货可居 ...
- 数据可视化的优秀入门书籍有哪些,D3.js 学习资源汇总
习·D3.js 学习资源汇总 除了D3.js自身以外,许多可视化工具包都是基于D3开发的,所以对D3的学习就显得很重要了,当然如果已经有了Javascript的经验,学起来也会不费力些. Github ...
- 数据可视化之 tick_params( 参数 )
参考:https://blog.csdn.net/helunqu2017/article/details/78736554/ 初学数据可视化,遇到了tick_params() 里面传参数问题,找了一些 ...
- 4款开源免费的数据可视化JavaScript库
概述:交互式数据可视化在很大程度上取决于JavaScript库的任务能力.在这篇文章中,我们将看看四个JavaScript库:D3,InfoVis,Processing.js,和Recline.js. ...
- 超级干货 :一文读懂数据可视化 ZT
前言 数据可视化,是指将相对晦涩的的数据通过可视的.交互的方式进行展示,从而形象.直观地表达数据蕴含的信息和规律. 早期的数据可视化作为咨询机构.金融企业的专业工具,其应用领域较为单一,应用形态较为保 ...
- PoPo数据可视化周刊第3期 - 台风可视化
9月台风席卷全球,本刊特别选取台风最佳可视化案例,数据可视化应用功力最深厚者,当属纽约时报,而传播效果最佳的是The Weather Channel关于Florence的视频预报,运用了数据可视化.可 ...
随机推荐
- 2019-7-18 collections,time,random,os,sys,序列化模块(json和pickle)应用
一.collections模块 1.具名元组:namedtuple(生成可以使用名字来访问元素的tuple) 表示坐标点x为1 y为2的坐标 注意:第二个参数可以传可迭代对象,也可以传字符串,但是字 ...
- C# 录音和变调
一直想研究下录音 正好有个项目有机会使用一下强大的 NAudio (https://github.com/naudio/NAudio)库 录音 NAudio 录音类库 public class NAu ...
- IDEA远程调试Ambari Server
1.配置端口 Ambari Server默认配置了服务端的debug参数,端口为5005.如果要修改端口,可以在/usr/sbin/ambari_server_main.py文件中对应地方修改,直接改 ...
- 在Windows中运行Linux bash命令的几种方法
如果你正在课程中正在学习 shell 脚本,那么需要使用 Linux 命令来练习命令和脚本. 你的学校实验室可能安装了 Linux,但是你自己没有安装了 Linux 的笔记本电脑,而是像其他人一样的 ...
- 原生JavaScript遮罩
/* 适用原生JS */ function showInfo(info) { var zzInfo = info; var mask_bg = document.createEleme ...
- VUE基础回顾6
1.ref ref可以直接访问元素,而不需要使用querySelector或者其他dom节点的原生方法. <div ref = "box"></div> 在 ...
- vue-cli3使用svg
(根据网上教程实操,仅作个记录) 执行命令安装插件 npm install svg-sprite-loader --save-dev 在vue.config.js中,添加配置 module.expor ...
- JavaScript学习笔记(6月份)
由于笔记比较杂,本身学习程度并不理想,所以暂时没有整理这些繁杂的笔记. ps:博客园markdown用起来和看起来都舒服太多了,这才是我了解的那个markdown,又回来了! 笔记 DOM对象 doc ...
- react native错误排查-TypeError: window.deltaUrlToBlobUrl is not a function
错误现象:window.deltaUrlToBlobUrl is not a function 最近在调试react-native时,打开浏览器调试时发现报错window.deltaUrlToBlob ...
- C#数字千分位
C#中把数字转换成带两位小数的千分位字符 如1234567.891变成1,234,567.89 方法:String.Format("{0:N}",1234567.891); / ...