机器学习:DeepDreaming with TensorFlow (三)
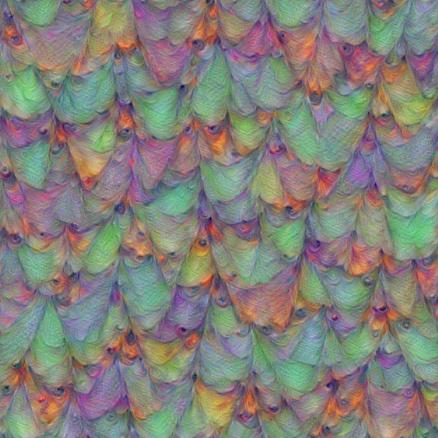
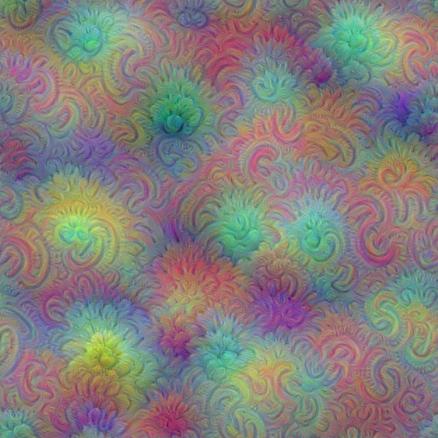
我们看到,利用TensorFlow 和训练好的Googlenet 可以生成多尺度的pattern,那些pattern看起来比起单一通道的pattern你要更好,但是有一个问题就是多尺度的pattern里高频分量太多,显得图像的噪点很多,为了解决这个问题,可以进一步的引入一个先验平滑函数,这样每次迭代的时候可以对图像进行模糊,去除高频分量,这样一般来说需要更多的迭代次数,另一种方式就是每次迭代中增强低频分量的梯度,这种技术被称为: 拉普拉斯金字塔分解,这里我们就要用到这种技术,我们称为:Laplacian Pyramid Gradient Normalization,利用LPGN,可以使生成的多尺度pattern图像更加平滑:
Laplacian Pyramid Gradient Normalization
# boilerplate code

from __future__ import print_function

import os

from io import BytesIO

import numpy as np

from functools import partial

import PIL.Image

from IPython.display import clear_output, Image, display, HTML

import tensorflow as tf

# !wget https://storage.googleapis.com/download.tensorflow.org/models/inception5h.zip && unzip inception5h.zip

model_fn = 'tensorflow_inception_graph.pb'

# creating TensorFlow session and loading the model

graph = tf.Graph()

sess = tf.InteractiveSession(graph=graph)

with tf.gfile.FastGFile(model_fn, 'rb') as f:

    graph_def = tf.GraphDef()

    graph_def.ParseFromString(f.read())

t_input = tf.placeholder(np.float32, name='input') # define the input tensor

imagenet_mean = 117.0

t_preprocessed = tf.expand_dims(t_input-imagenet_mean, 0)

tf.import_graph_def(graph_def, {'input':t_preprocessed})

layers = [op.name for op in graph.get_operations() if op.type=='Conv2D' and 'import/' in op.name]

feature_nums = [int(graph.get_tensor_by_name(name+':0').get_shape()[-1]) for name in layers]

print('Number of layers', len(layers))

print('Total number of feature channels:', sum(feature_nums))

# Picking some internal layer. Note that we use outputs before applying the ReLU nonlinearity

# to have non-zero gradients for features with negative initial activations.

layer = 'mixed4b_3x3_bottleneck_pre_relu'

channel = 24      # picking some feature channel to visualize

# start with a gray image with a little noise

img_noise = np.random.uniform(size=(224,224,3)) + 100.0

def showarray(a, fmt='jpeg'):

    a = np.uint8(np.clip(a, 0, 1)*255)

    f = BytesIO()

    PIL.Image.fromarray(a).save(f, fmt)

    display(Image(data=f.getvalue()))

def visstd(a, s=0.1):

    # Normalize the image range for visualization

    return (a-a.mean())/max(a.std(), 1e-4)*s + 0.5

def T(layer):

    # Helper for getting layer output tensor

    return graph.get_tensor_by_name("import/%s:0"%layer)

def tffunc(*argtypes):

    # Helper that transforms TF-graph generating function into a regular one.

    # See "resize" function below.

    placeholders = list(map(tf.placeholder, argtypes))

    def wrap(f):

        out = f(*placeholders)

        def wrapper(*args, **kw):

            return out.eval(dict(zip(placeholders, args)), session=kw.get('session'))

        return wrapper

    return wrap

# Helper function that uses TF to resize an image

def resize(img, size):

    img = tf.expand_dims(img, 0)

    return tf.image.resize_bilinear(img, size)[0,:,:,:]

resize = tffunc(np.float32, np.int32)(resize)

def calc_grad_tiled(img, t_grad, tile_size=512):

    # Compute the value of tensor t_grad over the image in a tiled way.

    # Random shifts are applied to the image to blur tile boundaries over

    # multiple iterations.

    sz = tile_size

    h, w = img.shape[:2]

    sx, sy = np.random.randint(sz, size=2)

    img_shift = np.roll(np.roll(img, sx, 1), sy, 0)

    grad = np.zeros_like(img)

    for y in range(0, max(h-sz//2, sz),sz):

        for x in range(0, max(w-sz//2, sz),sz):

            sub = img_shift[y:y+sz,x:x+sz]

            g = sess.run(t_grad, {t_input:sub})

            grad[y:y+sz,x:x+sz] = g

    return np.roll(np.roll(grad, -sx, 1), -sy, 0)

# Laplacian Pyramid Gradient Normalization

k = np.float32([1,4,6,4,1])

k = np.outer(k, k)

k5x5 = k[:,:,None,None]/k.sum()*np.eye(3, dtype=np.float32)

def lap_split(img):

    # Split the image into lo and hi frequency components

    with tf.name_scope('split'):

        lo = tf.nn.conv2d(img, k5x5, [1,2,2,1], 'SAME')

        lo2 = tf.nn.conv2d_transpose(lo, k5x5*4, tf.shape(img), [1,2,2,1])

        hi = img-lo2

    return lo, hi

def lap_split_n(img, n):

    # Build Laplacian pyramid with n splits

    levels = []

    for i in range(n):

        img, hi = lap_split(img)

        levels.append(hi)

    levels.append(img)

    return levels[::-1]

def lap_merge(levels):

    # Merge Laplacian pyramid

    img = levels[0]

    for hi in levels[1:]:

        with tf.name_scope('merge'):

            img = tf.nn.conv2d_transpose(img, k5x5*4, tf.shape(hi), [1,2,2,1]) + hi

    return img

def normalize_std(img, eps=1e-10):

    # Normalize image by making its standard deviation = 1.0

    with tf.name_scope('normalize'):

        std = tf.sqrt(tf.reduce_mean(tf.square(img)))

        return img/tf.maximum(std, eps)

def lap_normalize(img, scale_n=4):

    # Perform the Laplacian pyramid normalization

    img = tf.expand_dims(img,0)

    tlevels = lap_split_n(img, scale_n)

    tlevels = list(map(normalize_std, tlevels))

    out = lap_merge(tlevels)

    return out[0,:,:,:]

def render_lapnorm(t_obj, img0=img_noise, visfunc=visstd,

                   iter_n=10, step=1.0, octave_n=3, octave_scale=1.4, lap_n=4):

    t_score = tf.reduce_mean(t_obj) # defining the optimization objective

    t_grad = tf.gradients(t_score, t_input)[0] # behold the power of automatic differentiation!

    # build the laplacian normalization graph

    lap_norm_func = tffunc(np.float32)(partial(lap_normalize, scale_n=lap_n))

    img = img0.copy()

    for octave in range(octave_n):

        if octave>0:

            hw = np.float32(img.shape[:2])*octave_scale

            img = resize(img, np.int32(hw))

        for i in range(iter_n):

            g = calc_grad_tiled(img, t_grad)

            g = lap_norm_func(g)

            img += g*step

            print('.', end = ' ')

        clear_output()

        showarray(visfunc(img))

render_lapnorm(T(layer)[:,:,:,channel])

# render_lapnorm(T(layer)[:,:,:,65])

# render_lapnorm(T('mixed3b_1x1_pre_relu')[:,:,:,101])

# render_lapnorm(T(layer)[:,:,:,65]+T(layer)[:,:,:,139], octave_n=4)
生成的效果图如下所示:
Deepdream
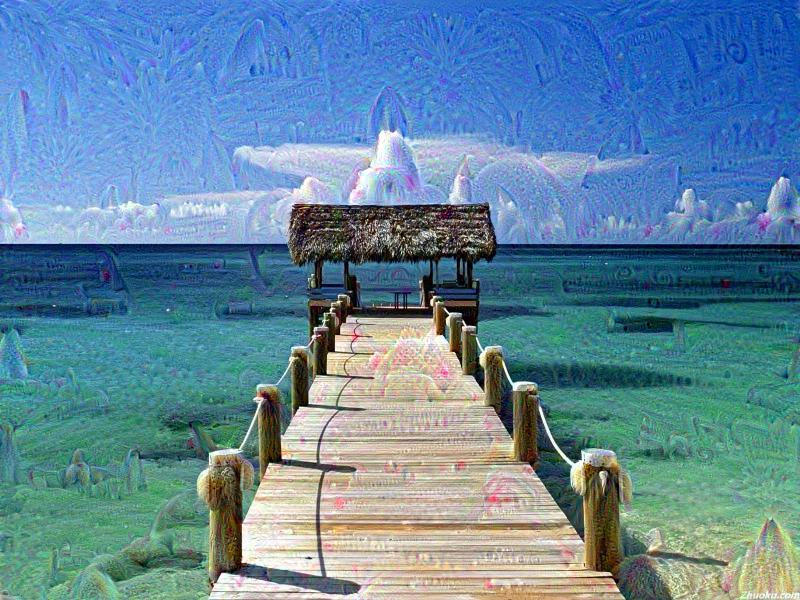
最后,我们再来看看Deep dream的生成,
def render_deepdream(t_obj, img0=img_noise,

                     iter_n=10, step=1.5, octave_n=4, octave_scale=1.4):

    t_score = tf.reduce_mean(t_obj) # defining the optimization objective

    t_grad = tf.gradients(t_score, t_input)[0] # behold the power of automatic differentiation!

    # split the image into a number of octaves

    img = img0

    octaves = []

    for i in range(octave_n-1):

        hw = img.shape[:2]

        lo = resize(img, np.int32(np.float32(hw)/octave_scale))

        hi = img-resize(lo, hw)

        img = lo

        octaves.append(hi)

    # generate details octave by octave

    for octave in range(octave_n):

        if octave>0:

            hi = octaves[-octave]

            img = resize(img, hi.shape[:2])+hi

        for i in range(iter_n):

            g = calc_grad_tiled(img, t_grad)

            img += g*(step / (np.abs(g).mean()+1e-7))

            print('.',end = ' ')

        clear_output()

        showarray(img/255.0)

img0 = PIL.Image.open('1.jpg')

img0 = np.float32(img0)

showarray(img0/255.0)

# render_deepdream(T(layer)[:,:,:,139], img0)

# render_deepdream(tf.square(T('mixed4c')), img0)
原图如下所示:

生成的效果图如下所示:

参考来源
机器学习:DeepDreaming with TensorFlow (三)的更多相关文章
- 机器学习: DeepDreaming with TensorFlow (一)
在TensorFlow 的官网上,有一个很有趣的教程,就是用 TensorFlow 以及训练好的深度卷积神经(GoogleNet)网络去生成一些有趣的pattern,通过这些pattern,可以更加深 ...
- 周志华-机器学习西瓜书-第三章习题3.5 LDA
本文为周志华机器学习西瓜书第三章课后习题3.5答案,编程实现线性判别分析LDA,数据集为书本第89页的数据 首先介绍LDA算法流程: LDA的一个手工计算数学实例: 课后习题的代码: # coding ...
- 机器学习之支持向量机(三):核函数和KKT条件的理解
注:关于支持向量机系列文章是借鉴大神的神作,加以自己的理解写成的:若对原作者有损请告知,我会及时处理.转载请标明来源. 序: 我在支持向量机系列中主要讲支持向量机的公式推导,第一部分讲到推出拉格朗日对 ...
- Google机器学习课程基于TensorFlow : https://developers.google.cn/machine-learning/crash-course
Google机器学习课程基于TensorFlow : https://developers.google.cn/machine-learning/crash-course https ...
- Andrew Ng机器学习课程笔记(三)之正则化
Andrew Ng机器学习课程笔记(三)之正则化 版权声明:本文为博主原创文章,转载请指明转载地址 http://www.cnblogs.com/fydeblog/p/7365475.html 前言 ...
- 系统学习机器学习之神经网络(三)--GA神经网络与小波神经网络WNN
系统学习机器学习之神经网络(三)--GA神经网络与小波神经网络WNN 2017年01月09日 09:45:26 Eason.wxd 阅读数 14135更多 分类专栏: 机器学习 1 遗传算法1.1 ...
- 机器学习:DeepDreaming with TensorFlow (二)
在前面一篇博客里,我们介绍了利用TensorFlow 和训练好的 Googlenet 来生成简单的单一通道的pattern,接下来,我们要进一步生成更为有趣的一些pattern,之前的简单的patte ...
- .NET平台机器学习组件-Infer.NET(三) Learner API—数据映射与序列化
所有文章分类的总目录:http://www.cnblogs.com/asxinyu/p/4288836.html 微软Infer.NET机器学习组件:http://www.cnblo ...
- ML.NET 发布0.11版本:.NET中的机器学习,为TensorFlow和ONNX添加了新功能
微软发布了其最新版本的机器学习框架:ML.NET 0.11带来了新功能和突破性变化. 新版本的机器学习开源框架为TensorFlow和ONNX添加了新功能,但也包括一些重大变化, 这也是发布RC版本之 ...
随机推荐
- api接口安全以及https
一:加密方法: 1,对称加密 AES,3DES,DES等,适合做大量数据或数据文件的加解密. 2,非对称加密 如RSA,Rabin.公钥加密,私钥解密.对大数据量进行加解密时性能较低. 二:https ...
- 【例题3-1 UVA - 272 】TEX Quotes
[链接] 我是链接,点我呀:) [题意] 在这里输入题意 [题解] 大水题. 用一个int记录遇到的是左括号还是右括号. [错的次数] 在这里输入错的次数 [反思] 在这里输入反思 [代码] #inc ...
- swift学习第九天:可选类型以及应用场景
可选类型的介绍 注意: 可选类型时swift中较理解的一个知识点 暂时先了解,多利用Xcode的提示来使用 随着学习的深入,慢慢理解其中的原理和好处 概念: 在OC开发中,如果一个变量暂停不使用,可以 ...
- php模拟post提交文件图片等
<?php /** * Email net.webjoy@gmail.com * author jackluo * 2014.11.21 * */ //* function curl_post( ...
- 摘录-MYSQL5.7版本sql_mode=only_full_group_by问题
下载安装的是最新版的mysql5.7.x版本,默认是开启了 only_full_group_by 模式的,但开启这个模式后,原先的 group by 语句就报错,然后又把它移除了. 一旦开启 only ...
- [转载]Ocelot简易教程(三)之主要特性及路由详解
上篇<Ocelot简易教程(二)之快速开始2>教大家如何快速跑起来一个ocelot实例项目,也只是简单的对Ocelot进行了配置,这篇文章会给大家详细的介绍一下Ocelot的配置信息.希望 ...
- RGCDQ(线段树+数论)
题意:求n和m之间的全部数的素因子个数的最大gcd值. 分析:这题好恶心.看着就是一颗线段树.但本题有一定的规律,我也是后来才发现,我还没推出这个规律.就不说了,就用纯线段树解答吧. 由于个点数都小于 ...
- AJAX 相关笔记
AJAX (Asynchronous JavaScript and XML(异步的 JavaScript 和 XML)). 平时工作中使用ajax的频率挺高的,这里整理了一些ajax相关的小知识,后续 ...
- vs 错误提示及解决方案
错误: 应输入";" 错误原因,宏展开出现错误:
- 【hdu 4315】Climbing the Hill
Time Limit: 2000/1000 MS (Java/Others) Memory Limit: 32768/32768 K (Java/Others) Total Submission(s) ...