使用Visual Studio Code开发Asp.Net Core WebApi学习笔记(四)-- Middleware
本文记录了Asp.Net管道模型和Asp.Net Core的Middleware模型的对比,并在上一篇的基础上增加Middleware功能支持。
在演示Middleware功能之前,先要了解一下Asp.Net管道模型发生了什么样的变化。
第一部分:管道模型
1. Asp.Net管道
在之前的Asp.Net里,主要的管道模型流程如下图所示:
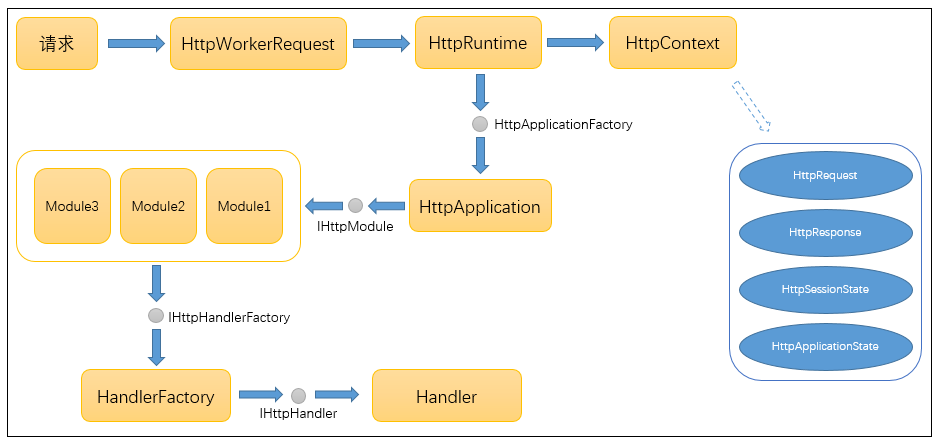
请求进入Asp.Net工作进程后,由进程创建HttpWorkRequest对象,封装此次请求有关的所有信息,然后进入HttpRuntime类进行进一步处理。HttpRuntime通过请求信息创建HttpContext上下文对象,此对象将贯穿整个管道,直到响应结束。同时创建或从应用程序池里初始化一个HttpApplication对象,由此对象开始处理之前注册的多个HttpModule。之后调用HandlerFactory创建Handler处理程序,最终处理此次请求内容,生成响应返回。
下面用一个简单的Asp.Net程序来验证这个流程。
使用VS2015创建一个空的Asp.Net项目,根据向导添加HttpModule.cs、HttpHandler.cs、Global.asax文件
 using System.Web;

 namespace WebApplicationTest

 {

     public class HttpModule1 : IHttpModule

     {

         public void Dispose()

         {

         }

         public void Init(HttpApplication context)

         {

             context.BeginRequest += (sender, e) =>

             {

                 context.Response.Write("HttpModule1 request begin....<br />");

             };

             context.EndRequest += (sender, e) =>

             {

                 context.Response.Write("HttpModule1 request end!<br />");

             };

         }

     }

     public class HttpModule2 : IHttpModule

     {

         public void Dispose()

         {

         }

         public void Init(HttpApplication context)

         {

             context.BeginRequest += (sender, e) =>

             {

                 context.Response.Write("HttpModule2 request begin....<br />");

             };

             context.EndRequest += (sender, e) =>

             {

                 context.Response.Write("HttpModule2 request end!<br />");

             };

         }

     }

     public class HttpModule3 : IHttpModule

     {

         public void Dispose()

         {

         }

         public void Init(HttpApplication context)

         {

             context.BeginRequest += (sender, e) =>

             {

                 context.Response.Write("HttpModule3 request begin....<br />");

             };

             context.EndRequest += (sender, e) =>

             {

                 context.Response.Write("HttpModule3 request end!<br />");

             };

         }

     }

 }
HttpModule.cs
 using System.Web;

 namespace WebApplicationTest

 {

     public class HttpHandler : IHttpHandler

     {

         public bool IsReusable

         {

             get

             {

                 return true;

             }

         }

         public void ProcessRequest(HttpContext context)

         {

             context.Response.ContentType = "text/html";

             context.Response.Write("Hello world!<br />");

             context.Response.End();

         }

     }

 }
HttpHandler.cs
配置Web.Config。以下是在IIS7环境下的配置内容。
 <?xml version="1.0" encoding="utf-8"?>

 <!--

   有关如何配置 ASP.NET 应用程序的详细信息,请访问

   http://go.microsoft.com/fwlink/?LinkId=169433

   -->

 <configuration>

   <system.web>

     <compilation debug="true" targetFramework="4.5"/>

     <httpRuntime targetFramework="4.5"/>

   </system.web>

   <system.webServer>

     <validation validateIntegratedModeConfiguration="false"/>

     <handlers>

       <add name="handler" verb="GET" path="index.handler" type="WebApplicationTest.HttpHandler,WebApplicationTest"/>

     </handlers>

     <modules>

       <add name="module1" type="WebApplicationTest.HttpModule1,WebApplicationTest"/>

       <add name="module2" type="WebApplicationTest.HttpModule2,WebApplicationTest"/>

       <add name="module3" type="WebApplicationTest.HttpModule3,WebApplicationTest"/>

     </modules>

   </system.webServer>

 </configuration>
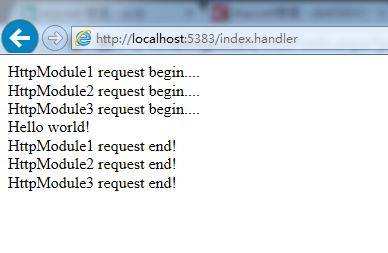
启动调试,访问地址 http://localhost:5383/index.handler ,可以看到页面内容。
之前版本的Asp.Net MVC正是通过 UrlRoutingModule.cs 类和 MvcHandler.cs 类进行扩展从而实现了MVC框架。
2、Asp.Net Core管道
而在Asp.Net Core里面,管道模型流程发生了很大的变化:
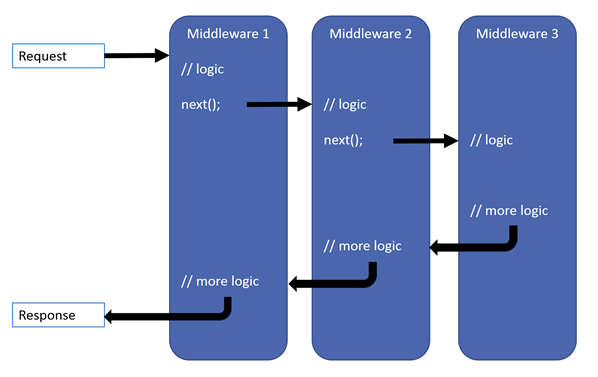
IHttpModule和IHttpHandler不复存在,取而代之的是一个个中间件(Middleware)。
Server将接收到的请求直接向后传递,依次经过每一个中间件进行处理,然后由最后一个中间件处理并生成响应内容后回传,再反向依次经过每个中间件,直到由Server发送出去。
中间件就像一层一层的“滤网”,过滤所有的请求和相应。这一设计非常适用于“请求-响应”这样的场景——消息从管道头流入最后反向流出。
接下来将演示在Asp.Net Core里如何实现中间件功能。
第二部分、Middleware
其实,在这个系列的第一篇里面,已经展示了管道的一个简单用法。这里再详细讲解一下如何实现自定义管道。
Middleware支持Run、Use和Map三种方法进行注册,下面将展示每一种方法的使用方式。
一、Run方法
所有需要实现的自定义管道都要在 Startup.cs 的 Configure 方法里添加注册。
         public void Configure(IApplicationBuilder app, ILoggerFactory loggerFactory)

         {

             // 添加日志支持

             loggerFactory.AddConsole();

             loggerFactory.AddDebug();

             // 添加NLog日志支持

             loggerFactory.AddNLog();

             // 添加自定义中间件

             app.Run(async context =>

             {

                 await context.Response.WriteAsync("Hello World!");

             });

             // 添加MVC中间件

             //app.UseMvc();

         }
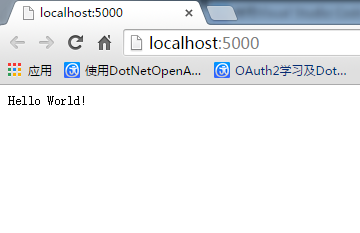
启动调试,访问地址 http://localhost:5000/ ,页面显示Hello World!字样。
再次添加一个Run方法
public void Configure(IApplicationBuilder app, ILoggerFactory loggerFactory)
{
// 添加日志支持
loggerFactory.AddConsole();
loggerFactory.AddDebug(); // 添加NLog日志支持
loggerFactory.AddNLog(); // 添加自定义中间件
app.Run(async context =>
{
await context.Response.WriteAsync("Hello World!");
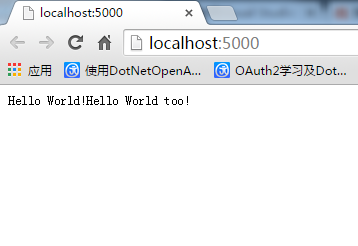
}); app.Run(async context =>
{
await context.Response.WriteAsync("Hello World too!");
}); // 添加MVC中间件
//app.UseMvc();
}
启动调试,再次访问发现页面上只有Hello World!字样。
原因是:Run的这种用法表示注册的此中间件为管道内的最后一个中间件,由它处理完请求后直接返回。
二、Use方法
         public void Configure(IApplicationBuilder app, ILoggerFactory loggerFactory)

         {

             // 添加日志支持

             loggerFactory.AddConsole();

             loggerFactory.AddDebug();

             // 添加NLog日志支持

             loggerFactory.AddNLog();

             // 添加自定义中间件

             app.Use(async (context, next) =>

             {

                 await context.Response.WriteAsync("Hello World!");

             });

             // 添加MVC中间件

             //app.UseMvc();

         }
启动调试,访问页面同样显示Hello World!字样。我们发现使用Use方法替代Run方法,一样可以实现同样的功能。
再次添加一个Use方法,将原来的Use方法内容稍作调整,尝试实现页面显示两个Hello World!字样。
         public void Configure(IApplicationBuilder app, ILoggerFactory loggerFactory)

         {

             // 添加日志支持

             loggerFactory.AddConsole();

             loggerFactory.AddDebug();

             // 添加NLog日志支持

             loggerFactory.AddNLog();

             // 添加自定义中间件

             app.Use(async (context, next) =>

             {

                 await context.Response.WriteAsync("Hello World!");

                 await next();

             });

             app.Use(async (context, next) =>

             {

                 await context.Response.WriteAsync("Hello World too!");

             });

             // 添加MVC中间件

             //app.UseMvc();

         }
启动调试,访问页面
将两个Use方法换个顺序,稍微调整一下内容,再次启动调试,访问页面,发现字样输出顺序也发生了变化。
         public void Configure(IApplicationBuilder app, ILoggerFactory loggerFactory)

         {

             // 添加日志支持

             loggerFactory.AddConsole();

             loggerFactory.AddDebug();

             // 添加NLog日志支持

             loggerFactory.AddNLog(); HelloworldMiddleware.cs

             // 添加自定义中间件

             app.Use(async (context, next) =>

             {

                 await context.Response.WriteAsync("Hello World too!");

                 await next();

             });

             app.Use(async (context, next) =>

             {

                 await context.Response.WriteAsync("Hello World!");

             });

             // 添加MVC中间件

             //app.UseMvc();

         }
从上面的例子可以发现,通过Use方法注册的中间件,如果不调用next方法,效果等同于Run方法。当调用next方法后,此中间件处理完后将请求传递下去,由后续的中间件继续处理。
当注册中间件顺序不一样时,处理的顺序也不一样,这一点很重要,当注册的自定义中间件数量较多时,需要考虑哪些中间件先处理请求,哪些中间件后处理请求。
另外,我们可以将中间件单独写成独立的类,通过UseMiddleware方法同样可以完成注册。下面将通过独立的中间件类重写上面的演示功能。
新建两个中间件类: HelloworldMiddleware.cs 、 HelloworldTooMiddleware.cs
 using System.Threading.Tasks;

 using Microsoft.AspNetCore.Http;

 namespace WebApiFrame.Core.Middlewares

 {

     public class HelloworldMiddleware

     {

         private readonly RequestDelegate _next;

         public HelloworldMiddleware(RequestDelegate next){

             _next = next;

         }

         public async Task Invoke(HttpContext context){

             await context.Response.WriteAsync("Hello World!");

             await _next(context);

         }

     }

 }
HelloworldMiddleware.cs
 using System.Threading.Tasks;

 using Microsoft.AspNetCore.Http;

 namespace WebApiFrame.Core.Middlewares

 {

     public class HelloworldTooMiddleware

     {

         private readonly RequestDelegate _next;

         public HelloworldTooMiddleware(RequestDelegate next){

             _next = next;

         }

         public async Task Invoke(HttpContext context){

             await context.Response.WriteAsync("Hello World too!");

         }

     }

 }
HelloworldTooMiddleware.cs
修改 Startup.cs 的Configure方法内容
         public void Configure(IApplicationBuilder app, ILoggerFactory loggerFactory)

         {

             // 添加日志支持

             loggerFactory.AddConsole();

             loggerFactory.AddDebug();

             // 添加NLog日志支持

             loggerFactory.AddNLog();

             // 添加自定义中间件

             app.UseMiddleware<HelloworldMiddleware>();

             app.UseMiddleware<HelloworldTooMiddleware>();

             // 添加MVC中间件

             //app.UseMvc();

         }
启动调试,访问页面,可以看到同样的效果。
三、Map方法
Map方法主要通过请求路径和其他自定义条件过滤来指定注册的中间件,看起来更像一个路由。
修改 Startup.cs 的Configure方法内容,增加静态方法MapTest
         public void Configure(IApplicationBuilder app, ILoggerFactory loggerFactory)

         {

             // 添加日志支持

             loggerFactory.AddConsole();

             loggerFactory.AddDebug();

             // 添加NLog日志支持

             loggerFactory.AddNLog();

             // 添加自定义中间件

             app.Map("/test", MapTest);

             // 添加MVC中间件

             //app.UseMvc();

         }

         private static void MapTest(IApplicationBuilder app){

             app.Run(async context => {

                 await context.Response.WriteAsync("Url is " + context.Request.PathBase.ToString());

             });

         }
启动调试,访问路径 http://localhost:5000/test ,页面显示如下内容
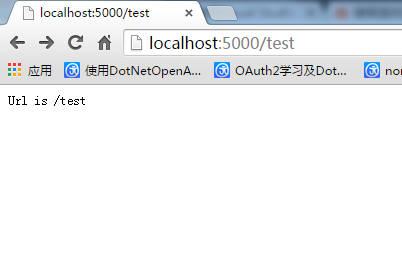
但是访问其他路径时,页面没有内容显示。从这个可以看到,Map方法通过类似路由的机制,将特定的Url地址请求引导到固定的方法里,由特定的中间件处理。
另外,Map方法还可以实现多级Url“路由”,其实就是Map方法的嵌套使用
             // 添加自定义中间件

             app.Map("/level1", lv1App => {

                 app.Map("/level1.1", lv11App => {

                     // /level1/level1.1

                 });

                 app.Map("/level1.2", lv12App => {

                     // /level1/level1.2

                 });

             });
也可以通过MapWhen方法使用自定义条件进行“路由”
         public void Configure(IApplicationBuilder app, ILoggerFactory loggerFactory)

         {

             // 添加日志支持

             loggerFactory.AddConsole();

             loggerFactory.AddDebug();

             // 添加NLog日志支持

             loggerFactory.AddNLog();

             // 添加自定义中间件

             app.MapWhen(context =>

             {

                 return context.Request.Query.ContainsKey("a");

             }, MapTest);

             // 添加MVC中间件

             //app.UseMvc();

         }

         private static void MapTest(IApplicationBuilder app)

         {

             app.Run(async context =>

             {

                 await context.Response.WriteAsync($"Url is {context.Request.Path.ToString()}{context.Request.QueryString.Value}");

             });

         }
启动调试,访问路径 http://localhost:5000/path?a=1&b=2 ,页面显示如下内容
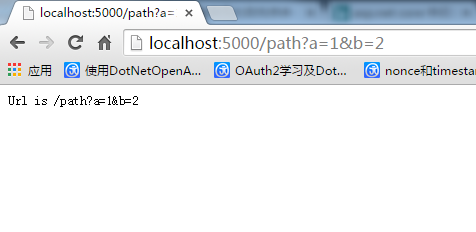
只有当请求参数中含有a时,页面才正常显示内容。
四、其他内置的中间件
Asp.Net Core框架内置了几个中间件

最后,用自定义中间件实现一个简单的访问日志记录功能,记录每一次请求的内容和响应时间。
1. 添加日志模型 VisitLog.cs
 using System;

 using System.Collections.Generic;

 using System.Linq;

 namespace WebApiFrame.Models

 {

     public class VisitLog

     {

         public string Url { get; set; }

         public IDictionary<string, string> Headers { get; set; } = new Dictionary<string, string>();

         public string Method { get; set; }

         public string RequestBody { get; set; }

         public DateTime ExcuteStartTime { get; set; }

         public DateTime ExcuteEndTime { get; set; }

         public override string ToString()

         {

             string headers = "[" + string.Join(",", this.Headers.Select(i => "{" + $"\"{i.Key}\":\"{i.Value}\"" + "}")) + "]";

             return $"Url: {this.Url},\r\nHeaders: {headers},\r\nMethod: {this.Method},\r\nRequestBody: {this.RequestBody},\r\nExcuteStartTime: {this.ExcuteStartTime.ToString("yyyy-MM-dd HH:mm:ss.fff")},\r\nExcuteStartTime: {this.ExcuteEndTime.ToString("yyyy-MM-dd HH:mm:ss.fff")}";

         }

     }

 }
2. 添加访问日志记录中间件 VisitLogMiddleware.cs ,同时添加UseVisitLogger扩展方法。
 using Microsoft.AspNetCore.Builder;

 using Microsoft.AspNetCore.Http;

 using Microsoft.Extensions.Logging;

 using System;

 using System.IO;

 using System.Linq;

 using System.Threading.Tasks;

 using WebApiFrame.Models;

 namespace WebApiFrame.Core.Middlewares

 {

     public class VisitLogMiddleware

     {

         private readonly RequestDelegate _next;

         private readonly ILogger logger;

         private VisitLog visitLog;

         public VisitLogMiddleware(RequestDelegate next, ILoggerFactory loggerFactory)

         {

             _next = next;

             logger = loggerFactory.CreateLogger<VisitLogMiddleware>();

         }

         public async Task Invoke(HttpContext context)

         {

             visitLog = new VisitLog();

             HttpRequest request = context.Request;

             visitLog.Url = request.Path.ToString();

             visitLog.Headers = request.Headers.ToDictionary(k => k.Key, v => string.Join(";", v.Value.ToList()));

             visitLog.Method = request.Method;

             visitLog.ExcuteStartTime = DateTime.Now;

             using (StreamReader reader = new StreamReader(request.Body))

             {

                 visitLog.RequestBody = reader.ReadToEnd();

             }

             context.Response.OnCompleted(ResponseCompletedCallback, context);

             await _next(context);

         }

         private Task ResponseCompletedCallback(object obj)

         {

             visitLog.ExcuteEndTime = DateTime.Now;

             logger.LogInformation($"VisitLog: {visitLog.ToString()}");

             return Task.FromResult();

         }

     }

     public static class VisitLogMiddlewareExtensions

     {

         public static IApplicationBuilder UseVisitLogger(this IApplicationBuilder builder)

         {

             return builder.UseMiddleware<VisitLogMiddleware>();

         }

     }

 }
3. 在 Startup.cs 添加中间件支持
public void Configure(IApplicationBuilder app, ILoggerFactory loggerFactory)
{
// 添加日志支持
loggerFactory.AddConsole();
loggerFactory.AddDebug(); // 添加NLog日志支持
loggerFactory.AddNLog(); // 添加自定义中间件
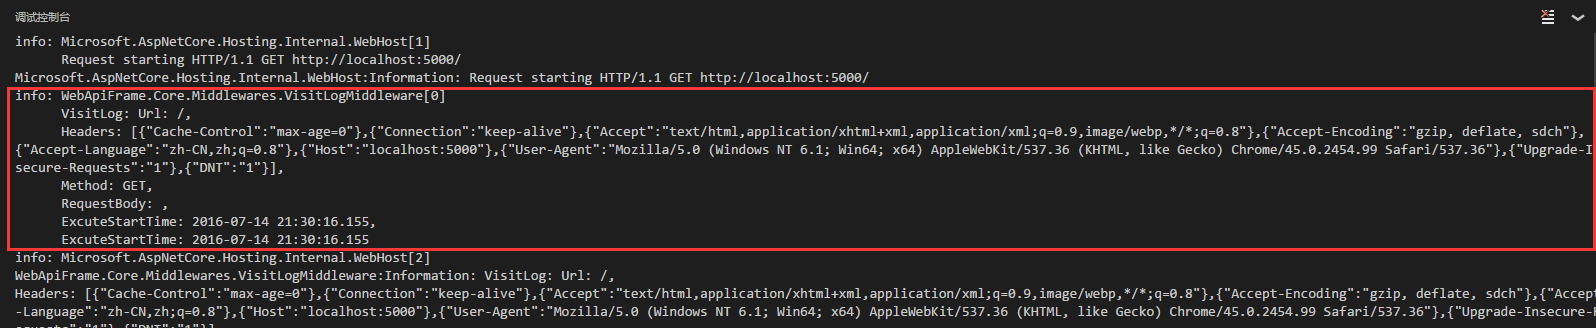
app.UseVisitLogger(); app.Run(async context =>
{
await context.Response.WriteAsync("Hello World!");
}); // 添加MVC中间件
//app.UseMvc();
}
4. 启动调试,访问地址 http://localhost:5000/ ,查看调试控制台日志打印信息。
另外,如果你比较细心会发现,在Configure方法里有这样一句代码: app.UseMvc(); ,Asp.Net Core Mvc正是通过这个方法借用中间件来扩展实现了MVC框架。
使用Visual Studio Code开发Asp.Net Core WebApi学习笔记(四)-- Middleware的更多相关文章
- 使用Visual Studio Code开发Asp.Net Core WebApi学习笔记(一)-- 起步
本文记录了在Windows环境下安装Visual Studio Code开发工具..Net Core 1.0 SDK和开发一个简单的Web-Demo网站的全过程. 一.安装Visual Studio ...
- 使用Visual Studio Code开发Asp.Net Core WebApi学习笔记(八)-- 多环境开发
本篇将演示Asp.Net Core如何在多环境下进行开发适配. 在一个正规的开发流程里,软件开发部署将要经过三个阶段:开发.测试.上线,对应了三个环境:开发.测试.生产.在不同的环境里,需要编写不同的 ...
- 使用Visual Studio Code开发Asp.Net Core WebApi学习笔记(十)-- 发布(Windows)
本篇将在这个系列演示的例子上继续记录Asp.Net Core在Windows上发布的过程. Asp.Net Core在Windows上可以采用两种运行方式.一种是自托管运行,另一种是发布到IIS托管运 ...
- 使用Visual Studio Code开发Asp.Net Core WebApi学习笔记(九)-- 单元测试
本篇将结合这个系列的例子的基础上演示在Asp.Net Core里如何使用XUnit结合Moq进行单元测试,同时对整个项目进行集成测试. 第一部分.XUnit 修改 Project.json 文件内容, ...
- 使用Visual Studio Code开发Asp.Net Core WebApi学习笔记(三)-- Logger
本篇是在上一篇的基础上添加日志功能,并记录NLog在Asp.Net Core里的使用方法. 第一部分:默认Logger支持 一.project.json添加日志包引用,并在cmd窗口使用 dotnet ...
- [转]使用Visual Studio Code开发Asp.Net Core WebApi学习笔记(三)-- Logger
本文转自:https://www.cnblogs.com/niklai/p/5662094.html 本篇是在上一篇的基础上添加日志功能,并记录NLog在Asp.Net Core里的使用方法. 第一部 ...
- 使用Visual Studio Code开发Asp.Net Core WebApi学习笔记(七)-- 结构化配置
本篇将记录.Net Core里颇有特色的结构化配置的使用方法. 相比较之前通过Web.Config或者App.Config配置文件里使用xml节点定义配置内容的方式,.Net Core在配置系统上发生 ...
- 使用Visual Studio Code开发Asp.Net Core WebApi学习笔记(六)-- 依赖注入
本篇将介绍Asp.Net Core中一个非常重要的特性:依赖注入,并展示其简单用法. 第一部分.概念介绍 Dependency Injection:又称依赖注入,简称DI.在以前的开发方式中,层与层之 ...
- 使用Visual Studio Code开发Asp.Net Core WebApi学习笔记(五)-- Filter
在上一篇里,介绍了中间件的相关内容和使用方法.本篇将介绍Asp.Net Core MVC框架的过滤器的相关内容和使用方法,并简单说明一下与中间件的区别. 第一部分.MVC框架内置过滤器 下图展示了As ...
随机推荐
- CentOS7 安装MongoDB 3.0服务
1,下载&安装 MongoDB 3.0 正式版本发布!这标志着 MongoDB 数据库进入了一个全新的发展阶段,提供强大.灵活而且易于管理的数据库管理系统.MongoDB宣称,3.0新版本不只 ...
- dedecms v5.7 sp1 给栏目添加缩略图功能
一.给数据库添加字段typeimg 如图: 二 . 修改 dede/catalog_add.php 找到 $in_query = "INSERT INTO `#@__arctype`(r ...
- tomcat 内存溢出
PermGen space的全称是Permanent Generation space,是指内存的永久保存区域,这一部分用于存放Class和Meta的信息,Class在被 Load的时候被放入Perm ...
- [Java] 匿名内部类
package test.file; import java.io.File; import java.io.FilenameFilter; /** * 匿名的内部类 * @author Frost. ...
- TOP/ORDER BY 顺序(转)
问题重现: --建表语句,测试数据 ),CreateTime datetime) go ) begin insert into TestTable )),DATEADD(day,@Count,GETD ...
- sql server 作业导出放到另外一台机器执行时报错的解决方法
SQL Server2008脚本创建作业失败,提示: 引用内容消息 515,级别 16,状态 2,过程 sp_add_job,第 137 行不能将值 NULL 插入列 'owner_sid',表 'm ...
- 异步任务神器 Celery 简明笔记
转自:http://www.jianshu.com/p/1840035cb510 异步任务 异步任务是web开发中一个很常见的方法.对于一些耗时耗资源的操作,往往从主应用中隔离,通过异步的方式执行.简 ...
- C Primer Plus(第五版)10
第 10 章 数组和指针 在本章中你将学习下列内容: · 关键字: static (静态) · 运算符: & * (一元) · 创建与初始化数组的方法. · 指针(基于已学的基础知识)及指针和 ...
- 303. Range Sum Query - Immutable
Given an integer array nums, find the sum of the elements between indices i and j (i ≤ j), inclusive ...
- Sqoop实现自定义job的增量导入
需求:redis缓存的数据隔段时间往MySQL中写入一次.如果按照job的增量导入,比如上次redis向mysql导入数据时间为8:00,下一次导入时间为9:00,8:20sqoop进行增量导入,导入 ...