改造断路器集群监控Hystrix Turbine实现自动注册消费者、实时监控多个服务
在上一篇文章中,我们搭建了Hystrix Dashoard,对指定接口进行监控。但是只能对一个接口进行监听,功能比较局限;
Turbine:汇总系统内多个服务的数据并显示到 Hystrix Dashboard 上。虽然可以实现对消费者的聚合监控,但是如果新增了消费者,也需要对其进行监控,就需要重新启动项目,这是非常不合理的。
改造后的turbine项目:本文将进行对turbine的改造,在原有的功能上实现登录认证、实时监控的功能,使turbine项目在不用重启的情况下都可以获取最新的、完整的服务消费情况。
准备项目:
1. eureka-service:eureka注册中心,端口:8761,用于服务注册与发现;
2. eureka-provider_1:服务提供者1,端口:8071,用于提供服务;
3. eureka-provider_2:服务提供者2,端口:8072,用于提供服务;
4. ribbon-consumer-hystrix-1:服务消费者1,端口:9001,用于消费服务;
5. ribbon-consumer-hystrix-2:服务消费者2,店口:9002,用于消费服务;
6. ReadLocalProperties:用于读取本地文件,端口:9999;
7. turbine-dashboard:断后改造后的hystrix dashboard客户端项目,端口:7979。
1-3个项目可参考https://www.souyunku.com/categories/自行创建,或者从下文附件中下载。我们详细讲下ribbon-consumer-hystrix-1、ribbon-consumer-hystrix-2、ReadLocalProperties项目、turbine-dashboard项目的构建;
重要注释在代码中,就不另外叙述了。
一、搭建ribbon-consumer-hystrix-1项目:
1. 在pom.xml中添加如下依赖:
<!-- 客户端负载均衡 -->

        <dependency>

            <groupId>org.springframework.cloud</groupId>

            <artifactId>spring-cloud-starter-ribbon</artifactId>

        </dependency>

        <!-- eureka客户端 -->

        <dependency>

            <groupId>org.springframework.cloud</groupId>

            <artifactId>spring-cloud-starter-eureka</artifactId>

        </dependency>

        <dependency>

            <groupId>org.springframework.cloud</groupId>

            <artifactId>spring-cloud-starter-hystrix</artifactId>

        </dependency>

         <dependency>

            <groupId>org.springframework.boot</groupId>

            <artifactId>spring-boot-starter-test</artifactId>

            <scope>test</scope>

        </dependency>

        <dependency>

            <groupId>com.google.code.gson</groupId>

            <artifactId>Gson</artifactId>

            <version>2.5</version>

        </dependency>

        <dependency>

            <groupId>org.slf4j</groupId>

            <artifactId>slf4j-api</artifactId>

        </dependency>

        <dependency>

            <groupId>org.springframework.boot</groupId>

            <artifactId>spring-boot-starter-actuator</artifactId>

        </dependency>
pom.xml
2.配置文件:
eureka:

  client:

    serviceUrl:

      defaultZone: http://localhost:8761/eureka/

  instance:

    leaseExpirationDurationInSeconds: 4

    leaseRenewalIntervalInSeconds: 1

spring:

  application:

    name: ribbon-consumer-hystrix

server:

  port: 9001

#用于存入本地文件,供ReadLocalProperties项目读取并调用

url: http://localhost:9001/sendMsg
application.yml
3.启动类:
 @EnableHystrix

 @EnableDiscoveryClient

 @SpringBootApplication

 public class RibbonConsumerApplication_1 {

     @LoadBalanced

     @Bean

     RestTemplate restTemplate() {

         return new RestTemplate();

     }

     public static void main(String[] args) {

         SpringApplication.run(RibbonConsumerApplication_1.class, args);

         writeConfig();

     }

     //读取调用该jar包的项目中配置文件的url,存入指定文件,供ReadLocalProperties项目读取

     public static void writeConfig (){

         Properties prop=new Properties();

         try {

             prop.load(Config.class.getResourceAsStream("/application.yml"));

         } catch (IOException e2) {

             // TODO Auto-generated catch block

             e2.printStackTrace();

         }

         String url="";

          url=prop.getProperty("url");

          System.out.println("url---"+url);

         //读取文件中已有的url

         Properties propp=new Properties();

         String oldUrl="";

         try {

         InputStream ins = new FileInputStream(new File("F:\\config.properties"));

         propp.load(ins);

          oldUrl=propp.getProperty("url");

           System.out.println("oldUrl---"+oldUrl);

             ins.close();

         } catch (FileNotFoundException e1) {

             // TODO Auto-generated catch block

             e1.printStackTrace();

         } catch (IOException e1) {

             // TODO Auto-generated catch block

             e1.printStackTrace();

         }

         //拼接原来的url和新的url

           try {

              // 调用 Hashtable 的方法 put,使用 getProperty 方法提供并行性。

              // 强制要求为属性的键和值使用字符串。返回值是 Hashtable 调用 put 的结果。

             FileOutputStream fos = new FileOutputStream("F:\\config.properties",false);

             System.out.println("fos---"+fos);

             Properties pro = new Properties();

             int ifHas=0;

             if(com.google.common.base.Strings.isNullOrEmpty(oldUrl)) {

                 oldUrl= ",";

             }

             String[] strs=oldUrl.split(",");

             for(int i=0;i<strs.length;i++) {

                 if(url.equals(strs[i])) {

                     ifHas=1;

                 }

             }

             //如果配置文件中未存在该接口

             String newUrl="";

             if(ifHas==0) {

                 // 存储

                 newUrl=oldUrl+","+url;//拼接已存在的urls和新的url

             }else {

                 newUrl=oldUrl;

             }

             pro.setProperty("url", newUrl);

             // 以适合使用 load 方法加载到 Properties 表中的格式,

             // 将此 Properties 表中的属性列表(键和元素对)写入输出流

                pro.store(fos, newUrl);

                fos.close();

          } catch (IOException e) {

              System.err.println("属性文件更新错误");

          }

     }

 }
RibbonConsumerApplication_1
4. 控制层:编写接口(此处以/hello为例)消费服务,编写接口用于组装监控面板监控对象,实现自动注册到turbine聚合监控面板上的功能。
监控面板监控对象,包括以下信息:
name:监控详情页显示的Hystrix Stream名称
stream:需要监控的服务接口
auth:作者
delay:获取监控数据间隔时间
@RestController

public class ConsumerController {

    @Autowired

    private RestTemplate restTemplate;

    //创建了熔断器的功能 ,并指定了defaultStores熔断方法

    //@HystrixCommand 表明该方法为hystrix包裹,

    //可以对依赖服务进行隔离、降级、快速失败、快速重试等等hystrix相关功能

    //fallbackMethod 降级方法

    //commandProperties 普通配置属性,可以配置HystrixCommand对应属性,例如采用线程池还是信号量隔离、熔断器熔断规则等等

    //ignoreExceptions 忽略的异常,默认HystrixBadRequestException不计入失败

    //groupKey() 组名称,默认使用类名称

    //commandKey 命令名称,默认使用方法名

    @HystrixCommand(fallbackMethod = "defaultStores")

    @GetMapping(value = "/hello")

    public String hello(Throwable throwable) {

        return restTemplate.getForEntity("http://eureka-provider/", String.class).getBody();

    }

    //熔断方法直接返回了一个字符串, "feign + hystrix ,提供者服务挂了"

    public String defaultStores(Throwable throwable) {

        return "Ribbon + hystrix ,提供者服务挂了";

    }

    //用于组装监控面板监控对象,实现自动注册到turbine聚合监控面板上的功能。

    @RequestMapping(value = "/sendMsg")

    public String sendMessage(HttpServletRequest request) {

        JsonObject lan=new JsonObject();

        lan.addProperty("name", "9001");

        lan.addProperty("stream", "http://127.0.0.1:9001/hystrix.stream");

        lan.addProperty("auth", "test");

        lan.addProperty("delay", "2000");

        System.out.println("jaon-lan------"+lan);

        return "callback("+lan+")";

    }

}
ConsumerController
二、搭建ribbon-consumer-hystrix-2项目:
做法同一,配置文件端口和sendMessage方法中端口改成9002。
三、搭建ReadLocalProperties项目:
1. 在pom.xml中添加如下依赖:
<dependency>

    <groupId>org.springframework.cloud</groupId>

     <artifactId>spring-cloud-starter-eureka</artifactId>

</dependency>
pom.xml
2.配置文件:
eureka:

  client:

    serviceUrl:

      defaultZone: http://localhost:8761/eureka/

  instance:

    leaseExpirationDurationInSeconds: 4

    leaseRenewalIntervalInSeconds: 1

spring:

  application:

    name: ribbon-consumer-hystrix-dashbord

server:

  port: 9999
application.yml
3.启动类:
@EnableDiscoveryClient

@SpringBootApplication

public class ReadApplication {

    public static void main(String[] args) {

        SpringApplication.run(ReadApplication.class, args);

    }

}
ReadApplication
4.控制层:编写接口实现从本地文件中读取接口列表。用于获取消费者注册信息,供turbine项目调用。
@RestController

public class ConsumerController {

    @RequestMapping(value = "/read")

    public String read(HttpServletRequest request) {

        // 读取文件中已有的url

        Properties propp = new Properties();

        String oldUrl = "";

        try {

            InputStream ins = new FileInputStream(new File("F:\\config.properties"));

            propp.load(ins);

            oldUrl = propp.getProperty("url");

            System.out.println("oldUrl---" + oldUrl);

            ins.close();

        } catch (FileNotFoundException e1) {

            // TODO Auto-generated catch block

            e1.printStackTrace();

        } catch (IOException e1) {

            // TODO Auto-generated catch block

            e1.printStackTrace();

        }

        return "readcallback(\"" + oldUrl + "\")";

    }

}
ConsumerController
四、重点改造搭建turbine-dashboard项目:
项目首先导入turbine项目,然后我们对其前端进行改造,通过ajax跨域请求ReadLocalProperties项目,读取本地文件F:\\config.properties中的urls,然后在监控面板中显示。
还记得读取本地文件F:\\config.properties中的urls是什么时候添加的吗?忘记的同学可以往上翻,懒得翻的同学我告诉你,就是在消费者项目启动时,通过writeConfig()方法将配置文件中的url添加到本地文件。
那配置文件中url的是什么呢?忘记的同学可以往上翻,懒得翻的同学我告诉你,配置文件中url是该项目封装的监控对象信息。当turbine-dashboard项目启动后,会从本地文件中读取这些url,然后获取一个个需要监控的对象,从而显示在监控面板上。
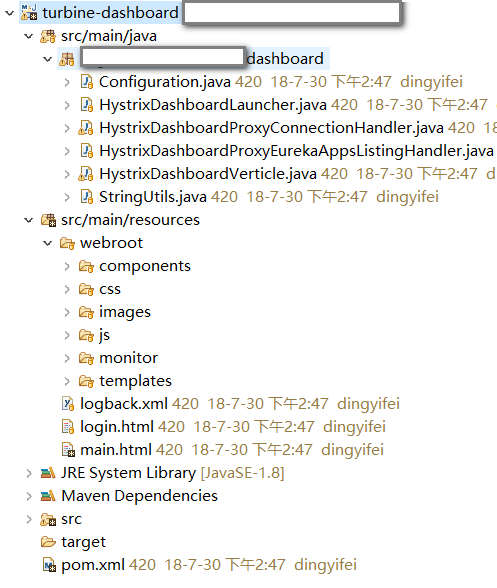
1.项目结构:(这里的项目结构是我改造后的)
2.登录页面:
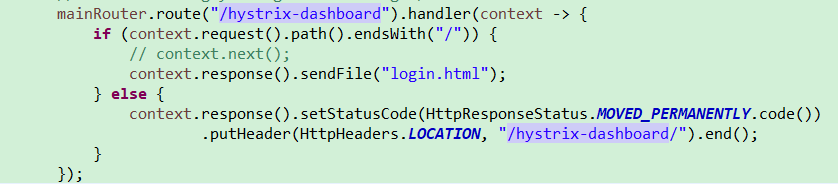
后端:修改/hystrix_dashboard路径的路由,使之路由到login.html,进行登录认证。
前端:新建login.html页面,进行登录认证,并将登录信息存入cookie。
 <html>

 <head>

 <meta http-equiv="Content-Type" content="text/html; charset=UTF-8">

 <title>登录</title>

 </head>

 <script type="text/javascript">

     function validateLogin() {

         var userName = document.getElementById('username').value;

         var password = document.getElementById('password').value;

         if (userName == "" || password == "") {

             alert("请输入用户名密码!");

             return false;

         } else if (userName != 'admin' || password != "admin") {

             alert("用户名密码不正确!");

             return false;

         } else {

             setCookie('username',userName,10);//cookie保存10分钟

             setCookie('password',password,10);//cookie保存10分钟

             //校验成功进入监控面板主页

             location.href = "/hystrix-dashboard/main";

         /*     location.href = "/hystrix-dashboard/main?username=" + userName

                     + "&&password=" + password; */

         }

     }

     /* 创建和存储 cookie */

     function setCookie(c_name, value, expire) {

         var exdate = new Date()

         exdate.setTime(exdate.getTime()+expire*60*1000); //设置date为当前时间分钟

     //    exdate.setDate(exdate.getHour() + expiredays)

         document.cookie = c_name

                 + "="

                 + escape(value)

                 + ((expire == null) ? "" : ";expires="

                         + exdate.toGMTString())

     }

     /* 检查是否已设置 cookie */

     function getCookie(c_name)

     {

     if (document.cookie.length>0)

       {

       c_start=document.cookie.indexOf(c_name + "=")

       if (c_start!=-1)

         {

         c_start=c_start + c_name.length+1

         c_end=document.cookie.indexOf(";",c_start)

         if (c_end==-1) c_end=document.cookie.length

         return unescape(document.cookie.substring(c_start,c_end))

         }

       }

     return ""

     }

 </script>

 <body>

     <div style="width: 800px; margin: 0 auto;">

         <center>

             <img width="264" height="233" src="data:images/hystrix-logo.png">

             <br> <br>

             <br> <br>

             <h2>Hystrix Dashboard</h2>

         </center>

     </div>

     <center>

         <form id="form" action="/hystrix-dashboard/test" method="post"></form>

         <table>

             <tr>

                 <td>username:</td>

                 <td><input type="text" name="username" id="username" size="20"

                     maxlength="20" /></td>

             </tr>

             <tr>

                 <td>password:</td>

                 <td><input type="password" name="password" id="password"

                     size="20" maxlength="20" /></td>

             </tr>

             <tr>

                 <td><input type="submit" name="login" value="login"

                     style="margin-top: 50%; margin-left: 150%"

                     onClick="return validateLogin()" /></td><!-- 进行登录校验 -->

             </tr>

         </table>

         </form>

     </center>

 </body>

 </html>
login.html
3.改造项目中的监控面板主页、监控详情页
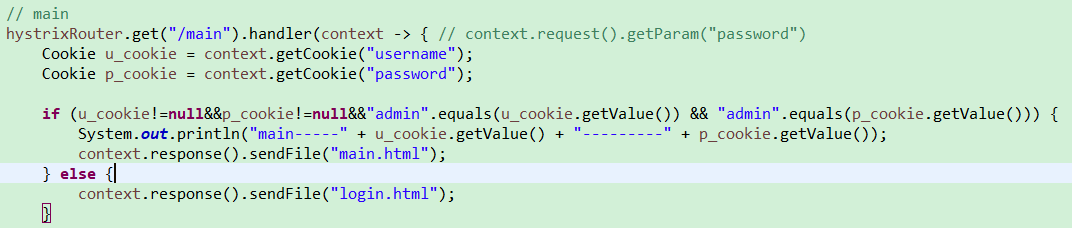
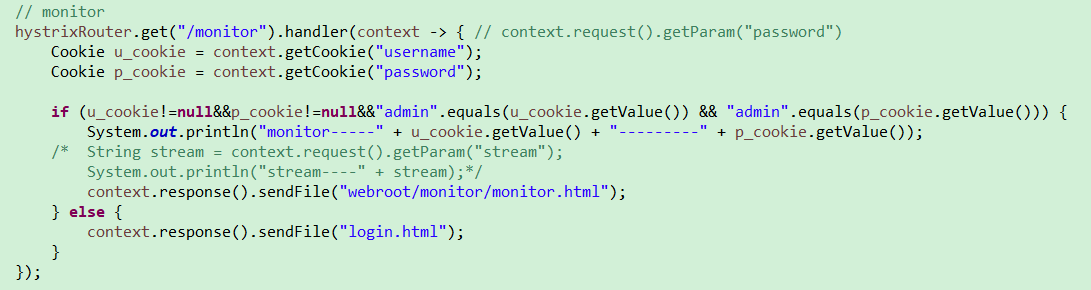
后端:对/main(监控面板主页)、/monitor(监控详情页)路径进行cookie认证
前端:获取需要监控的对象
     $(function(){

         $('#streams').html('<table id="hystrix_list"></table>');

     })

     //跨域请求read接口,获取本地文件中存储的urls

     $.getJSON("http://127.0.0.1:9999/read?jsoncallback=?");

     function readcallback(url){

         alert("read.url--"+url);

         var strs= new Array();

         strs=url.split(",");

         for (i=0;i<strs.length ;i++ )

         {

              if(strs[i]!="null"){

                $.getJSON(strs[i]+"?jsoncallback=?");   //$.getJSON("http://localhost:9000/sendMessage?jsoncallback=?");

              }else{

                  continue;

              }

         }

     }

     //跨域请求本地文件中存储的urls,获取需要进行监控的对象

     function callback(data){

         c={

                 name:data.name,

                 stream: data.stream,

                 auth: data.auth,

                 delay: data.delay

         };

         streams.push(c);

         /*  $('#streams').html('<table>' + _.reduce(streams, function(html, c) {

             return html + '<tr><td>' + c.name + '</td><td>' + c.stream + '</td> <td><a href="#" onclick="removeStream(this);">Remove</a></td> </tr>';

 }, '') + '</table>');  */

         $("#hystrix_list").append('<tr><td>' + c.name + '</td><td>' + c.stream + '</td> <td><a href="#" onclick="removeStream(this);">Remove</a></td> </tr>');

     }

         //添加需要监控的stream

         function addStream () {

             if ($('#stream').val().length > 0) {

                 var s = {

                     name: $('#title').val(),

                     stream: $('#stream').val(),

                     auth: $('#authorization').val(),

                     delay: $('#delay').val()

                 };

                 streams.push(s);

                 /* $('#streams').html('<table>' + _.reduce(streams, function(html, s) {

                             return html + '<tr><td>' + s.name + '</td><td>' + s.stream + '</td> <td><a href="#" onclick="removeStream(this);">Remove</a></td> </tr>';

                 }, '') + '</table>'); */

                 $("#hystrix_list").append('<tr><td>' + s.name + '</td><td>' + s.stream + '</td> <td><a href="#" onclick="removeStream(this);">Remove</a></td> </tr>');

                 $('#title').val("");

                 $('#stream').val("");

                 $('#authorization').val("");

                 $('#delay').val("");

                 $('#message').html("");

             } else {

                 $('#message').html("The 'stream' value is required.");

             }

         }
main.html
五、启动步骤:
1. 依次启动eureka-service、eureka-provider_1、eureka-provider_2、ribbon-consumer-hystrix-1、ribbon-consumer-hystrix-2、ReadLocalProperties项目 :
可以看见eureka监控面板都注册上了这五个服务:
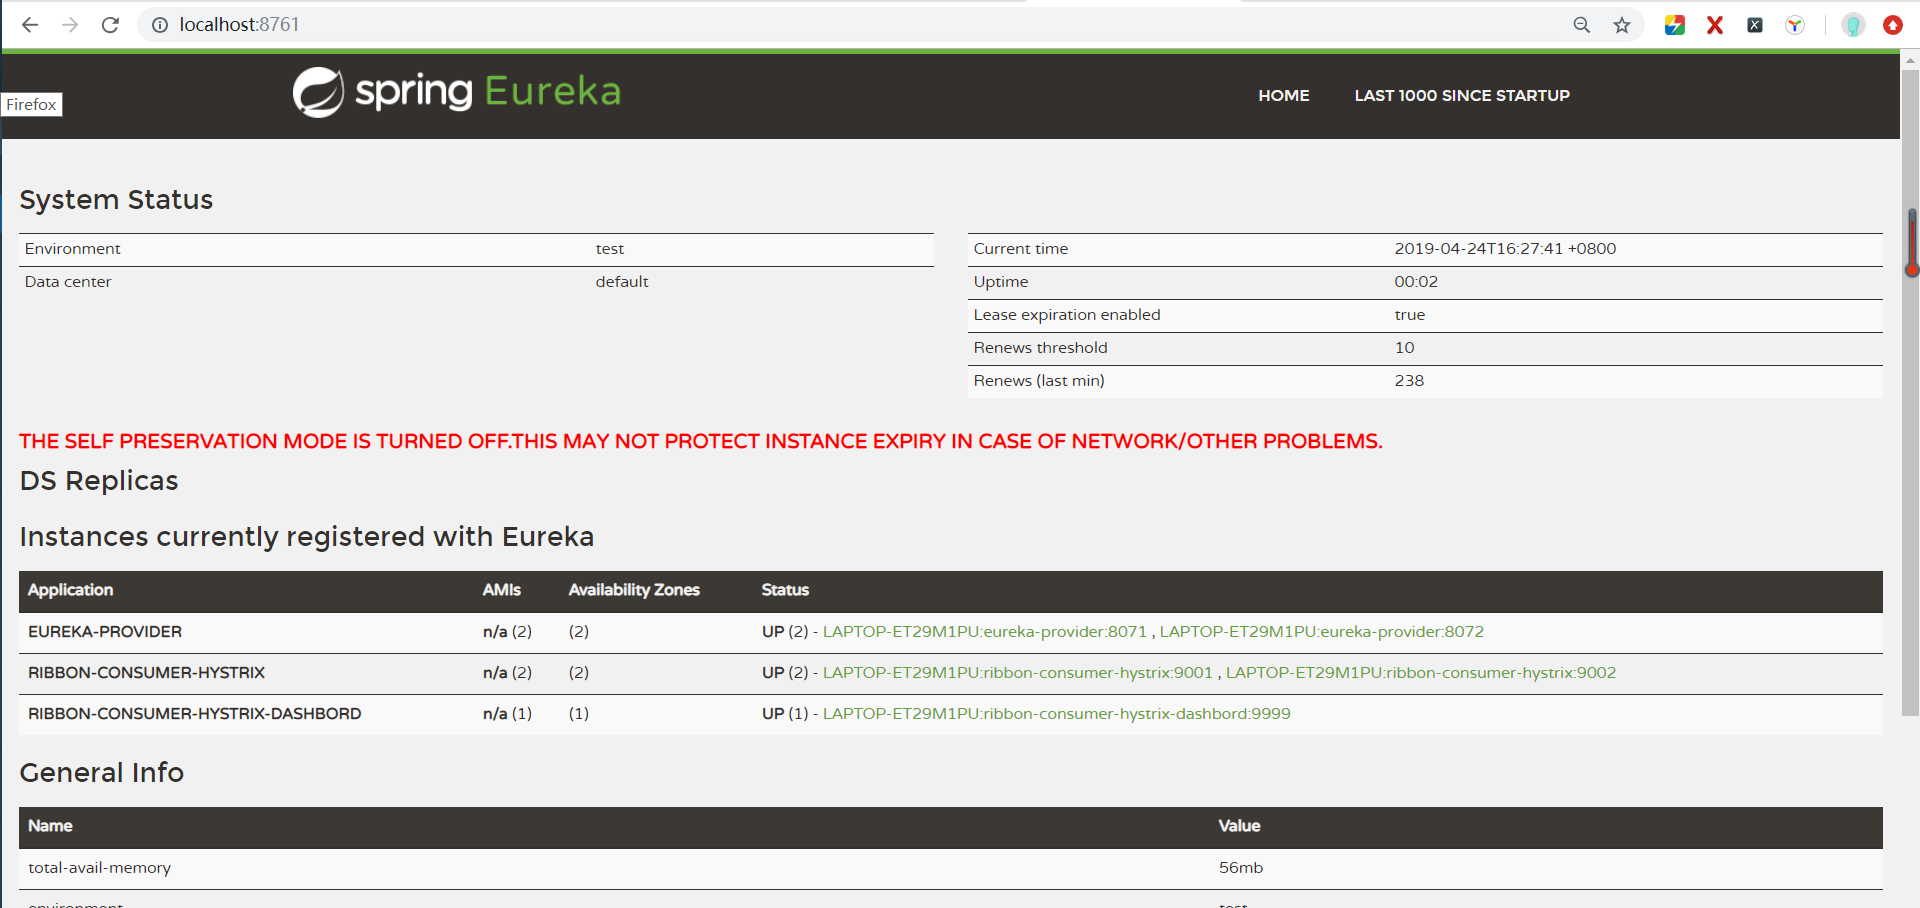
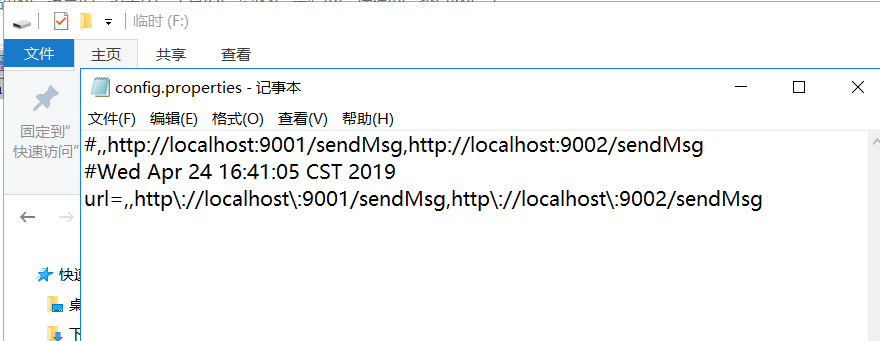
打开本地配置文件F:\\config.properties,可以看见两个消费者项目的获取监控对象的url已经保存在本地文件了:
2.启动turbine-dashboard项目:
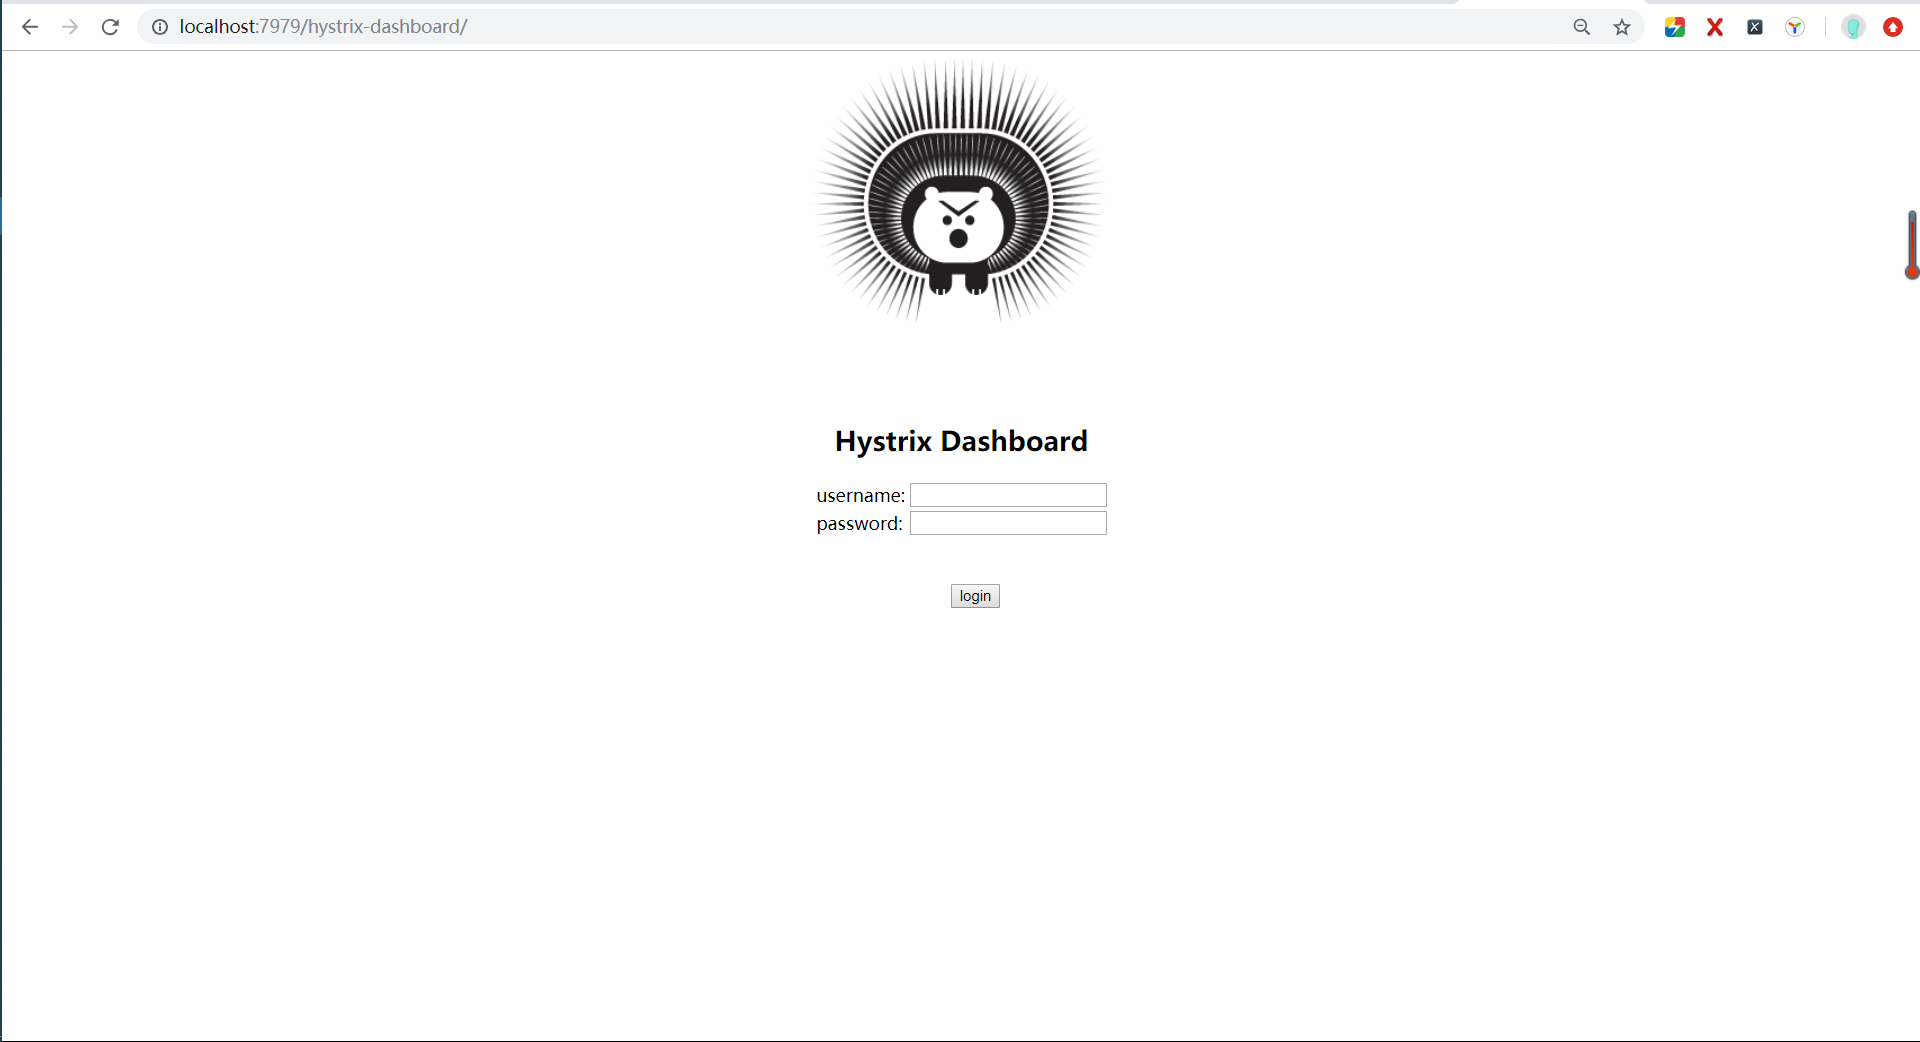
由于我们在浏览器输入的地址是http://localhost:7979/hystrix-dashboard/,经上文我们改造过后,路由到了登录页面。
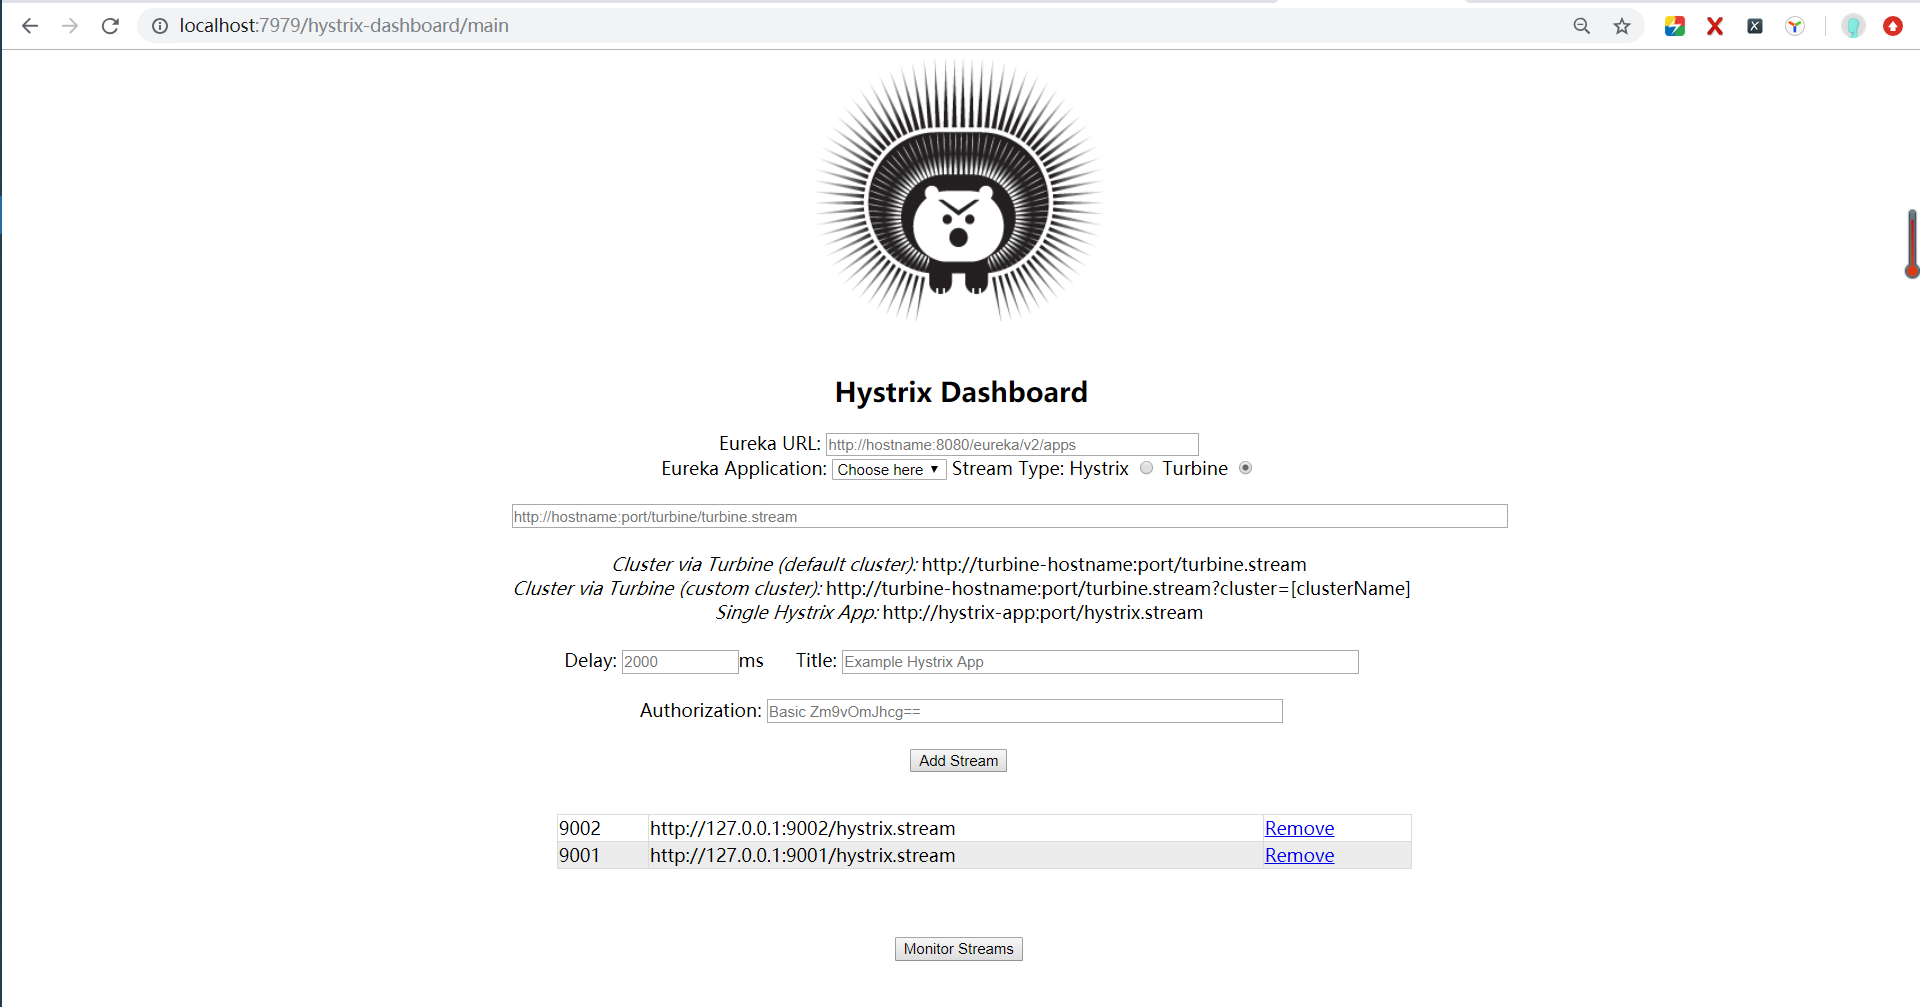
接下来我们输入代码中设置好的用户名密码,admin/admin,再点击login,结果进入到了监控主页:啊!又是这只恶狠狠的刺猬熊呢!
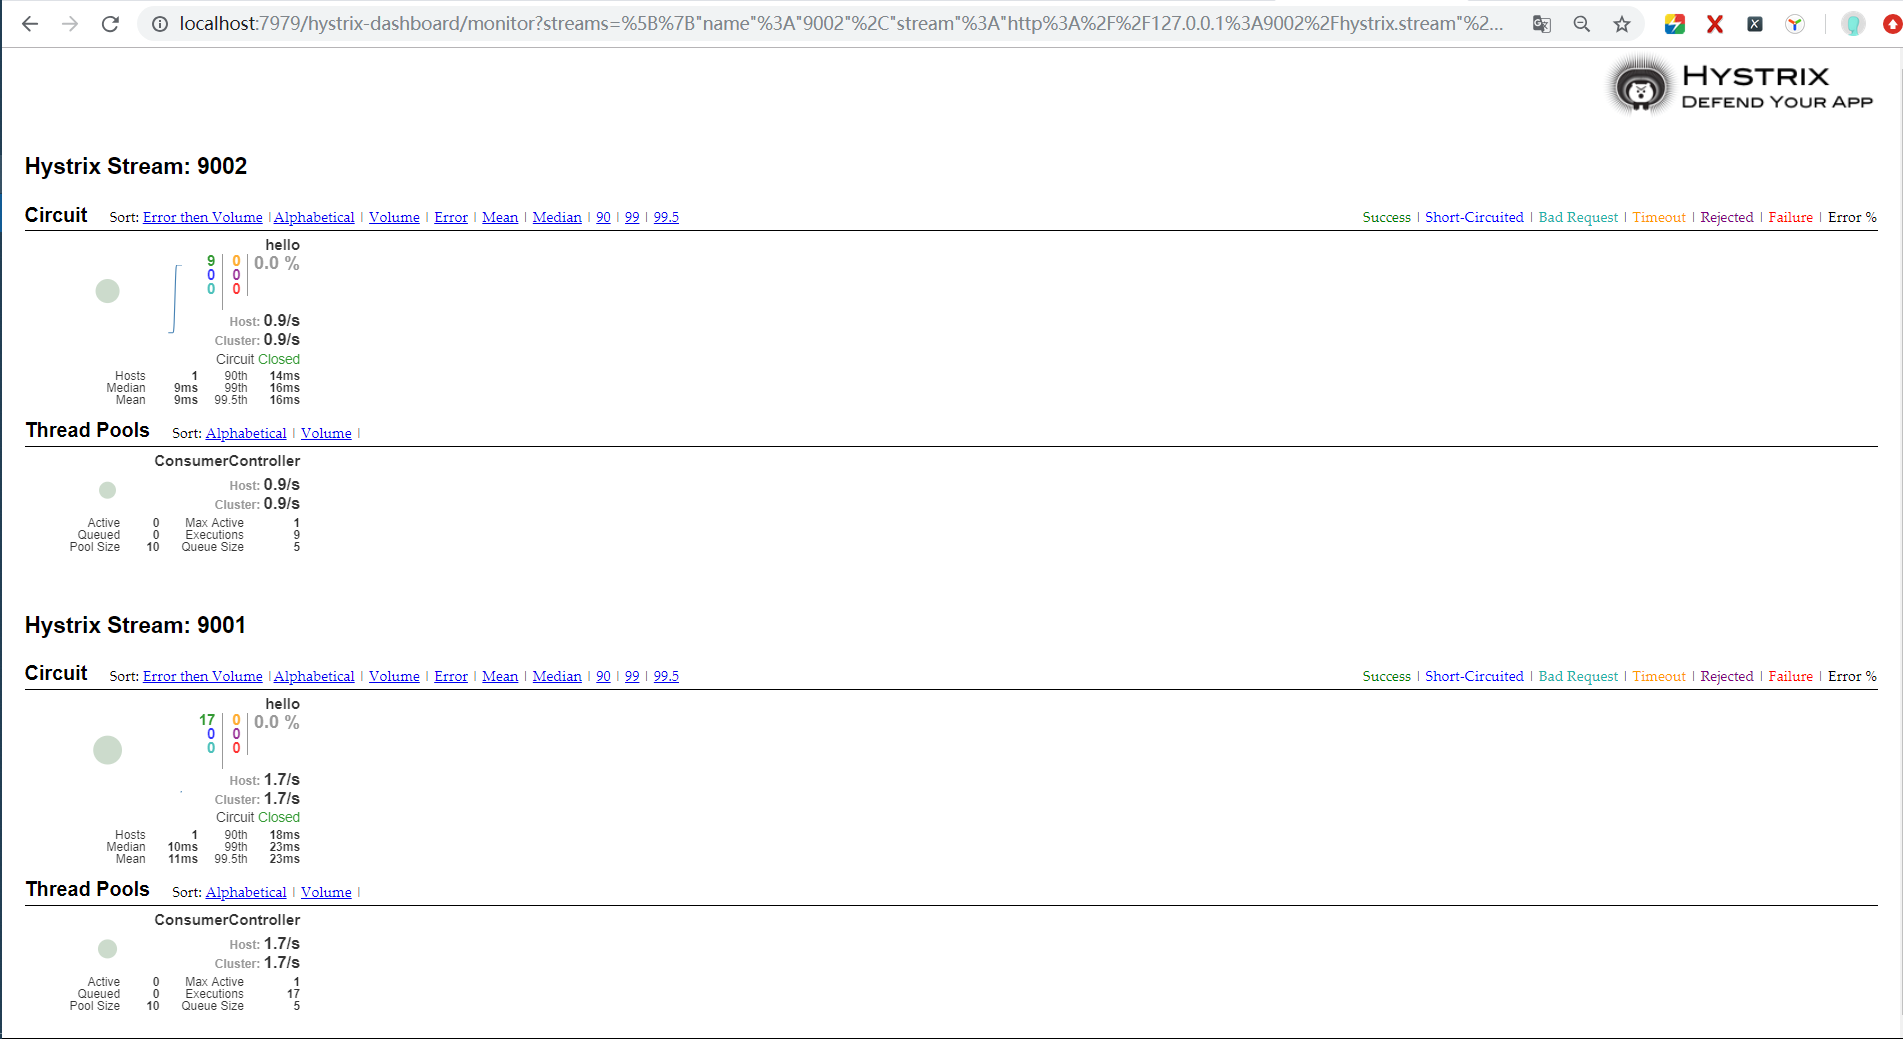
并且,我们可以看到在主页下方已经自动添加了两个监控对象,这就是我们之前在启动消费者对象的时候,保存的对象,当我们打开监控面板时获取到页面上了。
当然你也可以在此页面上手动添加和删除,然后直接点击“Monitor Stream”就可以进入监控详情页。
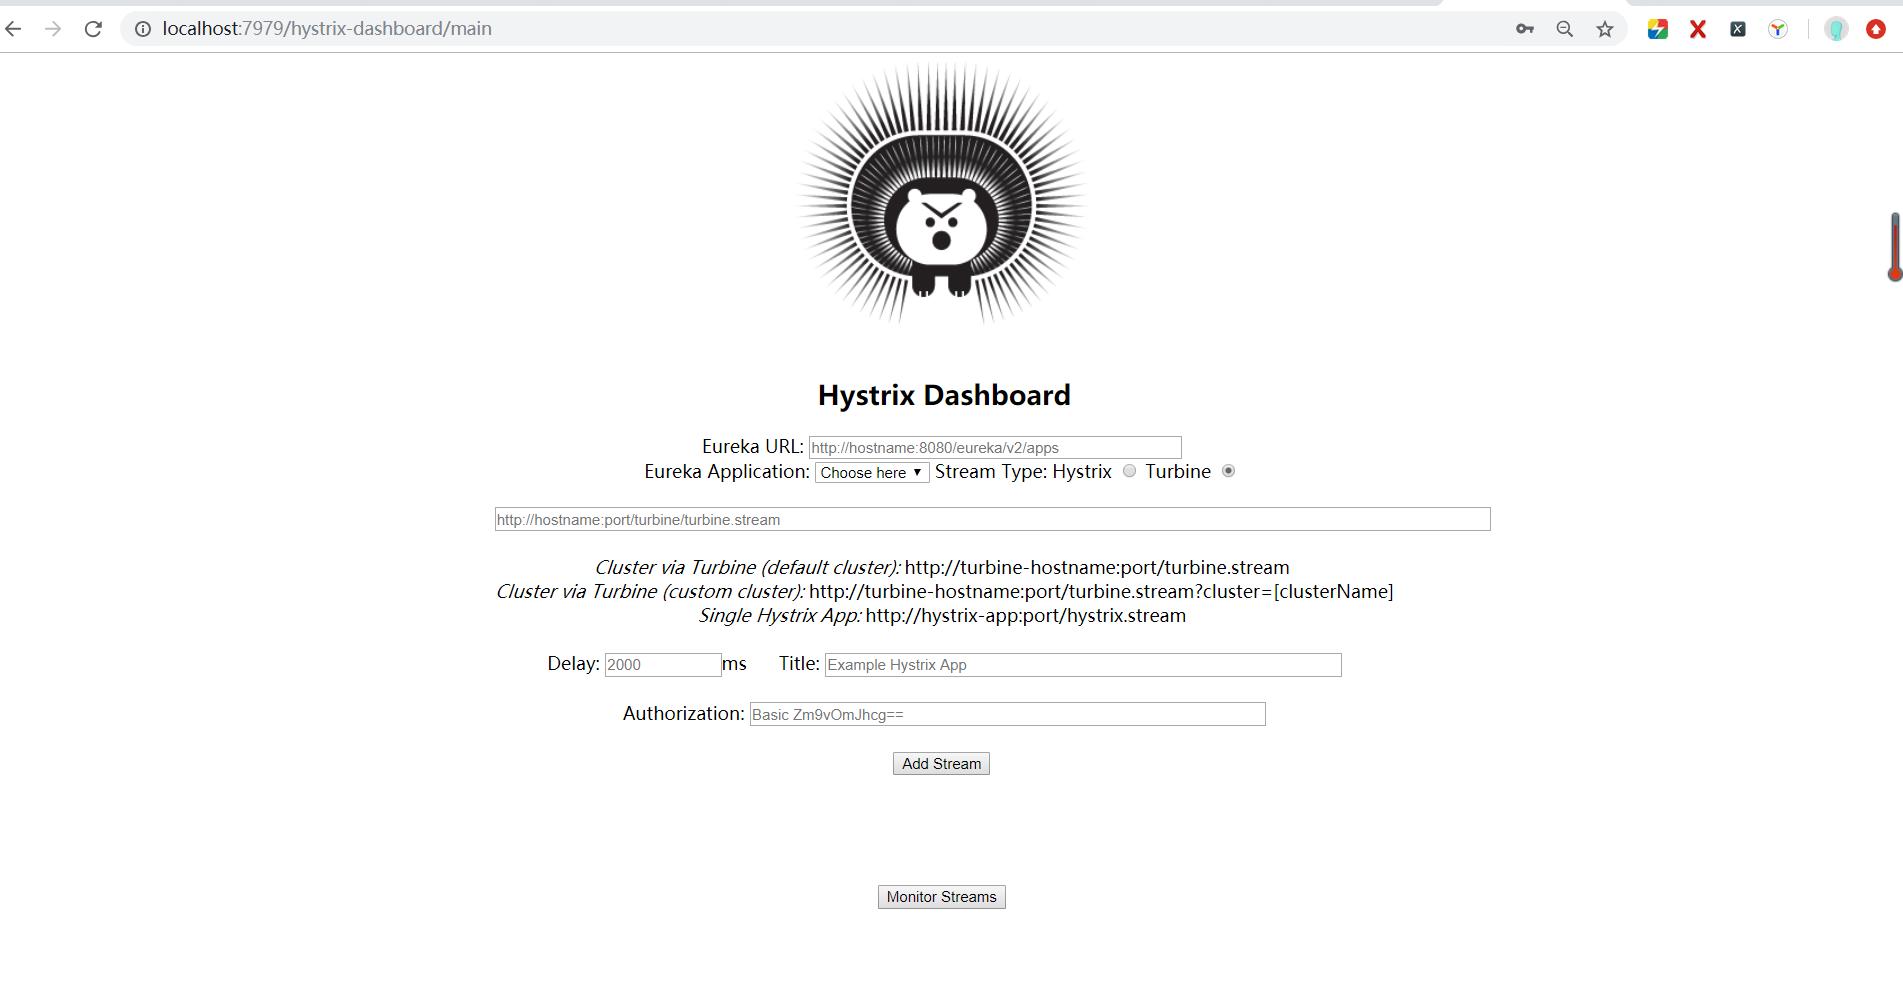
下图为未改造前的监控面板主页,需要手动添加监控对象。
点击“Monitor Stream”就可以进入监控详情页:
可以发现turbine dashboard项目实现了集群监控。
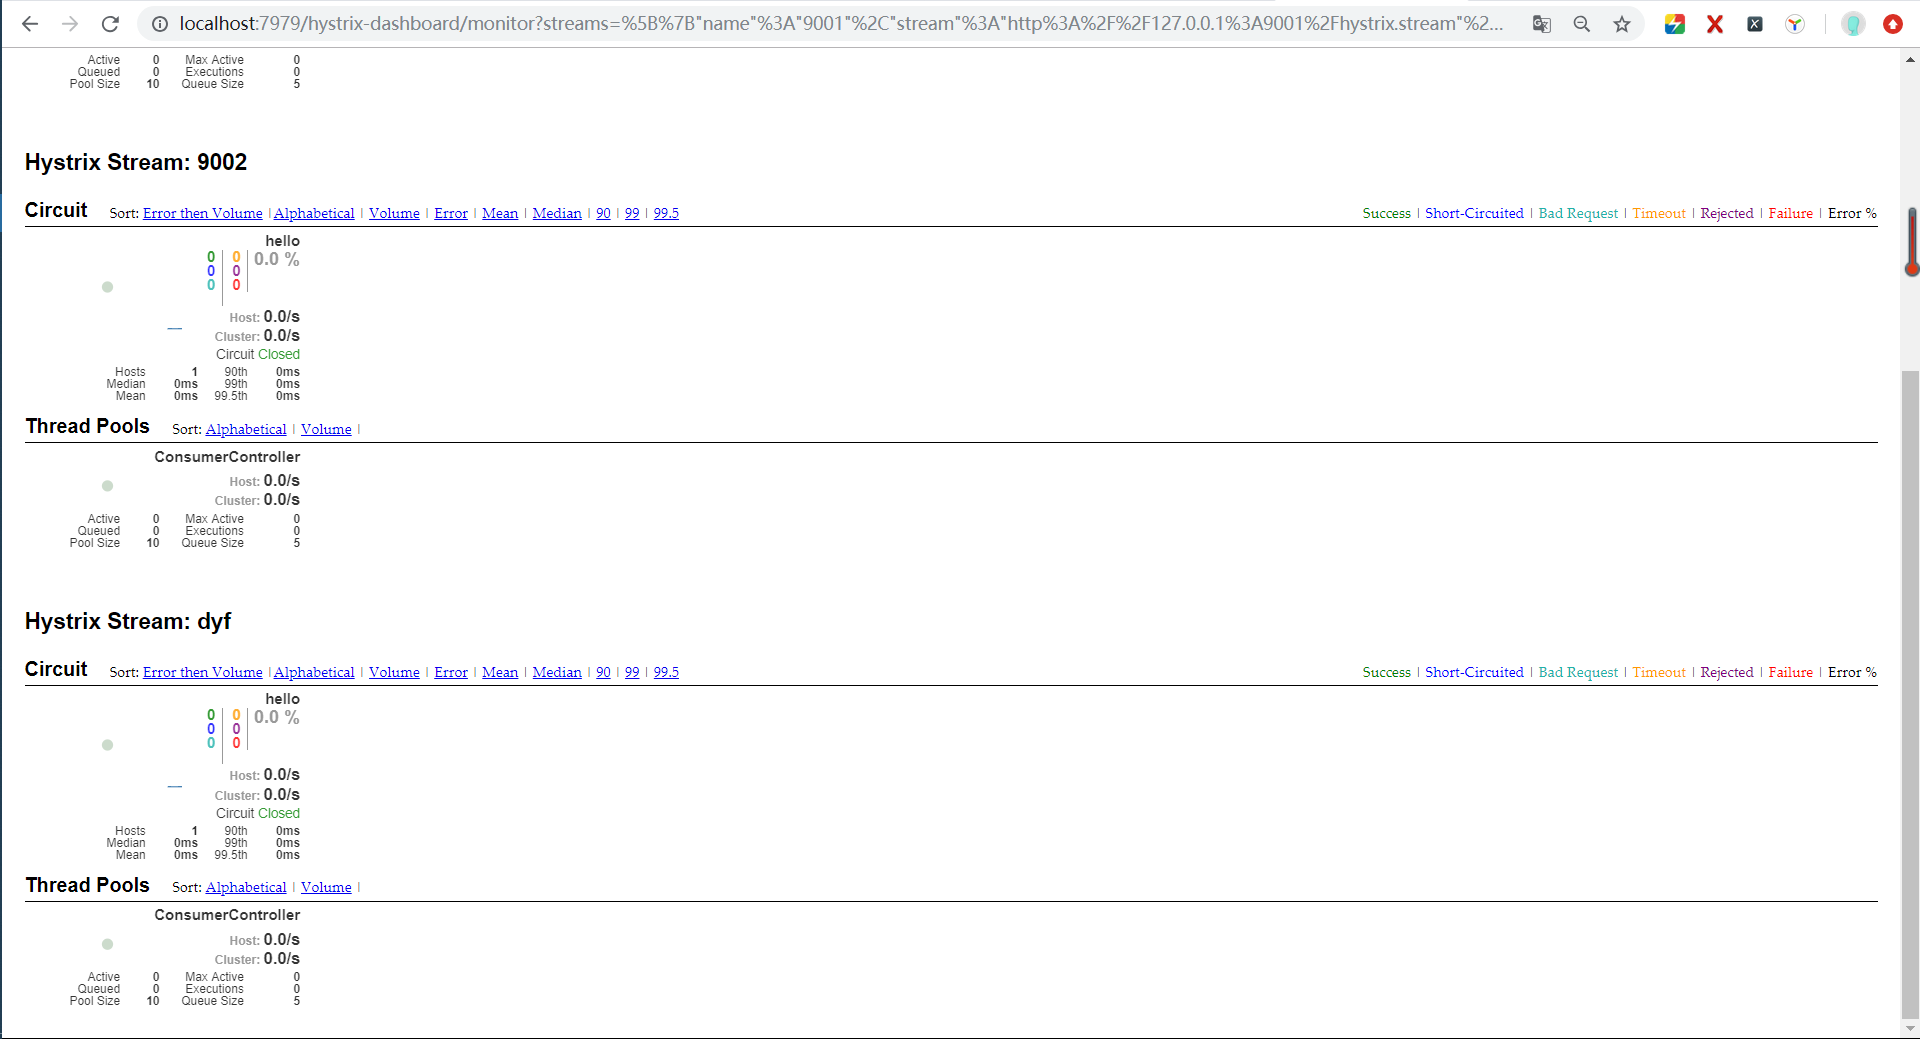
还没结束,为了测试是否实现消费者自动注册到turbine,我们在turbine项目启动的情况下,直接启动端口为9005的消费者项目,随后返回turbine监控主页面进行刷新,刷新后页面如下:
监控主页添加了一个新的消费者对象。

进入监控详情页,开始监控所有消费者对象。
虽然是在原来项目上已经做了改造,但是实际用的话还需要优化,比如登录用户密码、本地文件存储地址等可以写在配置文件中,从而可以根据不同环境进行打包等。
总之。。。有待改进
最后,附上本文用到的所有项目:newTurbine.zip
链接:https://pan.baidu.com/s/1maMx5d77towvphZbcbeQSg
提取码:xxdz
代码已上传至github,可以从我主页右上角获取。
改造断路器集群监控Hystrix Turbine实现自动注册消费者、实时监控多个服务的更多相关文章
- SpringCloud2.0 Turbine 断路器集群监控 基础教程(九)
1.启动基础工程 1.1.启动[服务中心]集群,工程名称:springcloud-eureka-server 参考 SpringCloud2.0 Eureka Server 服务中心 基础教程(二) ...
- springcloud(十一):熔断聚合监控Hystrix Turbine
springcloud(十一):熔断聚合监控Hystrix Turbine
- Spring Cloud :断路器集群监控(Turbine)
一. 简介 上一篇文章我们已经实现了对单个服务实例的监控,当然在实际应用中,单个实例的监控数据没有多大的价值,我们更需要的是一个集群系统的监控信息,这时我们就需要引入Turbine.Turb ...
- Spring Cloud项目之断路器集群监控Hystrix Dashboard
微服务(Microservices Architecture)是一种架构风格,一个大型复杂软件应用由一个或多个微服务组成.系统中的各个微服务可被独立部署,各个微服务之间是松耦合的.每个微服务仅关注于完 ...
- SpringCloud教程 | 第十三篇: 断路器聚合监控(Hystrix Turbine)
版权声明:本文为博主原创文章,欢迎转载,转载请注明作者.原文超链接 ,博主地址:http://blog.csdn.net/forezp. http://blog.csdn.net/forezp/art ...
- SpringCloud 教程 (六)断路器聚合监控(Hystrix Turbine)
一.Hystrix Turbine简介 看单个的Hystrix Dashboard的数据并没有什么多大的价值,要想看这个系统的Hystrix Dashboard数据就需要用到Hystrix Turbi ...
- 【SpringCloud】第十二篇: 断路器监控(Hystrix Turbine)
前言: 必需学会SpringBoot基础知识 简介: spring cloud 为开发人员提供了快速构建分布式系统的一些工具,包括配置管理.服务发现.断路器.路由.微代理.事件总线.全局锁.决策竞选. ...
- 史上最简单的SpringCloud教程 | 第十三篇: 断路器聚合监控(Hystrix Turbine)(Finchley版本)
转载请标明出处: 原文首发于:https://www.fangzhipeng.com/springcloud/2018/08/30/sc-f13-turbine/ 本文出自方志朋的博客 上一篇文章讲述 ...
- [Golang] kafka集群搭建和golang版生产者和消费者
一.kafka集群搭建 至于kafka是什么我都不多做介绍了,网上写的已经非常详尽了. 1. 下载zookeeper https://zookeeper.apache.org/releases.ht ...
随机推荐
- Python_shelve模块操作二进制文件
import shelve #导入shelve模块 fp=shelve.open('shelve_test.dat') #创建或打开二进制文件 zhangsan={'age':38,'sex':'Ma ...
- MYSQL复制原理及其流程
Mysql内建的复制功能是构建大型,高性能应用程序的基础.将Mysql的数据分布到多个系统上去,这种分布的机制,是通过将Mysql的某一台主机的数据复制到其他主机(slave)上,并重新执行一遍来实现 ...
- 【转及总结】Bootstrap 框架 栅格布局系统底层设计原理
如果你是初次接触Bootstrap,你一定会为它的栅格布局感到敬佩.事实上,这个布局系统提供了一套响应式的布局解决方案. 既然这么好用,那他是如何用CSS来实现的呢? 我特意去Bootstrap官方下 ...
- asp.net mvc 使用 Autocomplete 实现类似百度,谷歌动态搜索条提示框。
Autocomplete是一个Jquery的控件,用法比较简单. 大家先看下效果: 当文本框中输入内容,自动检索数据库给出下拉框进行提示功能. 需要用此控件大家先到它的官方网站进行下载最新版本: ht ...
- ps命令手册
LINFO ps命令 在PS(即,处理状态)命令被用来提供关于当前正在运行的信息的过程,包括它们的过程标识号(PID)来. 过程也称为任务,是程序的执行(即运行)实例.系统为每个过程分配一个唯一的 ...
- 【C#】对异步请求处理程序IHttpAsyncHandler的理解和分享一个易用性封装
在asp.net项目中,添加一个[一般处理程序]来处理请求是很自然的事,这样会得到一个实现自IHttpHandler的类,然后只需在ProcessRequest方法中写上处理逻辑就行了.但是这样的一个 ...
- centos网络配置方法(手动设置,自动获取)
不知道为什么最近一段时间网络特别的慢,还老是断,断的时候,局域网都连不上,当我手动设置一下ip后就可以了,搞得我很无语.下面是2种设置网络连接的方法,在说怎么设置前,一定要做好备份工作,特别是对于新手 ...
- spring创建bean及数据注入
通过spring的IoC可以实现由配置文件来创建类的对象,可以降低类鱼类之间的耦合, 通常我们都是在代码中控制对象的生成和属性注入,而使用IoC后,就可以将设计好的类交给IoC容器,让容器去控制对象的 ...
- Selenium 指定浏览器位置
在脚本开头要指定浏览器位置. public static void main(String[] args) throws InterruptedException, IOException { Sys ...
- ll 和 ls -l的详解
ll会列出该文件下的所有文件信息,包括隐藏文件 而ls -l 只会列出显示文件 ll 命令列出的信息更加详细,有时间,是否可读写等信息 ll命令和ls -l命令结果区别: 上面结果说明: 各个字段的含 ...