
Tutorial - Deferred Rendering Shadow Mapping 转
http://www.codinglabs.net/tutorial_opengl_deferred_rendering_shadow_mapping.aspx
Tutorial - Deferred Rendering Shadow Mapping
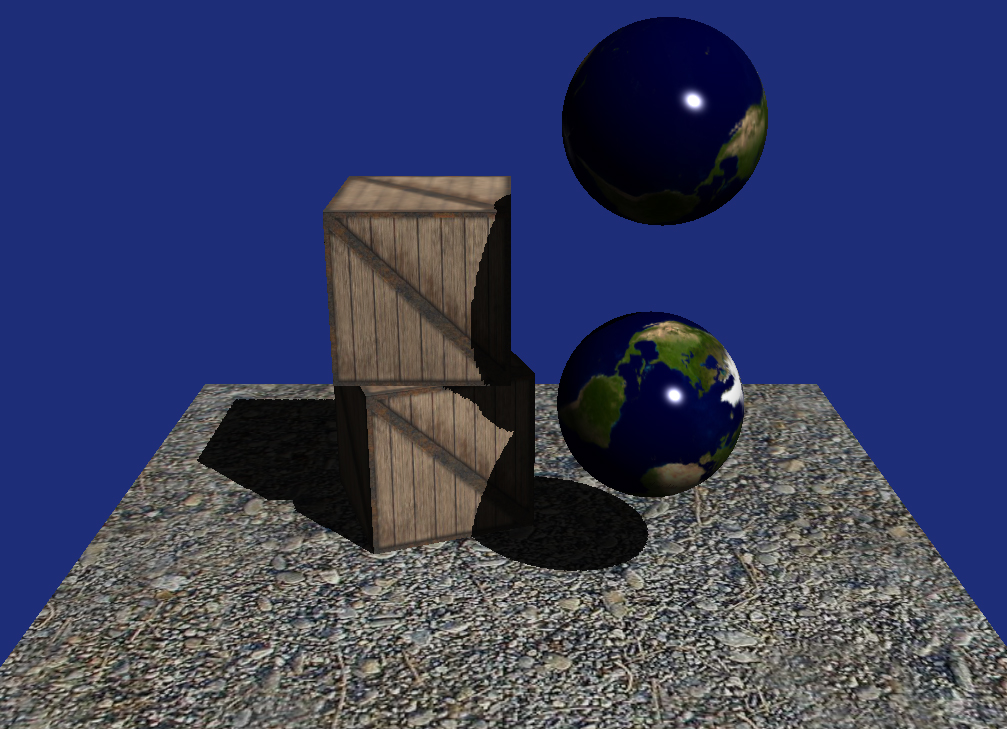
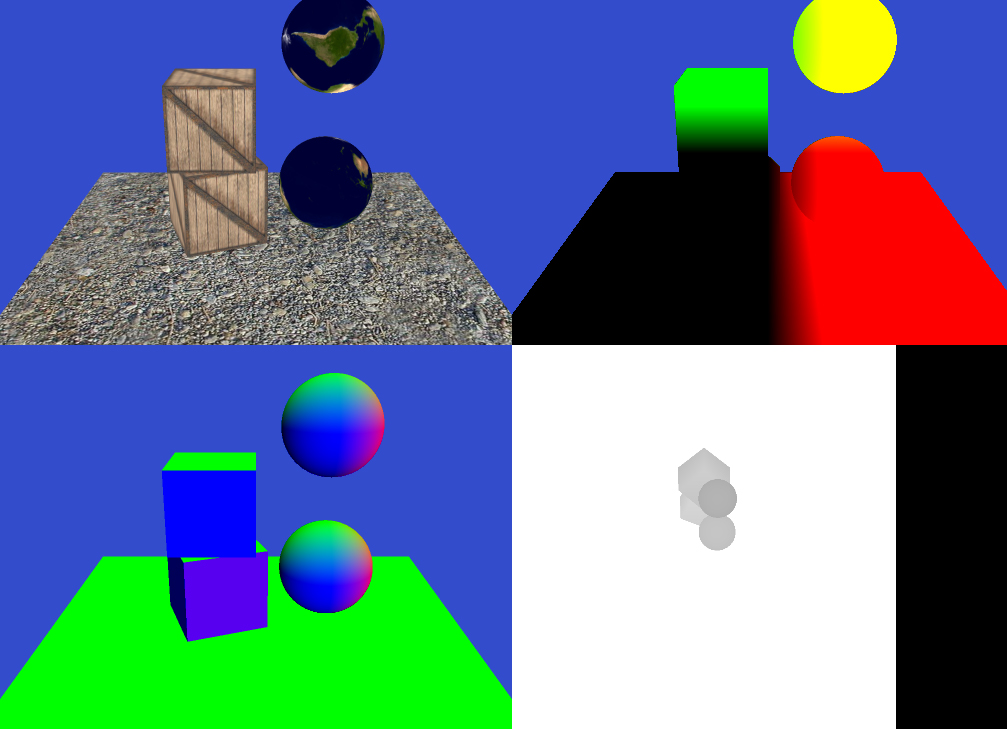
In this tutorial I will present the shadow mapping technique implemented in a deferred renderer. This tutorial will lean on a previous one, Simple Deferred Rendering in OpenGL; I strongly reccomend you to read it before proceeding with this tutorial as most of the code is shared and I will not present those bits that have already been covered in the other tutorial.
Shadow Mapping is the most widely used technique in real time rendering engines today. Almost every game uses some sort of shadow mapping technique to render its shadows, even if often the actual implementation relies on extensions of the basic shadow mapping that we will see in this tutorial. Some more advanced implementations are Cascade Shadow Mapping, Soft Shadow Mapping, Parallel Split Shadow Mapping, etc etc. For this tutorial we will simply try to understand the basics ideas that all these techniques use, which is using a texture (map) to encode useful information to render shadows.
 |
 |
Determining whether a pixel is in shadow or if it's lit by a given light is a visibility problem. What we want to test is if that specific point in the world is visible or not from the light point of view. We apply this idea to every pixel that we are rendering on screen thus what we want to do is to calculate what position each pixel is mapped to in world space. Once we have the position we can cast a ray back to the light. If the ray can reach the light without being interrupted, the pixel is in light, otherwise is in shadow. Watch the picture below (Figure 1). You can see how the two point are both visible from the camera, but just one is visible from the light.
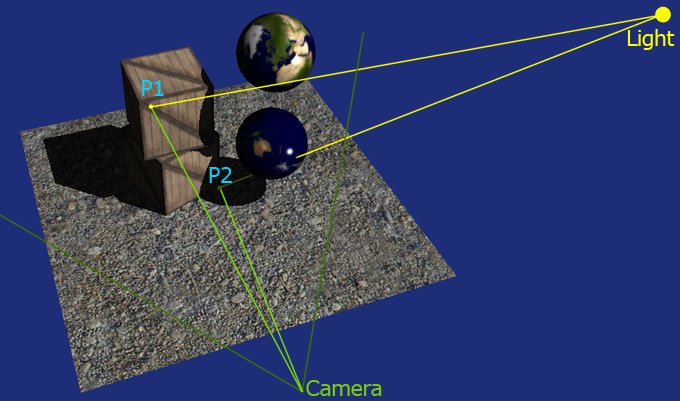 |
| Figure 1: Points in shadow and in light |
So now we know the principle and we can proceed to the practice. How can we determine whether a pixel (remapped in world) is visible or not from the light position. There are many many ways, but the one we are going to implement takes advantage of the ability of the GPU to render the depth of a scene. So if we set an imaginary camera in the light position and we render the depth of the scene as seen from the light what we get is a texture that contains a bunch of distances. Every pixel of this shadow map can be remapped in world space and will tell you what pixel the light see and how far that point is from the light itself. Watch Figure 2 below. The first point, P1, is visible from both the camera point of view and the light point of view. So if when we render it we also calculate its world position and then calculate the distance from the light we can compare it with the distance saved in the shadow map. When we compare P1's distance we will find that the value we calculate is the same value contained in the map (minus some error due to the way we store depth in the map). This because the pixel is visible frome the light point of view.
If we try to do the same with P2 we'll find a substantial difference. Say we calculate P2 in world space and then we calculate the distance between P2 in world space and the light as we did for P1. Now, if we compare the calculated distance with the distance saved in the shadow map we'll find that the one in the map is way smaller than the one we have just calculated. This because in the map the light will have the distance between P3 and the light itself. In fact, if you see from the light point of view P2 and P3 are overlapped, and since P3 is the closest one it "overrides" P2 which is then not visible. This tells us that P2 is in shadow.
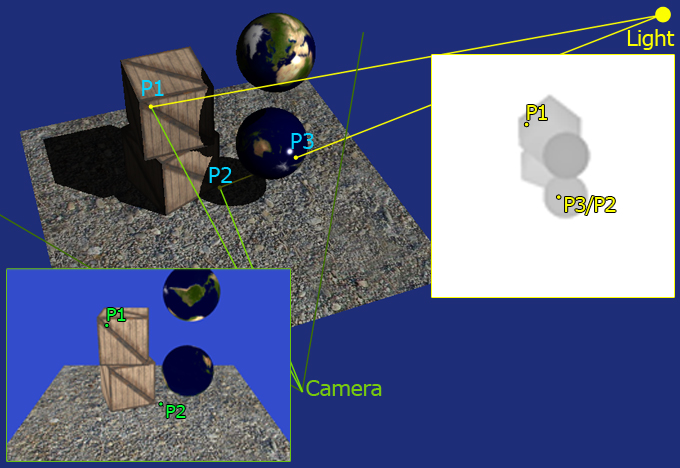 |
| Figure 2: Points in shadow and in light seen from light and camera |
This is all you need to implement shadow mapping. Let's see the sample code and let's try to make it as clear as possible.
1 |
I'll try to present the code not from the first to the last line but instead picking various funcionality and explaining what is doing what. So, let's start from the the rendering function. /** To start we want to acquire the shadow map, therefore we position the camera in the light's position and we orient it so that it looks down to the scene. We also flip from the standard CCW to CW when rendering the shadow map. This is a nice trick that works as far as every object is "closed". Flipping to CW renders the object "inside out" which means that we will use the back faces for comparing the distances reducing the shadow acne that typically shows up with shadow mapping. This is not mandatory, it just helps a bit in most of the cases (but make it worst in others). // Render the shadow map We then render all the models into the shadow map. We'll check how the shadow map is created in a moment, for now all we need to know is that here we render all the models' depth into a texture. // We then save out the matrices and send them to the deferred rendering, so when it comes to do the deferred pass We store the matrices in some local variables because we need to provide them to the shader to reproject the pixels back in world and into the light clip/projection space. Notice that we also restore the renderer back to render faces CCW. // Render our geometry into the FBO This is the core of the rendering procedure. Summarizing we acquire the shadow map, save the matrices, send the matrices to the shader and then render. So we now have to see in detail two more things: how we create and use the shadow map and, the most important one, the shader that composes and renders the final frame. |
2 |
Let's see how do we capture the shadow map. Since all we need to store in the shadow map is the depth, we don't have to create a colour render target. All we need is a render target that can receive depth. To isolate this feature I've created a class called DepthRenderTexture which provides some methods to render the depth into the render target and some debug functionality to show the render target as a texture. The constructor of this class tells OpenGL that we only want to render depth into an FBO: // Generate the OGL resources for what we need Once the OpenGL resource is created we can acquire the texture as we would do with a normal FBO. This is wrapped by the start and stop methods. |
3 |
We are now to the last step of this tutorial. How to combine everything and define whether a pixel is in shadow or not. All the magic happens in the shader, so we will now analyze it bit by bit. uniform sampler2D tDiffuse; So what's different from the previous tutorial? For a start we now read the light position from the light matrix (since we have it), but the important bit is obviously the line that calls readShadowMap(eyeDir). At that line we call the funcion that given the camera to pixel vector decides if the pixel we see is in shadow or not. We will see the function in a moment. The shadow value ranges between 0.0 to 1.0. We then use this value to make the diffuse light black and to kill the specular reflection. float readShadowMap(vec3 eyeDir) The eyeDir that comes in input is in View Space. To find the pixel in the shadow map we need to take that point and covert it into the light's clip space, which means going from Camera View Space into World Space, then into Light View Space, than into Light Projection Space/Clip space. All these transformations are done using matrices; if you are not familiar with space changes you may want to read my article about spaces and transformations. Once we are in the right space we calculate the texture coordinates and we are finally ready to read from the shadow map. Bias is a small offset that we apply to the values in the map to avoid that because of rounding errors a point ends up shading itself! So we shift all the map back a bit so that all the values in the map are slightly smaller than they should. Finally we check if the distance between the point and the light (projectedEyeDir) is smaller than the value stored in the depth map. Notice how we need to scale back projectedEyeDir from the -1 -> 1 range to the 0->1 range as the shadow map is in this latter range. That's it, not too difficult if you graps the idea of chaning space and mapping pixels into a map of dephts! Feel free to grab the code and have a play with it, as usual, trying yourself is way more useful than any explanation. |
Tutorial - Deferred Rendering Shadow Mapping 转的更多相关文章
- (转)Shadow Mapping
原文:丢失,十分抱歉,这篇是在笔记上发现的.SmaEngine 阴影和级联部分是模仿UE的结构设计 This tutorial will cover how to implement shadow ...
- OpenGL阴影,Shadow Mapping(附源程序)
实验平台:Win7,VS2010 先上结果截图(文章最后下载程序,解压后直接运行BIN文件夹下的EXE程序): 本文描述图形学的两个最常用的阴影技术之一,Shadow Mapping方法(另一种是Sh ...
- Tile-Based Deferred Rendering
目前所有的移动设备都使用的是 Tile-Based Deferred Rendering(TBDR) 的渲染架构.TBDR 的基本流程是这样的,当提交渲染命令的时候,GPU 不会立刻进行渲染,而是一帧 ...
- Shadow mapping
http://www.cnblogs.com/cxrs/archive/2009/10/17/1585038.html 1.什么是Shadow Maping? Shadow Mapping是 ...
- opengl 教程(24) shadow mapping (2)
原帖地址:http://ogldev.atspace.co.uk/www/tutorial24/tutorial24.html 本篇教程中,我们通过shadowmap来实现阴影渲染. 我们知道shad ...
- OpenGL 阴影之Shadow Mapping和Shadow Volumes
先说下开发环境.VS2013,C++空项目,引用glut,glew.glut包含基本窗口操作,免去我们自己新建win32窗口一些操作.glew使我们能使用最新opengl的API,因winodw本身只 ...
- shadow mapping实现动态shadow实现记录 【转】
http://blog.csdn.net/iaccepted/article/details/45826539 前段时间一直在弄一个室内场景,首先完成了render,效果还可以.然后给其加上shado ...
- OpenGL核心技术之Shadow Mapping改进版
笔者介绍:姜雪伟,IT公司技术合伙人,IT高级讲师,CSDN社区专家,特邀编辑,畅销书作者;已出版书籍:<手把手教你架构3D游戏引擎>电子工业出版社和<Unity3D实战核心技术详解 ...
- OpenGL核心技术之Shadow Mapping
笔者介绍:姜雪伟,IT公司技术合伙人,IT高级讲师,CSDN社区专家,特邀编辑,畅销书作者,国家专利发明人;已出版书籍:<手把手教你架构3D游戏引擎>电子工业出版社和<Unity3D ...
随机推荐
- Leetcode: Design Snake Game
Design a Snake game that is played on a device with screen size = width x height. Play the game onli ...
- JavaScricp
常用对话框 1.alert(""):警告对话框,作用是弹出一个警告对话框 2.confirm(""):确定对话框,弹出一个带确定和取消按钮的对话框——确定返回t ...
- BufferedReader与BufferedWriter读写中文乱码问题
正常读写英文时用""""没问题 FileReader fre = new FileReader("E:\\TEST\\readText.txt&quo ...
- 在jasp页面循环显示
<% int h=3;//行数 int l=3;//列数 %> <table> <% for(int i=0;i<h;i++){ %> <tr> ...
- SSAS中事实表中的数据如果因为一对多或多对多关系复制了多份,在维度上聚合的时候还是只算一份
SSAS事实表中的数据,有时候会因为一对多或多对多关系发生复制变成多份,如下图所示: 图1 我们可以从上面图片中看到,在这个例子中,有三个事实表Fact_People_Money(此表用字段Money ...
- java.lang.ClassNotFoundException: org.springframework.web.context.ContextLoaderListener
参考: http://www.cnblogs.com/sunxucool/archive/2013/06/07/3124380.html ---------------------------&g ...
- 简明外贸报价单(Price List)范本
简明外贸报价单(Price List)范本 简明外贸报价单(Price List)范本 报价单 Price List 报价日期:年 月 日 Supplier Address 供应商 公司地址 Co ...
- hybird混合式开发搭建
1.xml <?xml version="1.0" encoding="utf-8"?> <WebView xmlns:android=&qu ...
- c++多线程のunique和lazy initation
unique更方便使用,但是会消耗更多的计算机性能 onceflag保证一个线程被调用一次,防止不能的加锁开锁
- 【前端】iterable类型的 forEach方法
看三个例子: a = [ age: 1 , age: 2 ] a.forEach (item) -> item.age = 0 # 有效 console.log a # [ # age: 0 # ...