
[js高手之路]深入浅出webpack教程系列6-插件使用之html-webpack-plugin配置(下)
[js高手之路]深入浅出webpack教程系列索引目录:
- [js高手之路]深入浅出webpack教程系列1-安装与基本打包用法和命令参数
- [js高手之路]深入浅出webpack教程系列2-配置文件webpack.config.js详解(上)
- [js高手之路]深入浅出webpack教程系列3-配置文件webpack.config.js详解(下)
- [js高手之路]深入浅出webpack教程系列4-插件使用之html-webpack-plugin配置(上)
- [js高手之路]深入浅出webpack教程系列5-插件使用之html-webpack-plugin配置(中)
- [js高手之路]深入浅出webpack教程系列6-插件使用之html-webpack-plugin配置(下)
- [js高手之路]深入浅出webpack教程系列7-( babel-loader,css-loader,style-loader)的用法
- [js高手之路]深入浅出webpack教程系列8-(postcss-loader,autoprefixer,html-loader,less-loader,ejs-loader)用法
- [js高手之路]深入浅出webpack教程系列9-打包图片(file-loader)用法
上文我们对html-webpack-plugin的实例htmlWebpackPlugin进行了遍历分析,讲解了几个常用属性( inject, minify )以及自定义属性的添加,本文,我们继续深入他的配置选项的探讨.
一、chunks选项
这个属性非常有用,可以指定某个页面加载哪些chunk( 如:js文件 )
我们可以用他做多个页面模板的生成. 比如,我们在实际开发中,做一个博客网站,一般来说有首页,文章列表页,文章详情页等等,这些页面都有一个特点,都要引入一些公共的js文件以及该页面特有的js文件,比如:
首页( index.html ) 引入 main.js, index.js
文章列表页( list.html ) 引入 main.js, list.js
文章详情页( detail.html ) 引入 main.js, detail.js
传统方式,一个个的打开文件,拷贝修改,如果后期维护,又是一堆文件中,查找,拷贝,修改。很容易出错,而且效率低下,我们看下webpack是如何提高效率,开启前端工业化开发革命道路
webpack.dev.config.js文件代码:
 var HtmlWebpackPlugin = require('html-webpack-plugin');

 module.exports = {

     entry : {

         main : './src/js/main.js',

         index : './src/js/index.js',

         list : './src/js/list.js',

         detail : './src/js/detail.js'

     },

     output : {

         //__dirname,就是当前webpack.config.js文件所在的绝对路径

         path : __dirname + '/dist', //输出路径,要用绝对路径

         filename : 'js/[name]-[hash].bundle.js', //打包之后输出的文件名

     },

     plugins: [

         new HtmlWebpackPlugin({

             template : './index.html',

             title : '博客首页-by ghostwu',

             filename : 'index.html',

             inject : true,

             chunks : ['main', 'index']

         }),

         new HtmlWebpackPlugin({

             template : './index.html',

             title : '列表页-by ghostwu',

             filename : 'list.html',

             inject : true,

             chunks : ['main', 'list']

         }),

         new HtmlWebpackPlugin({

             template : './index.html',

             title : '文章详情页-by ghostwu',

             filename : 'detail.html',

             inject : true,

             chunks : ['main', 'detail']

         })

     ]

 };
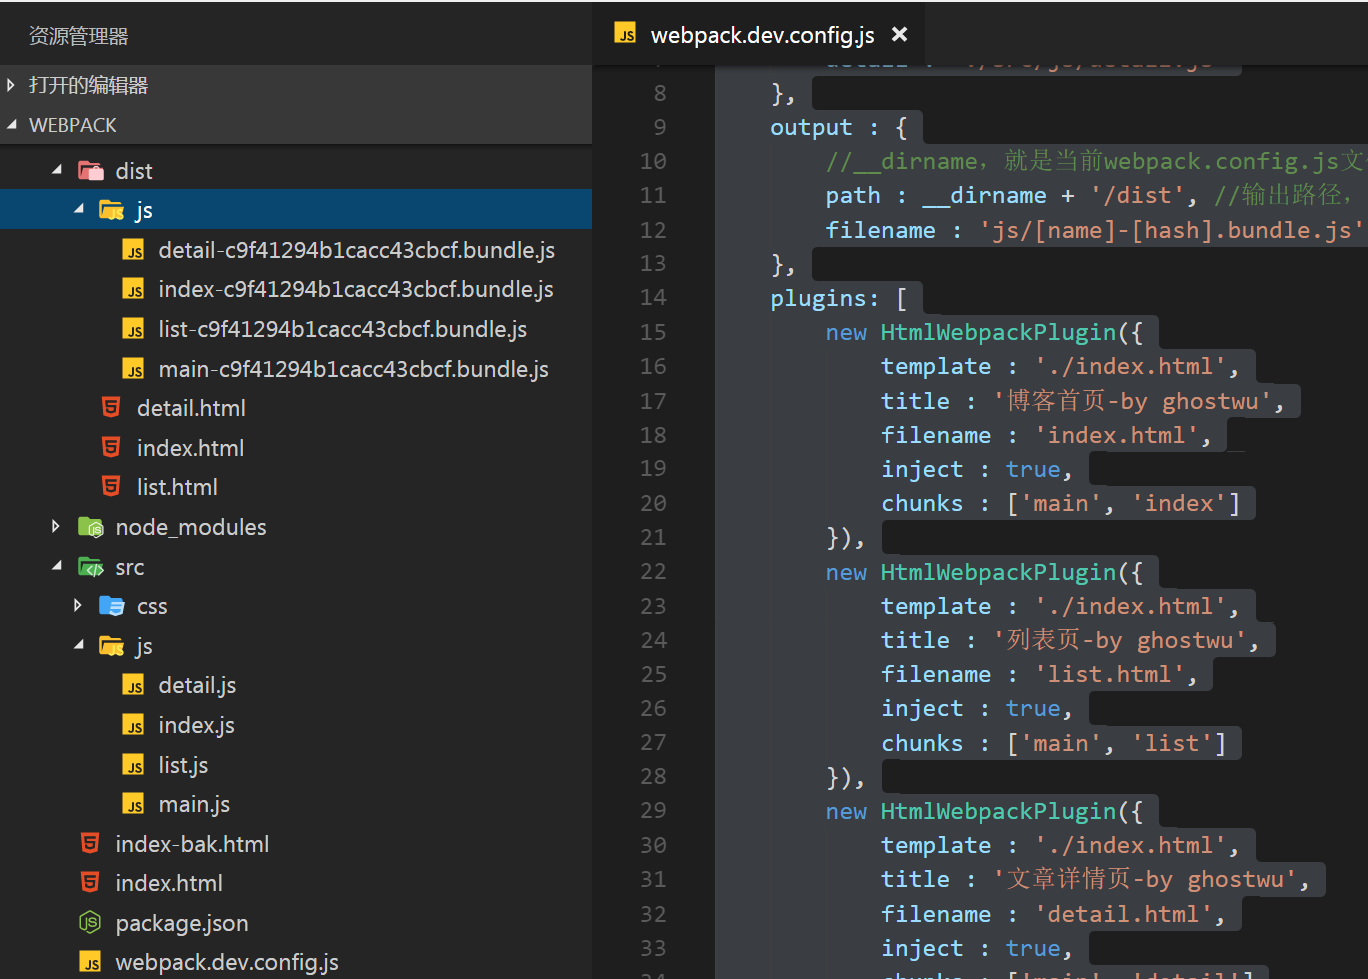
然后在src的js目录下面,创建main.js, index.js,list.js,detail.js文件,执行打包( npm run d )就会在dist下面生成3个文件,各自引入到各自的js文件,下次要维护的时候,只要修改这个配置文件,再次打包就可以了,是不是很方便
二、excludeChunks选项
这个很好理解,就是有很多chunks,排除不要加载的
webpack.dev.config.js文件代码:
 var HtmlWebpackPlugin = require('html-webpack-plugin');

 module.exports = {

     entry : {

         main : './src/js/main.js',

         index : './src/js/index.js',

         list : './src/js/list.js',

         detail : './src/js/detail.js'

     },

     output : {

         //__dirname,就是当前webpack.config.js文件所在的绝对路径

         path : __dirname + '/dist', //输出路径,要用绝对路径

         filename : 'js/[name]-[hash].bundle.js', //打包之后输出的文件名

     },

     plugins: [

         new HtmlWebpackPlugin({

             template : './index.html',

             title : '博客首页-by ghostwu',

             filename : 'index.html',

             inject : true,

             excludeChunks : ['list','detail']

         }),

         new HtmlWebpackPlugin({

             template : './index.html',

             title : '列表页-by ghostwu',

             filename : 'list.html',

             inject : true,

             excludeChunks : ['index','detail']

         }),

         new HtmlWebpackPlugin({

             template : './index.html',

             title : '文章详情页-by ghostwu',

             filename : 'detail.html',

             inject : true,

             excludeChunks : ['list','index']

         })

     ]

 };
把配置文件修改之后,再用npm run d执行一次打包,跟使用chunks的效果是一样的
三,把页面src引入文件的方式,改成用script标签嵌入的方式,减少http请求( 提高加载性能)
要达到这个目的,我们再安装一个插件html-webpack-inline-source-plugin
安装:npm install --save-dev html-webpack-inline-source-plugin
webpack.dev.config.js文件代码:
 var HtmlWebpackPlugin = require('html-webpack-plugin');

 var HtmlWebpackInlineSourcePlugin = require('html-webpack-inline-source-plugin');

 module.exports = {

     entry : {

         main : './src/js/main.js',

         index : './src/js/index.js',

         list : './src/js/list.js',

         detail : './src/js/detail.js'

     },

     output : {

         //__dirname,就是当前webpack.config.js文件所在的绝对路径

         path : __dirname + '/dist', //输出路径,要用绝对路径

         filename : 'js/[name]-[hash].bundle.js', //打包之后输出的文件名

     },

     plugins: [

         new HtmlWebpackPlugin({

             template : './index.html',

             title : '博客首页-by ghostwu',

             filename : 'index.html',

             inject : true,

             excludeChunks : ['list','detail'],

             inlineSource : '.(js|css)$' //全部内嵌

         }),

         new HtmlWebpackInlineSourcePlugin(),

         new HtmlWebpackPlugin({

             template : './index.html',

             title : '列表页-by ghostwu',

             filename : 'list.html',

             inject : true,

             excludeChunks : ['index','detail']

         }),

         new HtmlWebpackPlugin({

             template : './index.html',

             title : '文章详情页-by ghostwu',

             filename : 'detail.html',

             inject : true,

             excludeChunks : ['list','index']

         })

     ]

 };
执行npm run d打包命令之后,就会把dist/index.html文件的js和css改成内嵌方式
[js高手之路]深入浅出webpack教程系列6-插件使用之html-webpack-plugin配置(下)的更多相关文章
- [js高手之路]深入浅出webpack教程系列5-插件使用之html-webpack-plugin配置(中)
上文我们讲到了options的配置和获取数据的方式,本文,我们继续深入options的配置 一.html-webpack-plugin插件中的options除了自己定义了一些基本配置外,我们是可以任意 ...
- [js高手之路]深入浅出webpack教程系列4-插件使用之html-webpack-plugin配置(上)
还记得我们上文中的index.html文件吗? 那里面的script标签还是写死的index.bundle.js文件,那么怎么把他们变成动态的index.html文件,这个动态生成的index.htm ...
- [js高手之路]深入浅出webpack教程系列3-配置文件webpack.config.js详解(下)
本文继续接着上文,继续写下webpack.config.js的其他配置用法. 一.把两个文件打包成一个,entry怎么配置? 在上文中的webpack.dev.config.js中,用数组配置entr ...
- [js高手之路]深入浅出webpack教程系列7-( babel-loader,css-loader,style-loader)的用法
什么是loader呢,官方解释为文件的预处理器,通俗点说webpack在处理静态资源的时候,需要加载各种loader,比如,html文件,要用html-loader, css文件要用css-loade ...
- [js高手之路]深入浅出webpack教程系列9-打包图片(file-loader)用法
我们还是接着上文继续,本文我们要讲的是图片资源的打包,图片在静态排版中,经常出现的两个位置是css通过background引入背景,还有一种就是在html模板文件中用img标签引入的方式,如果要在we ...
- [js高手之路]深入浅出webpack教程系列8-(postcss-loader,autoprefixer,html-loader,less-loader,ejs-loader)用法
我们接着上文,那么在上篇文章的最后,写到了css-loader的用法,如果你用心发现,就能看到我在style.css样式文件中写了一个这样的样式: div { transition: all ease ...
- [js高手之路]深入浅出webpack教程系列1-安装与基本打包用法和命令参数
[js高手之路]深入浅出webpack教程系列索引目录: [js高手之路]深入浅出webpack教程系列1-安装与基本打包用法和命令参数 [js高手之路]深入浅出webpack教程系列2-配置文件we ...
- [js高手之路]深入浅出webpack教程系列2-配置文件webpack.config.js详解(上)
[js高手之路]深入浅出webpack教程系列索引目录: [js高手之路]深入浅出webpack教程系列1-安装与基本打包用法和命令参数 [js高手之路]深入浅出webpack教程系列2-配置文件we ...
- [js高手之路]深入浅出webpack系列2-配置文件webpack.config.js详解
接着上文,重新在webpack文件夹下面新建一个项目文件夹demo2,然后用npm init --yes初始化项目的package.json配置文件,然后安装webpack( npm install ...
随机推荐
- git 安装 和 基本操作
林纳斯的小故事 感兴趣的同学可以自己百度一下 版本控制常用svn git @@@svn 1 搭建环境 server:visualSVN Serverserver port: https 默认443ht ...
- java web 中有效解决中文乱码问题-pageEncoding与charset区别, response和request的setCharacterEncoding 区别
这里先写几个大家容易搞混的编码设置代码: 在jsp代码中的头部往往有这两行代码 pageEncoding是jsp文件本身的编码contentType的charset是指服务器发送给客户端时的内容编码J ...
- Eclipse Jetty插件安装
Eclipse Jetty插件安装 使用方法一: 本地资源包插件下载地址:http://pan.baidu.com/s/1sjNP5Id 或者是地址:http://pan.baidu.com/s/1b ...
- CI 结合 vue.js 的搜索功能模块
CI 结合 vue.js 的搜索功能模块 最近在有优化公司后台的某个模块的搜索功能优化 原先的是这个样子的,很是单调: 老大给我找个图希望我能弄成这样子: 经过不断修改,最后成了这样子 是不是比以前好 ...
- DataGuard开启延时应用的测试
DataGuard开启延时应用的测试 实验环境:RHEL 6.5 + Oracle 11.2.0.4 GI.DB + Primary RAC(2 nodes)+ Standby RAC(2 nodes ...
- web添加第三方应用,前端解决跨域问题的8种方案
应用场景 web应用通过QQ登录授权实现第三方登录. 操作步骤 1. 注册成为QQ互联平台开发者,http://connect.qq.com/ 2. 准备一个可访问的域名,如dev.foo.com 3 ...
- 借助AMD来解决HTML5游戏开发中的痛点
借助AMD来解决HTML5游戏开发中的痛点 游戏开发的痛点 现在,基于国内流行引擎(LayaAir和Egret)和TypeScript的HTML5游戏开发有诸多痛点: 未采用TypeScript编译器 ...
- 十分钟帮你搭建专业的内容付费平台(APP/网站)
内容付费变现时代,从商业运营角度出发,全面付费系统多方面支付节点,强化优质付费价格核心,ThinkSNS+(简称TS+),专注于帮助创业者变现,抓取社群经济,让您拥有专属的知识变现软件系统. 一.内容 ...
- HDU 6153 拓展KMP (2017CCPC)
A Secret Time Limit: 2000/1000 MS (Java/Others) Memory Limit: 256000/256000 K (Java/Others)Total ...
- 第一阶段项目(3body)
<div class="H1"> <div class="top-nav"> < ...