spring 5.x 系列第19篇 ——spring简单邮件、附件邮件、内嵌资源邮件、模板邮件发送 (xml配置方式)
源码Gitub地址:https://github.com/heibaiying/spring-samples-for-all
一、说明
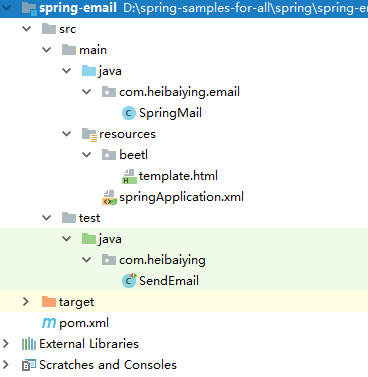
1.1 项目结构说明
- 邮件发送配置文件为springApplication.xml;
- 简单邮件发送、附件邮件发送、内嵌资源邮件发送、模板邮件发送的方法封装在SpringMail类中;
- 项目以单元测试的方法进行测试,测试类为SendEmail。
1.2 依赖说明
除了spring的基本依赖外,需要导入邮件发送的支持包spring-context-support
 <!--邮件发送依赖包-->
<dependency>
    <groupId>org.springframework</groupId>
    <artifactId>spring-context-support</artifactId>
    <version>${spring-base-version}</version>
</dependency>
 <!--模板引擎-->
        <!--这里采用的是beetl,beetl性能很卓越并且功能也很全面 官方文档地址 <a href="http://ibeetl.com/guide/#beetl">-->
<dependency>
    <groupId>com.ibeetl</groupId>
    <artifactId>beetl</artifactId>
    <version>2.9.7</version>
</dependency>
二、spring email
2.1 邮件发送配置
<?xml version="1.0" encoding="UTF-8"?>
<beans xmlns="http://www.springframework.org/schema/beans"
       xmlns:xsi="http://www.w3.org/2001/XMLSchema-instance"
       xmlns:context="http://www.springframework.org/schema/context"
       xsi:schemaLocation="http://www.springframework.org/schema/beans
        http://www.springframework.org/schema/beans/spring-beans.xsd
        http://www.springframework.org/schema/context
        http://www.springframework.org/schema/context/spring-context-4.1.xsd">

    <!-- 开启注解包扫描-->
    <context:component-scan base-package="com.heibaiying.email"/>

    <!--在这里可以声明不同的邮件服务器主机,通常是SMTP主机,而具体的用户名和时授权码则建议在业务中从数据库查询-->
    <bean id="qqMailSender" class="org.springframework.mail.javamail.JavaMailSenderImpl">
        <!--qq 邮箱配置 <a href="https://service.mail.qq.com/cgi-bin/help?subtype=1&no=167&id=28"> -->
        <property name="host" value="smtp.qq.com"/>
        <property name="port" value="587"/>
    </bean>

    <!--配置beetle模板引擎 如果不使用模板引擎,以下的配置不是必须的-->
    <bean id="resourceLoader" class="org.beetl.core.resource.ClasspathResourceLoader">
        <!--指定加载模板资源的位置 指定在classpath:beetl下-->
        <constructor-arg name="root" value="beetl"/>
    </bean>
    <!--beetl 配置  这里采用默认的配置-->
    <bean id="configuration" class="org.beetl.core.Configuration" init-method="defaultConfiguration"/>
    <bean id="groupTemplate" class="org.beetl.core.GroupTemplate">
        <constructor-arg name="loader" ref="resourceLoader"/>
        <constructor-arg name="conf" ref="configuration"/>
    </bean>

</beans>
2.2 新建邮件发送基本类
/**
 * @author : heibaiying
 * @description : 邮件发送基本类
 */
@Component
public class SpringMail {

    @Autowired
    private JavaMailSenderImpl qqMailSender;
    @Autowired
    private GroupTemplate groupTemplate;

    /**
     * 发送简单邮件
     * 在qq邮件发送的测试中,测试结果表明不管是简单邮件还是复杂邮件都必须指定发送用户,
     * 且发送用户已经授权不然都会抛出异常: SMTPSendFailedException 501 mail from address must be same as authorization user
     * qq 的授权码 可以在 设置/账户/POP3/IMAP/SMTP/Exchange/CardDAV/CalDAV服务 中开启服务后获取
     */
    public void sendTextMessage(String from, String authWord, String to, String subject, String content) {
        // 设置发送人邮箱和授权码
        qqMailSender.setUsername(from);
        qqMailSender.setPassword(authWord);
        // 实例化消息对象
        SimpleMailMessage msg = new SimpleMailMessage();
        msg.setFrom(from);
        msg.setTo(to);
        msg.setSubject(subject);
        msg.setText(content);
        try {
            // 发送消息
            this.qqMailSender.send(msg);
            System.out.println("发送邮件成功");
        } catch (MailException ex) {
            // 消息发送失败可以做对应的处理
            System.err.println("发送邮件失败" + ex.getMessage());
        }
    }

    /**
     * 发送带附件的邮件
     */
    public void sendEmailWithAttachments(String from, String authWord, String to,
                                         String subject, String content, Map<String, File> files) {
        try {
            // 设置发送人邮箱和授权码
            qqMailSender.setUsername(from);
            qqMailSender.setPassword(authWord);
            // 实例化消息对象
            MimeMessage message = qqMailSender.createMimeMessage();
            // 需要指定第二个参数为true 代表创建支持可选文本,内联元素和附件的多部分消息
            MimeMessageHelper helper = new MimeMessageHelper(message, true, "utf-8");
            helper.setFrom(from);
            helper.setTo(to);
            helper.setSubject(subject);
            helper.setText(content);
            // 传入附件
            for (Map.Entry<String, File> entry : files.entrySet()) {
                helper.addAttachment(entry.getKey(), entry.getValue());
            }
            // 发送消息
            this.qqMailSender.send(message);
            System.out.println("发送邮件成功");
        } catch (MessagingException ex) {
            // 消息发送失败可以做对应的处理
            System.err.println("发送邮件失败" + ex.getMessage());
        }
    }

    /**
     * 发送带内嵌资源的邮件
     */
    public void sendEmailWithInline(String from, String authWord, String to,
                                    String subject, String content, File file) {
        try {
            // 设置发送人邮箱和授权码
            qqMailSender.setUsername(from);
            qqMailSender.setPassword(authWord);
            // 实例化消息对象
            MimeMessage message = qqMailSender.createMimeMessage();
            // 需要指定第二个参数为true 代表创建支持可选文本,内联元素和附件的多部分消息
            MimeMessageHelper helper = new MimeMessageHelper(message, true, "utf-8");
            helper.setFrom(from);
            helper.setTo(to);
            helper.setSubject(subject);
            // 使用true标志来指示包含的文本是HTML 固定格式资源前缀 cid:
            helper.setText("<html><body><img src='cid:image'></body></html>", true);
            // 需要先指定文本 再指定资源文件
            FileSystemResource res = new FileSystemResource(file);
            helper.addInline("image", res);
            // 发送消息
            this.qqMailSender.send(message);
            System.out.println("发送邮件成功");
        } catch (MessagingException ex) {
            // 消息发送失败可以做对应的处理
            System.err.println("发送邮件失败" + ex.getMessage());
        }
    }

    /**
     * 使用模板邮件
     */
    public void sendEmailByTemplate(String from, String authWord, String to,
                                    String subject, String content) {
        try {
            Template t = groupTemplate.getTemplate("template.html");
            t.binding("subject", subject);
            t.binding("content", content);
            String text = t.render();
            // 设置发送人邮箱和授权码
            qqMailSender.setUsername(from);
            qqMailSender.setPassword(authWord);
            // 实例化消息对象
            MimeMessage message = qqMailSender.createMimeMessage();
            // 指定 utf-8 防止乱码
            MimeMessageHelper helper = new MimeMessageHelper(message, true, "utf-8");
            helper.setFrom(from);
            helper.setTo(to);
            helper.setSubject(subject);
            // 为true 时候 表示文本内容以 html 渲染
            helper.setText(text, true);
            this.qqMailSender.send(message);
            System.out.println("发送邮件成功");
        } catch (MessagingException ex) {
            // 消息发送失败可以做对应的处理
            System.err.println("发送邮件失败" + ex.getMessage());
        }
    }

}
关于模板邮件的说明:
模板引擎最主要的作用是,在对邮件格式有要求的时候,采用拼接字符串不够直观,所以采用模板引擎;
这里我们使用的beetl模板引擎,原因是其性能优异,官网是介绍其性能6倍与freemaker,并有完善的文档支持。当然大家也可以换成任何其他的模板引擎(freemarker,thymeleaf)
一个简单的模板template.html如下:
<!doctype html>
<html lang="en">
<head>
    <meta charset="UTF-8">
</head>
<body>
    <h1>邮件主题:<span style="color: chartreuse"> ${subject}</span></h1>
    <h4 style="color: blueviolet">${content}</h4>
</body>
</html>
2.3 邮件发送的测试
/**
 * @author : heibaiying
 * @description : 发送邮件测试类
 */
@RunWith(SpringRunner.class)
@ContextConfiguration({"classpath:springApplication.xml"})
public class SendEmail {

    @Autowired
    private SpringMail springMail;

    // 发送方邮箱地址
    private static final String from = "发送方邮箱地址@qq.com";
    // 发送方邮箱地址对应的授权码
    private static final String authWord = "授权码";
    // 接收方邮箱地址
    private static final String to = "接收方邮箱地址@qq.com";

    /**
     * 简单邮件测试
     */
    @Test
    public void sendMessage() {
        springMail.sendTextMessage(from, authWord, to, "spring简单邮件", "Hello Spring Email!");
    }

    /**
     * 发送带附件的邮件
     */
    @Test
    public void sendComplexMessage() {
        Map<String, File> fileMap = new HashMap<>();
        fileMap.put("image1.jpg", new File("D:\\LearningNotes\\picture\\msm相关依赖.png"));
        fileMap.put("image2.jpg", new File("D:\\LearningNotes\\picture\\RabbitMQ模型架构.png"));
        springMail.sendEmailWithAttachments(from, authWord, to, "spring多附件邮件"
                , "Hello Spring Email!", fileMap);
    }

    /**
     * 发送内嵌资源的邮件
     */
    @Test
    public void sendEmailWithInline() {
        springMail.sendEmailWithInline(from, authWord, to, "spring内嵌资源邮件"
                , "Hello Spring Email!", new File("D:\\LearningNotes\\picture\\RabbitMQ模型架构.png"));
    }

    /**
     * 发送模板邮件
     */
    @Test
    public void sendEmailByTemplate() {
        springMail.sendEmailByTemplate(from, authWord, to,
                "spring模板邮件", "Hello Spring Email!");
    }
}
附:源码Gitub地址:https://github.com/heibaiying/spring-samples-for-all
spring 5.x 系列第19篇 ——spring简单邮件、附件邮件、内嵌资源邮件、模板邮件发送 (xml配置方式)的更多相关文章
- spring 5.x 系列第20篇 ——spring简单邮件、附件邮件、内嵌资源邮件、模板邮件发送 (代码配置方式)
源码Gitub地址:https://github.com/heibaiying/spring-samples-for-all 一.说明 1.1 项目结构说明 邮件发送配置类为com.heibaiyin ...
- spring 5.x 系列第3篇 —— spring AOP (xml配置方式)
文章目录 一.说明 1.1 项目结构说明 1.2 依赖说明 二.spring aop 2.1 创建待切入接口及其实现类 2.2 创建自定义切面类 2.3 配置切面 2.4 测试切面 附: 关于切面表达 ...
- spring 5.x 系列第22篇 —— spring 定时任务 (代码配置方式)
源码Gitub地址:https://github.com/heibaiying/spring-samples-for-all 一.说明 1.1 项目结构说明 关于任务的调度配置定义在ServletCo ...
- spring 5.x 系列第21篇 —— spring 定时任务 (xml配置方式)
源码Gitub地址:https://github.com/heibaiying/spring-samples-for-all 一.说明 1.1 项目结构说明 关于任务的调度配置定义在springApp ...
- spring 5.x 系列第4篇 —— spring AOP (代码配置方式)
文章目录 一.说明 1.1 项目结构说明 1.2 依赖说明 二.spring aop 2.1 创建待切入接口及其实现类 2.2 创建自定义切面类 2.3 配置切面 2.4 测试切面 2.5 切面执行顺 ...
- spring 5.x 系列第2篇 —— springmvc基础 (代码配置方式)
文章目录 一.搭建hello spring工程 1.1 项目搭建 1.2 相关注解说明 二.配置自定义拦截器 三.全局异常处理 四.参数绑定 4.1 参数绑定 4.2 关于日期格式转换的三种方法 五. ...
- Mysql高手系列 - 第19篇:mysql游标详解,此技能可用于救火
Mysql系列的目标是:通过这个系列从入门到全面掌握一个高级开发所需要的全部技能. 这是Mysql系列第19篇. 环境:mysql5.7.25,cmd命令中进行演示. 代码中被[]包含的表示可选,|符 ...
- Spring之AOP原理、代码、使用详解(XML配置方式)
Spring 的两大核心,一是IOC,另一个是AOP,本博客从原理.AOP代码以及AOP使用三个方向来讲AOP.先给出一张AOP相关的结构图,可以放大查看. 一.Spring AOP 接口设计 1.P ...
- SpringBoot系列-整合Mybatis(XML配置方式)
目录 一.什么是 MyBatis? 二.整合方式 三.实战 四.测试 本文介绍下SpringBoot整合Mybatis(XML配置方式)的过程. 一.什么是 MyBatis? MyBatis 是一款优 ...
随机推荐
- 使用哈希加盐法来为密码加密(补充JAVA的实现)
使用哈希加盐法来为密码加密 转自:http://www.cnblogs.com/jfzhu/p/4023439.html 转载请注明出处 (一)为什么要用哈希函数来加密密码 如果你需要保存密码(比 ...
- HistCite 引文分析软件的利器
所需工具及网站清单, HISTCITE:DOWNLOAD YOUR FREE COPY. 提交自己的基本信息即可,十分简单: SCI数据库官网(web of science):http://apps. ...
- 简明Python3教程 16.标准库
简介 python标准库作为python标准安装的一部分,其自身包含数量庞大的实用模块, 因此熟悉python标准库非常重要,因为很多问题都能利用python标准库快速解决. 下面我们将研究标准库中的 ...
- 代码首要的目标应该是“解决问题”(包括“没有 bug”),其次的目标才是“简单优雅”。
什么是现实理想主义者 曾经有人看了我的文章,以为我是一个“理想主义者”,来找我聊天.他说:“你知道吗,我跟你一样喜欢简单优雅的代码.上次我在某公司工作,看到他们的代码乱得不成样子,二话没说给他们重写了 ...
- 转义及编码(\u, \x)
首先前面的 \表示转义, \x:只是 16 进制的意思,后边跟两位,则表示单字节编码: \d:十进制:\o:八进制: 对于 \xaa ⇒ chr(0xaa) ⇒ chr(16*a+a) \u:unic ...
- STL 中间< 超载
相同的代码,mingw能够执行,vs不能执行. vs报告错误: watermark/2/text/aHR0cDovL2Jsb2cuY3Nkbi5uZXQvY2h1Y2h1cw==/font/5a6L5 ...
- POST请求——HttpWebRequest
string url=""; string param=""; string result = string.Empty; HttpWebRequest req ...
- x:Static
用途:访问代码中的变量等 后台定义一个变量 public partial class GetStaticFromBackgroundCode : Window { public static stri ...
- 漫谈 JVM —— 内存模型、线程、锁
Java 内存模型(JMM),实际上的目的就是为了统一内存管理.这让我想到了,作为一个程序员总是想着有银弹,有一个代码能万能的在所有场景上.经过多次尝试我发现这是不可能的:需求在变,技术在更新,没有什 ...
- JAVASCRIPT高程笔记-------第十章 DOM对象
10.1.1 node类型 --除IE外 所有浏览器都可以访问到这个类型 :JS中所有的节点类型都继承自Node类型 nodeName 与nodeValue 如果是一个元素 那么nodeName中保 ...