安卓自动化测试,贺晓聪之uiautomator设备和选择器~Python详解
1、设备对象
引入uiautomator,获取设备对象<所谓设备对象可理解为:Android模拟器或者真机>
语法:from uiautomator import device as d
d 即为设备对象
1.1、获取设备信息
语法:d.info
返回值:
{ u'displayRotation': 0,

  u'displaySizeDpY': 640,

  u'displaySizeDpX': 360,

  u'currentPackageName': u'com.android.launcher',

  u'productName': u'takju',

  u'displayWidth': 720,

  u'sdkInt': 18,

  u'displayHeight': 1184,

  u'naturalOrientation': True

}
返回值解释如下:
displayRotation 0 代表竖屏 1 代表横屏
currentPackageName 当前的Activity的Package名字
productName 当前设备名称
displayWidth 当前设备屏幕宽度 当 displayRotation 取值为 1 时,也就是说当前是横屏状态时,displayWidth 取值会和 displayHeight 互换
displayHeight 当前设备屏幕高度 当 displayRotation 取值为 1 时,也就是说当前是横屏状态时,displayHeight 取值会和 displayWidth 互换
sdkInt 当前SDK版本
naturalOrientation 当 displayRotation 取值为 1 时,也就是说当前是横屏状态时,取值为False,为竖屏状态时,取值为:True
1.2、点亮或熄灭屏幕(Turn on/off screen)
# Turn on screen

d.screen.on()

# Turn off screen

d.screen.off()
# wakeup the device

d.wakeup()

# sleep the device, same as turning off the screen.

d.sleep()
检查屏幕状态,关闭OR点亮?
if d.screen == "on":  # of d.screen != "off"

    # do something in case of screen on

    pass

if d.screen == "off":  # of d.screen != "on"

    # do something in case of screen off

    pass
1.3、系统常用按键
# press home key

d.press.home()

# press back key

d.press.back()

# the normal way to press back key

d.press("back")

# press keycode 0x07('0') with META ALT(0x02) on

d.press(0x07, 0x02)
下面的这些按键也是被支持的,如下:
Next keys are currently supported:
home #手机Home键back #手机返回键left #对应键盘上的向右键<-right #对应键盘上的向右键->up #对应键盘上的向上键down #对应键盘上的向下键center #选中?menu #菜单search #查找?enter #对应键盘上的Enter键delete(ordel) #对应键盘上的DEL键 用于删除recent(recent apps) #任务切换volume_up #声音向上调整volume_down #声音向下调整volume_mute #静音按键camera #拍照power #电源键
1.4、与设备交互(单击、长按、滑动(手势密码)、拖拽)
单击屏幕坐标点
# click (x, y) on screen

d.click(x, y)
长按屏幕坐标点
# long click (x, y) on screen

d.long_click(x, y)
在屏幕上滑动
# swipe from (sx, sy) to (ex, ey)

d.swipe(sx, sy, ex, ey)

# swipe from (sx, sy) to (ex, ey) with 10 steps

d.swipe(sx, sy, ex, ey, steps=10)
在屏幕上拖拽
# drag from (sx, sy) to (ex, ey)

d.drag(sx, sy, ex, ey)

# drag from (sx, sy) to (ex, ey) with 10 steps

d.drag(sx, sy, ex, ey, steps=10)
1.5、屏幕操作及屏幕方向获取与控制<上述:displayRotation 0 代表竖屏 1 代表横屏>,竖屏分为 natural(自然的,正常的竖屏) 和 upsidedown(倒过来的竖屏),横屏分为向左和向右两个方向,分别为:left 和 right
设备属性:orientation 可能取得值为:
naturalornleftorlrightorrupsidedownoru(can not be set)
说明:在手机设备上,倒过来的屏幕很少见,因此:d.orientation 取值 upsidedown 的可能性几乎没有
# retrieve orientation, it may be "natural" or "left" or "right" or "upsidedown" 获取设备屏幕方向如下:

orientation = d.orientation

# set orientation and freeze rotation.

# notes: "upsidedown" can not be set until Android 4.3.                          设置设备屏幕方向如下:

d.orientation = "l" # or "left"

d.orientation = "r" # or "right"

d.orientation = "n" # or "natural"
锁屏/解除锁屏
# freeze rotation

d.freeze_rotation() #锁屏

# un-freeze rotation

d.freeze_rotation(False) #解锁
截屏操作
# take screenshot and save to local file "home.png", can not work until Android 4.2.

d.screenshot("home.png")
打开通知或快速设置
# open notification, can not work until Android 4.3.

d.open.notification()

# open quick settings, can not work until Android 4.3.

d.open.quick_settings()
注意:(如果notification已经打开了,调用d.open.quick_settings()不会打开快速设置)
等待空闲或窗口更新(Wait for idle or window update)
# wait for current window to idle

d.wait.idle()

# wait until window update event occurs

d.wait.update()
2、uiautomator 选择器
选择器是在当前窗口中标识特定的UI对象。可理解为:UiObject对象
目前,在uiautomator中支持以下属性选择器:
text, textContains, textMatches, textStartsWith

className, classNameMatches

description, descriptionContains, descriptionMatches, descriptionStartsWith

checkable, checked, clickable, longClickable

scrollable, enabled,focusable, focused, selected

packageName, packageNameMatches

resourceId, resourceIdMatches

index, instance
下面依次进行解读:
2.1、text选择器(支持在uiautomator中Text属性不为空的元素)
例如:
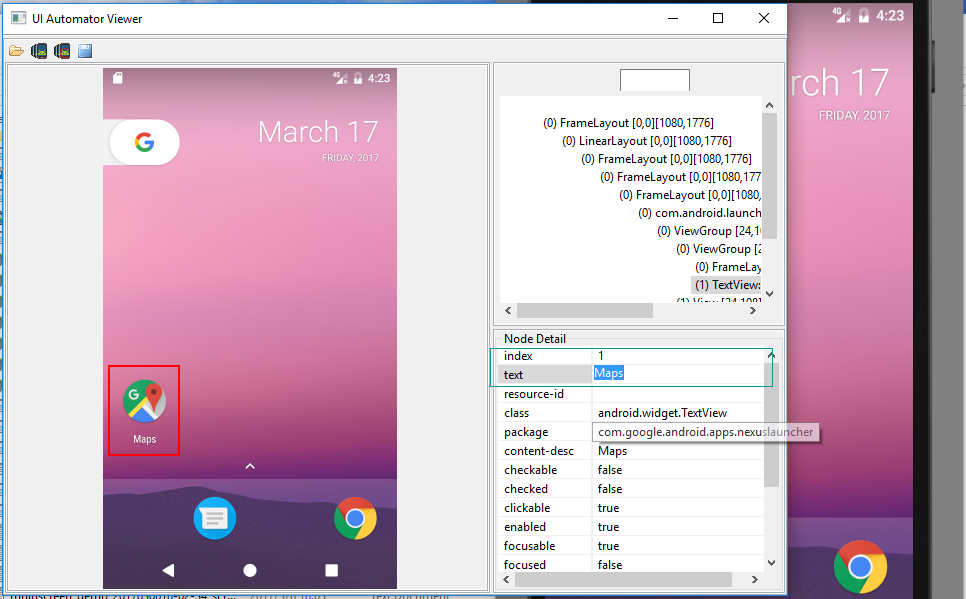
具体用法如下:
d(text="Maps").click()

#当然也可以多个属性在一块使用

d(text="Maps",className="android.widget.TextView").click()

#或者

d(text="Maps",className="android.widget.TextView",packageName="com.google.android.apps.nexuslauncher").click()
总之:要尽可能的使用选择器唯一确定一个被选择对象(UiObject)
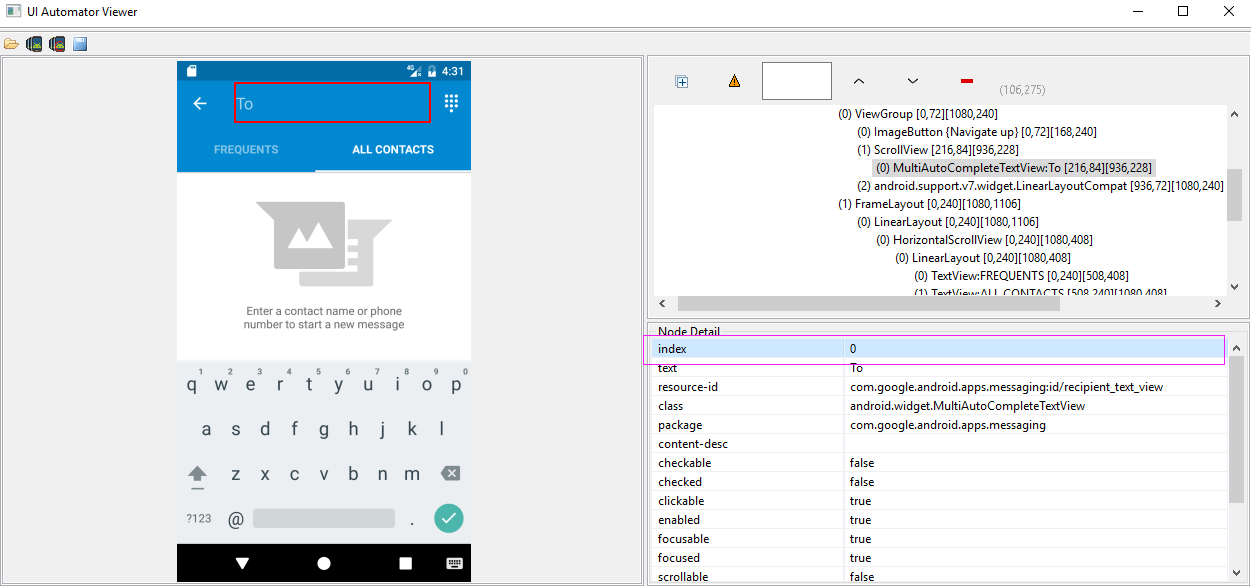
除了可以进行选择UiObject对象以外,我们亦可以使用选择器设置某些元素的值,如下:
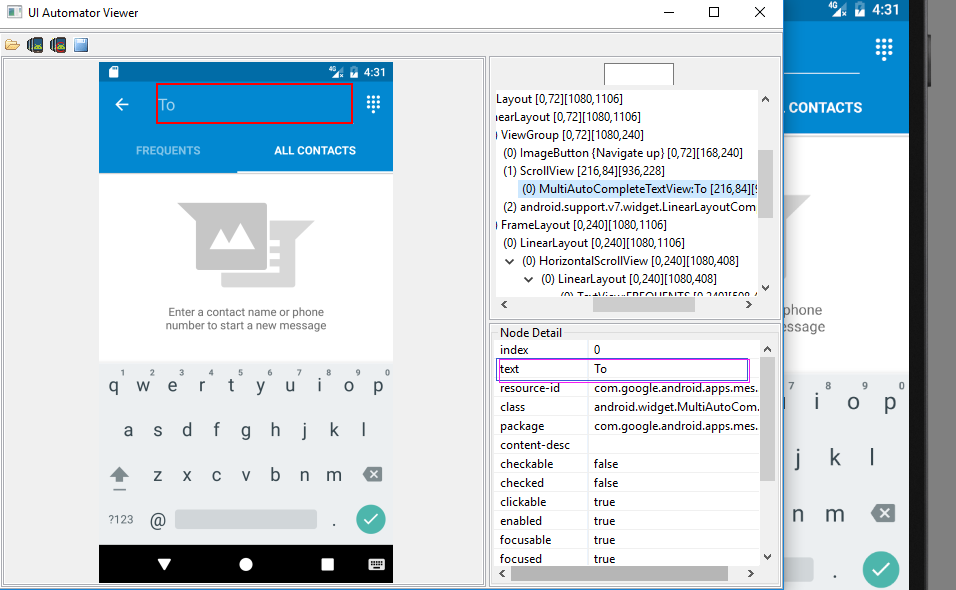
#输入短信目标手机号

d(text="To").set_text("")

#如果本窗口中有多个text为To的元素,我们也可以使用多属性选择

d(text="To",packageName="com.google.android.apps.messaging").set_text("").set_text("")
textContains,textMaches,textStartsWith 分别代表:包含,正则表达式,以XXX开头等
例如:
d(text="Name").set_text("John")
d(textContains="ame").set_text("John")
d(textStartsWith="Nam").set_text("John")
2.2、className,classNameMatches 类选择器 及 description, descriptionContains, descriptionMatches, descriptionStartsWith 描述选择器 及 packageName, packageNameMatches 包选择器 及 resourceId, resourceIdMatches ResId选择器用法和text选择器类似,都可以多属性选择器结合在一起使用。
示例代码如下:
# To seleted the object ,text is 'Clock' and its className is 'android.widget.TextView'

d(text='Clock', className='android.widget.TextView')
d(description="add new contact").click()

d(descriptionContains="new contact").click()

d(descriptionStartsWith="add new").click()
#resourceid选择器

d(resourceId="com.android.contacts:id/menu_save").click()

#text选择器

d(textStartsWith="Nam").set_text("John")

#描述选择器

d(descriptionContains="new contact").click()

#多属性结合

d(text="Name",className="android.widget.EditText").set_text("John")

#index选择器和child选择器

d(resourceId="com.android.settings:id/list").child(className="android.widget.LinearLayout", index=2).child(resourceId="android:id/widget_frame").child(resourceId="android:id/switch_widget").click()
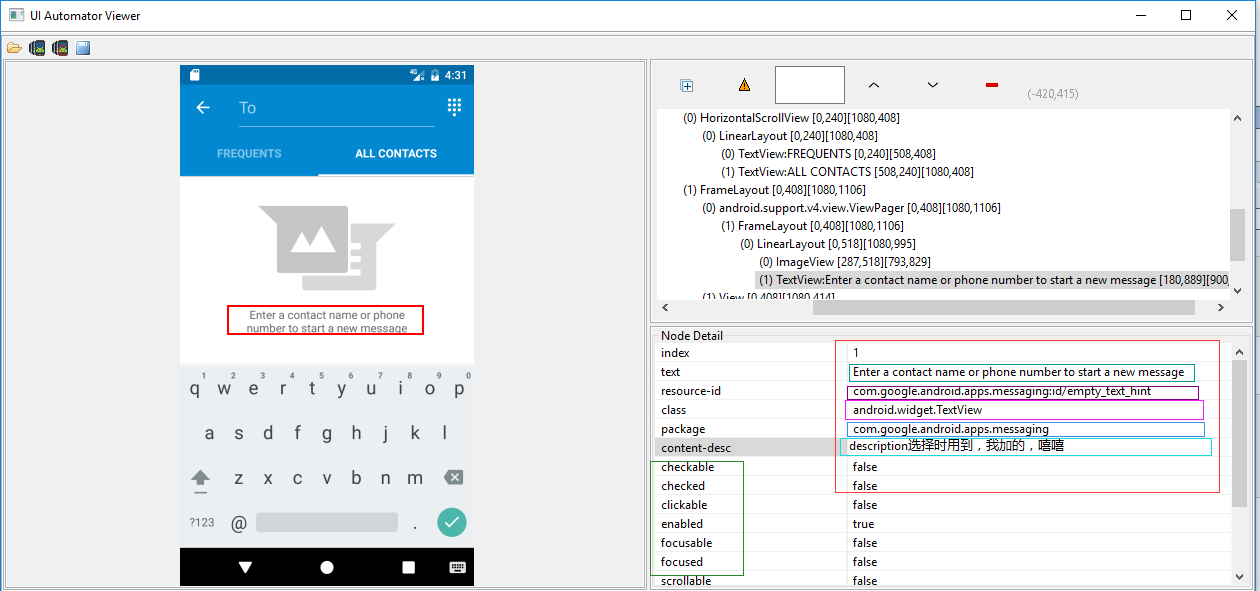
在此,说明下child、sibling选择器和index选择器及instance选择器(严格讲instance不是选择器,仅仅只是在输出多个结果的情况下,可以通过索引(下标)进行选择)
首先说明child选择器,sibling选择器:分别可理解为:子选择器(可嵌套),兄弟姐妹选择器
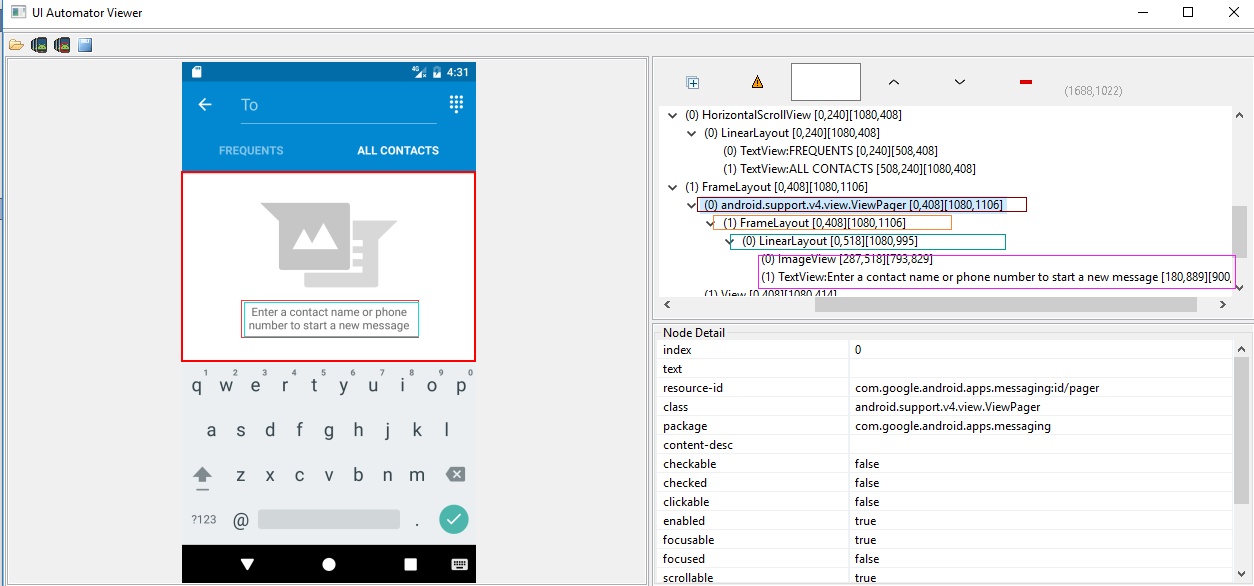
如上图右边部分,从上到下层次分为四层,最后一层的两个元素可理解为兄弟姐妹,在此,我们如果要选择最下面的那个元素就可以用到child选择器及sibling选择器,当然,本人不建议使用孩子,兄妹选择器,如果能用其他方法实现,建议用其他方法:
在此,我写的方法如下:<没有具体验证,仅仅只是演示>
#孩子选择器及兄弟姐妹选择器的用法:child/sibling

d(resourceId="id/pager").child(className="android.widget.FrameLayout").child(resourceId="id/empty_view").child(resourceId="id/empty_image_hint").sibling(packageName="com.google.android.apps.messaging")
2.3、index选择器及instance,比较容易混淆的两个,一个是选择器,一个代表索引,如下:
index选择器对应uiautomator的index属性,如下:
其用法和text选择器大同小异,不过在此需要指出的是,有些窗体中index取值会发生改变,因此,能不用index选择器的,尽可能不用!
#index选择器

d(className="android.widget.LinearLayout", index=2).click()
instance 的用法:当你的选择器返回的结果不是指向唯一元素时(两个或者多个),你可以通过instance进行选择。
贺晓聪原文:
Multiple instances
Sometimes the screen may contain multiple views with the same e.g. text, then you will have to use "instance" properties in selector like below:
d(text="Add new", instance=0) # which means the first instance with text "Add new"
However, uiautomator provides list like methods to use it.
# get the count of views with text "Add new" on current screen

d(text="Add new").count

# same as count property

len(d(text="Add new"))

# get the instance via index

d(text="Add new")[0]

d(text="Add new")[1]

...

# iterator

for view in d(text="Add new"):

    view.info  # ...
2.4、获取选定的UI对象状态及其信息(Get the selected ui object status and its information)
检测特定的UI对象是否存在(Check if the specific ui object exists)
两种写法,如下:
d(text="Settings").exists # True if exists, else False

d.exists(text="Settings") # alias of above property.
检索特定UI对象的信息(Retrieve the info of the specific ui object)
d(text="Settings").info
(结果为列表List),如下:
{ u'contentDescription': u'',

  u'checked': False,

  u'scrollable': False,

  u'text': u'Settings',

  u'packageName': u'com.android.launcher',

  u'selected': False,

  u'enabled': True,

  u'bounds': {u'top': 385,

              u'right': 360,

              u'bottom': 585,

              u'left': 200},

  u'className': u'android.widget.TextView',

  u'focused': False,

  u'focusable': True,

  u'clickable': True,

  u'chileCount': 0,

  u'longClickable': True,

  u'visibleBounds': {u'top': 385,

                     u'right': 360,

                     u'bottom': 585,

                     u'left': 200},

  u'checkable': False

}
设置/清除字段或编辑文本
d(text="Settings").clear_text()  # clear the text

d(text="Settings").set_text("My text...")  # set the text
执行单击特定的UI对象
# click on the center of the specific ui object

d(text="Settings").click()

# click on the bottomright corner of the specific ui object  单击右下方

d(text="Settings").click.bottomright()

# click on the topleft corner of the specific ui object   单击左上方

d(text="Settings").click.topleft()

# click and wait until the new window update  单击并等待窗体响应

d(text="Settings").click.wait()
长时间点击特定的ui对象,双击?
# long click on the center of the specific ui object

d(text="Settings").long_click()

# long click on the bottomright corner of the specific ui object 右下角

d(text="Settings").long_click.bottomright()

# long click on the topleft corner of the specific ui object 左上角

d(text="Settings").long_click.topleft()
将UI对象拖动到另一点
# notes : drag can not be set until Android 4.3.

# drag the ui object to point (x, y)

d(text="Settings").drag.to(x, y, steps=100)

# drag the ui object to another ui object(center)  拖拽到text='Clock'的对象位置上

d(text="Settings").drag.to(text="Clock", steps=50)
滑动UI对象
滑动分为四个方向:left ,right,top ,bottom 即:左滑动 右滑动 上滑动 及向下滑动
d(text="Settings").swipe.right()

d(text="Settings").swipe.left(steps=10)

d(text="Settings").swipe.up(steps=10)

d(text="Settings").swipe.down()
Two point gesture from one point to another
d(text="Settings").gesture((sx1, sy1), (sx2, sy2)) .to((ex1, ey1), (ex2, ey2))
Two point gesture on the specific ui object
Supports two gestures:
In, from edge to centerOut, from center to edge
# notes : pinch can not be set until Android 4.3.

# from edge to center. here is "In" not "in"

d(text="Settings").pinch.In(percent=100, steps=10)

# from center to edge

d(text="Settings").pinch.Out()
3 point gesture
d().gestureM((sx1, sy1), (sx2, sy2),(sx3, sy3)) \

                  .to((ex1, ey1), (ex2, ey2),(ex3,ey3))

d().gestureM((100,200),(300,200),(600,200),(100,600),(300,600),(600,900))
等到特定的UI对象出现或消失
# wait until the ui object appears

d(text="Settings").wait.exists(timeout=3000)

# wait until the ui object gone

d(text="Settings").wait.gone(timeout=1000)
在具体的UI对象执行甩(滚动)Perform scroll on the specific ui object(scrollable)
Possible properties:
horizorvertforwardorbackwardortoBeginningortoEnd
# fling forward(default) vertically(default)

d(scrollable=True).fling()

# fling forward horizentally

d(scrollable=True).fling.horiz.forward()

# fling backward vertically

d(scrollable=True).fling.vert.backward()

# fling to beginning horizentally

d(scrollable=True).fling.horiz.toBeginning(max_swipes=1000)

# fling to end vertically

d(scrollable=True).fling.toEnd()
Perform scroll on the specific ui object(scrollable)-在具体的UI对象执行甩(滚动)
Possible properties:
horizorvertforwardorbackwardortoBeginningortoEnd, orto
# scroll forward(default) vertically(default)

d(scrollable=True).scroll(steps=10)

# scroll forward horizentally

d(scrollable=True).scroll.horiz.forward(steps=100)

# scroll backward vertically

d(scrollable=True).scroll.vert.backward()

# scroll to beginning horizentally

d(scrollable=True).scroll.horiz.toBeginning(steps=100, max_swipes=1000)

# scroll to end vertically

d(scrollable=True).scroll.toEnd()

# scroll forward vertically until specific ui object appears

d(scrollable=True).scroll.to(text="Security")
感谢贺晓聪的无私奉献,谢谢!
安卓自动化测试,贺晓聪之uiautomator设备和选择器~Python详解的更多相关文章
- uiautomator设备和选择器~Python详解
1.设备对象 引入uiautomator,获取设备对象<所谓设备对象可理解为:Android模拟器或者真机> 语法:from uiautomator import device as d ...
- 《手把手教你》系列技巧篇(四十四)-java+ selenium自动化测试-处理https 安全问题或者非信任站点-下篇(详解教程)
1.简介 这一篇宏哥主要介绍webdriver在IE.Chrome和Firefox三个浏览器上处理不信任证书的情况,我们知道,有些网站打开是弹窗,SSL证书不可信任,但是你可以点击高级选项,继续打 ...
- 《手把手教你》系列基础篇(八十)-java+ selenium自动化测试-框架设计基础-TestNG依赖测试-番外篇(详解教程)
1.简介 经过前边几篇知识点的介绍,今天宏哥就在实际测试中应用一下前边所学的依赖测试.这一篇主要介绍在TestNG中一个类中有多个测试方法的时候,多个测试方法的执行顺序或者依赖关系的问题.如果不用de ...
- 《手把手教你》系列基础篇(八十一)-java+ selenium自动化测试-框架设计基础-TestNG如何暂停执行一些case(详解教程)
1.简介 在实际测试过程中,我们经常会遇到这样的情况,开发由于某些原因导致一些模块进度延后,而你的自动化测试脚本已经提前完成,这样就会有部分模块测试,有部分模块不能进行测试.这就需要我们暂时不让一些t ...
- 《手把手教你》系列基础篇(八十七)-java+ selenium自动化测试-框架设计基础-Log4j 2实现日志输出-上篇(详解教程)
1.简介 Apache Log4j 是一个非常古老的日志框架,并且是多年来最受欢迎的日志框架. 它引入了现代日志框架仍在使用的基本概念,如分层日志级别和记录器. 2015 年 8 月 5 日,该项目管 ...
- USB HID设备报告描述符详解(转)
转自:http://group.ednchina.com/93/198.aspx. 参考:USB HID usage table 概述: 报告在这里意思是数据传输(data transfer),而 ...
- 存储设备的DDP功能详解
http://blog.csdn.net/u013394982/article/details/18259015 DDP功能,即Dynamic Disk Pool,它是除了现有的RAID0,1,10, ...
- Appium+python自动化(四十一)-Appium自动化测试框架综合实践 - 即将落下帷幕(超详解)
1.简介 今天我们紧接着上一篇继续分享Appium自动化测试框架综合实践 - 代码实现.到今天为止,大功即将告成:框架所需要的代码实现都基本完成. 2.data数据封装 2.1使用背景 在实际项目过程 ...
- 安卓编程资源文件string中对占位符的使用详解
这里将为你详细介绍占位符的使用,将其学以致用,可以达到简化布局文件,减少字符串资源量. 1.在资源文件中的使用. 打开资源文件中的strings.xml文件,进行编辑.如下图所示: 图 1.0 2. ...
随机推荐
- .Net Core(完) 创建Docker镜像
使用Docker可以在操作系统上分出多个独立的区域(容器/Container),各个容器之间基本隔离,且可以有自己单独的系统配置.软件等,各个容器之间的软件基本不会互相干扰.Docker上配置好的容器 ...
- Django 添加mdia文件目录路径
1.settings.py MEDIA_URL = '/media/' MEDIA_ROOT = os.path.join(BASE_DIR, 'media') 2.urls.py from djan ...
- Scrum敏捷开发沉思录
计算机科学的诞生,是世人为了用数字手段解决实际生活中的问题.随着时代的发展,技术的进步,人们对于现实世界中的问题理解越来越深刻,描述也越来越抽象,于是对计算机软件的需求也越来越高,越来越复杂,变化也越 ...
- json替换jsonp实现跨域请求
最近遇到h5前端页面和web后端双方的请求存在跨域,普通的jquery.ajax请求已不能实现(因为js是不允许跨域的(如果可以跨域,那就能随便改别人的网页了),js的原理), 最后经过艰苦奋斗,终于 ...
- The stacking context
文档中的层叠上下文由满足以下任意一个条件的元素形成: 1. z-index 值不为 "auto"的 绝对/相对定位. 2. position位fixed. 3. opacity 属 ...
- [转]extern "C"的作用
extern "C"的主要作用就是为了能够正确实现C++代码调用其它C语言代码. 加上extern “C”后,会指示编译器将这部分代码按C语言进行编译,而不是C++的.这是因为C+ ...
- 6.3Pytyhon文件的操作(三)
目录 目录 前言 (一)文件的创建 (二)文件的删除 (三)文件的重命名 (四)文件的查看 (五)文件的复制 ==1.小文件的复制== ==2.大文件的复制== (六)文件的实战案例 ==1.文件的分 ...
- kafka 配置文件参数详解
kafka的配置分为 broker.producter.consumer三个不同的配置 一 BROKER 的全局配置 最为核心的三个配置 broker.id.log.dir.zookeeper.con ...
- MySQL基本简单操作01
MySQL基本简单操作 学会了安装Docker,那么就将它利用起来.(/滑稽脸) 之前想学习Mysql(Windows下配置真麻烦),学会了Docker就方便了,直接使用Docker创建一个Mysql ...
- MessageQueue 相关概念
/** * Implements a thread-local storage, that is, a variable for which each thread * has its own v ...