详细的最新版fastdfs单机版搭建
前言
目前项目是tomcat单机部署的,图片、视频也是上传到tomcat目录下,关键是此项目的主要内容还就是针对图片、视频的,这让我非常担忧;文件服务器的应用是必然的,而且时间还不会太久。之前一直有听说fastdfs,但一直没去认真琢磨他,最近才开始去研究它,今天只是去搭建一个简单的单机版,集群版后续再出;至于架构、原理什么我就不写了,网上资料非常多。
环境准备
系统:Centos6.7
fastdfs:到https://github.com/happyfish100下载,都下载最新的:fastdfs-master、libfastcommon-master、fastdfs-nginx-module-master,避免版本问题
Linux终端工具:xshell、xftp
Linux ip:192.168.1.207
fastdfs安装
上传相关包到/opt下,如图

安装zip、unzip
[root@fastdfs2 opt]# yum install -y unzip zip
解压fastdfs-master.zip
[root@fastdfs2 opt]# unzip -o fastdfs-master.zip -d /usr/local
编译安装fast
[root@fastdfs2 opt]# cd /usr/local/fastdfs-master
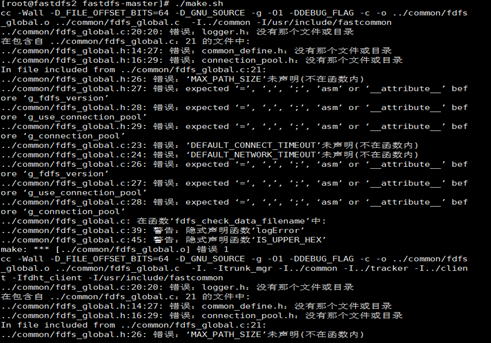
[root@fastdfs2 fastdfs-master]# ./make.sh
报错:./make.sh: line 146: perl: command not found
安装perl
[root@fastdfs2 fastdfs-master]# yum -y install perl
再运行./make.sh,报错:make: cc:命令未找到
安装gcc
[root@fastdfs2 fastdfs-master]# yum install gcc-c++
再运行./make.sh,仍出现如下错误:

缺少libfastcommon中的相关基础库
安装libfastcommon
解压libfastcommon-master.zip
[root@fastdfs2 fastdfs-master]# cd /opt
[root@fastdfs2 opt]# unzip -o libfastcommon-master.zip -d /usr/local
安装libfastcommon
[root@fastdfs2 opt]# cd /usr/local/libfastcommon-master/
[root@fastdfs2 libfastcommon-master]# ./make.sh
[root@fastdfs2 libfastcommon-master]# ./make.sh install
再装fastdfs
[root@fastdfs2 local]# cd /usr/local/fastdfs-master/
[root@fastdfs2 fastdfs-master]# ./make.sh
[root@fastdfs2 fastdfs-master]# ./make.sh install
拷贝配置文件
将fastdfs安装目录下的conf下的文件拷贝到/etc/fdfs/下
[root@fastdfs2 fastdfs-master]# cp -r conf/* /etc/fdfs/
自此fastdfs安装完成了,接下来配置trackerd和storaged,并启动它们。
fdfs可执行命令
[root@fastdfs2 fdfs]# ll /usr/bin/fdfs*
-rwxr-xr-x. 1 root root 210899 6月   8 21:00 /usr/bin/fdfs_appender_test

-rwxr-xr-x. 1 root root 210868 6月   8 21:00 /usr/bin/fdfs_appender_test1

-rwxr-xr-x. 1 root root 198740 6月   8 21:00 /usr/bin/fdfs_append_file

-rwxr-xr-x. 1 root root 198044 6月   8 21:00 /usr/bin/fdfs_crc32

-rwxr-xr-x. 1 root root 198735 6月   8 21:00 /usr/bin/fdfs_delete_file

-rwxr-xr-x. 1 root root 199112 6月   8 21:00 /usr/bin/fdfs_download_file

-rwxr-xr-x. 1 root root 198960 6月   8 21:00 /usr/bin/fdfs_file_info

-rwxr-xr-x. 1 root root 211836 6月   8 21:00 /usr/bin/fdfs_monitor

-rwxr-xr-x. 1 root root 762687 6月   8 21:00 /usr/bin/fdfs_storaged

-rwxr-xr-x. 1 root root 212997 6月   8 21:00 /usr/bin/fdfs_test

-rwxr-xr-x. 1 root root 212618 6月   8 21:00 /usr/bin/fdfs_test1

-rwxr-xr-x. 1 root root 329821 6月   8 21:00 /usr/bin/fdfs_trackerd

-rwxr-xr-x. 1 root root 199076 6月   8 21:00 /usr/bin/fdfs_upload_appender

-rwxr-xr-x. 1 root root 203766 6月   8 21:00 /usr/bin/fdfs_upload_file
配置并启动trackerd
修改trackerd.conf
不改也可以,但是要保证/home/yuqing/fastdfs路径存在
[root@fastdfs2 fdfs]# cd /etc/fdfs/
[root@fastdfs2 fdfs]# vi tracker.conf
将base_path=/home/yuqing/fastdfs改成base_path=/data/fastdfs
创建trackerd数据、日志目录
[root@fastdfs2 fdfs]# mkdir -p /data/fastdfs
启动trackerd
[root@fastdfs2 fdfs]# /usr/bin/fdfs_trackerd /etc/fdfs/tracker.conf restart
查看trackerd进程,如下图:

说明trackered已经启动起来;其实也可以查看日志:/data/fastdfs/logs/trackerd.log,来判断trackerd是否正常启动起来。
配置并启动storaged
修改storage.conf
[root@fastdfs2 fdfs]# cd /etc/fdfs/
[root@fastdfs2 fdfs]# vi storage.conf
base_path=/home/yuqing/fastdfs改为:base_path=/data/fastdfs
store_path0=/home/yuqing/fastdfs改为:store_path0=/data/fastdfs/storage
tracker_server=192.168.209.121:22122改为:tracker_server=192.168.1.207:22122,这个ip改成自己的
创建storaged数据、日志目录
[root@fastdfs2 fdfs]# mkdir -p /data/fastdfs/storage
启动storaged
[root@fastdfs2 fdfs]# /usr/bin/fdfs_storaged /etc/fdfs/storage.conf restart
查看storaged进程,如下图:

说明storaged已经启动起来;其实也可以查看日志:/data/fastdfs/logs/storaged.log来判断storaged是否正常启动起来。
上传图片测试
本地(win环境)安装fastdfs连接驱动
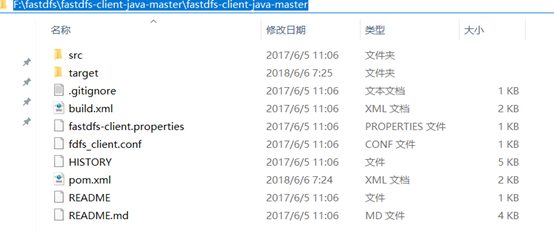
从https://github.com/happyfish100/fastdfs-client-java下载源码,我下载的是zip包,解压后目录如下图:

maven本地安装:mvn clean install

当然也可以用ant构建:ant clean package
书写测试代码
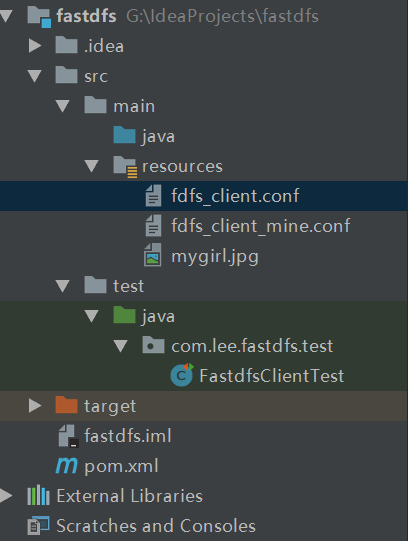
代码结构如图

fdfs_client_mine.conf:
connect_timeout = 2

network_timeout = 30

charset = UTF-8

http.tracker_http_port = 8080

http.anti_steal_token = no

http.secret_key = FastDFS1234567890

tracker_server = 192.168.1.207:22122
FastdfsClientTest.java:
package com.lee.fastdfs.test;

import org.csource.common.NameValuePair;

import org.csource.fastdfs.*;

import org.junit.Test;

import java.io.FileNotFoundException;

import java.io.IOException;

public class FastdfsClientTest {

    //客户端配置文件

    public String conf_filename = "fdfs_client_mine.conf";

    //本地文件,要上传的文件

    public String local_filename = "G:\\IdeaProjects\\fastdfs\\src\\main\\resources\\mygirl.jpg";

    //上传文件

    @Test

    public void testUpload() {

        for(int i=0;i<10;i++){

            try {

                ClientGlobal.init(conf_filename);

                TrackerClient tracker = new TrackerClient();

                TrackerServer trackerServer = tracker.getConnection();

                StorageServer storageServer = null;

                StorageClient storageClient = new StorageClient(trackerServer,

                        storageServer);

                NameValuePair nvp [] = new NameValuePair[]{

                        new NameValuePair("item_id", "100010"),

                        new NameValuePair("width", "80"),

                        new NameValuePair("height", "90")

                };

                String fileIds[] = storageClient.upload_file(local_filename, null,

                        nvp);

                System.out.println(fileIds.length);

                System.out.println("组名:" + fileIds[0]);

                System.out.println("路径: " + fileIds[1]);

            } catch (FileNotFoundException e) {

                e.printStackTrace();

            } catch (IOException e) {

                e.printStackTrace();

            } catch (Exception e) {

                e.printStackTrace();

            }

        }

    }

}
上传图片:mygirl.jpg
执行测试代码,当输出如下信息时,表示上传成功:
2

组名:group1

路径: M00/00/00/wKgBz1salX-AKZMdAABHO7x65CM183.jpg

2

组名:group1

路径: M00/00/00/wKgBz1salX-ATR4PAABHO7x65CM553.jpg

2

组名:group1

路径: M00/00/00/wKgBz1salX-AKFyFAABHO7x65CM038.jpg

2

组名:group1

路径: M00/00/00/wKgBz1salX-ASse4AABHO7x65CM705.jpg

2

组名:group1

路径: M00/00/00/wKgBz1salX-AKUn7AABHO7x65CM247.jpg

2

组名:group1

路径: M00/00/00/wKgBz1salX-AdT4cAABHO7x65CM342.jpg

2

组名:group1

路径: M00/00/00/wKgBz1salX-AR0V0AABHO7x65CM992.jpg

2

组名:group1

路径: M00/00/00/wKgBz1salX-AMpoLAABHO7x65CM691.jpg

2

组名:group1

路径: M00/00/00/wKgBz1salX-AcjanAABHO7x65CM587.jpg

2

组名:group1

路径: M00/00/00/wKgBz1salX-Ab8qnAABHO7x65CM687.jpg
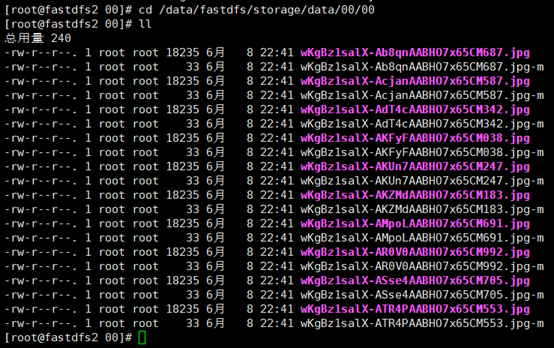
我们到服务器上看看,图片确实已经上传了,如下图:

由于现在还没有和nginx整合无法使用http下载。
FastDFS 和nginx整合
fastdfs-nginx-module安装
解压
[root@fastdfs2 00]# cd /opt
[root@fastdfs2 opt]# unzip -o fastdfs-nginx-module-master.zip -d /usr/local
拷贝配置文件
[root@fastdfs2 opt]# cd /usr/local/fastdfs-nginx-module-master/src
[root@fastdfs2 src]# cp mod_fastdfs.conf /etc/fdfs/
编辑配置文件
[root@fastdfs2 src]# cd /etc/fdfs/
[root@fastdfs2 fdfs]# vi mod_fastdfs.conf
base_path=/tmp改成:base_path=/data/fastdfs
tracker_server=tracker:22122改成:tracker_server=192.168.1.207:22122
url_have_group_name = false改成:url_have_group_name = true;#url中包含group名称
store_path0=/home/yuqing/fastdfs改成:store_path0=/data/fastdfs/storage
nginx安装
nginx依赖包安装
[root@fastdfs2 fdfs]# cd /opt
[root@fastdfs2 opt]# yum -y install zlib zlib-devel openssl openssl--devel pcre pcre-devel
解压nginx
[root@fastdfs2 opt]# tar -zxvf nginx-1.13.12.tar.gz
安装nginx并添加fastdfs模块
[root@fastdfs2 opt]# cd nginx-1.13.12
[root@fastdfs2 nginx-1.13.12]# ./configure --prefix=/usr/local/nginx --add-module=/usr/local/fastdfs-nginx-module-master/src
[root@fastdfs2 nginx-1.13.12]# make
[root@fastdfs2 nginx-1.13.12]# make install
检查nginx模块
[root@fastdfs2 nginx-1.13.12]# cd /usr/local/nginx/sbin/
[root@fastdfs2 sbin]# ./nginx -V
nginx version: nginx/1.13.12

uilt by gcc 4.4.7 20120313 (Red Hat 4.4.7-18) (GCC)

configure arguments: --prefix=/usr/local/nginx --add-module=/usr/local/fastdfs-nginx-module-master/src
已经把fastdfs模块添加进去了。
配置nginx配置文件
[root@fastdfs2 sbin]# cd /usr/local/nginx/conf
[root@fastdfs2 conf]# vi nginx-fdfs.conf
内容如下,ip注意改成自己的:
events {

    use epoll;

    worker_connections  1024;

}

http {

    server {

        listen       80;

        server_name  192.168.1.207;

        location /group1/M00/{

                #root /home/FastDFS/fdfs_storage/data;

                ngx_fastdfs_module;

        }

    }

    server {

        listen 8888;

    server_name 192.168.1.207;

        location / {

            root   html;

            index  index.html index.htm;

        }

    }

}
启动nginx
[root@fastdfs2 conf]# cd /usr/local/nginx/sbin/
[root@fastdfs2 sbin]# ./nginx -c /usr/local/nginx/conf/nginx-fdfs.conf
访问图片
文件路径在上面的上传图片的测试代码中有输入,我们进行拼装下:
http://192.168.1.207/group1/M00/00/00/wKgBz1salX-ATR4PAABHO7x65CM553.jpg

总结
1、fastdfs相关包推荐直接到官网下载,能避免因为版本而造成的问题
2、上传成功而访问却出现nginx:400问题,极有可能url_have_group_name = false没有改成:url_have_group_name = true;
大家搭建的时候一定要细心再细心,也祝大家能够顺利的完成!(我是搭建了一段时间,中间各种小插曲 )
)
详细的最新版fastdfs单机版搭建的更多相关文章
- FastDfs单机版搭建
详细的最新版fastdfs单机版搭建 前言 目前项目是tomcat单机部署的,图片.视频也是上传到tomcat目录下,关键是此项目的主要内容还就是针对图片.视频的,这让我非常担忧:文件服务器的应用是必 ...
- (转)超详细单机版搭建hadoop环境图文解析
超详细单机版搭建hadoop环境图文解析 安装过程: 一.安装Linux操作系统 二.在Ubuntu下创建hadoop用户组和用户 三.在Ubuntu下安装 ...
- FastDFS:搭建文件管理系统
文章转自:https://www.cnblogs.com/chiangchou/p/fastdfs.html#_label1 一.FastDFS介绍 FastDFS开源地址:https://githu ...
- docker安装fastdfs单机版
docker search fastdfs INDEX NAME DESCRIPTION STARS OFFICIAL AUTOMATED docker.io docker.io/season/fas ...
- FastDFS 环境搭建
原文地址:FastDFS 环境搭建 博客地址:http://www.extlight.com 一.前言 最近闲下来,整理了一下笔记,今天就分享一下 FastDFS 环境搭建吧. 二.介绍 2.1 Fa ...
- Flutter实战视频-移动电商-42.详细页_UI主页面架构搭建
42.详细页_UI主页面架构搭建 详细分成六大部分拆分开 body里面用FutureBuilder异步加载. FutureBuilder里面的furure属性这里用一个方法,必须返回的也是future ...
- docker安装部署、fastDFS文件服务器搭建与springboot项目接口
一.docker安装部署 1.更新yum包:sudo yum update 2.安装需要的软件包,yum-util 提供yum-config-manager功能,另外两个是devicemapper驱动 ...
- 超详细单机版搭建hadoop环境图文解析
前言: 年前,在老大的号召下,我们纠集了一帮人搞起了hadoop,并为其取了个响亮的口号“云在手,跟我走”.大家几乎从零开始,中途不知遇到多少问题,但终 于在回家之前搭起了一个拥有12台服务器的集群, ...
- FastDFS单机搭建以及java客户端Demo
http://blog.csdn.net/u012453843/article/details/69951920 http://blog.csdn.net/xyang81/article/detail ...
随机推荐
- NC nc开发工具java虚拟机参数
-Dnc.exclude.modules=${FIELD_EX_MODULES} -Dnc.runMode=develop -Dnc.server.location=${FIELD_NC_HO ...
- python 数据可视化(matplotlib)
matpotlib 官网 :https://matplotlib.org/index.html matplotlib 可视化示例:https://matplotlib.org/gallery/inde ...
- pycharm 如何进行全部搜索
界面里面先按ctrl F 弹出搜索页面 在搜索框内连续按两次shift shift可以搜索全文
- rapidjson常见使用示例
目录 目录 1 1. 前言 2 2. Move语意 2 3. rapidjson::Document 2 4. 成员迭代器MemberIterator 3 5. 数组迭代器ValueIterator ...
- js-运动函数包
function move(obj, attr, dir, target, endFn) { clearInterval(obj.timer) // 避免全局变量,所以要用oBox.timer di ...
- Navicat for MYSQL 数据库手动同步方法
Navicat for MYSQL 数据库手动同步方法 数据库同步有两种类型,一是结构同步,一般是数据库表增删,或是表中字段的增删:二是数据同步,即是表里面的记录的增删. 现假设我要让本地数据 ...
- poj3280
将给定字符串用最小代价(添加,删除)变为回文串. dp:dp[i][j]表示将i-j变为回文串的最小代价. 若s[i]==s[j],则dp[i][j]=dp[i+1][j-1] 否则,若s[i+1]- ...
- JavaScript中的定时事件
这两个函数都是在给定的时间之后开始执行的,并不是立即执行. var timeId = window.setTimeout("method()",1000); //定时执行,还可以这 ...
- 关于height、offsetheight、clientheight、scrollheight、innerheight、outerheight的区别一览
平时,不管在pc端页面还是移动端页面,因为我们一般很少会设置某个块的的高度,但是呢,我有时候有需要取到这些高度以便于我们方便进行判断和下一步的编写.一般这个时候我都是直接的获取一个块的高度.heigh ...
- Servlet案例4:用户注册
数据库准备: CREATE DATABASE web; USE web; CREATE TABLE `user` ( `uid` ) NOT NULL, `username` ) DEFAULT NU ...
