
Elasticsearch 6.x 入门测试
首先听一下官方的话:
https://www.elastic.co/guide/en/elasticsearch/reference/current/index.html
我尝试了使用Java作为Client向ES操作,结果发现这个家伙要引入大量的JAR包,而且还必须是JDK1.8!!!!!我只好使用python操作ES写入和操作数据了。
1、创建mapping
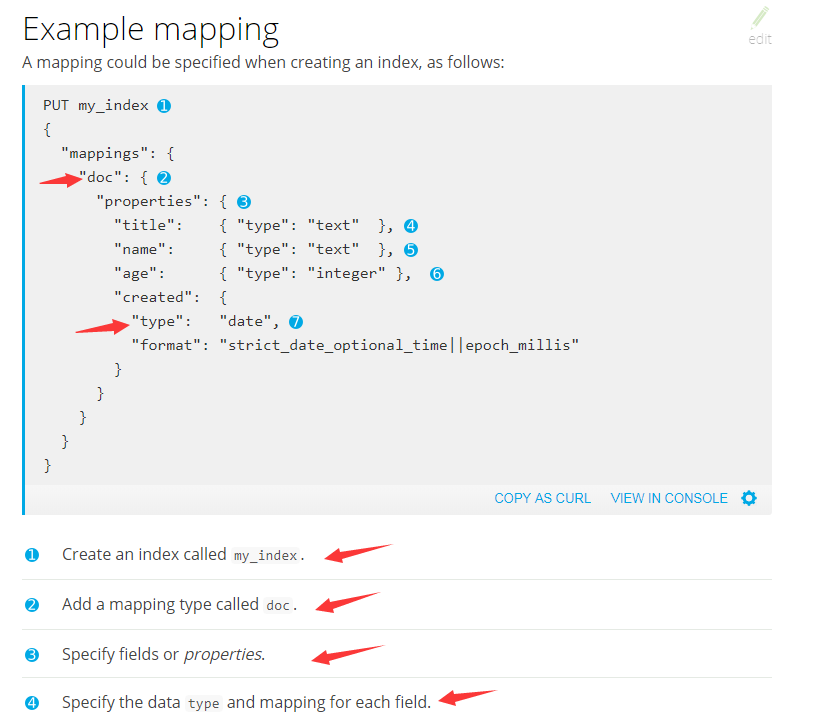
参考地址:
https://www.elastic.co/guide/en/elasticsearch/reference/current/indices-get-mapping.html
对应的python是这样的:
from elasticsearch import Elasticsearch

es_servers = [{

    "host": "10.10.6.225",

    "port": ""

}]

# 使用文档在这里:http://elasticsearch-py.readthedocs.io/en/master/

es = Elasticsearch(es_servers)

# 初始化索引的Mappings设置

_index_mappings = {

    "mappings": {

        "doc": {

            "properties": {

                "title": {"type": "text"},

                "name": {"type": "text"},

                "age": {"type": "integer"},

                "created": {

                    "type": "date",

                    "format": "yyyy-MM-dd HH:mm:ss"

                }

            }

        }

    }

}

# 如果索引不存在,则创建索引

if es.indices.exists(index='blog_index') is not True:

    es.indices.create(index='blog_index', body=_index_mappings)
2、查看mapping
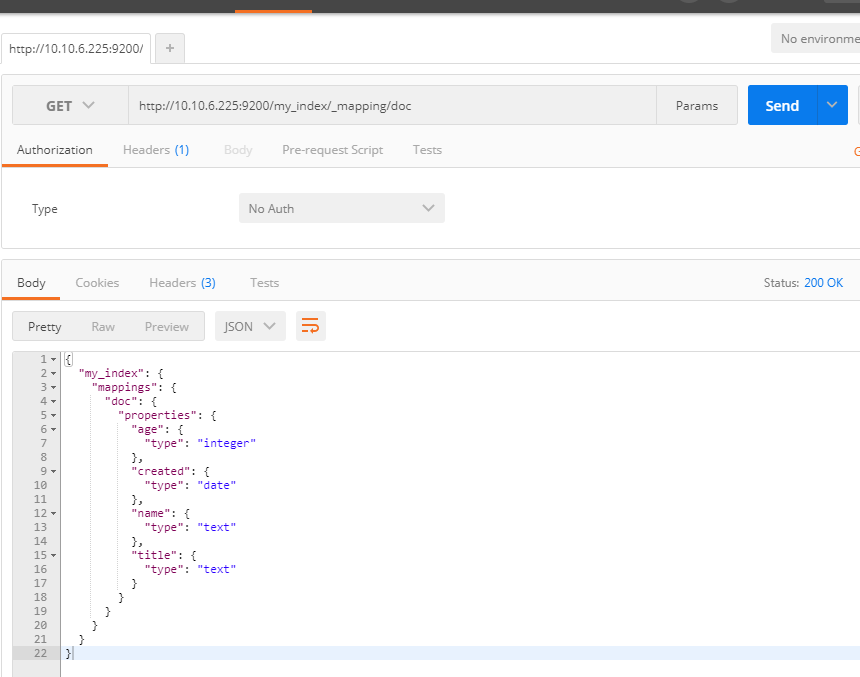
URL:http://10.10.6.225:9200/my_index/_mapping/doc

方式:GET

返回:

{

  "my_index": {

    "mappings": {

      "doc": {

        "properties": {

          "age": {

            "type": "integer"

          },

          "created": {

            "type": "date"

          },

          "name": {

            "type": "text"

          },

          "title": {

            "type": "text"

          }

        }

      }

    }

  }

}
参考网址:https://www.elastic.co/guide/en/elasticsearch/reference/current/indices-get-mapping.html
python的脚本在这里:
# pip install elasticsearch

from elasticsearch import Elasticsearch

es_servers = [{

    "host": "10.10.6.225",

    "port": ""

}]

# 使用文档在这里:http://elasticsearch-py.readthedocs.io/en/master/

es = Elasticsearch(es_servers)

print(es.indices.get(index='blog_index')['blog_index']['mappings'])
返回:
C:\Python36\python.exe D:/Work/ELK/run.py

{'doc': {'properties': {'age': {'type': 'integer'}, 'created': {'type': 'date'}, 'name': {'type': 'text'}, 'title': {'type': 'text'}}}}

Process finished with exit code 0
3、如果你想更新Mapping,那么就看看这里吧:

就是不行,不行,作废,重导入!!!!!
4、上传一些数据玩玩吧!
# pip install elasticsearch

import time

from elasticsearch import Elasticsearch

from elasticsearch.helpers import bulk

es_servers = [{

    "host": "10.10.6.225",

    "port": ""

}]

# 使用文档在这里:http://elasticsearch-py.readthedocs.io/en/master/

es = Elasticsearch(es_servers)

index_name = 'blog_index'

doc_type_name = 'doc'

# 创建ACTIONS

ACTIONS = []

line_list = [

    {'age': 25, 'created': '2018-02-09 12:00:01', 'name': '黄海', 'title': '厉害了我的国'},

    {'age': 32, 'created': '2018-02-19 12:00:01', 'name': '李勇', 'title': '红海行动'},

    {'age': 25, 'created': '2018-02-13 12:00:01', 'name': '赵志', 'title': '湄公河行动'},

    {'age': 22, 'created': '2018-02-03 12:00:01', 'name': '李四', 'title': '极品相师'},

    {'age': 18, 'created': '2018-02-01 12:00:01', 'name': '刘勇', 'title': '乡村爱情故事'},

    {'age': 43, 'created': '2018-01-01 12:00:01', 'name': '刘勇', 'title': '乡村爱情故事'},

    {'age': 28, 'created': '2018-01-02 12:00:01', 'name': '刘勇', 'title': '乡村爱情故事'},

    {'age': 23, 'created': '2018-01-04 12:00:01', 'name': '刘勇', 'title': '乡村爱情故事'},

    {'age': 22, 'created': '2018-03-01 12:00:01', 'name': '刘勇', 'title': '乡村爱情故事'},

    {'age': 21, 'created': '2018-03-01 12:00:01', 'name': '刘勇', 'title': '乡村爱情故事'},

    {'age': 25, 'created': '2018-03-01 12:00:01', 'name': '刘勇', 'title': '乡村爱情故事'},

    {'age': 34, 'created': '2018-03-01 12:00:01', 'name': '刘勇', 'title': '乡村爱情故事'},

    {'age': 33, 'created': '2017-04-01 12:00:01', 'name': '刘勇', 'title': '乡村爱情故事'},

    {'age': 54, 'created': '2017-04-01 12:00:01', 'name': '刘勇', 'title': '乡村爱情故事'},

    {'age': 25, 'created': '2017-04-01 12:00:01', 'name': '刘勇', 'title': '乡村爱情故事'}

]

for line in line_list:

    action = {

        "_index": index_name,

        "_type": doc_type_name,

        "_source": {

            "age": line['age'],

            "created": line['created'],

            "name": line['name'],

            "title": line['title']

        }

    }

    ACTIONS.append(action)

    # 批量处理

success, _ = bulk(es, ACTIONS, index=index_name, raise_on_error=True)

5、按时间段进行聚合测试
from elasticsearch import Elasticsearch

es_servers = [{

    "host": "10.10.6.225",

    "port": ""

}]

# 使用文档在这里:http://elasticsearch-py.readthedocs.io/en/master/

es = Elasticsearch(es_servers)

print(es.indices.get(index='blog_index')['blog_index']['mappings'])

body= {

     "size" : 0,

     "aggs": {

        "sales": {

           "date_histogram": {

              "field": "created",

              "interval": "month",

              "format": "yyyy-MM"

           }

        }

     }

  }

res = es.search(index="blog_index", body=body)

print(res)

打完收工!
Elasticsearch 6.x 入门测试的更多相关文章
- Elasticsearch全文检索工具入门
Elasticsearch全文检索工具入门: 1.下载对应系统版本的文件 elasticsearch-2.4.0.zip 1.1运行elasticsearch-2.4.0\elasticsearch- ...
- 最新版本elasticsearch本地搭建入门篇
最新版本elasticsearch本地搭建入门篇 项目介绍 最近工作用到elasticsearch,主要是用于网站搜索,和应用搜索. 工欲善其事,必先利其器. 自己开始关注elasticsearch, ...
- elasticsearch.net search入门使用指南中文版(翻译)
elasticsearch.net search入门使用指南中文版,elasticsearch.Net是一个非常底层且灵活的客户端,它不在意你如何的构建自己的请求和响应.它非常抽象,因此所有的elas ...
- elasticsearch.net search入门使用指南中文版
原文:http://edu.dmeiyang.com/book/nestusing.html elasticsearch.net为什么会有两个客户端? Elasticsearch.Net是一个非常底层 ...
- Elasticsearch学习记录(入门篇)
Elasticsearch学习记录(入门篇) 1. Elasticsearch的请求与结果 请求结构 curl -X<VERB> '<PROTOCOL>://<HOST& ...
- ElasticSearch极简入门总结
一,目录 安装es 项目添加maven依赖 es客户端组件注入到spring容器中 es与mysql表结构对比 索引的删除创建 文档的crud es能快速搜索的核心-倒排索引 基于倒排索引的精确搜索. ...
- Springboot整合ElasticSearch进行简单的测试及用Kibana进行查看
一.前言 搜索引擎还是在电商项目.百度.还有技术博客中广泛应用,使用最多的还是ElasticSearch,Solr在大数据量下检索性能不如ElasticSearch.今天和大家一起搭建一下,小编是看完 ...
- (转)开源分布式搜索平台ELK(Elasticsearch+Logstash+Kibana)入门学习资源索引
Github, Soundcloud, FogCreek, Stackoverflow, Foursquare,等公司通过elasticsearch提供搜索或大规模日志分析可视化等服务.博主近4个月搜 ...
- Elasticsearch【快速入门】
前言:毕设项目还要求加了这个做大数据搜索,正好自己也比较感兴趣,就一起来学习学习吧! Elasticsearch 简介 Elasticsearch 是一个分布式.RESTful 风格的搜索和数据分析引 ...
随机推荐
- web项目中的执行流程参数传递详解
还是从这个图开始讲解: struts2中有一个存放数据的中心:值栈.(值栈里面有map和对象栈) 首先:值栈的作用范围是一个请求:request作用域(一个请求是代表的一个过程,即页面点击到数据返回到 ...
- day16 常用类(String、StringBuffer、StringBuilder)
1.String是唯一一个可以直接用常量赋值的引用数据类型. String的常量也是一个对象. 数据段——字符串常量池. 2.每一个字符串常量对象在加载期放入字符串常量池. java对String常量 ...
- JavaScript中replace()方法的第二个参数解析
语法 string.replace(searchvalue,newvalue) 参数值 searchvalue 必须.规定子字符串或要替换的模式的 RegExp 对象.请注意,如果该值是一个字符串,则 ...
- Shell记录-Shell命令(find)
Linux中的find命令在目录结构中搜索文件,并执行指定的操作.Linux下find命令提供了相当多的查找条件,功能很强大.由于find具有强大的功能,所以它的选项也很多,其中大部分选项都值得我们花 ...
- VsCode搭建Java开发环境(Spring Boot项目创建、运行、调试)
源码地址:https://github.com/YANGKANG01/Spring-Boot-Demo 安装扩展 安装如下两个主要扩展即可,这两个扩展已关联java项目开发主要使用的maven.spr ...
- Django 2.0.1 官方文档翻译: 编写你的第一个 Django app,第二部分(Page 7)
编写你的第一个 Django app,第二部分(Page 7)转载请注明链接地址 本教程上接前面的教程.我们会配置数据,创建你的第一个 model,并对Django 自动生成的 admin 站点进行快 ...
- 【转载】BP神经网络
原文地址:http://blog.csdn.net/acdreamers/article/details/44657439 今天来讲BP神经网络,神经网络在机器学习中应用比较广泛,比如函数逼近,模式识 ...
- highCharts参数实例解释
<!DOCTYPE html> <html> <head> <meta http-equiv="Content-Type" content ...
- 【Foreign】动态规划 [分治][DP]
动态规划 Time Limit: 50 Sec Memory Limit: 128 MB Description 一开始有n个数,一段区间的价值为这段区间相同的数的对数. 我们想把这n个数切成恰好k ...
- 20155325 2016-2017-2 《Java程序设计》第5周学习总结
教材学习内容总结 Java中把正常流程放try块中,错误(异常)处理放catch块中. Error及其子类写程序不用处理,最多留个日志.因为这种错误Java应用程序本身是无力回复的. 在使用throw ...