QEMU KVM Libvirt手册(9): network
虚拟网卡由-net nic定义
# qemu-system-x86_64 -enable-kvm -name ubuntutest -m 2048 -hda ubuntutest.img -vnc :19 -net nic
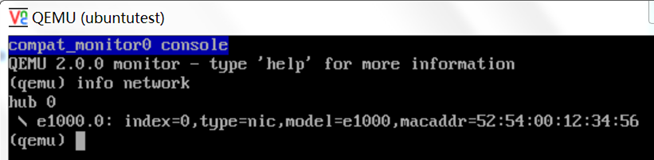
如果我们在monitor中查看info network
可以看到下面的
有时候,我们看到的是VLAN 0,这里的VLAN和802.1.q一点关系都没有,就是virtual hub的概念,在新的版本里面已经改了。
我们可以在monitor里面
set_link e1000.0 off
set_link e1000.0 on
来启停网卡
-net nic [, vlan = n] [, macaddr = mac] [, model = type] [, Name = str] [, addr = str] [, vectors = v]
vlan参数表示连接在哪个virtual hub上
可以指定mac addr
model有多种
# qemu-system-x86_64 -enable-kvm -name ubuntutest -m 2048 -hda ubuntutest.img -vnc :19 -net nic,model=?
qemu: Supported NIC models: ne2k_pci,i82551,i82557b,i82559er,rtl8139,e1000,pcnet,virtio
可以指定名字
addr是指在pci总线上的地址
我们可以添加多个网卡
# qemu-system-x86_64 -enable-kvm -name ubuntutest -m 2048 -hda ubuntutest.img -vnc :19 -net nic,vlan=3,model=ne2k_pci -net user,vlan=3 -net nic,vlan=2 -net user,vlan=2
可以创建用户态的network
# qemu-system-x86_64 -enable-kvm -name ubuntutest -m 2048 -hda ubuntu-14.04.img -vnc :19 -net nic -net user
默认分配的IP是从10.0.2.15开始的
但是从外面无法ssh进去
Port-redirects from the host system (hostfwd)
# qemu-system-x86_64 -enable-kvm -name ubuntutest -m 2048 -hda ubuntu-14.04.img -vnc :19 -net nic -net user,hostfwd=tcp::12345-:22
会将在host机器上到端口12345的包转发给guest机器的22端口
我们可以从host上ssh
# ssh -p 12345 openstack@localhost
The authenticity of host '[localhost]:12345 ([127.0.0.1]:12345)' can't be established.
ECDSA key fingerprint is f2:ef:bc:8f:d8:bd:66:97:48:53:4d:0d:c1:d8:6d:c3.
Are you sure you want to continue connecting (yes/no)? yes
Warning: Permanently added '[localhost]:12345' (ECDSA) to the list of known hosts.
openstack@localhost's password:
Welcome to Ubuntu 14.04 LTS (GNU/Linux 3.13.0-24-generic x86_64)
* Documentation: https://help.ubuntu.com/
System information as of Sun Jul 13 14:12:34 EDT 2014
System load: 0.0 Memory usage: 2% Processes: 71
Usage of /: 39.9% of 2.89GB Swap usage: 0% Users logged in: 0
Graph this data and manage this system at:
https://landscape.canonical.com/
74 packages can be updated.
32 updates are security updates.
Last login: Sun Jul 13 13:03:03 2014
openstack@openstackcliu8:~$ ip addr
1: lo: <LOOPBACK,UP,LOWER_UP> mtu 65536 qdisc noqueue state UNKNOWN group default
link/loopback 00:00:00:00:00:00 brd 00:00:00:00:00:00
inet 127.0.0.1/8 scope host lo
valid_lft forever preferred_lft forever
inet6 ::1/128 scope host
valid_lft forever preferred_lft forever
2: eth0: <BROADCAST,MULTICAST,UP,LOWER_UP> mtu 1500 qdisc pfifo_fast state UP group default qlen 1000
link/ether 52:54:00:12:34:56 brd ff:ff:ff:ff:ff:ff
inet 10.0.2.15/24 brd 10.0.2.255 scope global eth0
valid_lft forever preferred_lft forever
inet6 fe80::5054:ff:fe12:3456/64 scope link
valid_lft forever preferred_lft forever
-net user, hostfwd = [tcp | udp]: [hostaddr]: host-port [guestaddr]: guest port
在monitor中也可以用下面的命令添加和删除hostfwd
(Qemu) hostfwd_add [VLAN_ID name] [tcp | udp]: [hostaddr]: host-port [guestaddr]: guest port
(Qemu) hostfwd_remove [VLAN_ID name] [tcp | udp]: [hostaddr]: host port
Redirects from the guest system (guestfwd)
Forward guest TCP connections to the IP address server on port port to the character device dev. This option can be given multiple times.
# qemu-system-x86_64 -enable-kvm -name ubuntutest -m 2048 -hda ubuntu-14.04.img -vnc :19 -net nic -net user,guestfwd=tcp:10.0.2.1:80-stdio
GET /index.html HTTP/1.1
User-Agent: Wget/1.15 (linux-gnu)
Accept: */*
Host: 10.0.2.1
Connection: Keep-Alive
出现下面的输出,是在guest里面运行wget http://10.0.2.1/index.html的时候
在上面的网络设置中,我们发现,guest system和host system的网络是完全隔离的,如果需要通信,则需要进行fwd功能,如果想全方位通信,则比较困难。
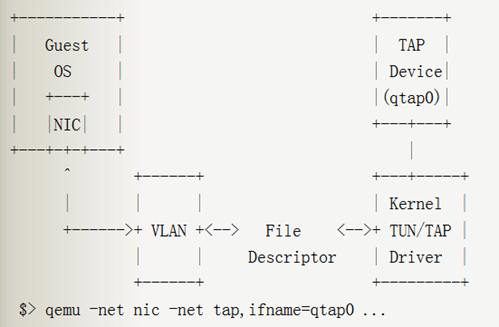
于是有了TUN/TAP network interfaces
它会将guest system的网络和host system的网络连在一起。
通过TUN/TAP adapter,会生成一个在host system上的虚拟网卡tap,而tun建立了point to point的网络设备,使得guest system的网卡和tap虚拟网卡成为一对,从而guest system的所有网络包,host system都能收到。
This driver basically allows a user-space application to obtain a file descriptor which is connected to a network device. Any frames sent to the kernel over the file descriptor will be received by the device and any frames transmitted via the device will be received by the application.
创建的过程如下
(1) 在Host机器上创建bridge br0
brctl addbr br0
(2) 将br0设为up
ip link set br0 up
(3) 创建tap device
# tunctl -b
tap0
(4) 将tap0设为up
ip link set tap0 up
(5) 将tap0加入到br0上
brctl addif br0 tap0
(6) 启动虚拟机
qemu-system-x86_64 -enable-kvm -name ubuntutest -m 2048 -hda ubuntu-14.04.img -boot c -vnc :19 -net nic,model=virtio -net tap,ifname=tap0,script=no,downscript=no
虚拟机连接tap0,tap0连接br0
(7) 虚拟机启动后,网卡没有配置,所以无法连接外网,先给br0设置一个ip
ifconfig br0 192.168.57.1/24
(8) 在虚拟机里面,给网卡设置地址
ifconfig eth0 192.168.57.2/24
这个时候在虚拟机里面可以ping的通192.168.57.1了,但是还是无法访问外网
(9) 在Host上设置NAT,并且enable ip forwarding
# sysctl -p
net.ipv4.ip_forward = 1
sudo iptables -t nat -A POSTROUTING -o eth0 -j MASQUERADE
(10) 在虚拟机里面设置默认网关
route add –net default gw 192.168.57.1
这个时候,可以ping的通外网网关了
ping 16.158.164.1
(11) 然后在虚拟机里面设置dns,则可以进行apt-get
# cat /etc/resolv.conf
# Dynamic resolv.conf(5) file for glibc resolver(3) generated by resolvconf(8)
# DO NOT EDIT THIS FILE BY HAND -- YOUR CHANGES WILL BE OVERWRITTEN
nameserver 16.110.135.52
nameserver 16.110.135.51
Multiple instances with sockets networking
通过-net socket参数,可以使得多个instance之间互通
TCP socket,一个监听一个connect,两者相连,相互通信
Host ~ $ qemu-system-x86_64 plate01.img -net nic,macaddr=52:54:00:12:34:56 -net socket, listen=:1234
Host ~ $ qemu-system-x86_64 plate02.img -net nic,macaddr=52:54:00:12:34:57 -net socket, connect = 127.0.0.1:1234
属于不同vlan的instance也可以相互连接
UDP multicast socket
Host ~ $ qemu-system-x86_64 plate01.img -net nic,macaddr = 52:54:00:12:34:56 -net socket, mcast = 230.0.0.1:1234
Host ~ $ qemu-system-x86_64 plate02.img -net nic,macaddr = 52:54:00:12:34:57 -net socket, mcast = 230.0.0.1:1234
Host ~ $ qemu-system-x86_64 plate03.img -net nic,macaddr = 52:54:00:12:34:58 -net socket, mcast = 230.0.0.1:1234
同一个multicast group可以相互通信
Bridging and Switching
可以使用brctl (bridge-utils), 也可以使用openvswitch
netdev参数
-netdev [user | tap | vde | socket], id = str [, option] [, option] [, ...]
Network protocol analysis
-net dump [,vlan=n][,file=f][,len=n]
qemu-system-x86_64 -enable-kvm -name ubuntutest -m 2048 -hda ubuntu-14.04.img -vnc :19 -net nic -net user -net dump
会生成一个文件
qemu-vlan0.pcap
需要用tcpdump查看
QEMU KVM Libvirt手册(9): network的更多相关文章
- QEMU KVM Libvirt手册(6) – Network Block Device
网络块设备是通过NBD Server将虚拟块设备通过TCP/IP export出来,可以远程访问. NBD Server通常是qemu-nbd 可以提供unix socket qemu-nbd -t ...
- QEMU KVM Libvirt手册(10):Managing Virtual Machines with libvirt
libvirt is a library that provides a common API for managing popular virtualization solutions, among ...
- QEMU KVM Libvirt手册(11): Managing Storage
When managing a VM Guest on the VM Host Server itself, it is possible to access the complete file sy ...
- QEMU KVM Libvirt手册(7): 硬件虚拟化
在openstack中,如果我们启动一个虚拟机,我们会看到非常复杂的参数 qemu-system-x86_64 -enable-kvm -name instance-00000024 -S -mach ...
- QEMU KVM libvirt 手册(3) - Storage Media
访问Hard Drive 使用-hda –hdb qemu-system-x86_64 -enable-kvm -name ubuntutest -m 2048 -hda ubuntutest.im ...
- QEMU KVM Libvirt手册(10): KVM的各种限制
Overcommits KVM allows for both memory and disk space overcommit. However, hard errors resulting fro ...
- QEMU KVM Libvirt手册(8): 半虚拟化设备virtio
KVM本身并不提供半虚拟化功能,是通过virtio来实现的 The benefits of virtio drivers are of lower overhead and higher perfor ...
- QEMU KVM libvirt手册(4) – images
RAW raw是默认的格式,格式简单,容易转换为其他的格式.需要文件系统的支持才能支持sparse file 创建image # qemu-img create -f raw flat.img 10G ...
- QEMU KVM libvirt手册(2): monitor
Administrating Virtual Machines with QEMU Monitor When QEMU is running, a monitor console is provide ...
随机推荐
- W3CSchool闯关笔记(Bootstrap)
该闯关内容与JS闯关衔接. 每一题的答案均在注释处, 第一关:把所有的HTML内容放在一个包含有container-fluid的class名称的div下(注意,是所有的HTML内容,style标签属于 ...
- verilog function功能函数写法
:] sm2tc; :] din; :] dp; :] dn; :] dout; begin dp = {'b0, din[14:0]}; dn = ~dp + 'b1; dout = (din[] ...
- c编译步骤
这几天查编译问题时,在头文件中加入某些错误信息,却发现没有编译报错.想了一下可能是,还未进行到语法分析阶段. 这里再了解一下编译过程. 一般而言代码编译包含了四个阶段的处理,即预处理(也称预编译,Pr ...
- Python学习笔记十一
1. 协程 并发的解决方案: 多进程 多线程 什么叫并发:看起来同时进行 如何实现并发:切换+保存状态 进程线程都是由操作系统调度的 协程:单线程下实现的并发,应用程序级别的切换, ...
- .net基础学java系列(二)IDE 之 插件
上一篇文章.net基础学java系列(二)IDE "扎实的基础"+"宽广的视野",基本可以帮我们摆脱码畜.码奴.码农的命运! IT领袖:IT大哥:IT精英:IT ...
- SpringBoot的事件监听
事件监听的流程分为三步:1.自定义事件,一般是继承ApplicationEvent抽象类.2.定义事件监听器,一般是实现ApplicationListener接口.3.a.启动的时候,需要将监听器加入 ...
- How Classes are Found
转载自: https://docs.oracle.com/javase/7/docs/technotes/tools/findingclasses.html How Classes are Found ...
- SQLSERVER的递归
实际项目如遇到按照如地区这样树状结构的条件递归查询数据的场景中,可以使用. CREATE FUNCTION [dbo].[GetAllChildrenTypeById] ( ) ) RETURNS T ...
- JMeter调试参数是否取值正确,调试正则提取的结果(log.info|log.error|print)
JMeter调试参数是否取值正确,调试正则提取的结果(log.info | log.error | print) Jmeter的log输出控制(jmeter.log) 1 2 log_level.jm ...
- web.xml中Servlet3.1版本的头信息格式
<?xml version="1.0" encoding="UTF-8"?> <web-app xmlns:xsi="http:// ...