React Native(四)——顶部以及底部导航栏实现方式
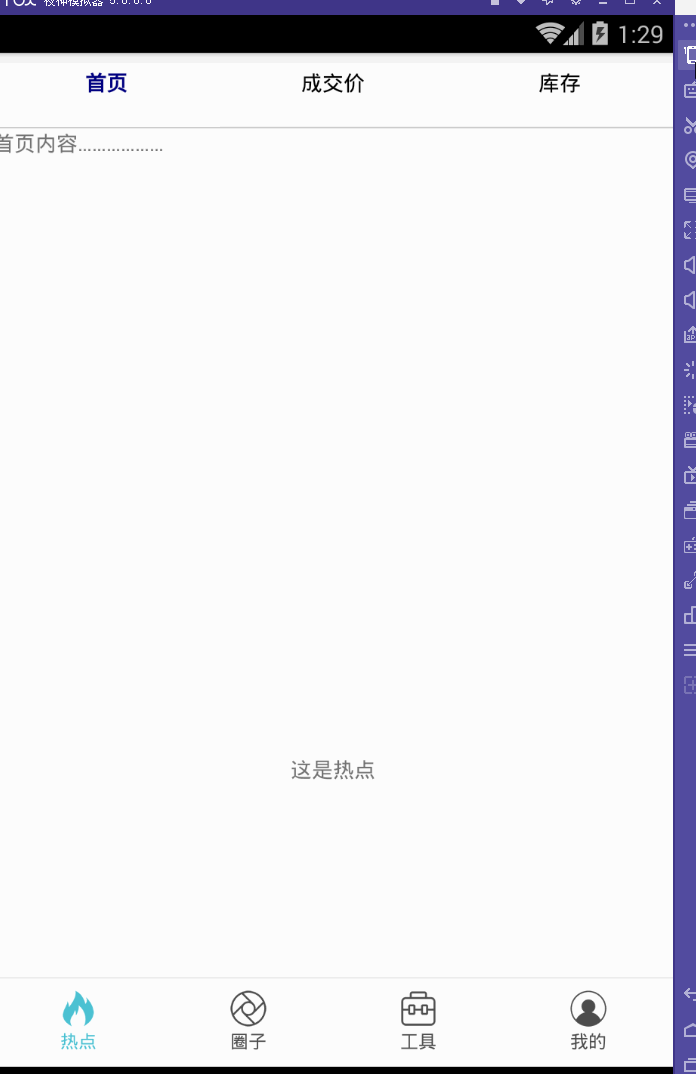
效果图:
一步一步慢慢来:
其实刚入手做app的时候,就应该做出简单的顶部以及底部导航栏。无奈又在忙其他事情,导致这些现在才整理出来。

1.顶部导航栏:react-native-scrollable-tab-view;文档地址:https://github.com/skv-headless/react-native-scrollable-tab-view
2.底部导航栏:react-navigation中的TabNavigator;文档地址:https://reactnavigation.org/docs/navigators/tab
3.一直想让index.android.js的代码简洁一些,苦思不得其解,直到现在才找到了一点“路径”,看这版的源代码:
index.android.js:
/**

 * Sample React Native App

 * https://github.com/facebook/react-native

 * @flow

 */

import React, { Component } from 'react';

import {

  AppRegistry,

  StyleSheet,

  Text,

  View,

  Image

} from 'react-native';

//顶部导航栏

import TopTabBar from './Views/TopTabBar';

//底部导航栏

import BottomTabBar from './Views/BottomTabBar';

export default class ywg extends Component {

  render() {

    return (

      <View style={{flex:1}}>

        <TopTabBar/>

        <BottomTabBar/>

      </View>

    );

  }

}

AppRegistry.registerComponent('ywg', () => ywg);

怎样?够简单吧……对了,这样的代码看起来才比较“优雅”(容忍zheng小叶正儿八经的胡说八道哦~)而主要的代码就在
//顶部导航栏

import TopTabBar from './Views/TopTabBar';

//底部导航栏

import BottomTabBar from './Views/BottomTabBar';
这两个红色的文件中。
【重点注意】将两个Component同时使用的时候,一定要在最外层的View上定义样式,否则任你怎样摆弄,它们总是不会展现“庐山真面目”,具体的文档在:http://reactnative.cn/docs/0.46/layout-props.html
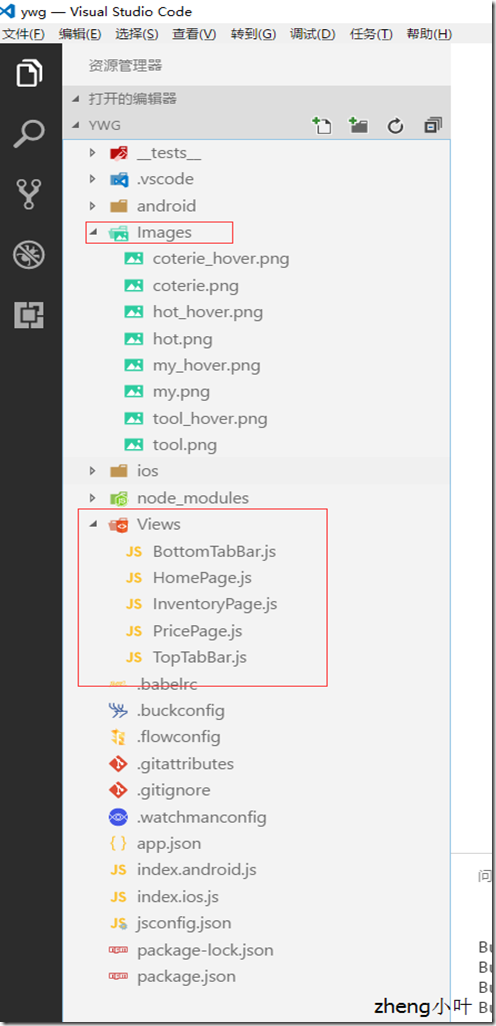
这是项目文件路径。
BottomTabBar.js:
/**

 * Sample React Native App

 * https://github.com/facebook/react-native

 * @flow

 */

import React, { Component } from 'react';

import {

  AppRegistry,

  StyleSheet,

  Text,

  View,

  Image

} from 'react-native';

//底部导航栏

import { TabNavigator } from "react-navigation";

class Home extends React.Component {

  static navigationOptions = {

      tabBarLabel: '热点',

      tabBarIcon: ({ focused, tintColor }) => (

          <Image

              source={focused ? require('../Images/hot_hover.png') : require('../Images/hot.png')}

              style={{ width: 26, height: 26, tintColor: tintColor }}

          />

      )

  };

  render() {

      return (

          <View style={styles.container}>

              <Text>这是热点</Text>

          </View>

      );

  }

}   class Circle extends React.Component {

  static navigationOptions = {

      tabBarLabel: '圈子',

      tabBarIcon: ({ focused, tintColor }) => (

          <Image

              source={focused ? require('../Images/coterie_hover.png') : require('../Images/coterie.png')}

              style={{ width: 26, height: 26, tintColor: tintColor }}

          />

      )

  };

  render() {

      return (

          <View style={styles.container}>

              <Text>这是圈子内容</Text>

          </View>

      );

  }

}   class Tools extends React.Component {

  static navigationOptions = {

      tabBarLabel: '工具',

      tabBarIcon: ({ focused, tintColor }) => (

          <Image

              source={focused ? require('../Images/tool.png') : require('../Images/tool.png')}

              style={{ width: 26, height: 26, tintColor: tintColor }}

          />

      )

  };

  render() {

      return (

          <View style={styles.container}>

              <Text>这是工具内容</Text>

          </View>

      );

  }

}

class Mypage extends React.Component {

    static navigationOptions = {

      tabBarLabel: '我的',

      tabBarIcon: ({ focused, tintColor }) => (

        <Image

          source={focused ? require('../Images/my_hover.png') : require('../Images/my.png')}

          style={{ width: 26, height: 26, tintColor: tintColor }}

        />

      )

    };

    render() {

      return (

        <View style={styles.container}>

          <Text>这是我的内容</Text>

        </View>

      );

    }

}

const BottomTabBar = TabNavigator(

  {

    Home: {

      screen: Home,

    },

    Circle: {

      screen: Circle,

    },

    Tools: {

      screen: Tools,

    },

    Mypage: {

      screen: Mypage,

    },

  },

  {

    tabBarOptions: {

      activeTintColor: '#4BC1D2',

      inactiveTintColor: '#000',

      showIcon: true,

      showLabel: true,

      upperCaseLabel: false,

      pressColor: '#823453',

      pressOpacity: 0.8,

      style: {

        backgroundColor: '#fff',

        paddingBottom: 0,

        borderTopWidth: 0.5,

        borderTopColor: '#ccc',

      },

      labelStyle: {

        fontSize: 12,

        margin: 1

      },

      indicatorStyle: { height: 0 }, //android 中TabBar下面会显示一条线,高度设为 0 后就不显示线了

    },

    tabBarPosition: 'bottom',

    swipeEnabled: false,

    animationEnabled: false,

    lazy: true,

    backBehavior: 'none',

  });

const styles = StyleSheet.create({

  container: {

    flex: 1,

    justifyContent: 'center',

    alignItems: 'center',

    backgroundColor: '#fff',

  }

});

module.exports = BottomTabBar;
TopTabBar.js:
/**

 * Sample React Native App

 * https://github.com/facebook/react-native

 * @flow

 */

import React, { Component } from 'react';

import {

  AppRegistry,

  StyleSheet,

  Text,

  View,

  Image

} from 'react-native';

import HomePage from '../Views/HomePage';

import PricePage from '../Views/PricePage';

import InventoryPage from '../Views/InventoryPage';

//顶部导航

var ScrollableTabView = require('react-native-scrollable-tab-view');

export default class TopTabBar extends Component {

  render() {

    return (

      <ScrollableTabView

       tabBarUnderlineStyle={{backgroundColor:'#fff'}}

      >

        <HomePage tabLabel="首页" />

        <PricePage tabLabel="成交价" />

        <InventoryPage tabLabel="库存" />

      </ScrollableTabView>

    );

  }

}

module.exports = TopTabBar;
而关于这些的详细介绍可以参考这里(老大的小结):http://www.cnblogs.com/vipstone/p/7516115.html?utm_source=tuicool&utm_medium=referral;
美中不足:
怎样才能实现顶部栏、底部栏控制各自部分功能呢?留下来的~~~

PS:尴尬的事情猝不及防的发生了……
一直想不明白,顶部导航栏跟底部导航栏同时存在的情况下,怎样控制各自的功能呢?于是再请教完做手机开发的同事后才恍然大悟,原来自己想的顶部导航栏根本不是顶部导航栏,简言之就是自己把布局搞错了!明明只是有底部导航栏,而所谓的“顶部导航栏”也只是底部导航栏中的第一小部分里面嵌套着一个轮播组件,才会给人以错觉,啊啊啊……事实真相居然是这样的~

React Native(四)——顶部以及底部导航栏实现方式的更多相关文章
- React Native 的组件之底部导航栏 TabBarIOS(一)
import React,{Component}from 'react'; import { AppRegistry, StyleSheet, Text, View, TabBarIOS, } fro ...
- React native中DrawerNavigator,StackNavigator,TabNavigator导航栏使用
import React from 'react'; import { View, Text,Button } from 'react-native'; import { DrawerNavigato ...
- Android学习笔记- Fragment实例 底部导航栏的实现
1.要实现的效果图以及工程目录结构: 先看看效果图吧: 接着看看我们的工程的目录结构: 2.实现流程: Step 1:写下底部选项的一些资源文件 我们从图上可以看到,我们底部的每一项点击的时候都有不同 ...
- Flutter - 创建底部导航栏
之前写过的一篇文章介绍了 Flutter - 创建横跨所有页面的侧滑菜单, 这次就一起来学习一下底部导航栏. 底部导航栏在ios平台上非常常见,app store就是这样的风格.还有就是大家最常用的微 ...
- TextView+Fragment实现底部导航栏
前言:项目第二版刚上线没多久,产品又对需求进行了大改动,以前用的是左滑菜单,现在又要换成底部导航栏,于是今天又苦逼加班了.花了几个小时实现了一个底部导航栏的demo,然后总结一下.写一篇博客.供自己以 ...
- iOS开发笔记13:顶部标签式导航栏及下拉分类菜单
当内容及分类较多时,往往采用顶部标签式导航栏,例如网易新闻客户端的顶部分类导航,最近刚好有这样的应用场景,参考网络上一些demo,实现了这种导航效果,记录一些要点. 效果图(由于视频转GIF掉帧,滑动 ...
- Android底部导航栏——FrameLayout + RadioGroup
原创文章,转载请注明出处http://www.cnblogs.com/baipengzhan/p/6285881.html Android底部导航栏有多种实现方式,本文详细介绍FrameLayout ...
- Android底部导航栏创建——ViewPager + RadioGroup
原创文章,引用请注明出处:http://www.cnblogs.com/baipengzhan/p/6270201.html Android底部导航栏有多种实现方式,本文详解其中的ViewPager ...
- 二、Fragment+RadioButton实现底部导航栏
在App中经常看到这样的tab底部导航栏 那么这种效果是如何实现,实现的方式有很多种,最常见的就是使用Fragment+RadioButton去实现.下面我们来写一个例子 首先我们先在activi ...
随机推荐
- Python之重复执行
pip install retry 自动尝试5次,每次间隔2秒 from retry import retry @retry(tries=5, delay=2) def test(): print 1 ...
- 【转】【Python】Python中的__init__.py与模块导入(from import 找不到模块的问题)
python中的Module是比较重要的概念.常见的情况是,事先写好一个.py文 件,在另一个文件中需要import时,将事先写好的.py文件拷贝 到当前目录,或者是在sys.path中增加事先写好的 ...
- hibernate+spring整合增删改事务错误
org.springframework.dao.InvalidDataAccessApiUsageException: Write operations are not allowed in read ...
- group by 小结
前提:SQL函数的两个概念 聚敛函数:对多条记录进行操作的函数,如SUM.COUNT.MIN.MAX.AVG. 其他函数:对单条记录进行操作的函数,如ABS.CEIL.SQRT等. 举个例子: SEL ...
- 计算机网络——网络层
一.虚拟线路与数据报线路 1. 在网络层提供有连接的计算机网络为虚电路网络: 如因特网:它需要VC(虚拟电路)号,用于建立虚拟电路的报文称为信令报文,相关的协议称为信令协议: 无连接的网络为数据报网络 ...
- 【转载】Linux命令行常用光标移动快捷键
声明:下面内容来自:http://www.linuxidc.com/Linux/2016-10/136027.htm, 来源:linux社区 作者:aslongas 我转载于此处,为了作个笔记,方便 ...
- 2017年第八届蓝桥杯C/C++B组省赛题目解析
一. 购物单 小明刚刚找到工作,老板人很好,只是老板夫人很爱购物.老板忙的时候经常让小明帮忙到商场代为购物.小明很厌烦,但又不好推辞. 这不,XX大促销又来了!老板夫人开出了长长的购物单,都是有打折优 ...
- smarty模板开发基础总结
前提:1. 部署smarty模板目录:2. 编写Smarty类的子类,定制好template_dir.compile_dir.config_dir.cache_dir.left_delimiter.r ...
- Python——Requests库的开发者接口
本文介绍 Python Requests 库的开发者接口,主要内容包括: 目录 一.主要接口 1. requests.request() 2. requests.head().get().post() ...
- Linux可视化服务器管理工具webmin
webmin是一个可视化的linux服务器管理工具,可以帮助我们实现很多功能. Webmin官网: http://www.webmin.com/ 下载地址:http://prdownloads.sou ...