ElementUI 复杂顶部和左侧导航栏实现
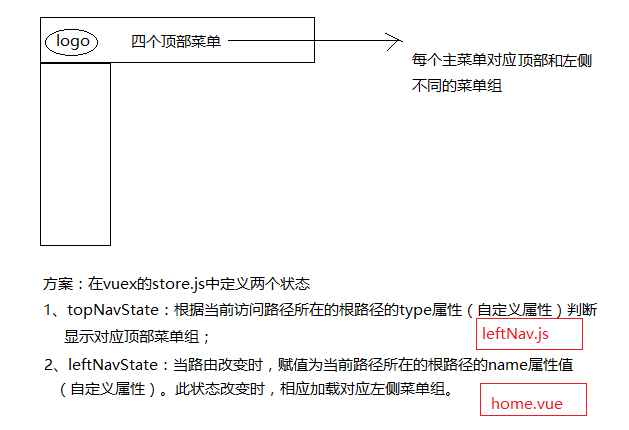
描述:如图
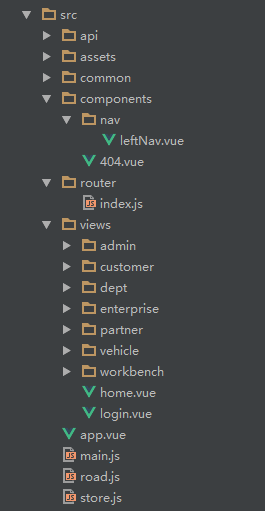
项目路径如下图所示:
代码实现:
首先在store.js中添加两个状态:
import Vue from 'vue'

import Vuex from 'vuex'

Vue.use(Vuex)

const state = {

    topNavState: 'home',

    leftNavState: 'home'

}

export default new Vuex.Store({

    state

})
App.vue内容:
<template>

  <div id="app">

    <router-view></router-view>

  </div>

</template>

<script>

  export default {

    name: 'app'

  }

</script>
main.js代码:
import Vue from 'vue'

import App from './App'

import router from './router'

import ElementUI from 'element-ui'

import store from './store.js'
import 'element-ui/lib/theme-chalk/index.css'
import '@/assets/iconfont.css'
import '@/assets/css/style.css'
Vue.config.productionTip = false

Vue.use(ElementUI)

new Vue({

    router,

    store,

    el: '#app',

    render: h => h(App)

})
router/index.js文件声明路由:
其中:行程计划、任务、通讯录属于首页大板块(topNavState=“home”);企业信息、车辆信息、部门信息都属于enterprise这一大板块(topNavState=“enterprise”)
import Vue from 'vue'

import Router from 'vue-router'

import LeftNav from '@/components/nav/leftNav.vue'

import Home from '@/views/home.vue'

import Dashboard from '@/views/workbench/dashboard.vue'

import Mission from '@/views/workbench/mission/mission.vue'

import Plan from '@/views/workbench/plan.vue'

import Maillist from '@/views/workbench/maillist.vue'

import EnterpriseList from '@/views/enterprise/index.vue'

import EnterpriseAdd from '@/views/enterprise/add.vue'

import EnterpriseDetail from '@/views/enterprise/detail.vue'

import EnterpriseValidate from '@/views/enterprise/validate.vue'

import VehicleManage from '@/views/vehicle/index.vue'

import DeptManager from '@/views/dept/index.vue'

import NotFound from '@/components/404.vue'

// 懒加载方式,当路由被访问的时候才加载对应组件

const Login = resolve => require(['@/views/login'], resolve)

Vue.use(Router)

let router = new Router({

  routes: [

    {

      path: '/login',

      type: 'login',

      component: Login

    },

    {

      path: '*',

      component: NotFound

    },

    {

      path: '/',

      type: 'home', // 根据type区分不同模块(顶部导航)

      name: 'home', // 根据name区分不同子模块(左侧导航)

      redirect: '/dashboard',

      component: Home,

      menuShow: true,

      children: [

        {

          path: '/dashboard',

          component: LeftNav,

          name: 'dashboard', // 当前路由的name

          leaf: true, // 只有一个节点

          iconCls: 'iconfont icon-home', // 图标样式class

          menuShow: true,

          children: [

            { path: '/dashboard', component: Dashboard, name: '首页', menuShow: true }

          ]

        },

        {

          path: '/mySet',

          component: LeftNav,

          name: '我的设置',

          iconCls: 'el-icon-menu',

          menuShow: true,

          children: [

            { path: '/mySet/plan', component: Plan, name: '行程计划', menuShow: true },

            { path: '/mySet/mission', component: Mission, name: '我的任务', menuShow: true },

            { path: '/mySet/maillist', component: Maillist, name: '通讯录', menuShow: true }

          ]

        }

      ]

    },

    {

      path: '/enterpriseManager',

      type: 'enterprise',

      name: 'enterprise',

      component: Home,

      redirect: '/enterprise/list',

      menuShow: true,

      children: [

        {

          path: '/enterpriseList',

          component: LeftNav,

          name: 'enterpriseList',

          leaf: true, // 只有一个节点

          iconCls: 'iconfont icon-home', // 图标样式class

          menuShow: true,

          children: [

            { path: '/enterprise/list', component: EnterpriseList, name: '企业列表', menuShow: true },

            { path: '/enterprise/detail', component: EnterpriseDetail, name: '企业详情', menuShow: false }

          ]

        },

        {

          path: '/enterpriseAdd',

          component: LeftNav,

          name: 'enterpriseAdd',

          leaf: true, // 只有一个节点

          iconCls: 'el-icon-menu',

          menuShow: true,

          children: [

            { path: '/enterprise/add', component: EnterpriseAdd, name: '企业添加', menuShow: true }

          ]

        },

        {

          path: '/enterpriseValidate',

          component: LeftNav,

          name: 'enterpriseValidate',

          leaf: true, // 只有一个节点

          iconCls: 'el-icon-menu',

          menuShow: true,

          children: [

            { path: '/enterprise/validate', component: EnterpriseValidate, name: '企业认证', menuShow: true }

          ]

        }

      ]

    },

    {

      path: '/vehicleManager',

      type: 'enterprise',

      name: 'vehicle',

      component: Home,

      redirect: '/vehicle/list',

      menuShow: true,

      children: [

        {

          path: '/vehicleList',

          component: LeftNav,

          name: 'vehicleList',

          leaf: true, // 只有一个节点

          iconCls: 'iconfont icon-home', // 图标样式class

          menuShow: true,

          children: [

            { path: '/vehicle/list', component: VehicleManage, name: '车辆信息', menuShow: true }

          ]

        }

      ]

    },

    {

      path: '/deptManager',

      type: 'enterprise',

      name: 'dept',

      component: Home,

      redirect: '/dept/list',

      menuShow: true,

      children: [

        {

          path: '/deptList',

          component: LeftNav,

          name: 'deptList',

          leaf: true, // 只有一个节点

          iconCls: 'iconfont icon-home', // 图标样式class

          menuShow: true,

          children: [

            { path: '/dept/list', component: DeptManager, name: '部门信息', menuShow: true }

          ]

        }

      ]

    }

  ]

});

router.beforeEach((to, from, next) => {

  // console.log('to:' + to.path)

  if (to.path.startsWith('/login')) {

    window.localStorage.removeItem('access-user')

    next()

  } else if(to.path.startsWith('/register')){

    window.localStorage.removeItem('access-user')

    next()

  } else {

    let user = JSON.parse(window.localStorage.getItem('access-user'))

    if (!user) {

      next({path: '/login'})

    } else {

      next()

    }

  }

});

export default router
特别说明:
这里的路由对象router ,设置的是最多三级,一级路由主要对应的是顶部导航和其他无子页面的路由,二级和三级路由分别对应的是左侧导航的一级和二级菜单(比如三级路由对应的就是左侧导航的二级菜单),二级路由设置leaf属性,值为true表明该路由下没有子菜单(如果该路由下的某页面不显示在左侧导航,不算子菜单)。
leftNav.vue文件中主要是左侧导航菜单加载代码:
<template>

  <el-col :span="24" class="main">

    <!--左侧导航-->

    <aside :class="{showSidebar:!collapsed}">

      <!--展开折叠开关-->

      <div class="menu-toggle" @click.prevent="collapse">

        <i class="iconfont icon-outdent" v-show="!collapsed" title="收起"></i>

        <i class="iconfont icon-indent" v-show="collapsed" title="展开"></i>

      </div>

      <!--导航菜单-->

      <el-menu :default-active="$route.path" router :collapse="collapsed" ref="leftNavigation">

        <template v-for="(issue,index) in $router.options.routes">

          <template v-if="issue.name === $store.state.leftNavState"><!-- 注意:这里就是leftNavState状态作用之处,当该值与router的根路由的name相等时加载相应菜单组 -->

            <template v-for="(item,index) in issue.children">

              <el-submenu v-if="!item.leaf" :index="index+''" v-show="item.menuShow">

                <template slot="title"><i :class="item.iconCls"></i><span slot="title">{{item.name}}</span></template>

                <el-menu-item v-for="term in item.children" :key="term.path" :index="term.path" v-if="term.menuShow"

                              :class="$route.path==term.path?'is-active':''">

                  <i :class="term.iconCls"></i><span slot="title">{{term.name}}</span>

                </el-menu-item>

              </el-submenu>

              <el-menu-item v-else-if="item.leaf&&item.children&&item.children.length" :index="item.children[0].path"

                            :class="$route.path==item.children[0].path?'is-active':''" v-show="item.menuShow">

                <i :class="item.iconCls"></i><span slot="title">{{item.children[0].name}}</span>

              </el-menu-item>

            </template>

          </template>

        </template>

      </el-menu>

    </aside>

    <!--右侧内容区-->

    <section class="content-container">

      <div class="grid-content bg-purple-light">

        <el-col :span="24" class="content-wrapper">

          <transition name="fade" mode="out-in">

            <router-view></router-view>

          </transition>

        </el-col>

      </div>

    </section>

  </el-col>

</template>

<script>

  export default {

    name: 'leftNav',

    data () {

      return {

        collapsed: false

      }

    },

    methods: {

      //折叠导航栏

      collapse: function () {

        this.collapsed = !this.collapsed;

      },

      // 左侧导航栏根据当前路径默认打开子菜单(如果当前路由是三级,则父级子菜单默认打开)

      defaultLeftNavOpened () {

        let cur_path = this.$route.path; //获取当前路由

        let routers = this.$router.options.routes; // 获取路由对象

        let subMenuIndex = 0, needOpenSubmenu = false;

        for (let i = 0; i < routers.length; i++) {

          let children = routers[i].children;

          if(children){

            for (let j = 0; j < children.length; j++) {

              if (children[j].path === cur_path) {

                break;

              }

              // 如果该菜单下有子菜单(个数>1且设置的leaf为false才有下拉子菜单)

              if(children[j].children && !children[j].leaf) {

                let grandChildren = children[j].children;

                for(let z=0; z<grandChildren.length; z++) {

                  if(grandChildren[z].path === cur_path) {

                    subMenuIndex = j;

                    needOpenSubmenu = true;

                    break;

                  }

                }

              }

            }

          }

        }

        if(this.$refs['leftNavigation'] && needOpenSubmenu) {

          this.$refs['leftNavigation'].open(subMenuIndex); // 打开子菜单

        }

      },

    },

    mounted() {

      this.defaultLeftNavOpened();

    }

  }

</script>
home.vue是后台主页组件代码
<template>

  <el-row class="container">

    <!--头部-->

    <el-col :span="24" class="topbar-wrap">

      <div class="topbar-logo topbar-btn">

        <a href="/"><img src="../assets/logo.png" style="padding-left:8px;"></a>

      </div>

      <div class="topbar-logos" v-show="!collapsed">

        <a href="/" style="color: #fff;">车车综合管理</a>

      </div>

      <div class="topbar-title">

        <el-row v-show="$store.state.topNavState==='home'"><!-- 注意:这里就是topNavState作用之处,根据当前路由所在根路由的type值判断显示不同顶部导航菜单 -->

          <el-col :span="24">

            <el-menu :default-active="defaultActiveIndex" class="el-menu-demo" mode="horizontal" @select="handleSelect" :router="true">

              <el-menu-item index="/">工作台</el-menu-item>

              <el-menu-item index="/enterpriseManager">企业管理</el-menu-item>

              <el-menu-item index="/orderManager">订单管理</el-menu-item>

              <el-menu-item index="/systemManager">系统管理</el-menu-item>

            </el-menu>

          </el-col>

        </el-row>

        <el-row v-show="$store.state.topNavState==='enterprise'">

          <el-col :span="24">

            <el-menu :default-active="defaultActiveIndex" class="el-menu-demo" mode="horizontal" @select="handleSelect" :router="true">

              <el-menu-item index="/enterpriseManager">企业信息</el-menu-item>

              <el-menu-item index="/vehicleManager">车辆信息</el-menu-item>

              <el-menu-item index="/deptManager">组织架构</el-menu-item>

            </el-menu>

          </el-col>

        </el-row>

      </div>

      <div class="topbar-account topbar-btn">

        <el-dropdown trigger="click">

          <span class="el-dropdown-link userinfo-inner">

            <i class="iconfont icon-user"></i> {{nickname}}   <i class="el-icon-caret-bottom"></i></span>

          <el-dropdown-menu slot="dropdown">

            <el-dropdown-item>

              <div @click="jumpTo('/user/profile')"><span style="color: #555;font-size: 14px;">个人信息</span></div>

            </el-dropdown-item>

            <el-dropdown-item>

              <div @click="jumpTo('/user/changepwd')"><span style="color: #555;font-size: 14px;">修改密码</span></div>

            </el-dropdown-item>

            <el-dropdown-item divided @click.native="logout">退出登录</el-dropdown-item>

          </el-dropdown-menu>

        </el-dropdown>

      </div>

    </el-col>

    <!--中间-->

    <transition name="fade" mode="out-in">

      <router-view></router-view>

    </transition>

  </el-row>

</template>

<script>

  export default {

    name: 'home',

    data () {

      return {

        defaultActiveIndex: "/",

        loading: false,

        nickname: '',

        collapsed: false

      }

    },

    created() {// 组件创建完后获取数据,

      // 此时 data 已经被 observed 了

      this.fetchNavData();

    },

    methods: {

      handleSelect(index){

        this.defaultActiveIndex = index;

      },

      //折叠导航栏

      collapse () {

        this.collapsed = !this.collapsed;

      },

      fetchNavData () { // 初始化菜单激活项

        var cur_path = this.$route.path; //获取当前路由

        var routers = this.$router.options.routes; // 获取路由对象

        var nav_type = "", nav_name = "";

        for (var i = 0; i < routers.length; i++) {

          var children = routers[i].children;

          if(children){

            for (var j = 0; j < children.length; j++) {

              var grand_children = children[j].children;

              if(grand_children){

                for (var k = 0; k < grand_children.length; k++) {

                  if (grand_children[k].path === cur_path) {

                    nav_type = routers[i].type;

                    nav_name = routers[i].name;

                    break;

                  }

                  // 如果该菜单下还有子菜单

                  if(children[j].children) {

                    let grandChildren = children[j].children;

                    for(let z=0; z<grandChildren.length; z++) {

                      if(grandChildren[z].path === cur_path) {

                        nav_type = routers[i].type;

                        nav_name = routers[i].name;

                        break;

                      }

                    }

                  }

                }

              }

            }

          }

        }

        this.$store.state.topNavState = nav_type;  // 改变topNavState状态的值

        this.$store.state.leftNavState = nav_name;  // 改变leftNavState状态的值

        if(nav_type == "home"){

          this.defaultActiveIndex = "/";

        } else {

          this.defaultActiveIndex = "/" + nav_name + "Manager";

        }

      },

      jumpTo(url){

        this.defaultActiveIndex = url;

        this.$router.push(url); //用go刷新

      },

      logout(){

        //logout

        let that = this;

        this.$confirm('确认退出吗?', '提示', {

          confirmButtonClass: 'el-button--warning'

        }).then(() => {

          //确认

          localStorage.removeItem('access-user');

          that.$router.go('/login'); //用go刷新

        }).catch(() => {});

      }

    },

    mounted() {

      let user = localStorage.getItem('access-user');

      if (user) {

        user = JSON.parse(user);

        this.nickname = user.nickname || '';

      }

    },

    watch: {

      '$route': 'fetchNavData'  //监听router值改变时,改变导航菜单激活项

    }

  }

</script>
注意fetchNavData()这个方法,主要是根据当前跳转的路由,去找到这个路由对应的type(对应顶部导航栏的分类)和name(对应左侧导航栏的分类),然后保存type和name到$store中,这样在顶部导航可以根据$store中的type显示相应的菜单,同样在左侧导航就可以取到这个name值并显示相应的左侧菜单栏了。
之前写的左侧导航栏(leftNav.vue)的代码有个不足的地方——当前打开页面是三级路由(也就是左侧导航的二级菜单)时,刷新当前页,(在左侧导航中)当前路由所属的一级菜单没有默认打开。
解决方案已修改,在leftNav.vue中添加defaultLeftNavOpened()方法,详情可以回看leftNav.vue的代码。
对于这个项目的demo,也放到了github共享,请看github地址:https://github.com/yqrong/ccproject.git
最近这段时间把项目修改了下(将顶部导航也提取出来作为命名视图),详情请看下篇:
ElementUI+命名视图实现复杂顶部和左侧导航栏
补充:
今天有位细心的网友发现了一个小问题:
左侧导航当前激活的是非第一个菜单时,切换其他顶部导航再切换回来,会有两个激活的菜单。
解决:el-menu标签缺少default-active属性设置,加上即可。
<el-menu :default-active="$route.path" router :collapse="collapsed" ref="leftNavigation">

<!-- ... -->

</el-menu>
写代码还是不够细心,自我检讨一下。
ElementUI 复杂顶部和左侧导航栏实现的更多相关文章
- ElementUI+命名视图实现复杂顶部和左侧导航栏
在了解了命名视图的用途后,发现用命名视图来实现复杂导航更加省力.更多知识请参考这里 这里只说明重要配置内容,其他内容配置请参考上一篇初始版本: ElementUI 复杂顶部和左侧导航栏实现 或参考文末 ...
- iOS开发笔记13:顶部标签式导航栏及下拉分类菜单
当内容及分类较多时,往往采用顶部标签式导航栏,例如网易新闻客户端的顶部分类导航,最近刚好有这样的应用场景,参考网络上一些demo,实现了这种导航效果,记录一些要点. 效果图(由于视频转GIF掉帧,滑动 ...
- React Native(四)——顶部以及底部导航栏实现方式
效果图: 一步一步慢慢来: 其实刚入手做app的时候,就应该做出简单的顶部以及底部导航栏.无奈又在忙其他事情,导致这些现在才整理出来. 1.顶部导航栏:react-native-scrollable- ...
- dedecms左侧导航栏不显示问题
dedecms左侧导航栏不显示问题 在做织梦项目时,经常会碰到后台左侧导航栏不显示的问题,如下所示: 这主要是由于文件权限不足造成的.有两种方法 第一种:把 /data 文件夹全部改成 777 权 ...
- CI框架后台添加左侧导航栏出现的一系列问题
- MFC office2007风格设置左侧导航栏 [转]
当基础的框架搭好以后,我想为其添加一个左侧导航栏,过程如下:在框架类的头文件添加一个导航栏参数: CMFCOutlookBar m_navigation; 为了完善功能,在导航栏里面我添加了一个CTr ...
- 修改layui的后台模板的左侧导航栏可以伸缩
原生的左侧导航栏代码: <div class="layui-side layui-bg-black"> <div class="layui-side-s ...
- 前端(各种demo)二:左侧导航栏的折叠和打开(不使用js)基础版和升级版
1.给div设置定位. 复习一下—— css中position有五种属性: static:默认值,没有定位 absolute:绝对定位,相对于父级元素进行定位 relative:相对定位 fixed: ...
- 使用jsonp形式跨域访问实现电商平台的左侧导航栏
电商平台有个具备的左侧商品类目的导航栏的结构. 通过jsonp跨域访问电商平台的后台管理系统商品分类.(主要实现后台Java代码) 实现基本步骤: 1.在后台管理系统中准备相应的json数据. poj ...
随机推荐
- 阶段5 3.微服务项目【学成在线】_day18 用户授权_11-前端集成认证授权-身份校验
把下面赋值到nginx中 前端的服务需要配置一下 重启nginx 启动教学管理的前端 没有登陆直接就进来教学管理的后端了 下面我们要做的就是这两件事 1.前端页面校验用户的身份,如果用户没有登录则跳转 ...
- JavaScript正则表达式补充
定义正则表达式 /.../用于定义正则表达式 /.../g表示全局匹配 /.../i表示不区分大小写 /.../m表示多行匹配 JS正则匹配时本身就是支持多行,此处多行匹配只是影响正则表达式^和$,m ...
- 【C/C++开发】C++实现简单的线程类
C++封装一个简单的线程类 多线程编程简介: 大家在编程时,经常需要在程序中启动一个或多个线程来处理任务,而如果每次都是去调用系统创建线程的API函数来创建,代码量虽不多,但线程的创建和业务逻辑代码就 ...
- 【ARM-Linux开发】DRM学习(一)
http://www.landley.NET/kdocs/htmldocs/drm.html 非常好的一个链接,直接把DRM说的很透.很多API的功能都写全了. Table of Contents 1 ...
- Android Studio优化编译速度
随着Android Studio的不断完善,其安卓开发者阵营也基本从Eclipse转移到了Android Studio,毕竟Android Studio是谷歌亲力亲为开发的官方开发软件.不过其最重要的 ...
- 最新 美柚java校招面经 (含整理过的面试题大全)
从6月到10月,经过4个月努力和坚持,自己有幸拿到了网易雷火.京东.去哪儿. 美柚等10家互联网公司的校招Offer,因为某些自身原因最终选择了 美柚.6.7月主要是做系统复习.项目复盘.LeetCo ...
- JS中根据某个值进行大小排序
//从大到小排序 function compareBigToSmall(property){ return function(a,b){ var value1 = a[property]; var v ...
- 总结几个最近处理问题中使用http协议的代码
demo1:几个不同的http请求方式总结: ----------------------------------------------------------------------------- ...
- 洛谷 题解 P1225 【黑白棋游戏】
看见很多dalao写了什么双向BFS,蒟蒻表示不会写啊. 怎么办办? 先来分析一下题目,一眼看去就是一个搜索题,考虑DFS与BFS. 先放一份DFS的代码: #include<bits/stdc ...
- (JavaScript) 百度地图与腾讯地图坐标转换
/** * 坐标转换,百度地图坐标转换成腾讯地图坐标 * lng 腾讯经度(pointy) * lat 腾讯纬度(pointx) * 经度>纬度 */ function bMapToQQMap( ...