【译】Spring 4 @Profile注解示例
前言
译文链接:http://websystique.com/spring/spring-profile-example/
本文将探索Spring中的@Profile注解,可以实现不同环境(开发、测试、部署等)使用不同的配置。同样,除了使用注解也会给出基于XML配置的示例作为对比。
假设你有一个应用涉及数据库交互,你可能希望在开发环境上使用mysql数据库,在生产环境上使用oracle数据库,那么使用Spring的Profiles,可以轻松达到这个目的,接下来我们将给出一个实例详细介绍这种情况。
涉及技术及开发工具
- Spring 4.0.6.RELEASE
- Maven 3
- JDK 1.6
- Eclipse JUNO Service Release 2
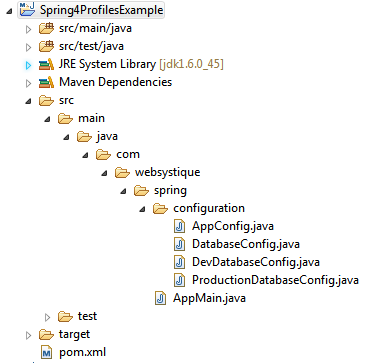
工程目录结构
步骤一:往pom.xml中添加依赖
<project xmlns="http://maven.apache.org/POM/4.0.0" xmlns:xsi="http://www.w3.org/2001/XMLSchema-instance"

    xsi:schemaLocation="http://maven.apache.org/POM/4.0.0 http://maven.apache.org/xsd/maven-4.0.0.xsd">

    <modelVersion>4.0.0</modelVersion>

    <groupId>com.websystique.spring</groupId>

    <artifactId>Spring4ProfilesExample</artifactId>

    <version>1.0.0</version>

    <packaging>jar</packaging>

    <name>Spring4ProfilesExample</name>

    <properties>

        <springframework.version>4.0.6.RELEASE</springframework.version>

    </properties>

    <dependencies>

        <dependency>

            <groupId>org.springframework</groupId>

            <artifactId>spring-core</artifactId>

            <version>${springframework.version}</version>

        </dependency>

        <dependency>

            <groupId>org.springframework</groupId>

            <artifactId>spring-context</artifactId>

            <version>${springframework.version}</version>

        </dependency>

        <dependency>

            <groupId>org.springframework</groupId>

            <artifactId>spring-orm</artifactId>

            <version>${springframework.version}</version>

        </dependency>

    </dependencies>

    <build>

        <pluginManagement>

            <plugins>

                <plugin>

                    <groupId>org.apache.maven.plugins</groupId>

                    <artifactId>maven-compiler-plugin</artifactId>

                    <version>3.2</version>

                    <configuration>

                        <source>1.6</source>

                        <target>1.6</target>

                    </configuration>

                </plugin>

            </plugins>

        </pluginManagement>

    </build>

</project>
步骤二:创建Spring配置类
Spring配置类是指用@Configuration注解标注的类,这些类包含了用@Bean标注的方法。这些被@Bean标注的方法可以生成bean并交由spring容器管理。
package com.websystique.spring.configuration;

import javax.sql.DataSource;

import org.springframework.beans.factory.annotation.Autowired;

import org.springframework.context.annotation.ComponentScan;

import org.springframework.context.annotation.Configuration;

@Configuration

@ComponentScan(basePackages = "com.websystique.spring")

public class AppConfig {

    @Autowired

    public DataSource dataSource;

}
以上配置只有一个属性被自动注入,接下来我们将展示这个dataSource属性可以根据不同的环境(开发环境或生产环境)注入不同的bean。
package com.websystique.spring.configuration;

import javax.sql.DataSource;

public interface DatabaseConfig {

    DataSource createDataSource();

}
一个简单的接口,可以被所有可能的环境配置实现
package com.websystique.spring.configuration;

import javax.sql.DataSource;

import org.springframework.context.annotation.Bean;

import org.springframework.context.annotation.Configuration;

import org.springframework.context.annotation.Profile;

import org.springframework.jdbc.datasource.DriverManagerDataSource;

@Profile("Development")

@Configuration

public class DevDatabaseConfig implements DatabaseConfig {

    @Override

    @Bean

    public DataSource createDataSource() {

        System.out.println("Creating DEV database");

        DriverManagerDataSource dataSource = new DriverManagerDataSource();

        /*

         * Set MySQL specific properties for Development Environment

         */

        return dataSource;

    }

}
package com.websystique.spring.configuration;

import javax.sql.DataSource;

import org.springframework.context.annotation.Bean;

import org.springframework.context.annotation.Configuration;

import org.springframework.context.annotation.Profile;

import org.springframework.jdbc.datasource.DriverManagerDataSource;

@Profile("Production")

@Configuration

public class ProductionDatabaseConfig implements DatabaseConfig {

    @Override

    @Bean

    public DataSource createDataSource() {

        System.out.println("Creating Production database");

        DriverManagerDataSource dataSource = new DriverManagerDataSource();

        /*

         * Set ORACLE specific properties for Production environment

         */

        return dataSource;

    }

}
以上两个配置类都实现了DatabaseConfig接口,特殊的地方在于它们都用@Profile标注。
被@Profile标注的组件只有当指定profile值匹配时才生效。
可以通过以下方式设置profile值:
1、设置spring.profiles.active属性(通过JVM参数、环境变量或者web.xml中的Servlet context参数)
2、ApplicationContext.getEnvironment().setActiveProfiles(“ProfileName”)
根据你的实际环境设置profile值,然后被profile标注(而且value=设置值)的bean才会被注册到spring容器。
步骤三:运行main方法测试
package com.websystique.spring;

import org.springframework.context.annotation.AnnotationConfigApplicationContext;

public class AppMain {

    public static void main(String args[]){

        AnnotationConfigApplicationContext  context = new AnnotationConfigApplicationContext();

        //Sets the active profiles

        context.getEnvironment().setActiveProfiles("Development");

        //Scans the mentioned package[s] and register all the @Component available to Spring

        context.scan("com.websystique.spring");

        context.refresh();

        context.close();

    }

}
注意以上代码,context.scan("com.websystique.spring")扫描到该包并开始注册所有被@Component标注的bean时,如果同时遇到被@Profile注解标注的bean时,会与profile值做比较,profile值匹配则注册到spring容器,否则直接跳过。
在我们这个例子中,DevDatabaseConfig会被注册到Spring容器中。
运行以上程序,结果如下:
Creating DEV database
附:基于XML的配置
替换DevelopmentDatabaseConfig配置为dev-config-context.xml (src/main/resources/dev-config-context.xml)
<?xml version="1.0" encoding="UTF-8"?>

<beans xmlns="http://www.springframework.org/schema/beans"

        xmlns:xsi="http://www.w3.org/2001/XMLSchema-instance"

        xsi:schemaLocation="http://www.springframework.org/schema/beans http://www.springframework.org/schema/beans/spring-beans-4.0.xsd">

    <bean id="dataSource" class="org.springframework.jdbc.datasource.DriverManagerDataSource">

        <property name="driverClassName" value="com.mysql.jdbc.Driver" />

        <property name="url" value="jdbc:mysql://localhost:3306/websystique" />

        <property name="username" value="myuser" />

        <property name="password" value="mypassword" />

    </bean>

</beans>
替换ProductionDatabaseConfig配置为prod-config-context.xml (src/main/resources/prod-config-context.xml)
<?xml version="1.0" encoding="UTF-8"?>

<beans xmlns="http://www.springframework.org/schema/beans"

    xmlns:xsi="http://www.w3.org/2001/XMLSchema-instance"

    xsi:schemaLocation="http://www.springframework.org/schema/beans http://www.springframework.org/schema/beans/spring-beans-4.0.xsd">

    <bean id="dataSource" class="org.springframework.jdbc.datasource.DriverManagerDataSource">

        <property name="driverClassName" value=" oracle.jdbc.driver.OracleDriver" />

        <property name="url"     value="jdbc:oracle:thin:@PRODHOST:PRODPORT/websystique" />

        <property name="username" value="myproduser" />

        <property name="password" value="myprodpassword" />

    </bean>

</beans>
替换AppConfig配置为app-config.xml (src/main/resources/app-config.xml)
<?xml version="1.0" encoding="UTF-8"?>

<beans xmlns="http://www.springframework.org/schema/beans"

        xmlns:xsi="http://www.w3.org/2001/XMLSchema-instance"

        xmlns:context="http://www.springframework.org/schema/context"

        xsi:schemaLocation="http://www.springframework.org/schema/beans http://www.springframework.org/schema/beans/spring-beans-4.0.xsd

                            http://www.springframework.org/schema/context http://www.springframework.org/schema/context/spring-context-4.0.xsd">

    <context:component-scan base-package="com.websystique.spring"/>

    <beans profile="Development">

        <import resource="dev-config-context.xml"/>

    </beans>

    <beans profile="Production">

        <import resource="prod-config-context.xml"/>

    </beans>

</beans>
根据实际的profile配置,相应的config-context.xml文件会被加载,其它的会被忽略。
最后,main方法如下:
package com.websystique.spring;

import org.springframework.context.support.AbstractApplicationContext;

import org.springframework.context.support.ClassPathXmlApplicationContext;

public class AppMain {

    public static void main(String args[]){

        AbstractApplicationContext  context = new ClassPathXmlApplicationContext("app-config.xml");

        //Sets the active profiles

        context.getEnvironment().setActiveProfiles("Development");

        /*

         * Perform any logic here

         */

        context.close();

    }

}
运行程序,会得到相同的结果。
程序源码
http://websystique.com/?smd_process_download=1&download_id=799
【译】Spring 4 @Profile注解示例的更多相关文章
- 十、Spring的@Profile注解
首先我们来看看spring官方文档对这个注解的解释: The @Profile annotation allows you to indicate that a component is eligib ...
- 【转】Spring Boot Profile使用
http://blog.csdn.net/he90227/article/details/52981747 摘要: spring Boot使用@Profile注解可以实现不同环境下配置参数的切换,任何 ...
- 【译】Spring 4 @PropertySource和@Value注解示例
前言 译文链接:http://websystique.com/spring/spring-propertysource-value-annotations-example/ 本篇文章将展示如何通过@P ...
- spring切换环境变量——@Profile注解的使用
在容器中如果存在同一类型的多个组件,也可以使用@Profile注解标识要获取的是哪一个bean,这在不同的环境使用不同的变量的情景特别有用.例如,开发环境.测试环境.生产环境使用不同的数据源,在不改变 ...
- 使用 spring.profiles.active 及 @profile 注解 动态化配置内部及外部配置
引言:使用 spring.profiles.active 参数,搭配@Profile注解,可以实现不同环境下(开发.测试.生产)配置参数的切换 一.根据springboot的配置文件命名约定,结合ac ...
- spring boot: 一般注入说明(四) Profile配置,Environment环境配置 @Profile注解
1.通过设定Environment的ActiveProfile来设置当前context所需要的环境配置,在开发中使用@Profile注解类或方法,达到不同情况下选择实例化不同的Bean. 2.使用jv ...
- 【Spring Cloud】Spring Cloud之自定义@SpringCloudProfile注解实现@Profile注解的功能
一.为什么会想到定义@SpringCloudProfile这样的注解 首页提一下@Profile注解:它主要用与Spring Boot多环境配置中,指定某个类只在指定环境中生效,比如swagger的配 ...
- 【Spring】使用@Profile注解实现开发、测试和生产环境的配置和切换,看完这篇我彻底会了!!
写在前面 在实际的企业开发环境中,往往都会将环境分为:开发环境.测试环境和生产环境,而每个环境基本上都是互相隔离的,也就是说,开发环境.测试环境和生产环境是互不相通的.在以前的开发过程中,如果开发人员 ...
- 【Spring】简单的Spring AOP注解示例
引入相关包: <properties> <spring.version>3.0.5.RELEASE</spring.version> <aspectj.ver ...
随机推荐
- egret调用页面js的方法。
参考文献: http://bbs.egret-labs.org/thread-267-3-1.html http://docs.egret-labs.org/post/manual/threelibs ...
- TODO:这是一个我的自媒体
TODO:这是一个我的自媒体 自媒体(外文名:We Media)又称"公民媒体"或"个人媒体",是指私人化.平民化.普泛化.自主化的传播者,以现代化.电子化的手 ...
- Entity Framework 6 Recipes 2nd Edition(13-10)译 -> 显式创建代理
问题 你有一个POCO实体,原本在执行一个查询时动态创建代理,现在你不想EF延迟创建代理带来的代价. 解决方案 假设你有一个如图Figure13-15的模型 Figure 13-15. A model ...
- Atitit webservice发现机制 WS-Discovery标准的规范attilax总结
Atitit webservice发现机制 WS-Discovery标准的规范attilax总结 1.1. WS-Discovery标准1 1.2. 一.WS-Discovery1 1.2.1. ...
- JavaScript随笔5
事件(1) 鼠标的点击坐标: 火狐不支持 IE event.clientX//可视区坐标 event.clientY FF ev.clientX ev.clientY 兼容: var oEvent = ...
- JS事件调试 - 查找HTML元素绑定的事件以及绑定代码所在位置
日常的网页开发调试工作中,经常需要知道指定的某个网页元素绑定了哪些事件以及绑定代码的位置,下面介绍三种用来跟踪页面中的事件的方法. 1.使用firefox调试 我们可以使用firefox的debug工 ...
- 【JAVA框架】Hibernate 与Mybatis 区别
Hibernate Mybatis 简介 区别 与联系 欢迎提出见解及转载. 1 简单简介 1.1 Hibernate 框架 Hibernate是一个开放源代码的对象关 ...
- .NET Core下的日志(3):如何将日志消息输出到控制台上
当我们利用LoggerFactory创建一个Logger对象并利用它来实现日志记录,这个过程会产生一个日志消息,日志消息的流向取决于注册到LoggerFactory之上的LoggerProvider. ...
- 【中文分词】隐马尔可夫模型HMM
Nianwen Xue在<Chinese Word Segmentation as Character Tagging>中将中文分词视作为序列标注问题(sequence labeling ...
- Java进击C#——开发环境
在进入本章之前.笔者想说一些话.对于笔者来讲语言没有好坏之分.只有适不适用之别.当上一篇发到首页的时候,我突然发现有可能会引发争论.这是笔者担心的,这也是笔者不想看到的. 笔者想写这一系列的原因不是为 ...