
iOS - Quartz 2D 贝塞尔曲线
1、贝塞尔曲线
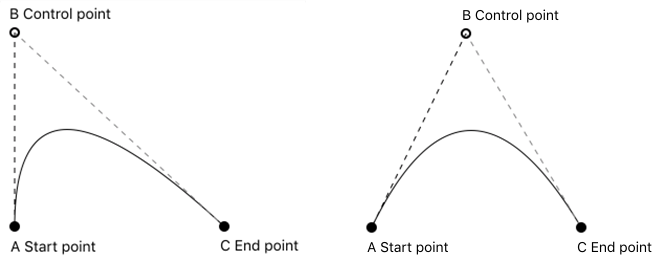
贝塞尔曲线(Bézier curve),又称贝兹曲线或贝济埃曲线,是应用于二维图形应用程序的数学曲线。一般的矢量图形软件通过它来精确画出曲线,贝兹曲线由线段与节点组成,节点是可拖动的支点,线段像可伸缩的皮筋,我们在绘图工具上看到的钢笔工具就是来做这种矢量曲线的。贝塞尔曲线是计算机图形学中相当重要的参数曲线,在一些比较成熟的位图软件中也有贝塞尔曲线工具,如 PhotoShop 等。在 Flash4 中还没有完整的曲线工具,而在 Flash5 里面已经提供出贝塞尔曲线工具。
二阶贝塞尔曲线示意图
三阶贝塞尔曲线示意图
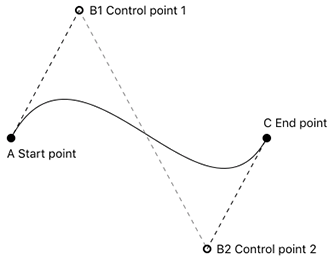
贝塞尔路径(UIBezierPath)是 iOS UIKit 框架中对 Quartz 2D 绘图的封装。实际操作起来,使用贝塞尔路径,更为方便。用法与 CGContextRef 类似,但是 OC 对其进行了封装,更加面向对象。
贝塞尔路径常用的方法
	// 设置起始点

	- (void)moveToPoint:(CGPoint)point;

	// 添加直线到一点

	- (void)addLineToPoint:(CGPoint)point;

	// 封闭闭路径

	- (void)closePath;

	// 返回一个描述椭圆的路径

	+ (UIBezierPath *)bezierPathWithOvalInRect:(CGRect)rect;

	// 贝塞尔曲线

	- (void)addQuadCurveToPoint:(CGPoint)endPoint controlPoint:(CGPoint)controlPoint;

	// 三次贝塞尔曲线

	- (void)addCurveToPoint:(CGPoint)endPoint controlPoint1:(CGPoint)controlPoint1 controlPoint2:(CGPoint)controlPoint2;

	// 绘制圆弧

	- (void)addArcWithCenter:(CGPoint)center radius:(CGFloat)radius startAngle:(CGFloat)startAngle endAngle:(CGFloat)endAngle clockwise:(BOOL)clockwise;
2、基本图形的绘制
- 贝塞尔路径基本图形的绘制详情见 Quartz 2D 二维绘图 基本图形绘制
3、二三阶贝塞尔曲线示例
3.1 二阶贝塞尔曲线示例
QBezierPathView.h
	@interface QBezierPathView : UIView

	@end
QBezierPathView.m
	@interface QBezierPathView ()

	/// 路径

	@property (nonatomic, strong) UIBezierPath *path;

	/// 起始点

	@property (nonatomic, assign) CGPoint startP;

	/// 终止点

	@property (nonatomic, assign) CGPoint endP;

	/// 控制点

	@property (nonatomic, assign) CGPoint controlP;

	/// 线的颜色

	@property (nonatomic, strong) UIColor *pathColor;

	/// 线的宽度

	@property (nonatomic, assign) CGFloat pathWidth;

	/// 当前触摸的点

	@property (nonatomic, assign) NSUInteger currentTouchP;

	@end

	@implementation QBezierPathView

	/// 初始化

	- (instancetype)initWithFrame:(CGRect)frame {

	    if (self = [super initWithFrame:frame]) {

	        // 设置初始值

	        self.startP    = CGPointMake(20, 300);

	        self.endP      = CGPointMake(250, 300);

	        self.controlP  = CGPointMake(100, 100);

	        self.pathColor = [UIColor redColor];

	        self.pathWidth = 2;

	    }

	    return self;

	}

	/// 绘制二阶贝塞尔曲线

	- (void)drawRect:(CGRect)rect {

	    // 绘制贝塞尔曲线

	    self.path = [UIBezierPath bezierPath];

	    [self.path moveToPoint:self.startP];

	    [self.path addQuadCurveToPoint:self.endP controlPoint:self.controlP];

	    self.path.lineWidth = self.pathWidth;

	    [self.pathColor setStroke];

	    [self.path stroke];

	    // 绘制辅助线

	    self.path = [UIBezierPath bezierPath];

	    self.path.lineWidth = 1;

	    [[UIColor grayColor] setStroke];

	    CGFloat lengths[] = {5};

	    [self.path setLineDash:lengths count:1 phase:1];

	    [self.path moveToPoint:self.controlP];

	    [self.path addLineToPoint:self.startP];

	    [self.path stroke];

	    [self.path moveToPoint:self.controlP];

	    [self.path addLineToPoint:self.endP];

	    [self.path stroke];

	    // 绘制辅助点及信息

	    self.path = [UIBezierPath bezierPathWithArcCenter:self.startP radius:4 startAngle:0 endAngle:M_PI * 2 clockwise:YES];

	    [[UIColor blackColor] setStroke];

	    [self.path fill];

	    self.path = [UIBezierPath bezierPathWithArcCenter:self.endP radius:4 startAngle:0 endAngle:M_PI * 2 clockwise:YES];

	    [[UIColor blackColor] setStroke];

	    [self.path fill];

	    self.path = [UIBezierPath bezierPathWithArcCenter:self.controlP radius:3 startAngle:0 endAngle:M_PI * 2 clockwise:YES];

	    self.path.lineWidth = 2;

	    [[UIColor blackColor] setStroke];

	    [self.path stroke];

	    CGRect startMsgRect = CGRectMake(self.startP.x + 8, self.startP.y - 7, 50, 20);

	    [@"起始点" drawInRect:startMsgRect withAttributes:nil];

	    CGRect endMsgRect = CGRectMake(self.endP.x + 8, self.endP.y - 7, 50, 20);

	    [@"终止点" drawInRect:endMsgRect withAttributes:nil];

	    CGRect control1MsgRect = CGRectMake(self.controlP.x + 8, self.controlP.y - 7, 50, 20);

	    [@"控制点" drawInRect:control1MsgRect withAttributes:nil];

	}

	/// 触摸开始

	- (void)touchesBegan:(NSSet<UITouch *> *)touches withEvent:(nullable UIEvent *)event {

	    // 获取触摸点位置

	    CGPoint startPoint = [touches.anyObject locationInView:self];

	    CGRect startR   = CGRectMake(self.startP.x   - 4, self.startP.y   - 4, 8, 8);

	    CGRect endR     = CGRectMake(self.endP.x     - 4, self.endP.y     - 4, 8, 8);

	    CGRect controlR = CGRectMake(self.controlP.x - 4, self.controlP.y - 4, 8, 8);

	    // 判断当前触摸点

	    if (CGRectContainsPoint(startR, startPoint)) {

	        self.currentTouchP = 1;

	    } else if (CGRectContainsPoint(endR, startPoint)) {

	        self.currentTouchP = 2;

	    } else if (CGRectContainsPoint(controlR, startPoint)) {

	        self.currentTouchP = 3;

	    }

	}

	/// 触摸移动

	- (void)touchesMoved:(NSSet<UITouch *> *)touches withEvent:(nullable UIEvent *)event {

	    // 获取触摸点位置

	    CGPoint touchPoint = [touches.anyObject locationInView:self];

	    // 限制触摸点的边界

	    if (touchPoint.x < 0) {

	        touchPoint.x = 0;

	    }

	    if (touchPoint.x > self.bounds.size.width) {

	        touchPoint.x = self.bounds.size.width;

	    }

	    if (touchPoint.y < 0) {

	        touchPoint.y = 0;

	    }

	    if (touchPoint.y > self.bounds.size.height) {

	        touchPoint.y = self.bounds.size.height;

	    }

	    // 设置当前触摸点的值

	    switch (self.currentTouchP) {

	        case 1:

	            self.startP = touchPoint;

	            break;

	        case 2:

	            self.endP = touchPoint;

	            break;

	        case 3:

	            self.controlP = touchPoint;

	            break;

	        default:

	            break;

	    }

	    // 刷新

	    [self setNeedsDisplay];

	}

	/// 触摸结束

	- (void)touchesEnded:(NSSet<UITouch *> *)touches withEvent:(nullable UIEvent *)event {

	    // 释放之前的触摸点

	    self.currentTouchP = 0;

	}

	/// 触摸取消

	- (void)touchesCancelled:(NSSet *)touches withEvent:(nullable UIEvent *)event {

	    [self touchesEnded:touches withEvent:event];

	}

	@end
ViewController.m
	CGRect frame = CGRectMake(20, 50, self.view.bounds.size.width - 40, 400);

	QBezierPathView *pathView = [[QBezierPathView alloc] initWithFrame:frame];

	pathView.backgroundColor = [UIColor whiteColor];

	pathView.layer.borderWidth = 1;

	[self.view addSubview:pathView];
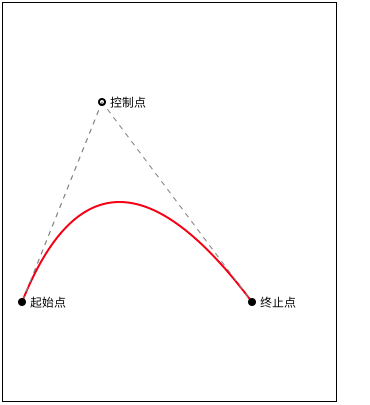
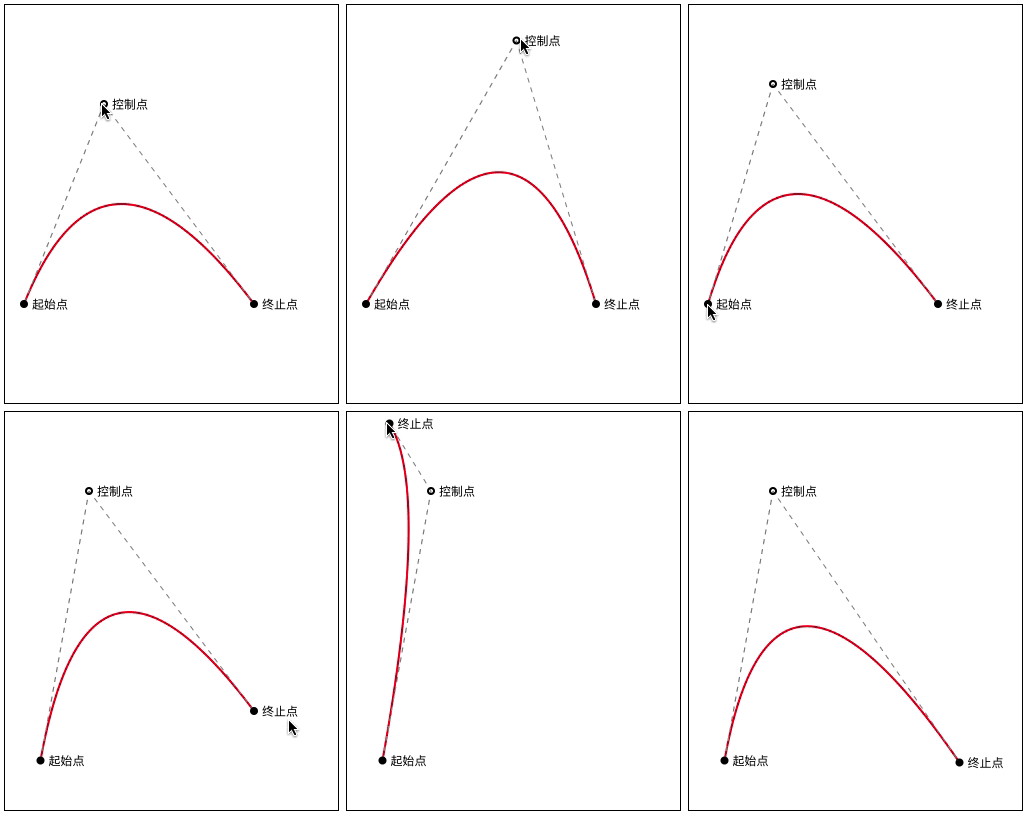
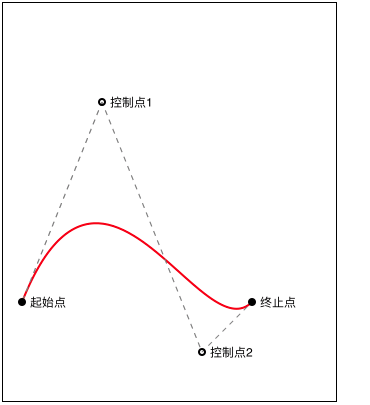
效果
3.2 三阶贝塞尔曲线示例
QBezierPathView.h
	@interface QBezierPathView : UIView

	@end
QBezierPathView.m
	@interface QBezierPathView : UIView

	@interface QBezierPathView ()

	/// 路径

	@property (nonatomic, strong) UIBezierPath *path;

	/// 起始点

	@property (nonatomic, assign) CGPoint startP;

	/// 终止点

	@property (nonatomic, assign) CGPoint endP;

	/// 控制点

	@property (nonatomic, assign) CGPoint controlP1;

	@property (nonatomic, assign) CGPoint controlP2;

	/// 线的颜色

	@property (nonatomic, strong) UIColor *pathColor;

	/// 线的宽度

	@property (nonatomic, assign) CGFloat pathWidth;

	/// 当前触摸的点

	@property (nonatomic, assign) NSUInteger currentTouchP;

	@end

	@implementation QBezierPathView

	/// 初始化

	- (instancetype)initWithFrame:(CGRect)frame {

	    if (self = [super initWithFrame:frame]) {

	        // 设置初始值

	        self.startP    = CGPointMake(20, 300);

	        self.endP      = CGPointMake(250, 300);

	        self.controlP1  = CGPointMake(100, 100);

	        self.controlP2  = CGPointMake(200, 350);

	        self.pathColor = [UIColor redColor];

	        self.pathWidth = 2;

	    }

	    return self;

	}

	/// 绘制二阶贝塞尔曲线

	- (void)drawRect:(CGRect)rect {

	    // 绘制贝塞尔曲线

	    self.path = [UIBezierPath bezierPath];

	    [self.path moveToPoint:self.startP];

	    [self.path addCurveToPoint:self.endP controlPoint1:self.controlP1 controlPoint2:self.controlP2];

	    self.path.lineWidth = self.pathWidth;

	    [self.pathColor setStroke];

	    [self.path stroke];

	    // 绘制辅助线

	    self.path = [UIBezierPath bezierPath];

	    self.path.lineWidth = 1;

	    [[UIColor grayColor] setStroke];

	    CGFloat lengths[] = {5};

	    [self.path setLineDash:lengths count:1 phase:1];

	    [self.path moveToPoint:self.controlP1];

	    [self.path addLineToPoint:self.startP];

	    [self.path stroke];

	    [self.path moveToPoint:self.controlP1];

	    [self.path addLineToPoint:self.controlP2];

	    [self.path stroke];

	    [self.path moveToPoint:self.controlP2];

	    [self.path addLineToPoint:self.endP];

	    [self.path stroke];

	    // 绘制辅助点及信息

	    self.path = [UIBezierPath bezierPathWithArcCenter:self.startP radius:4 startAngle:0 endAngle:M_PI * 2 clockwise:YES];

	    [[UIColor blackColor] setStroke];

	    [self.path fill];

	    self.path = [UIBezierPath bezierPathWithArcCenter:self.endP radius:4 startAngle:0 endAngle:M_PI * 2 clockwise:YES];

	    [[UIColor blackColor] setStroke];

	    [self.path fill];

	    self.path = [UIBezierPath bezierPathWithArcCenter:self.controlP1 radius:3 startAngle:0 endAngle:M_PI * 2 clockwise:YES];

	    self.path.lineWidth = 2;

	    [[UIColor blackColor] setStroke];

	    [self.path stroke];

	    self.path = [UIBezierPath bezierPathWithArcCenter:self.controlP2 radius:3 startAngle:0 endAngle:M_PI * 2 clockwise:YES];

	    self.path.lineWidth = 2;

	    [[UIColor blackColor] setStroke];

	    [self.path stroke];

	    CGRect startMsgRect = CGRectMake(self.startP.x + 8, self.startP.y - 7, 50, 20);

	    [@"起始点" drawInRect:startMsgRect withAttributes:nil];

	    CGRect endMsgRect = CGRectMake(self.endP.x + 8, self.endP.y - 7, 50, 20);

	    [@"终止点" drawInRect:endMsgRect withAttributes:nil];

	    CGRect control1MsgRect = CGRectMake(self.controlP1.x + 8, self.controlP1.y - 7, 50, 20);

	    [@"控制点1" drawInRect:control1MsgRect withAttributes:nil];

	    CGRect control2MsgRect = CGRectMake(self.controlP2.x + 8, self.controlP2.y - 7, 50, 20);

	    [@"控制点2" drawInRect:control2MsgRect withAttributes:nil];

	}

	/// 触摸开始

	- (void)touchesBegan:(NSSet<UITouch *> *)touches withEvent:(nullable UIEvent *)event {

	    // 获取触摸点位置

	    CGPoint startPoint = [touches.anyObject locationInView:self];

	    CGRect startR    = CGRectMake(self.startP.x   - 4, self.startP.y   - 4, 8, 8);

	    CGRect endR      = CGRectMake(self.endP.x     - 4, self.endP.y     - 4, 8, 8);

	    CGRect controlR1 = CGRectMake(self.controlP1.x - 4, self.controlP1.y - 4, 8, 8);

	    CGRect controlR2 = CGRectMake(self.controlP2.x - 4, self.controlP2.y - 4, 8, 8);

	    // 判断当前触摸点

	    if (CGRectContainsPoint(startR, startPoint)) {

	        self.currentTouchP = 1;

	    } else if (CGRectContainsPoint(endR, startPoint)) {

	        self.currentTouchP = 2;

	    } else if (CGRectContainsPoint(controlR1, startPoint)) {

	        self.currentTouchP = 3;

	    } else if (CGRectContainsPoint(controlR2, startPoint)) {

	        self.currentTouchP = 4;

	    }

	}

	/// 触摸移动

	- (void)touchesMoved:(NSSet<UITouch *> *)touches withEvent:(nullable UIEvent *)event {

	    // 获取触摸点位置

	    CGPoint touchPoint = [touches.anyObject locationInView:self];

	    // 限制触摸点的边界

	    if (touchPoint.x < 0) {

	        touchPoint.x = 0;

	    }

	    if (touchPoint.x > self.bounds.size.width) {

	        touchPoint.x = self.bounds.size.width;

	    }

	    if (touchPoint.y < 0) {

	        touchPoint.y = 0;

	    }

	    if (touchPoint.y > self.bounds.size.height) {

	        touchPoint.y = self.bounds.size.height;

	    }

	    // 设置当前触摸点的值

	    switch (self.currentTouchP) {

	        case 1:

	            self.startP = touchPoint;

	            break;

	        case 2:

	            self.endP = touchPoint;

	            break;

	        case 3:

	            self.controlP1 = touchPoint;

	            break;

	        case 4:

	            self.controlP2 = touchPoint;

	            break;

	        default:

	            break;

	    }

	    // 刷新

	    [self setNeedsDisplay];

	}

	/// 触摸结束

	- (void)touchesEnded:(NSSet<UITouch *> *)touches withEvent:(nullable UIEvent *)event {

	    // 释放之前的触摸点

	    self.currentTouchP = 0;

	}

	/// 触摸取消

	- (void)touchesCancelled:(NSSet *)touches withEvent:(nullable UIEvent *)event {

	    [self touchesEnded:touches withEvent:event];

	}

	@end
ViewController.m
	CGRect frame = CGRectMake(20, 50, self.view.bounds.size.width - 40, 400);

	QBezierPathView *pathView = [[QBezierPathView alloc] initWithFrame:frame];

	pathView.backgroundColor = [UIColor whiteColor];

	pathView.layer.borderWidth = 1;

	[self.view addSubview:pathView];
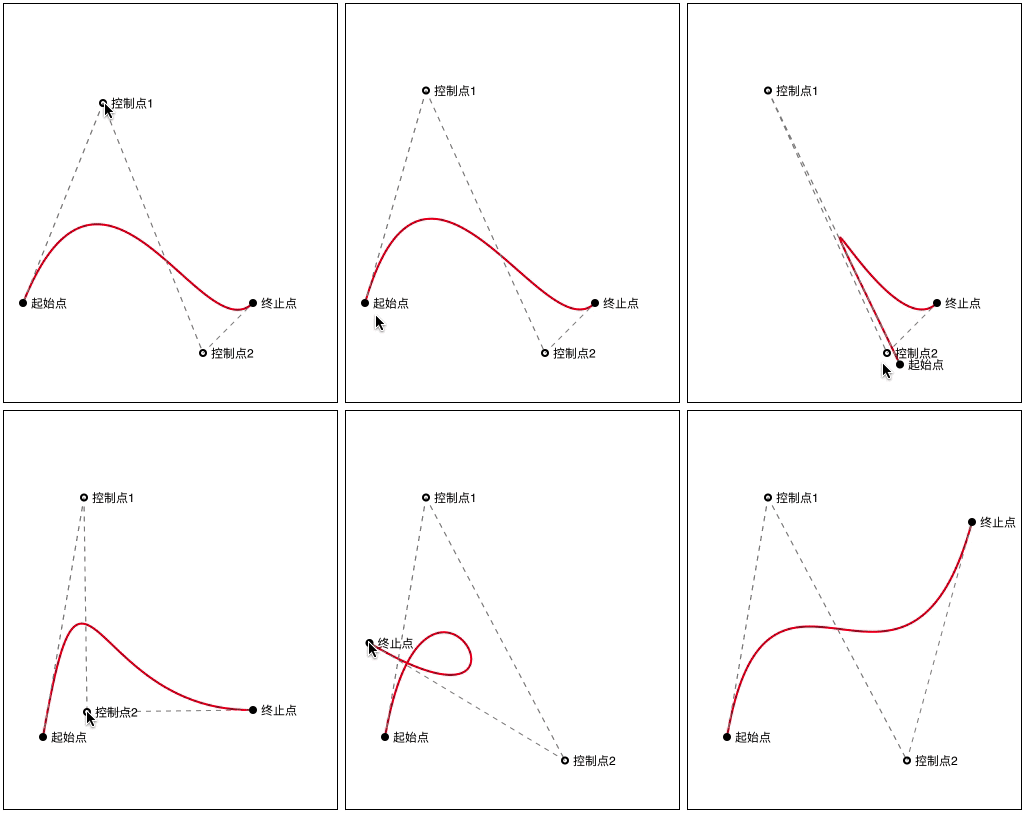
效果
iOS - Quartz 2D 贝塞尔曲线的更多相关文章
- iOS - Quartz 2D 二维绘图
1.Quartz 2D 简介 Quartz 2D 属于 Core Graphics(所以大多数相关方法的都是以 CG 开头),是 iOS/Mac OSX 提供的在内核之上的强大的 2D 绘图引擎,并且 ...
- iOS之UIBezierPath贝塞尔曲线属性简介
#import <Foundation/Foundation.h> #import <CoreGraphics/CoreGraphics.h> #import <UIKi ...
- iOS - Quartz 2D 第三方框架 Charts 绘制图表
1.Charts 简介 使用第三方框架 Charts 绘制 iOS 图表.GitHub 源码 Charts Charts 是一款用于绘制图表的框架,可以绘制柱状图.折线图.K线图.饼状图等.Chart ...
- IOS Quartz 2D 学习(1)
IOS提供两种创建图形的途径: 1.OpenGL. 2.Quartz.Core Animation.UIKit图形支持. UIKit的图形系统 1.视图绘画周期: DrawRect方法,在任何时候,当 ...
- iOS - Quartz 2D 画板绘制
1.绘制画板 1.1 绘制简单画板 PaintBoardView.h @interface PaintBoardView : UIView @end PaintBoardView.m @interfa ...
- iOS - Quartz 2D 手势截屏绘制
1.绘制手势截屏 具体实现代码见 GitHub 源码 QExtension QTouchClipView.h @interface QTouchClipView : UIView /** * 创建手势 ...
- iOS - Quartz 2D 下载进度按钮绘制
1.绘制下载进度按钮 具体实现代码见 GitHub 源码 QExtension QProgressButton.h @interface QProgressButton : UIButton /// ...
- iOS 2D绘图详解(Quartz 2D)之路径(点,直线,虚线,曲线,圆弧,椭圆,矩形)
前言:一个路径可以包含由一个或者多个shape以及子路径subpath,quartz提供了很多方便的shape可以直接调用.例如:point,line,Arc(圆弧),Curves(曲线),Ellip ...
- IOS用CGContextRef画各种图形(文字、圆、直线、弧线、矩形、扇形、椭圆、三角形、圆角矩形、贝塞尔曲线、图片)
... 首先了解一下CGContextRef: An opaque type that represents a Quartz 2D drawing environment. Graphics Con ...
随机推荐
- HDU 4333 [SAM WRONG!!!]
题意:给一个数字,每一次把它的最后一位拿到最前面,一直那样下去,分别求形成的数字小于,等于和大于原来数的个数. SAM上就是走n步 相等好好做啊,但是大于小于不好做啊,用类似弦论的思想也不能处理出怎样 ...
- HashMap----工作原理
先来些简单的问题 "你用过HashMap吗?" "什么是HashMap?你为什么用到它?" 几乎每个人都会回答"是的",然后回答HashMa ...
- 【HTTP协议】---TCP三次握手和四次挥手
TCP三次握手和四次挥手 首先我们知道HTTP协议通常承载于TCP协议之上,HTTPS承载于TLS或SSL协议层之上 通过上面这张图我们能够知道. 在Http工作之前,Web浏览器通过网络和W ...
- CENTOS6.6下mysql MMM架构搭建
本文来自我的github pages博客http://galengao.github.io/ 即www.gaohuirong.cn MMM(Master-Master replication mana ...
- Linux系统上安装JDK1.8
1,下载jdk1.8 首先进入jdk下载目录:http://www.oracle.com/technetwork/java/javase/downloads/jdk8-downloads-213315 ...
- break的标签的用法
package study; public class breakdemo { public static void main(String[] args) { System.out.println( ...
- Caused by: java.lang.ClassCastException: org.springframework.web.SpringServletContainerInitializer cannot be cast to javax.servlet.ServletContainerInitializer错误解决办法
严重: Failed to initialize end point associated with ProtocolHandler ["http-bio-8080"] java. ...
- C#将制定文件夹下的PDF文件合并成一个并输出至指定路径
/// <summary> /// 将源路径下的PDF合并至目标路径下 /// </summary> /// <param name="SourcePath&q ...
- python3.6+django2.0 一小时学会开发一套学员管理系统demo
1.在pycharm中新建project demo1 添加app01 点击create按钮完成新建 2.在demo项目目录下新建目录static,并在settings.py中追加代码: STATICF ...
- 老男孩Python全栈开发(92天全)视频教程 自学笔记16
day16课程内容: 装饰器: def outer(): x=10 def inner(): print(x) return innerouter()() #inner 是局部变量,10闭包:如果在一 ...