Spring Boot (1) 构建第一个Spring Boot工程
Spring boot简介
spring boot是spring官方推出的一个全新框架,其设计目的是用来简化新spring应用的初始搭建以及开发过程。
Spring boot特点
1.化繁为简,简化配置
2.嵌入的Tomcat,无需部署war文件
3.简化maven配置
4.自动配置spring
5.开箱即用,没有代码生成,也无需xml配置。
6.微服务的入门级微框架
spring boot并不是对spring功能上的增强,而是提供了一种快速使用spring的方式。
开发工具:InteliJ IDEA 、 Maven
最简单的创建方式:Spring Initializr
新建项目->左侧选择spring Initializr ->next->输入group、java版本、maven project、打包方式等信息->next->选择web->完成。
使用这种方式搭建spring boot项目可以自动完成一些简单框架
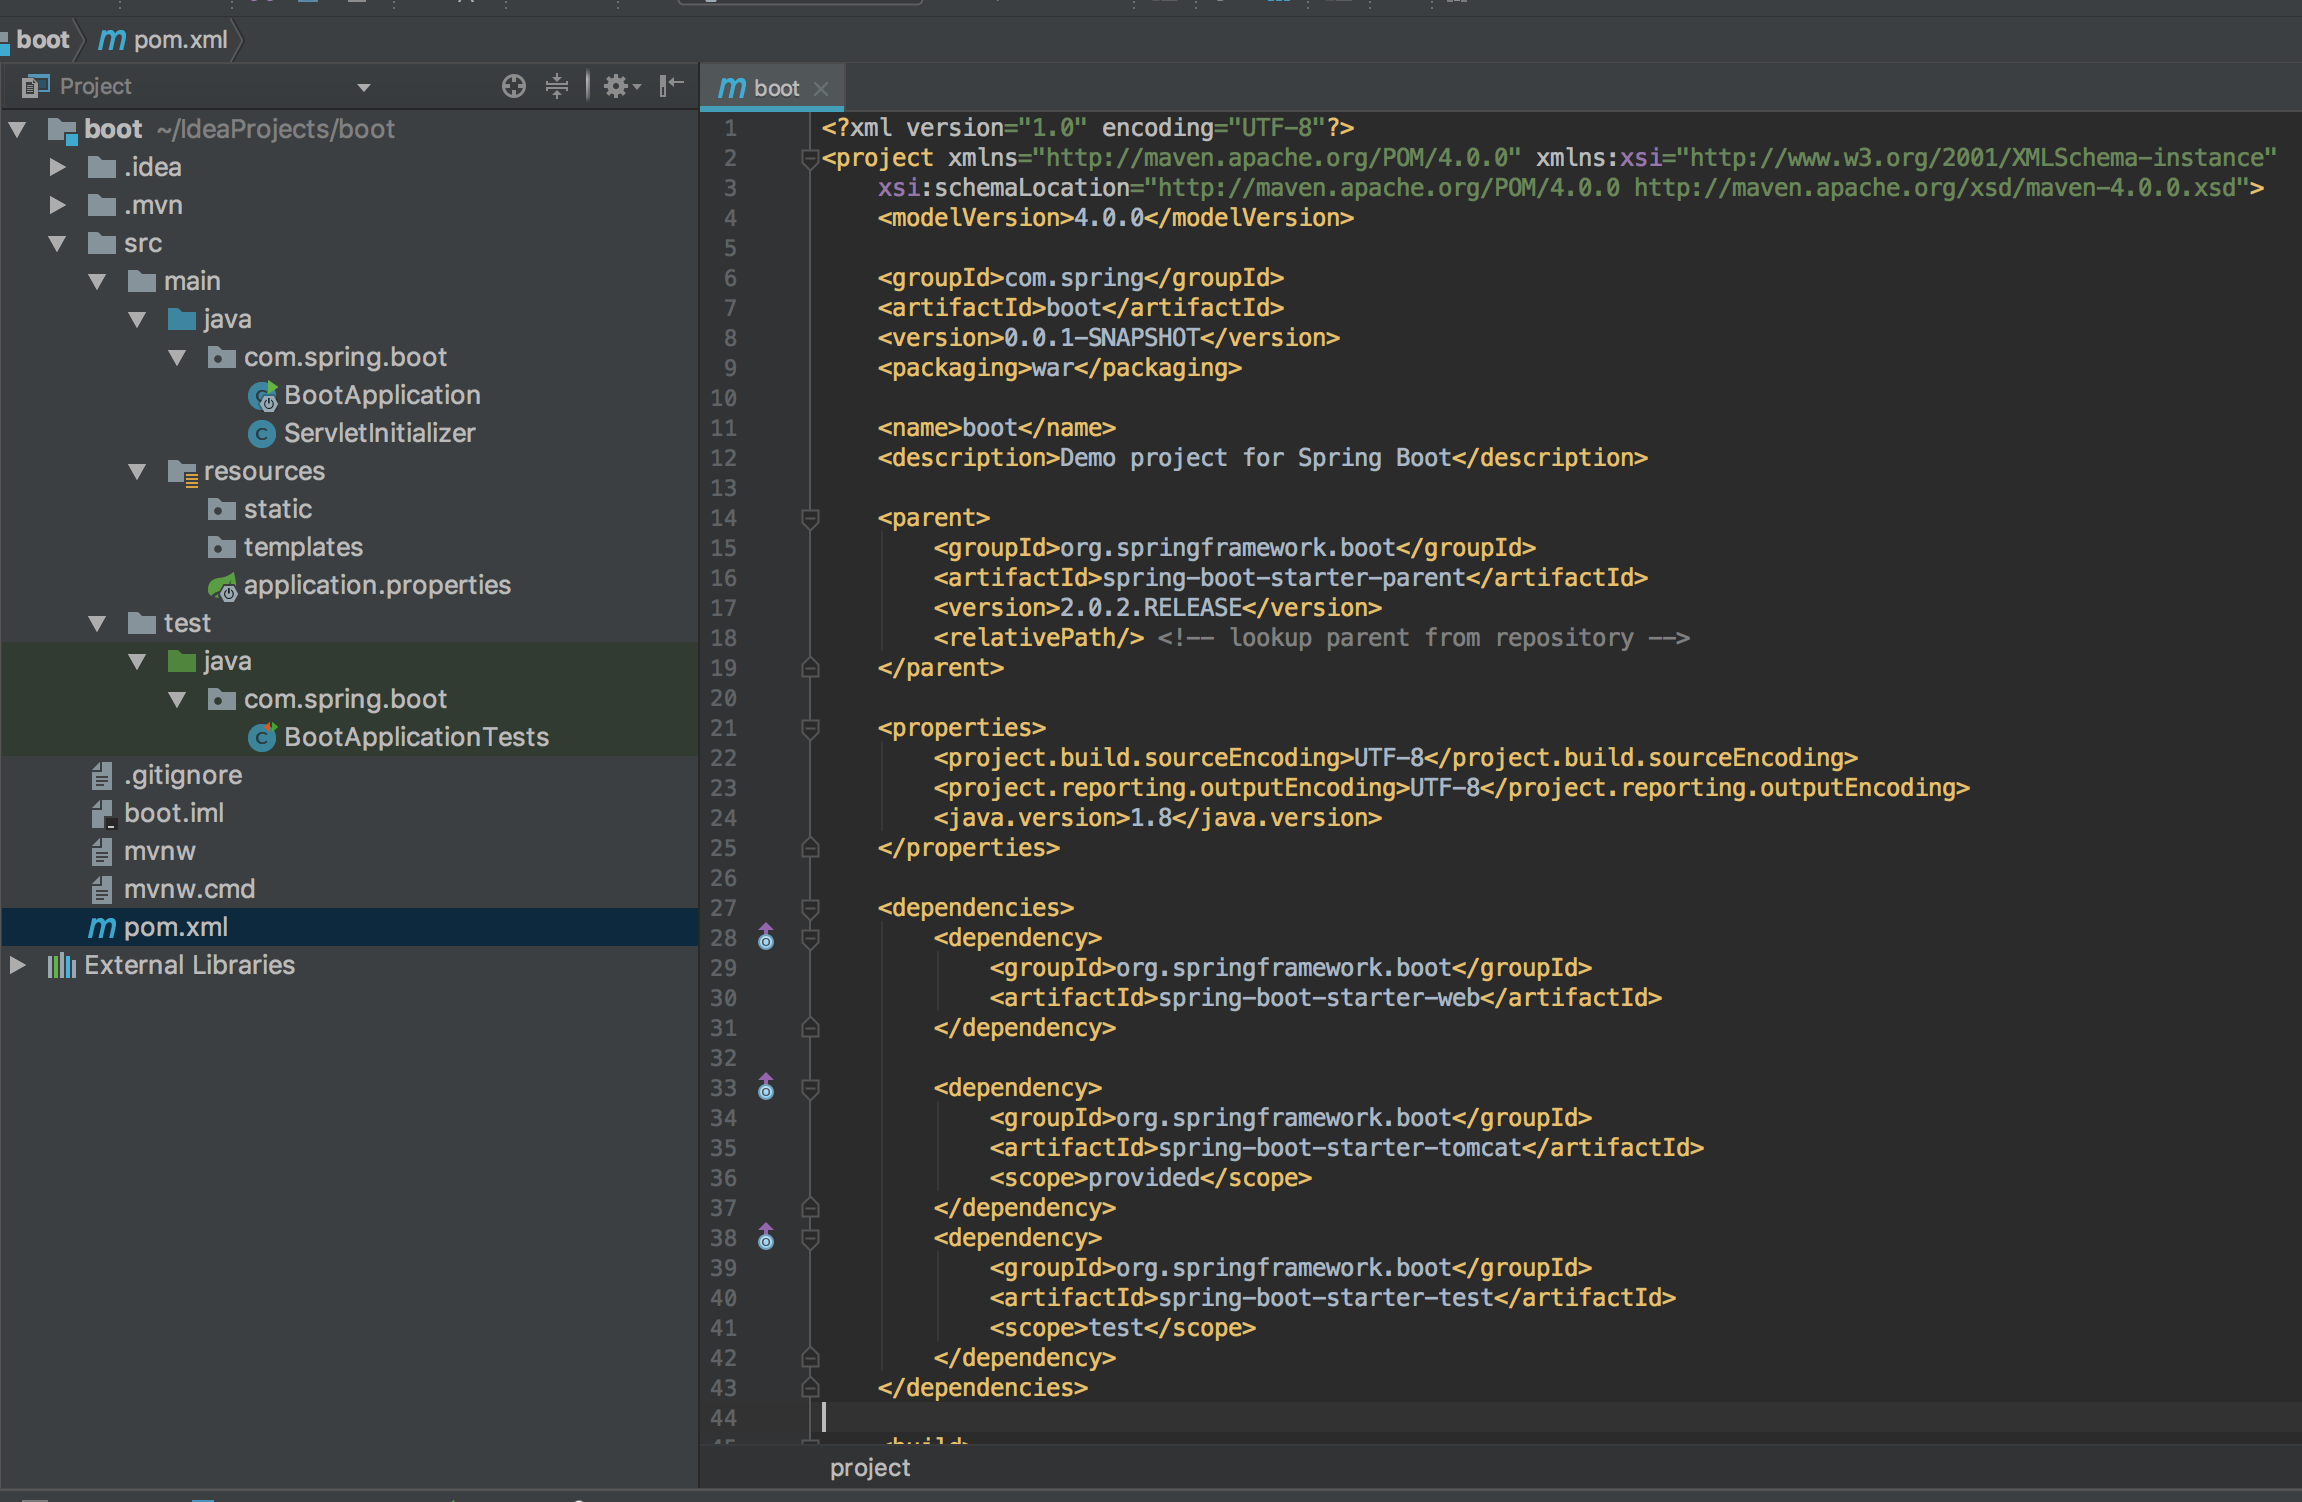
目录结构:
src.main.java 源码文件夹 BootApplication启动类、resources资源文件夹、test测试文件夹 pom.xml maven依赖如下:
pom.xml
<?xml version="1.0" encoding="UTF-8"?>

<project xmlns="http://maven.apache.org/POM/4.0.0" xmlns:xsi="http://www.w3.org/2001/XMLSchema-instance"

    xsi:schemaLocation="http://maven.apache.org/POM/4.0.0 http://maven.apache.org/xsd/maven-4.0.0.xsd">

    <modelVersion>4.0.0</modelVersion>

    <groupId>com.spring</groupId>

    <artifactId>boot</artifactId>

    <version>0.0.1-SNAPSHOT</version>

    <packaging>war</packaging>

    <name>boot</name>

    <description>Demo project for Spring Boot</description>

    <!--sprin boot 父节点依赖,引入这个之后相关的引用就不需要添加version配置了,spring boot会选择最合适的版本进行添加 -->

    <parent>

        <groupId>org.springframework.boot</groupId>

        <artifactId>spring-boot-starter-parent</artifactId>

        <version>2.0.2.RELEASE</version>

        <relativePath/> <!-- lookup parent from repository -->

    </parent>

    <properties>

        <project.build.sourceEncoding>UTF-8</project.build.sourceEncoding>

        <project.reporting.outputEncoding>UTF-8</project.reporting.outputEncoding>

        <java.version>1.8</java.version>

    </properties>

    <dependencies>

        <!--spring-boot-starter-web : spring相关的jar,内置tomcat服务器,jackson,MVC ,AOP 等 -->

        <dependency>

            <groupId>org.springframework.boot</groupId>

            <artifactId>spring-boot-starter-web</artifactId>

        </dependency>

        <dependency>

            <groupId>org.springframework.boot</groupId>

            <artifactId>spring-boot-starter-test</artifactId>

            <scope>test</scope>

        </dependency>

    </dependencies>

    <build>

        <plugins>

            <plugin>

                <groupId>org.springframework.boot</groupId>

                <artifactId>spring-boot-maven-plugin</artifactId>

            </plugin>

        </plugins>

    </build>

</project>
新建一个HelloController.java
/**

 * RestController 等价于 @Controller 和 @ResponseBody

 */

@RestController //引入spring boot的web模块,就会自动配置web.xml等于web相关的内容

public class HelloController {

    @RequestMapping("/hello")

    public String hello(){

        return "hello";

    }

}
编辑BootApplication 不需要部署tomcat服务器,内置的tomcat服务器直接通过main方法运行
/**

 * 指定这是一个spring boot 应用程序

 */

@SpringBootApplication

public class BootApplication {

    public static void main(String[] args) {

        SpringApplication.run(BootApplication.class,args);

    }

}
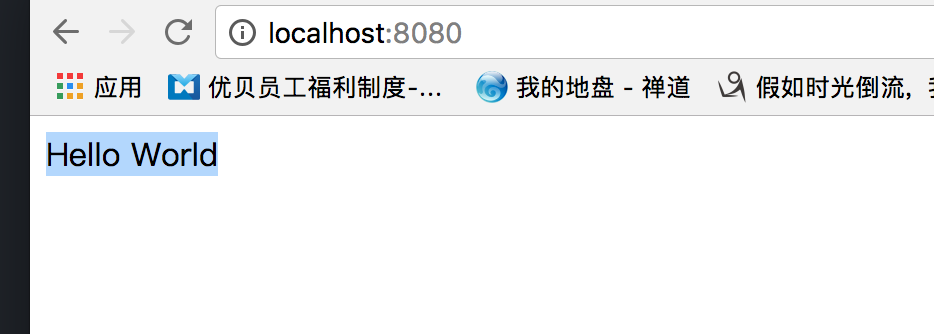
启动BootApplication,默认端口8080 输入地址http://localhost:8080/hello 即可访问成功

也可以使用junit测试:
编辑src.test.java下的BootApplicationTests
package com.spring.boot;

import org.junit.Before;

import org.junit.Test;

import org.junit.runner.RunWith;

import org.springframework.beans.factory.annotation.Autowired;

import org.springframework.boot.test.context.SpringBootTest;

import org.springframework.boot.test.web.client.TestRestTemplate;

import org.springframework.boot.web.server.LocalServerPort;

import org.springframework.http.ResponseEntity;

import org.springframework.test.context.junit4.SpringRunner;

import java.net.URL;

import static org.junit.Assert.assertEquals;

@RunWith(SpringRunner.class)

@SpringBootTest(webEnvironment = SpringBootTest.WebEnvironment.RANDOM_PORT)

public class BootApplicationTests {

    @LocalServerPort

    private int port;

    private URL base;

    @Autowired

    private TestRestTemplate template;

    @Before

    public void setUp() throws Exception {

        this.base = new URL("http://localhost:" + port + "/hello");

    }

    @Test

    public void hello() throws Exception {

        ResponseEntity<String> response = template.getForEntity(base.toString(), String.class);

        assertEquals(response.getBody(), "Hello battcn");

    }

}
自定义banner
springboot在启动时会有以下内容,可以自定义在resources目录下添加指定命名文件即可:banner.txt、banner.jpg、banner.gif、banner.jpeg等等
  .   ____          _            __ _ _

 /\\ / ___'_ __ _ _(_)_ __  __ _ \ \ \ \

( ( )\___ | '_ | '_| | '_ \/ _` | \ \ \ \

 \\/  ___)| |_)| | | | | || (_| |  ) ) ) )

  '  |____| .__|_| |_|_| |_\__, | / / / /

 =========|_|==============|___/=/_/_/_/

 :: Spring Boot ::        (v2.0.2.RELEASE)
@SpringBootApplication详解
@SpringBootApplication

public class BootApplication {

    public static void main(String[] args) {

        SpringApplication.run(BootApplication.class,args);

    }

}
这个Run是一个单独的项目启动类。
@SpringBootApplication 是一个组合注解包括了@EnableAutoConfiguration及其他多个注解,这是一个项目启动注解,如下:
@Target({ElementType.TYPE})

@Retention(RetentionPolicy.RUNTIME)

@Documented

@Inherited

@SpringBootConfiguration

@EnableAutoConfiguration

@ComponentScan(

    excludeFilters = {@Filter(

    type = FilterType.CUSTOM,

    classes = {TypeExcludeFilter.class}

)}

)

public @interface SpringBootApplication {
前四个注解:是元注解,用来修饰当前注解,就像public类的修饰词,没有实际的功能,如果不打算写自定义注解,不需要了解
后三个注解:是真正起作用的注解,包括
@SpringBootConfigration:当前类是一个配置类,就像xml配置文件,而现在是用java配置文件,效果是一样的
@EnableAutoConfiguration:spring boot 核心功能,自动配置,根据当前引入的jar包进行自动配置,比如引入了jackson的包,那么就会自动配置json,所以可以使用@ResponseBody,引入了Spring boot 的web模块,就会自动配置web.xml等web相关的内容,所以这些配置就不需要我们自己配置了
@ComponentScan:用注解配置实现自动扫描,默认会扫描当前包和所有子包,和xml配置自动效果一样,@Filter是排除了两个系统类
@SpringBootConfiguration和@Bean
@SpringBootConfiguration

public class Config {

    @Bean

    public String testStr(){

        return "Hello World";

    }

}
@SpringBootConfiguration:说明这是一个配置文件类,他会被@ComponentScan扫描到
@Bean:就是在spring容器中声明了一个bean,赋值为hello world,String方法类型就是bean的类型,hello方法名是bean的id
如果用xml配置文件来声明bean:<bean id="hello" class="String"></bean>
HelloController.java
@RestController //引入spring boot的web模块,就会自动配置web.xml等于web相关的内容

public class HelloController {

    @Autowired

    String testStr;

    @RequestMapping("/hello")

    public String hello(){

        return testStr;

    }

}
在这里注入spring容器中的那个String类型的Bean,并打印到页面
Spring Boot (1) 构建第一个Spring Boot工程的更多相关文章
- 只需两步!Eclipse+Maven快速构建第一个Spring Boot项目
随着使用Spring进行开发的个人和企业越来越多,Spring从一个单一简介的框架变成了一个大而全的开源软件,最直观的变化就是Spring需要引入的配置也越来越多.配置繁琐,容易出错,让人无比头疼, ...
- 构建第一个 Spring Boot 工程
Spring Boot概述 什么是Spring Boot 随着动态语言的流行,java的开发显得格外笨重,繁多的配置文件编写,低下的开发效率,复杂的部署流程以及第三方技术集成难度大. 在上述环境下Sp ...
- 使用docker构建第一个spring boot项目
在看了一些简单的docker命令之后 打算自己尝试整合一下docker+spring boot项目本文是自己使用docker+spring boot 发布一个项目1.docker介绍 docke是提供 ...
- 从零开始的Spring Boot(1、搭建一个Spring Boot项目Hello World)
搭建一个Spring Boot项目Hello World 写在前面 从零开始的Spring Boot(2.在Spring Boot中整合Servlet.Filter.Listener的方式):http ...
- 构建第一个Spring Boot2.0应用之项目创建(一)
1.开发环境 IDE: JAVA环境: Tomcat: 2.使用Idea生成spring boot项目 以下是使用Idea生成基本的spring boot的步骤. (1)创建工程第一步 (2)创建工 ...
- 构建第一个Spring Boot2.0应用之集成mybatis(六)
一.环境: IDE:IntelliJ IDEA 2017.1.1 JDK:1.8.0_161 Maven:3.3.9 springboot:2.0.2.RELEASE 二.步骤 方式一:利用配置文件配 ...
- 构建第一个Spring Boot2.0应用之application.properties和application.yml(八)
本节学习在项目中配置文件配置的方式,一种是通过applicaiton.properties,一种是通过application.yml方式. 一.环境: IDE:IntelliJ IDEA 2017.1 ...
- 构建第一个Spring Boot2.0应用之集成mybatis、Druid(七)
一.环境: IDE:IntelliJ IDEA 2017.1.1 JDK:1.8.0_161 Maven:3.3.9 springboot:2.0.2.RELEASE 二.说明: 本文综合之 ...
- 构建第一个Spring Boot项目
1.启动IntelliJ IDEA,点击"Create New Project"  2.选择"Spring initializr",设定SDK及Spring ...
随机推荐
- linux获得网卡信息
#define MAX_INTERFACE 64 int showifs() { int i; int rc; int sock; int ifnum; struct ifreq ifr[MAX_IN ...
- hadoop datanode usages方差算法
stdDev 标准差(方差) 阐述及应用 简单来说,标准差是一组数值自平均值分散开来的程度的一种测量观念.一个较大的标准差,代表大部分的数值和其平均值之间差异较大:一个较小的标准差,代表这些数值较接近 ...
- pandas中选取某行为缺失值的数据,并返回
1.df.dropna() 可以返回去掉NaN的df结果集. 2.pandas中dataframe取差集: df=pd.DataFrame({"name":[1,2,3,np.Na ...
- angular的又一本好书
MANNING出的<ANGULAR.JS IN ACTION>. 比上本看完的书<ANGULAR ESSENTIAL>多了一些有全局性的东东. 八个关键概念:MODULE,CO ...
- RDS for MySQL Online DDL 使用
https://help.aliyun.com/knowledge_detail/41733.html?spm=5176.7841698.2.17.u67H3h
- 微信的token验证
微信的token验证 在微信公众平台的基本配置中,需要输入token,这个token不是那个access_token springmvc验证代码: @RequestMapping(value=&quo ...
- Java怎样获取Content-Type的文件类型Mime Type
在Http请求中.有时须要知道Content-Type类型,尤其是上传文件时.更为重要.尽管有些办法可以解决,但都不太准确或者繁琐,索性我发现一个开源的类库可以解决相对完美的解决问题,它就是jMime ...
- ORACLE错误1033出现和ORA-00600错误解决的方法
非法关机以后.Oracle数据常常出现这个错误: EXP-00056:ORACLE错误1033出现 ORA-01033:ORACLE initialization or shutdown in pro ...
- centos下配置防火墙port失败
问题:将规则加入到防火墙中.总是port无法开启 (1)改动文件 首先vim /etc/sysconfig/iptables -A INPUT -m state --state NEW -m tcp ...
- 成都传智播客java就业班激情洋溢的青春篮球赛
为了缓解学员们的学习压力,也为了培养学员们的团队协作精神,5月28日下午,在班主任倪老师和王老师联手带领下,我们1406280ls" style="color:rgb(51,102 ...