odoo12之应用:一、双因子验证(Two-factor authentication, 2FA)(HOTP,TOTP)附源码
前言
双因子认证:双因子认证(2FA)是指结合密码以及实物(信用卡、SMS手机、令牌或指纹等生物标志)两种条件对用户进行认证的方法。--百度百科
跟我一样"老"的网瘾少年想必一定见过买点卡后上面送的密保(类似但不完全一样),还有"将军令",以及网银的网盾,是一种二次验证的机制;它通常是6位的数字,每次使用后(HOTP)或者一定时间后(TOTP)都将会刷新,大大加大了用户的安全性,OTP(One-Time Password)分为HOTP(HMAC-based One-Time Password)和TOTP(Time-based One-Time Password)。
HOTP是基于 HMAC 算法加密的一次性密码,以事件同步机制,把事件次序(counter)及相同的密钥(secret)作为输入,通过 HASH 算法运算出一致的密码。
TOTP是基于时间戳算法的一次性密码,基于客户端的时间和服务器的时间及相同的密钥(secret)作为输入,产生数字进行对比,这就需要客户端的时间和服务器的时间保持相对的一致性。
Odoo12集成双因子认证
为了让odoo12的登录也可以使用双因子认证以提高安全性,我们需要:
、实现OTP验证逻辑

、为ODOO用户界面展示二维码

、为管理员用户提供OTP开关

、在登录界面增加对OTP的验证
我们需要依赖的包:
pip install pyotp

pip install pyqrcode

pip install pypng
实现OTP验证逻辑
首先,我们需要对res.users用户进行重写,添加OTP验证逻辑
# -*- coding: utf-8 -*-

import base64

import pyotp

import pyqrcode

import io

from odoo import models, fields, api, _, tools

from odoo.http import request

from odoo.exceptions import AccessDenied

import logging

_logger = logging.getLogger(__name__)

class ResUsers(models.Model):

    _inherit = 'res.users'

    otp_type = fields.Selection(selection=[('time', _('Time based')), ('count', _('Counter based'))], default='time',

                                string="Type",

                                help="Type of 2FA, time = new code for each period, counter = new code for each login")

    otp_secret = fields.Char(string="Secret", size=16, help='16 character base32 secret',

                             default=lambda self: pyotp.random_base32())

    otp_counter = fields.Integer(string="Counter", default=0)

    otp_digits = fields.Integer(string="Digits", default=6, help="Length of the code")

    otp_period = fields.Integer(string="Period", default=30, help="Seconds to update code")

    otp_qrcode = fields.Binary(compute="_compute_otp_qrcode")

    otp_uri = fields.Char(compute='_compute_otp_uri', string="URI")

    # 生成二维码

    @api.model

    def create_qr_code(self, uri):

        buffer = io.BytesIO()

        qr = pyqrcode.create(uri)

        qr.png(buffer, scale=3)

        return base64.b64encode(buffer.getvalue()).decode()

    # 将二维码的值赋给otp_qrcode变量

    @api.depends('otp_uri')

    def _compute_otp_qrcode(self):

        self.ensure_one()

        self.otp_qrcode = self.create_qr_code(self.otp_uri)

    # 计算otp_uri

    @api.depends('otp_type', 'otp_period', 'otp_digits', 'otp_secret', 'company_id', 'otp_counter')

    def _compute_otp_uri(self):

        self.ensure_one()

        if self.otp_type == 'time':

            self.otp_uri = pyotp.utils.build_uri(secret=self.otp_secret, name=self.login,

                                                 issuer_name=self.company_id.name, period=self.otp_period)

        else:

            self.otp_uri = pyotp.utils.build_uri(secret=self.otp_secret, name=self.login,

                                                 initial_count=self.otp_counter, issuer_name=self.company_id.name,

                                                 digits=self.otp_digits)

    # 验证otp验证码是否正确

    @api.model

    def check_otp(self, otp_code):

        res_user = self.env['res.users'].browse(self.env.uid)

        if res_user.otp_type == 'time':

            totp = pyotp.TOTP(res_user.otp_secret)

            return totp.verify(otp_code)

        elif res_user.otp_type == 'count':

            hotp = pyotp.HOTP(res_user.otp_secret)

            # 允许用户不小心多点20次,但是已经用过的码则无法再次使用

            for count in range(res_user.otp_counter, res_user.otp_counter + 20):

                if count > 0 and hotp.verify(otp_code, count):

                    res_user.otp_counter = count + 1

                    return True

        return False

    # 覆盖原生_check_credentials,增加双因子验证

    def _check_credentials(self, password):

        super(ResUsers, self)._check_credentials(password)

        # 判断是否打开双因子验证并校验验证码

        if self.company_id.is_open_2fa and not self.check_otp(request.params.get('tfa_code')):

            # pass

            raise AccessDenied(_('Validation Code Error!'))
在这里,我们继承了res.users,添加了如下方法:
   _compute_otp_uri: 计算otp_uri

     create_qr_code: 通过计算的otp_uri生成二维码

_compute_otp_qrcode: 调用create_qr_code生成二维码,赋值给otp_qrcode变量

          check_otp: 用于验证otp验证码是否正确

 _check_credentials: 覆盖原生_check_credentials,判断双因子的开关,调用check_otp进行双因子验证
_check_credentials方法中,我们判断了双因子的开关,而双因子开关是以公司为单位的,因此我们还需要对res.company进行继承添加字段:
# -*- coding: utf-8 -*-

from odoo import models, api, fields

class ResCompany(models.Model):

    _inherit = "res.company"

    is_open_2fa = fields.Boolean(string="Open 2FA", default=False)
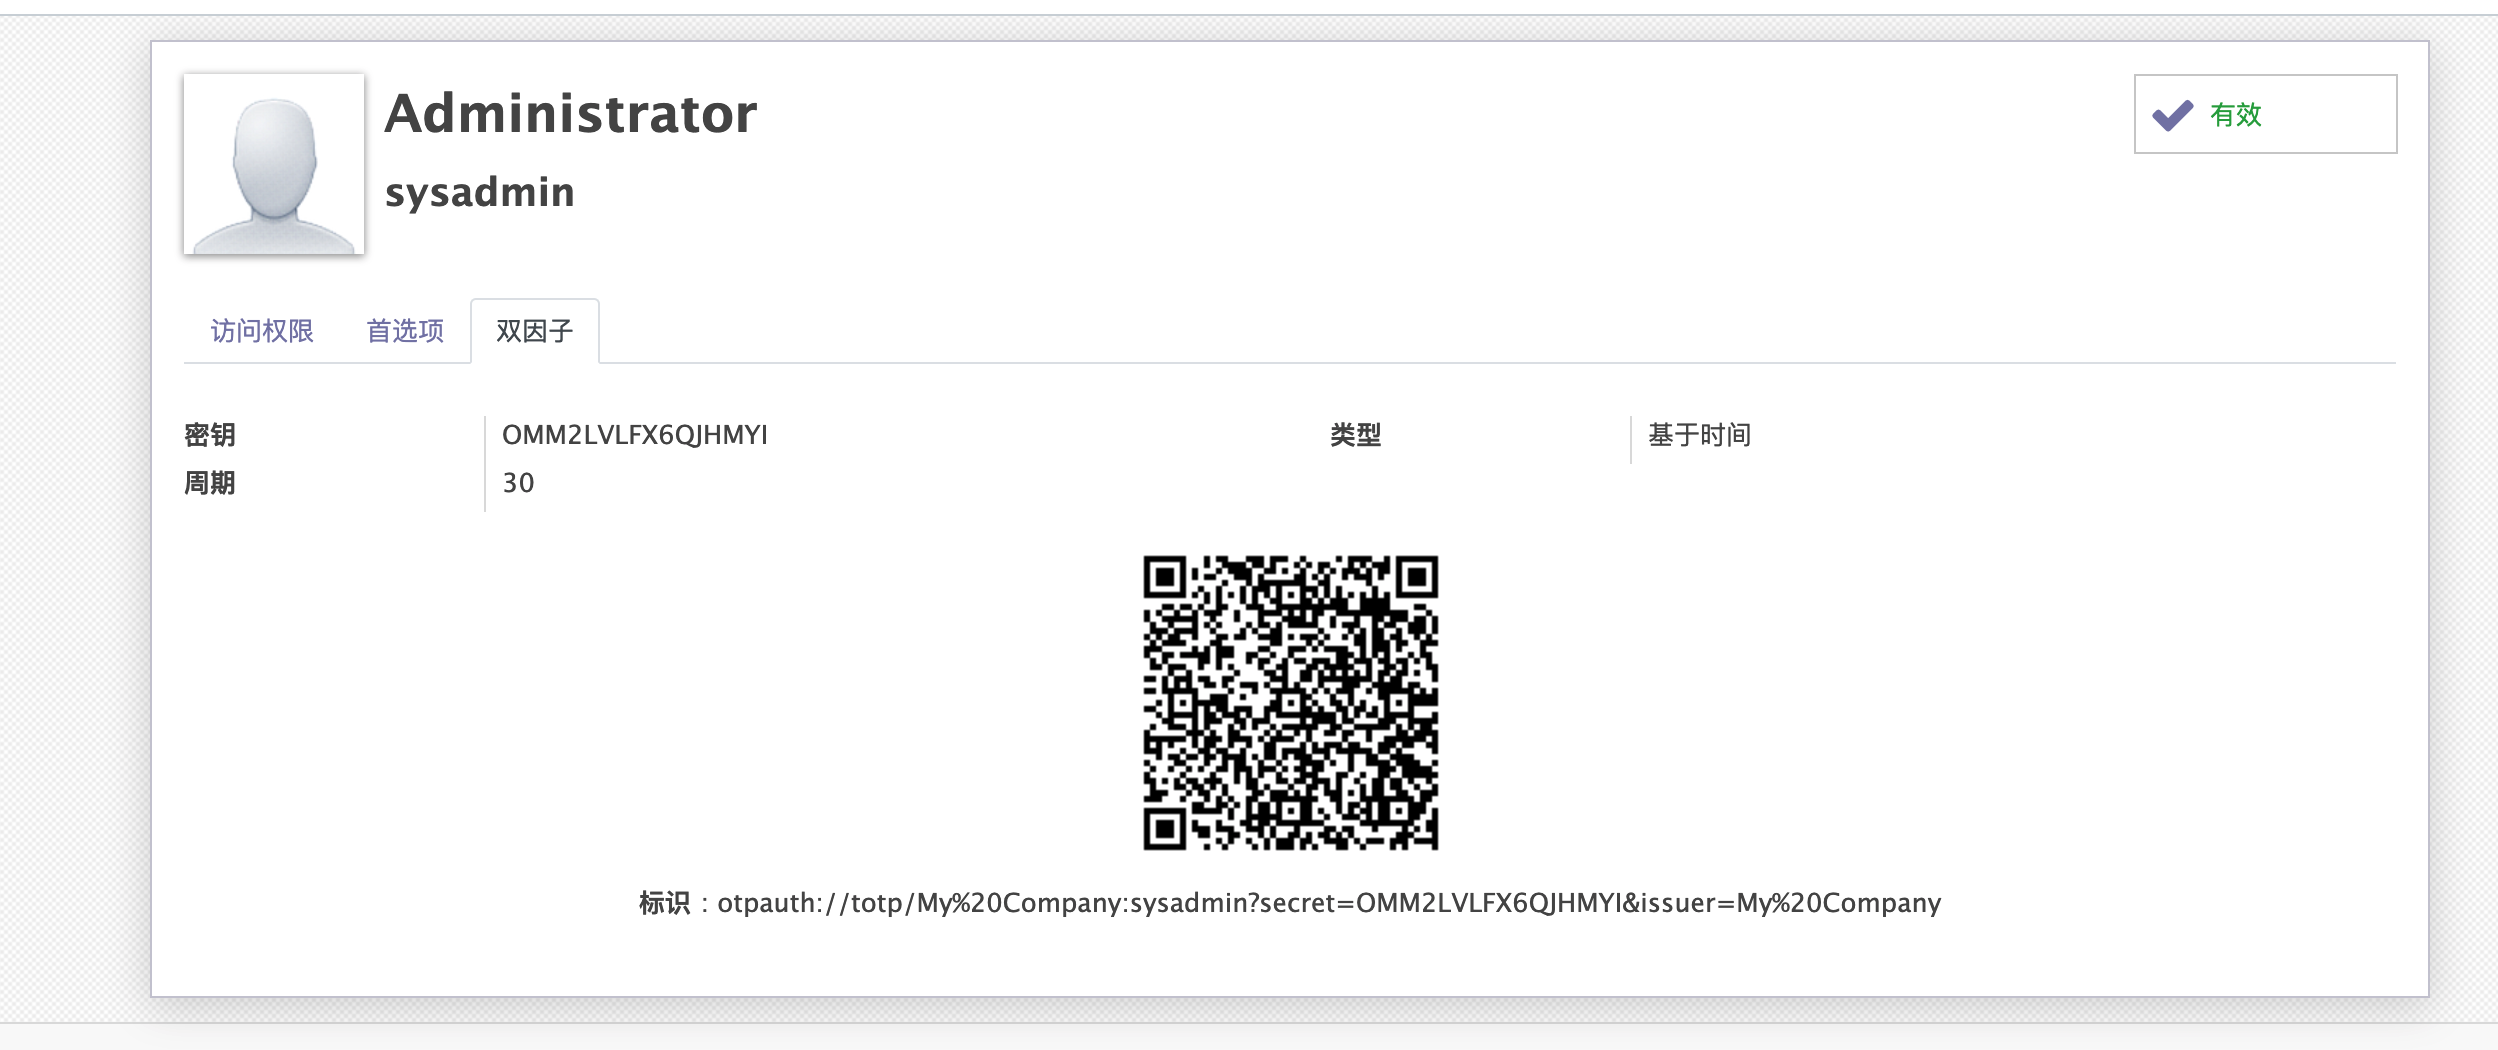
为ODOO用户界面展示二维码
我们写好逻辑后,需要在用户界面中将二维码以及配置展示出来:
<?xml version="1.0" encoding="utf-8"?>

<odoo>

    <data>

        <!-- 设置->用户&公司->用户界面-->

        <record id="view_users_form" model="ir.ui.view">

            <field name="name">res.users.form</field>

            <field name="model">res.users</field>

            <field name="inherit_id" ref="base.view_users_form"/>

            <field name="arch" type="xml">

                <notebook colspan="4" position="inside">

                    <page string="2FA">

                        <group col="4" colspan="4">

                            <field name="otp_secret"/>

                            <field name="otp_type"/>

                            <field name="otp_counter"

                                   attrs="{'invisible':[('otp_type', '==', 'time')], 'readonly': True}"/>

                            <field name="otp_digits" attrs="{'invisible':[('otp_type', '==', 'time')]}"/>

                            <field name="otp_period" attrs="{'invisible':[('otp_type', '==', 'count')]}"/>

                        </group>

                        <div class="row" style="display: block;text-align: center;">

                            <field name="otp_qrcode" widget="image" nolabel="1"/>

                        </div>

                        <div class="row" style="display: block;text-align: center;">

                            <label for="otp_uri"/>:

                            <field name="otp_uri"/>

                        </div>

                    </page>

                </notebook>

            </field>

        </record>

        <!-- 右上角首选项界面-->

        <record id="view_users_form_simple_modif" model="ir.ui.view">

            <field name="name">res.users.preferences.form.otp</field>

            <field name="model">res.users</field>

            <field name="inherit_id" ref="base.view_users_form_simple_modif"/>

            <field name="arch" type="xml">

                <footer position="before">

                    <div class="o_horizontal_separator">OTP</div>

                    <div class="row" style="display:block;text-align:center">

                        <field name="otp_qrcode" widget="image" nolabel="1"/>

                    </div>

                    <div class="row" style="display:block;text-align:center">

                        <field name="otp_uri" nolabel="1"/>

                    </div>

                </footer>

            </field>

        </record>

    </data>

</odoo>
效果如下:
为管理员用户提供OTP开关
我们需要让OTP可以为管理员配置,我们将它加入到res.config.settings的常规设置中:
首先,继承模型添加关联字段,is_open_2fa与company_id里的is_open_2fa关联:
# -*- coding: utf-8 -*-

from odoo import fields, models

class ResConfigSettings(models.TransientModel):

    _inherit = 'res.config.settings'

    is_open_2fa = fields.Boolean(related='company_id.is_open_2fa', string="Open 2FA", readonly=False)
然后,我们将它展示到常规设置->用户当中
<?xml version="1.0" encoding="utf-8"?>

<odoo>

    <record id="res_config_settings_view_form" model="ir.ui.view">

        <field name="name">res.config.settings.view.form.inherit.base.setup</field>

        <field name="model">res.config.settings</field>

        <field name="priority" eval="100"/>

        <field name="inherit_id" ref="base.res_config_settings_view_form"/>

        <field name="arch" type="xml">

            <xpath expr="//div[@id='user_default_rights']" position="inside">

                <div class="col-12 col-lg-6 o_setting_box">

                    <div class="o_setting_left_pane">

                        <field name="is_open_2fa"/>

                    </div>

                    <div class="o_setting_right_pane">

                        <label for="is_open_2fa"/>

                        <div class="text-muted">

                            The Switch to open 2FA

                        </div>

                    </div>

                </div>

            </xpath>

        </field>

    </record>

</odoo>
效果如下: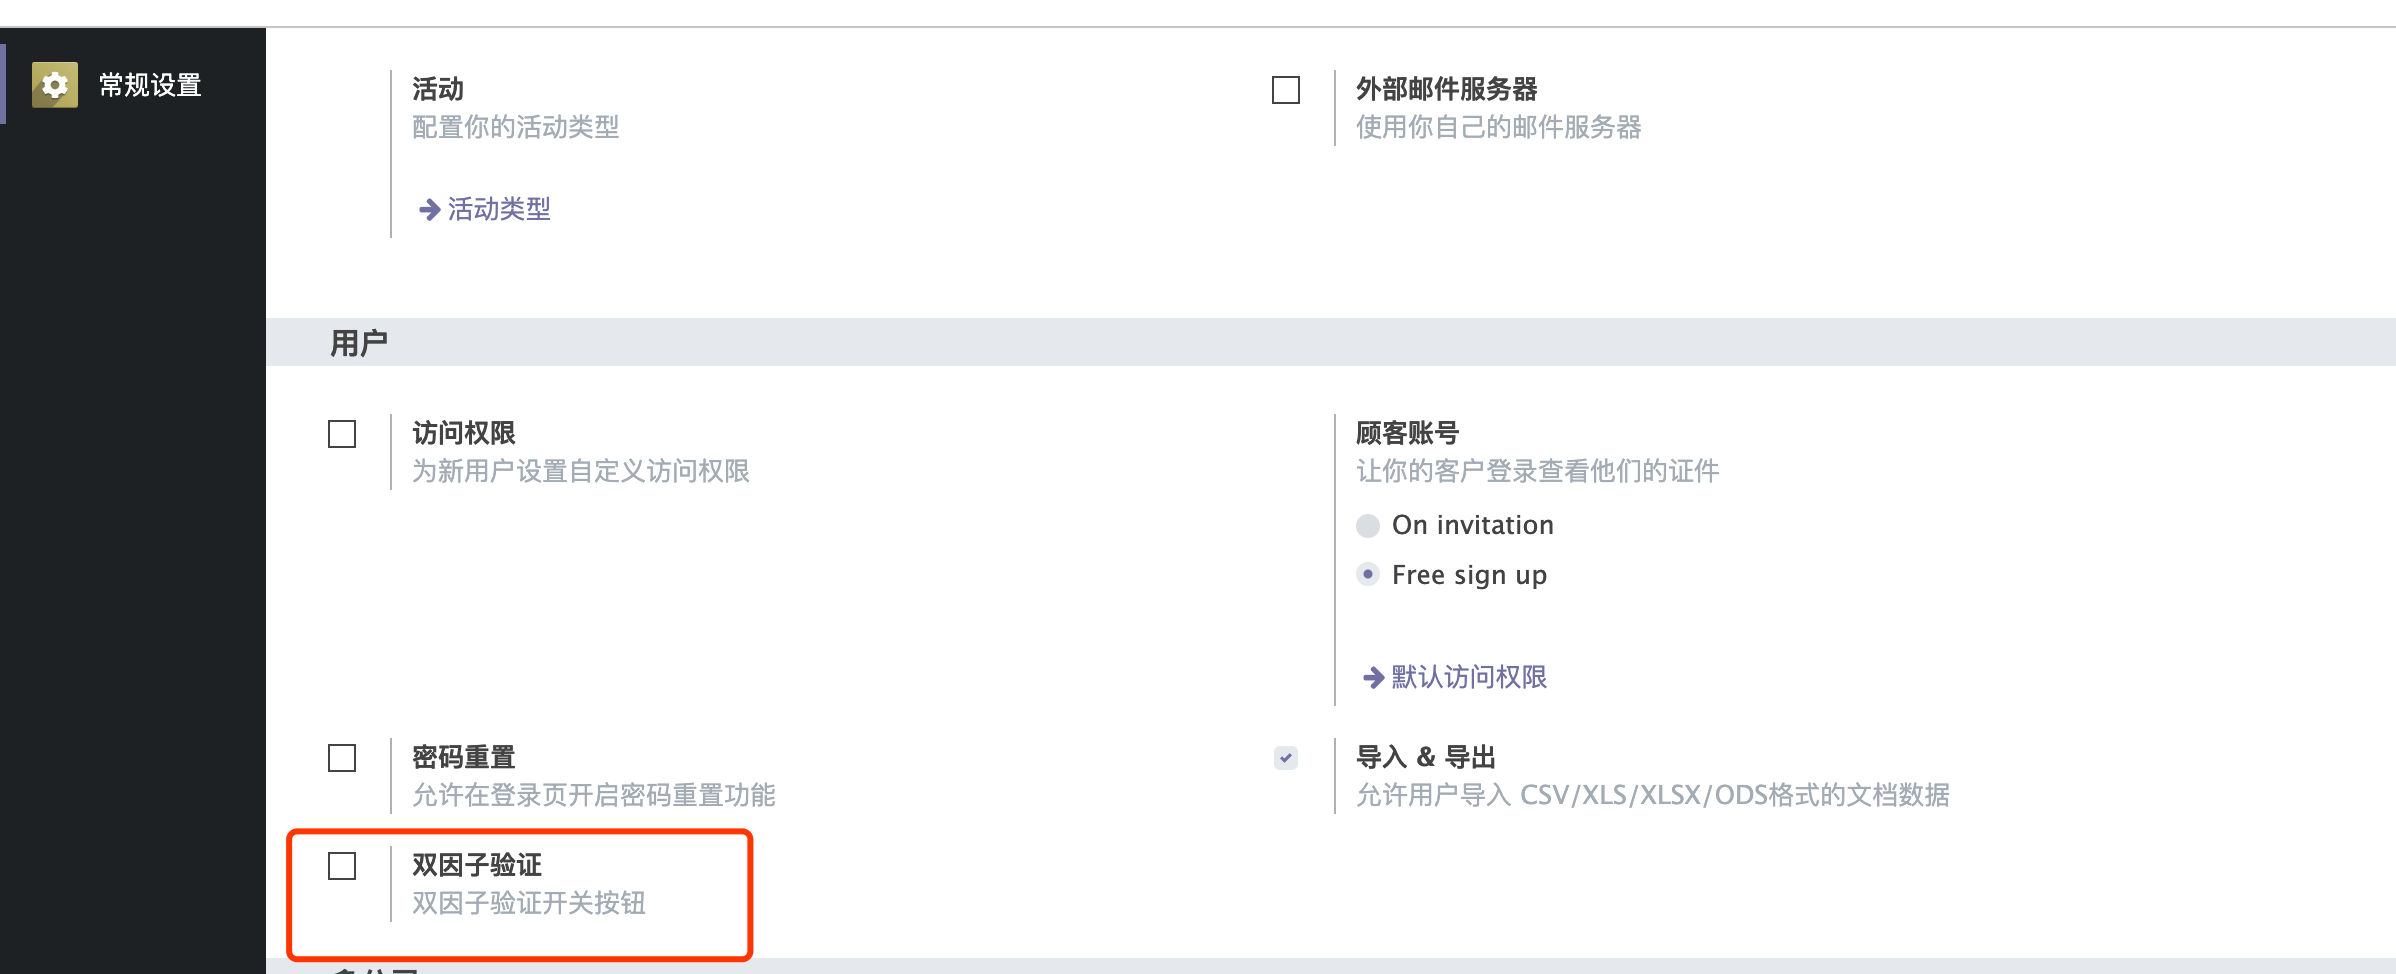
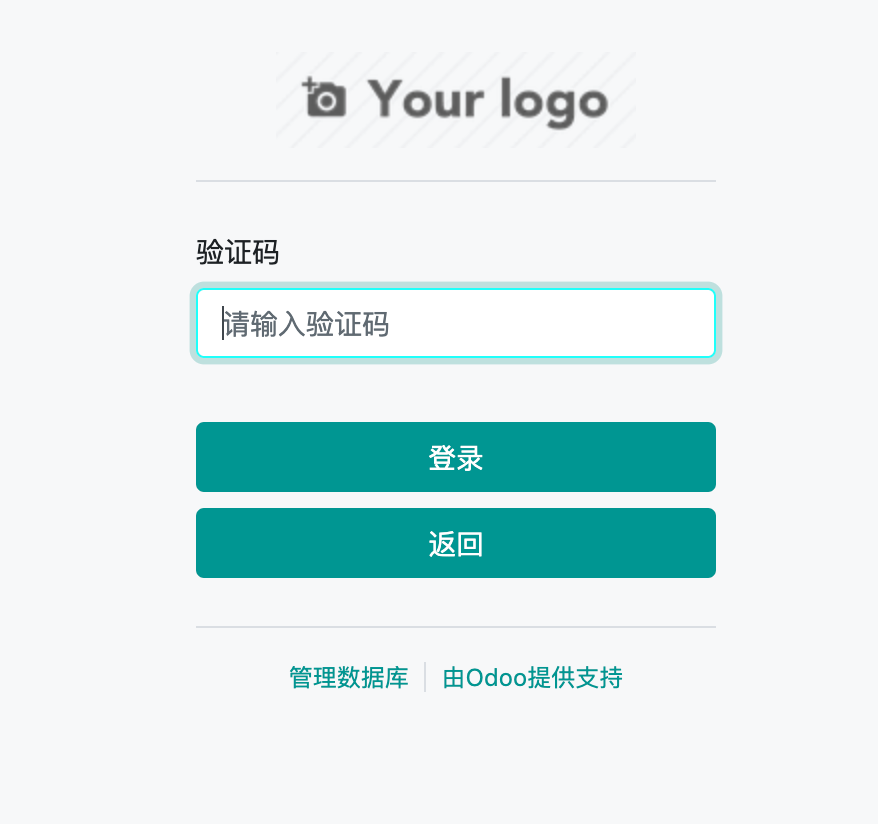
在登录界面增加对OTP的验证
最后,我们修改登录界面,在页面中增加对otp的验证。
首先,我们需要新增输入页面:
<?xml version="1.0" encoding="utf-8"?>

<odoo>

    <template id="auth_2FA.2fa_auth" name="TFA_auth">

        <t t-call="web.login_layout">

            <form class="oe_login_form" role="form" t-attf-action="/web/login/2fa_auth{{ '?debug' if debug else '' }}"

                  method="post" onsubmit="this.action = this.action + location.hash">

                <input type="hidden" name="csrf_token" t-att-value="request.csrf_token()"/>

                <div class="form-group field-login">

                    <label for="tfa_code">Validation Code</label>

                    <input type="text" placeholder="Please input 2FA digits number" name="tfa_code" t-att-value="tfa_code" id="tfa_code"

                           t-attf-class="form-control #{'form-control-sm' if form_small else ''}" required="required"

                           autofocus="autofocus" autocapitalize="off"/>

                </div>

                <p class="alert alert-danger" t-if="error" role="alert">

                    <t t-esc="error"/>

                </p>

                <p class="alert alert-success" t-if="message" role="status">

                    <t t-esc="message"/>

                </p>

                <div t-attf-class="clearfix oe_login_buttons text-center mb-1 {{'pt-2' if form_small else 'pt-3'}}">

                    <button type="submit" class="btn btn-primary btn-block">Log in</button>

                    <button type="button" class="btn btn-primary btn-block" onclick="window.location.href='/web/login'">Return</button>

                    <div class="o_login_auth"/>

                </div>

                <input type="hidden" name="login" t-att-value="login"/>

                <input type="hidden" name="password" t-att-value="password"/>

                <input type="hidden" name="redirect" t-att-value="redirect"/>

            </form>

        </t>

    </template>

</odoo>
然后,我们需要对/web/login路由进行修改,更改它的跳转逻辑和验证逻辑,在controller中添加main.py:
# -*- coding: utf-8 -*-

import odoo

import logging

from odoo import http, _

from odoo.addons.web.controllers.main import ensure_db, Home

from passlib.context import CryptContext

from odoo.http import request

default_crypt_context = CryptContext(

    ['pbkdf2_sha512', 'md5_crypt'],

    deprecated=['md5_crypt'],

)

_logger = logging.getLogger(__name__)

class WebHome(odoo.addons.web.controllers.main.Home):

    # Override by misterling

    @http.route('/web/login', type='http', auth="none", sitemap=False)

    def web_login(self, redirect=None, **kw):

        ensure_db()

        request.params['login_success'] = False

        if request.httprequest.method == 'GET' and redirect and request.session.uid:

            return http.redirect_with_hash(redirect)

        if not request.uid:

            request.uid = odoo.SUPERUSER_ID

        values = request.params.copy()

        try:

            values['databases'] = http.db_list()

        except odoo.exceptions.AccessDenied:

            values['databases'] = None

        if request.httprequest.method == 'POST':

            old_uid = request.uid

            try:

                request.env.cr.execute(

                    "SELECT COALESCE(company_id, NULL), COALESCE(password, '') FROM res_users WHERE login=%s",

                    [request.params['login']]

                )

                res = request.env.cr.fetchone()

                if not res:

                    raise odoo.exceptions.AccessDenied(_('Wrong login account'))

                [company_id, hashed] = res

                if company_id and request.env['res.company'].browse(company_id).is_open_2fa:

                    # 验证密码正确性

                    valid, replacement = default_crypt_context.verify_and_update(request.params['password'], hashed)

                    if replacement is not None:

                        self._set_encrypted_password(self.env.user.id, replacement)

                    if valid:

                        response = request.render('auth_2FA.2fa_auth', values)

                        response.headers['X-Frame-Options'] = 'DENY'

                        return response

                    else:

                        raise odoo.exceptions.AccessDenied()

                # 没有打开双因子验证

                uid = request.session.authenticate(request.session.db, request.params['login'],

                                                   request.params['password'])

                request.params['login_success'] = True

                return http.redirect_with_hash(self._login_redirect(uid, redirect=redirect))

            except odoo.exceptions.AccessDenied as e:

                request.uid = old_uid

                if e.args == odoo.exceptions.AccessDenied().args:

                    values['error'] = _("Wrong login/password")

                else:

                    values['error'] = e.args[0]

        else:

            if 'error' in request.params and request.params.get('error') == 'access':

                values['error'] = _('Only employee can access this database. Please contact the administrator.')

        if 'login' not in values and request.session.get('auth_login'):

            values['login'] = request.session.get('auth_login')

        if not odoo.tools.config['list_db']:

            values['disable_database_manager'] = True

        # otherwise no real way to test debug mode in template as ?debug =>

        # values['debug'] = '' but that's also the fallback value when

        # missing variables in qweb

        if 'debug' in values:

            values['debug'] = True

        response = request.render('web.login', values)

        response.headers['X-Frame-Options'] = 'DENY'

        return response

    @http.route('/web/login/2fa_auth', type='http', auth="none")

    def web_login_2fa_auth(self, redirect=None, **kw):

        ensure_db()

        request.params['login_success'] = False

        if not request.uid:

            request.uid = odoo.SUPERUSER_ID

        values = request.params.copy()

        try:

            values['databases'] = http.db_list()

        except odoo.exceptions.AccessDenied:

            values['databases'] = None

        old_uid = request.uid

        try:

            uid = request.session.authenticate(request.session.db, request.params['login'],

                                               request.params['password'])

            request.params['login_success'] = True

            return http.redirect_with_hash(self._login_redirect(uid, redirect=redirect))

        except odoo.exceptions.AccessDenied as e:

            request.uid = old_uid

            if e.args == odoo.exceptions.AccessDenied().args:

                values['error'] = _("Wrong login/password")

            else:

                values['error'] = e.args[0]

        if not odoo.tools.config['list_db']:

            values['disable_database_manager'] = True

        if 'login' not in values and request.session.get('auth_login'):

            values['login'] = request.session.get('auth_login')

        if 'debug' in values:

            values['debug'] = True

        response = request.render('auth_2FA.2fa_auth', values)

        response.headers['X-Frame-Options'] = 'DENY'

        return response
我们新增了otp验证路由,将登录逻辑增加到otp验证路由中,然后更改login路由,增加以下逻辑:
request.env.cr.execute(

    "SELECT COALESCE(company_id, NULL), COALESCE(password, '') FROM res_users WHERE login=%s",

    [request.params['login']]

)

res = request.env.cr.fetchone()

if not res:

    raise odoo.exceptions.AccessDenied(_('Wrong login account'))

[company_id, hashed] = res

if company_id and request.env['res.company'].browse(company_id).is_open_2fa:

    # 验证密码正确性

    valid, replacement = default_crypt_context.verify_and_update(request.params['password'], hashed)

    if replacement is not None:

        self._set_encrypted_password(self.env.user.id, replacement)

    if valid:

        response = request.render('auth_2FA.2fa_auth', values)

        response.headers['X-Frame-Options'] = 'DENY'

        return response

    else:

        raise odoo.exceptions.AccessDenied()
这段代码的作用是判断otp是否开启并进行密码验证(不登录,不生成session),通过密码验证跳转到otp验证页面。效果如下:
增加语言支持
由于使用的是英文,我们需要增加中文翻译支持。
Tip:需要中文翻译的语句在非字段描述中需要使用_进行包裹,如:

_("Wrong login/password")
打开开发者模式,设置->翻译->导出翻译->选择简体中文,PO文件,要导出的应用为two factor authentication。新建auth_2FA/i18n目录,将导出的文件复制到i18n目录下,修改里面英文内容对应的中文内容后,重启服务器即可生效。
如果没有生效,请在设置->翻译->加载翻译中重新加载。
TODO
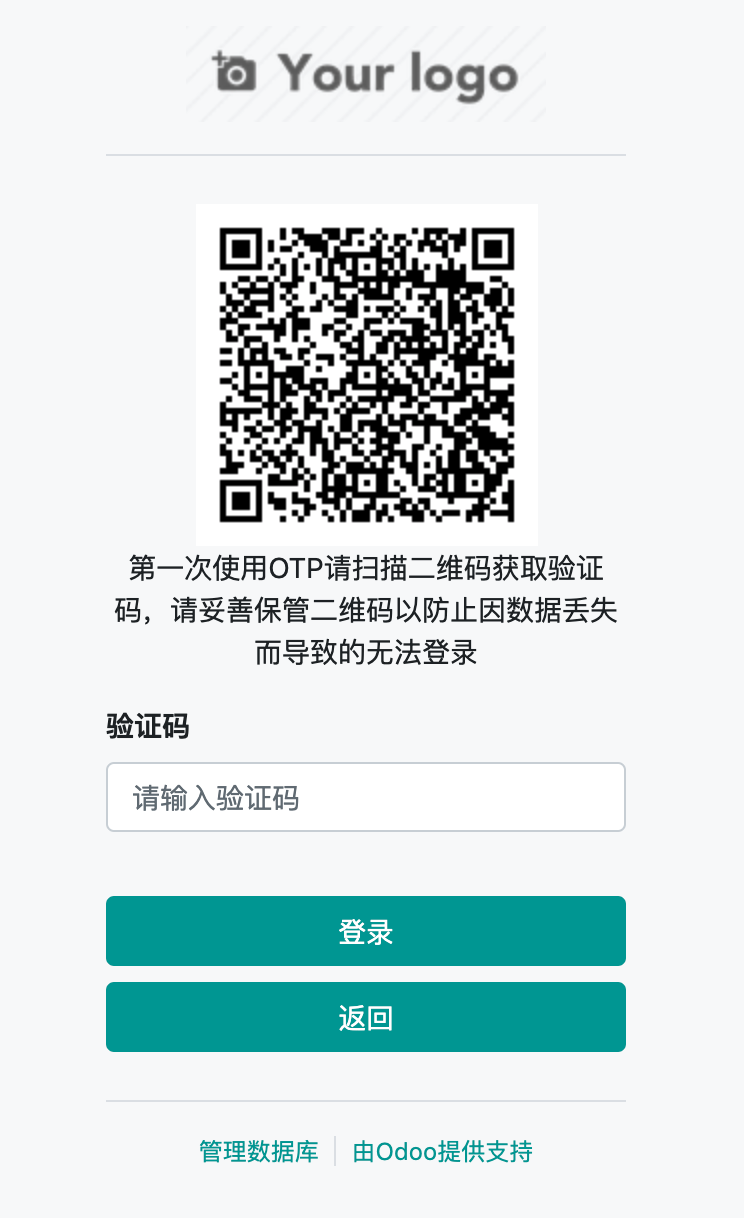
对于第一次使用的用户,在用户登录时,在登录界面中展示二维码。实现方案:为res.users增加"是否第一次使用"字段,在第一次登录后展示二维码,并为其赋值为True。具体的逻辑有兴趣的朋友可以先行尝试实现。
APP下载
功能需要配套app使用,请自己手机搜索"谷歌验证器"下载使用,或使用其他可用otp软件替代。
代码地址
从github中下载:
git clone https://github.com/lingjiawen/auth_2FA.git
从odoo官方app中下载:https://apps.odoo.com/apps/modules/12.0/auth_2FA/
声明
原文来自于博客园(https://www.cnblogs.com/ljwTiey/p/11505473.html)
转载请注明文章出处,文章如有任何版权问题,请联系作者删除。
代码仅供学习使用,未经作者允许,禁止使用于商业用途。
合作或问题反馈,联系邮箱:26476395@qq.com
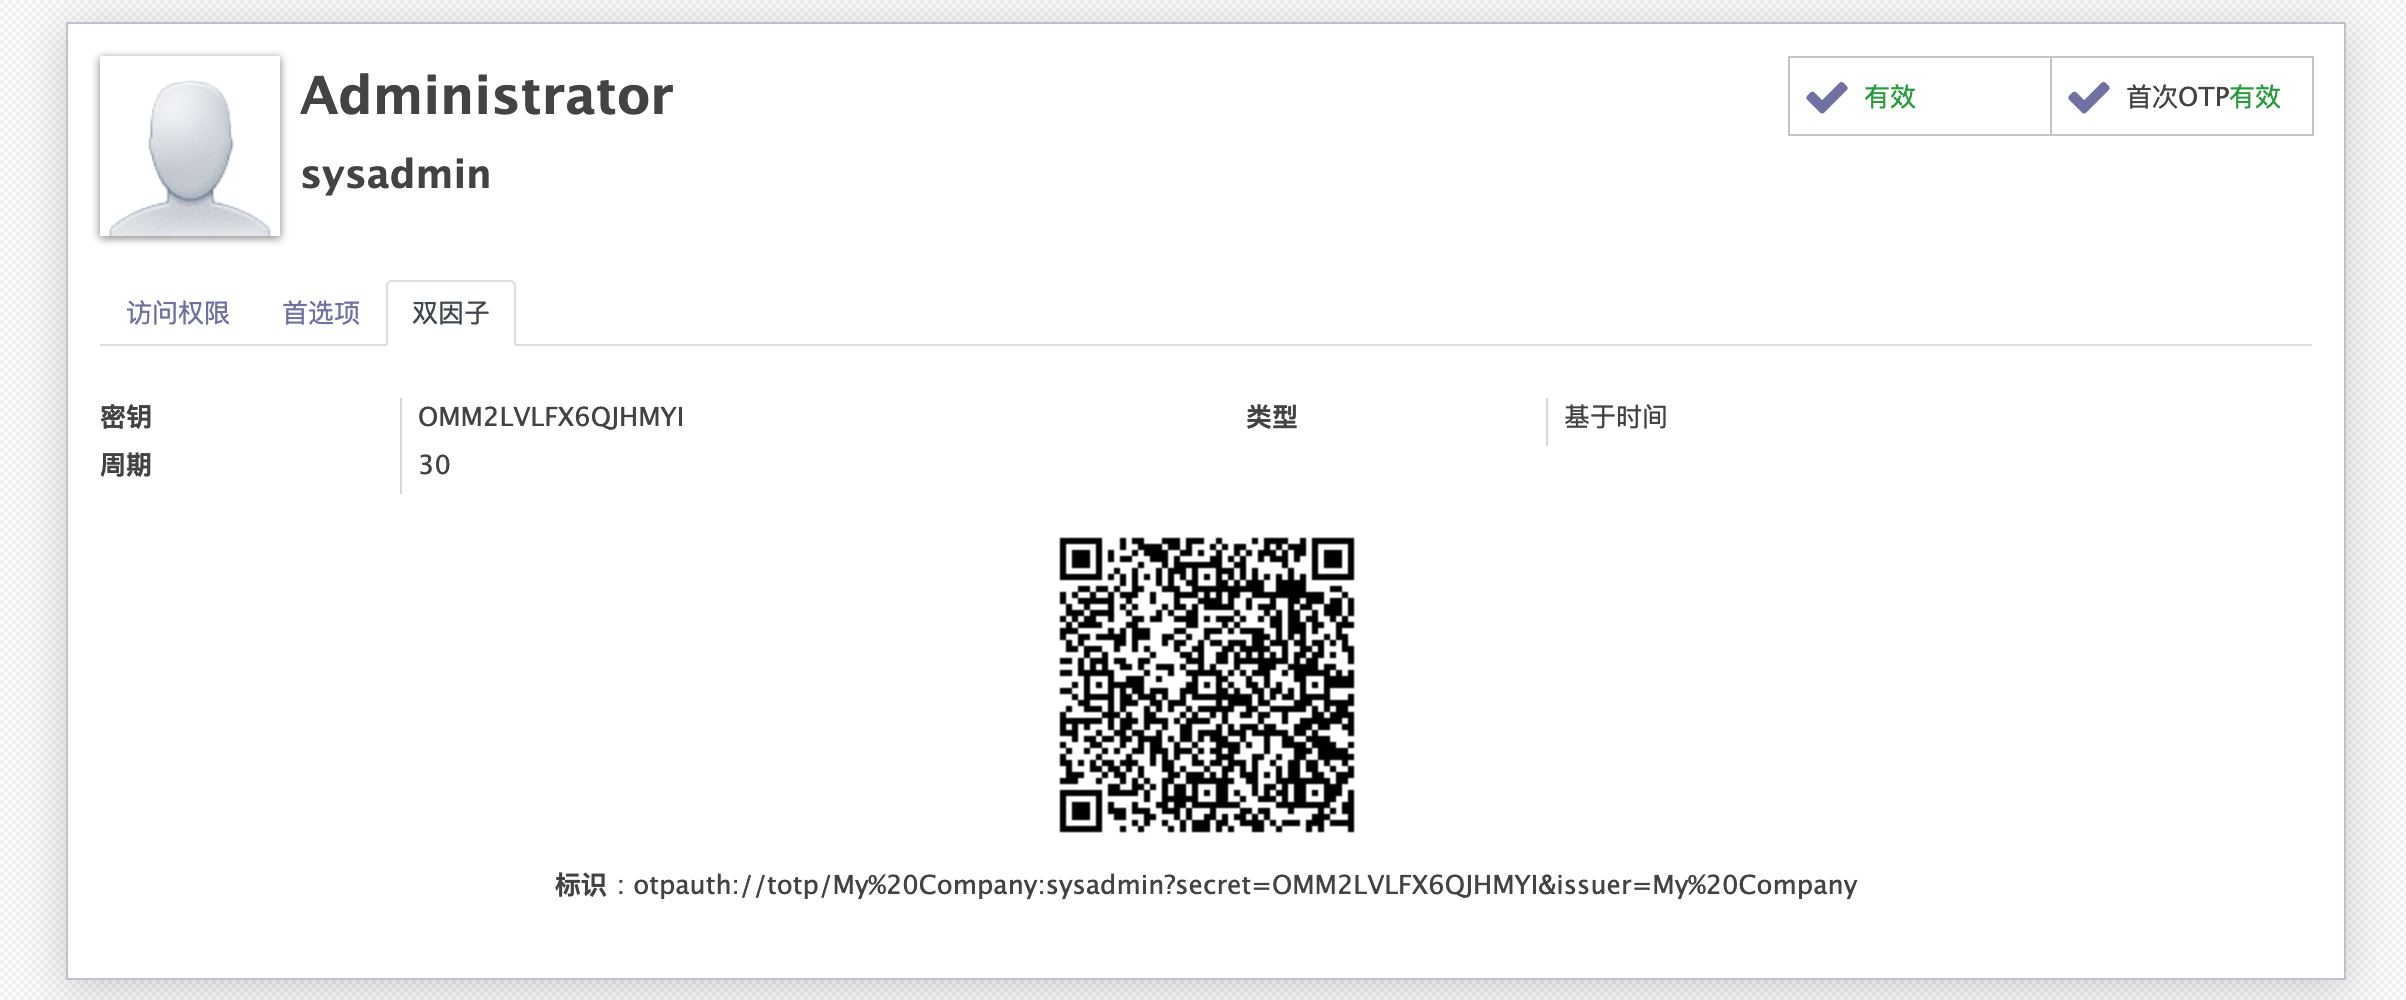
---------------------------------以下为9月12号更新----------------------------------
新增对于第一次使用的用户,在用户登录时,在登录界面中展示二维码。实现方案:为res.users增加"是否第一次使用"字段,在第一次登录后展示二维码,并为其赋值为True,已更新至github和app store,效果如下:
odoo12之应用:一、双因子验证(Two-factor authentication, 2FA)(HOTP,TOTP)附源码的更多相关文章
- Remote验证及其改进(附源码)
Remote验证及其改进(附源码) 表单中的输入项,有些是固定的,不变的验证规则,比如字符长度,必填等.但有些是动态的,比如注册用户名是否存在这样的检查,这个需要访问服务器后台才能解决.这篇文章将会介 ...
- 强制禁用gitlab的双因子认证:Two-Factor Authentication
(一)问题描述: 此博客解决如下问题:禁用gitlab的双因子认证 禁用前,如图(此时,你在gitlab中什么也干不了) (二)思路分析: 百度了很多方法,都不可靠(如不可靠的说明:https://s ...
- Java钉钉开发_02_免登授权(身份验证)(附源码)
源码已上传GitHub: https://github.com/shirayner/DingTalk_Demo 一.本节要点 1.免登授权的流程 (1)签名校验 (2)获取code,并传到后台 (3) ...
- JAVA WEB项目中生成验证码及验证实例(附源码及目录结构)
[我是一个初学者,自己总结和网上搜索资料,代码是自己敲了一遍,亲测有效,现将所有的目录结构和代码贴出来分享给像我一样的初学者] 作用 验证码为全自动区分计算机和人类的图灵测试的缩写,是一种区分用户是计 ...
- Asp.net MVC验证哪些事(3)-- Remote验证及其改进(附源码)
表单中的输入项,有些是固定的,不变的验证规则,比如字符长度,必填等.但有些是动态的,比如注册用户名是否存在这样的检查,这个需要访问服务器后台才能解决.这篇文章将会介绍MVC中如何使用[RemoteAt ...
- 利用js编写一个简单的html表单验证,验证通过时提交数据(附源码)
<!DOCTYPE html> <html lang="en"> <head> <meta charset="UTF-8 ...
- ASP.NET Core & 双因素验证2FA 实战经验分享
必读 本文源码核心逻辑使用AspNetCore.Totp,为什么不使用AspNetCore.Totp而是使用源码封装后面将会说明. 为了防止不提供原网址的转载,特在这里加上原文链接: https:// ...
- (诊断)解决GitHub使用双因子身份认证“Two-Factor Athentication”后无法git push 代码的“fatal: Authentication failed for ...”错误
在GitHub上采取双因子身份认证后,在git push 的时候将会要求填写用户的用户名和密码,用户名就是用户在GitHub上申请的用户名,但是密码不是普通登录GitHub的密码. 一旦采取双因子身份 ...
- 双因子方差分析|adjusted R|强度|SSA|SSE|SST|
应用统计学 方差分析的基本假设: 组间组平均与总平均的不同是由treatment引发的.单个值与组平均的不同是由组内error引发的. 如果没有处理误差SSA=SSE,所以右尾假设如果F>1则处 ...
随机推荐
- java常见面试题目(一)
在大四实习阶段,秋招的时候,面试了很多家公司,总结常见的java面试题目:(答案可以自己百度) 1.你所用oracle的版本号是多少? 2.tomcat修改8080端口号的配置文件是哪个? 3.myb ...
- 微信小程序的视图与渲染
1.组件的基本使用 <button type="default" > default </button> <button type="pri ...
- WIZnet-io6Library下载及使用
概观 io6Library是一个IPv6集成库,可以轻松集成和管理使用WIZnet硬连线双TCP / IP堆栈控制器(WIZCHIP)产品系列的用户应用程序. io6Library用于管理依赖于用户特 ...
- 怎么把PicPick设置成中文版?
1.首先打开软件 2.在File文件中中点击能看到Program Options这一选项,单击打开 3.右下方有个Language选项,改成简体中文
- P3195 [HNOI2008]玩具装箱TOY 斜率优化dp
传送门:https://www.luogu.org/problem/P3195 题目描述 P教授要去看奥运,但是他舍不下他的玩具,于是他决定把所有的玩具运到北京.他使用自己的压缩器进行压缩,其可以将任 ...
- DIY显示器篇------DIY教程
前言: DIY显示器是这几年才火起来的,或者说这几年在游戏圈火起来的.我第一次看到是在NGA上,一位玩PUBG的大佬自己DIY了一个显示器,27寸 2k 144 ips的屏幕,当时市面上只有四款显示器 ...
- Windows10下载mysql详解
mysql版本分为企业版(Enterprise)和社区版(Community),其中社区办是通过GPL协议授权的开源软件,可以免费使用,而企业版是需要收费的商业软件. mysql官网 https:// ...
- 详解javascript中的this的指向问题
首先,要明白this 既不指向函数自身,也不指函数的词法作用域.this一般存在于函数中,表示当前函数的执行上下文,如果函数没有执行,那么this没有内容,只有函数在执行后this才有绑定. 然后,我 ...
- 🕸捕获与改写HTTPS请求
前言 本文站在 macOS 用户的角度下,分享一下对 HTTPS 进行请求拦截.对响应进行修改的经验. 要注意的是,本文介绍的工具虽然一定程度上对 Windows 用户也适用 ,但并非所有工具都是免费 ...
- Oracle - Sequences
创建计数器 --最小值1,最大值999999999999999999999999999,从1开始,每次自增1,缓存20 --SQL语句: -- Create sequence create seque ...