usb之python(pyusb)
电脑系统为WIN7 64位
python:为python3.6 32位
需要插件PyUSB-1.0.0.tar,pywinusb-0.4.2。
按照的步骤我偷懒了,自己百度一下。
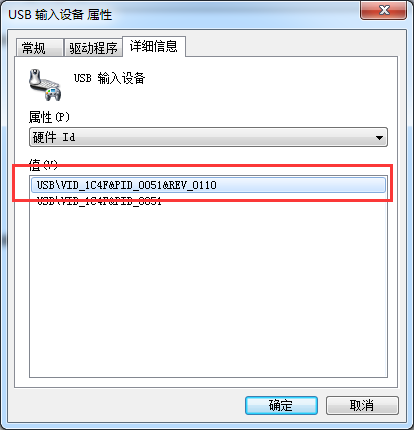
我们先看设备管理的
测试代码如下
#!/usr/bin/python
# -*- coding:utf-8 -*-

import usb.util

import sys

#USB\VID_1C4F&PID_0051

dev =  usb.core.find(idVendor= 0x1C4F, idProduct= 0x0051)

if dev is None:

    raise ValueError('Device not found')

print(dev)

# set the active configuration. With no arguments, the first

# configuration will be the active one

cfg = dev.get_active_configuration()
测试结果
Python 3.6.0 (v3.6.0:41df79263a11, Dec 23 2016, 07:18:10) [MSC v.1900 32 bit (Intel)] on win32

Type "copyright", "credits" or "license()" for more information.

>>>

================== RESTART: C:\Users\libra\Desktop\2222.py ==================

DEVICE ID 1c4f:0051 on Bus 003 Address 002 =================

 bLength                :   0x12 (18 bytes)

 bDescriptorType        :    0x1 Device

 bcdUSB                 :  0x110 USB 1.1

 bDeviceClass           :    0x0 Specified at interface

 bDeviceSubClass        :    0x0

 bDeviceProtocol        :    0x0

 bMaxPacketSize0        :    0x8 (8 bytes)

 idVendor               : 0x1c4f

 idProduct              : 0x0051

 bcdDevice              :  0x110 Device 1.1

 iManufacturer          :    0x1

 iProduct               :    0x2

 iSerialNumber          :    0x0

 bNumConfigurations     :    0x1

  CONFIGURATION 1: 100 mA ==================================

   bLength              :    0x9 (9 bytes)

   bDescriptorType      :    0x2 Configuration

   wTotalLength         :   0x22 (34 bytes)

   bNumInterfaces       :    0x1

   bConfigurationValue  :    0x1

   iConfiguration       :    0x0

   bmAttributes         :   0xa0 Bus Powered, Remote Wakeup

   bMaxPower            :   0x32 (100 mA)

    INTERFACE 0: Human Interface Device ====================

     bLength            :    0x9 (9 bytes)

     bDescriptorType    :    0x4 Interface

     bInterfaceNumber   :    0x0

     bAlternateSetting  :    0x0

     bNumEndpoints      :    0x1

     bInterfaceClass    :    0x3 Human Interface Device

     bInterfaceSubClass :    0x1

     bInterfaceProtocol :    0x2

     iInterface         :    0x0

      ENDPOINT 0x81: Interrupt IN ==========================

       bLength          :    0x7 (7 bytes)

       bDescriptorType  :    0x5 Endpoint

       bEndpointAddress :   0x81 IN

       bmAttributes     :    0x3 Interrupt

       wMaxPacketSize   :    0x4 (4 bytes)

       bInterval        :    0xa
如果先出现系统无法识别的话
可以参考
https://stackoverflow.com/questions/33972145/pyusb-on-windows-8-1-no-backend-available-how-to-install-libusb
| I downloaded latest libusb windows binaries from here: http://sourceforge.net/projects/libusb/files/libusb-1.0/libusb-1.0.20/libusb-1.0.20.7z/download then I copied libusb1.dll according to this: when you are on 64-bit Windows, MS64\dll\libusb-1.0.dll must be copied into C:\Windows\System32 and (for running 32-bit applications that use libusb) MS32\dll\libusb-1.0.dll must be copied into C:\Windows\SysWOW64. and then I copied libusb1.lib from binaries to lib dir in python directory and now pyusb works for me. hope it helps. |
继续
#!/usr/bin/python
# -*- coding:utf-8 -*-

import usb.core

import usb.util

import sys

#USB\VID_1C4F&PID_0051

dev =  usb.core.find(idVendor= 0x1C4F, idProduct= 0x0051)

if dev is None:

    raise ValueError('Device not found')

print(dev)

# set the active configuration. With no arguments, the first

# configuration will be the active one

cfg = dev.get_active_configuration()

print("#"*60)

print(cfg)
================= RESTART: C:/Users/libra/Desktop/3333333.py =================

DEVICE ID 1c4f:0051 on Bus 003 Address 002 =================

 bLength                :   0x12 (18 bytes)

 bDescriptorType        :    0x1 Device

 bcdUSB                 :  0x110 USB 1.1

 bDeviceClass           :    0x0 Specified at interface

 bDeviceSubClass        :    0x0

 bDeviceProtocol        :    0x0

 bMaxPacketSize0        :    0x8 (8 bytes)

 idVendor               : 0x1c4f

 idProduct              : 0x0051

 bcdDevice              :  0x110 Device 1.1

 iManufacturer          :    0x1

 iProduct               :    0x2

 iSerialNumber          :    0x0

 bNumConfigurations     :    0x1

  CONFIGURATION 1: 100 mA ==================================

   bLength              :    0x9 (9 bytes)

   bDescriptorType      :    0x2 Configuration

   wTotalLength         :   0x22 (34 bytes)

   bNumInterfaces       :    0x1

   bConfigurationValue  :    0x1

   iConfiguration       :    0x0

   bmAttributes         :   0xa0 Bus Powered, Remote Wakeup

   bMaxPower            :   0x32 (100 mA)

    INTERFACE 0: Human Interface Device ====================

     bLength            :    0x9 (9 bytes)

     bDescriptorType    :    0x4 Interface

     bInterfaceNumber   :    0x0

     bAlternateSetting  :    0x0

     bNumEndpoints      :    0x1

     bInterfaceClass    :    0x3 Human Interface Device

     bInterfaceSubClass :    0x1

     bInterfaceProtocol :    0x2

     iInterface         :    0x0

      ENDPOINT 0x81: Interrupt IN ==========================

       bLength          :    0x7 (7 bytes)

       bDescriptorType  :    0x5 Endpoint

       bEndpointAddress :   0x81 IN

       bmAttributes     :    0x3 Interrupt

       wMaxPacketSize   :    0x4 (4 bytes)

       bInterval        :    0xa

############################################################

  CONFIGURATION 1: 100 mA ==================================

   bLength              :    0x9 (9 bytes)

   bDescriptorType      :    0x2 Configuration

   wTotalLength         :   0x22 (34 bytes)

   bNumInterfaces       :    0x1

   bConfigurationValue  :    0x1

   iConfiguration       :    0x0

   bmAttributes         :   0xa0 Bus Powered, Remote Wakeup

   bMaxPower            :   0x32 (100 mA)

    INTERFACE 0: Human Interface Device ====================

     bLength            :    0x9 (9 bytes)

     bDescriptorType    :    0x4 Interface

     bInterfaceNumber   :    0x0

     bAlternateSetting  :    0x0

     bNumEndpoints      :    0x1

     bInterfaceClass    :    0x3 Human Interface Device

     bInterfaceSubClass :    0x1

     bInterfaceProtocol :    0x2

     iInterface         :    0x0

      ENDPOINT 0x81: Interrupt IN ==========================

       bLength          :    0x7 (7 bytes)

       bDescriptorType  :    0x5 Endpoint

       bEndpointAddress :   0x81 IN

       bmAttributes     :    0x3 Interrupt

       wMaxPacketSize   :    0x4 (4 bytes)

       bInterval        :    0xa
usb之python(pyusb)的更多相关文章
- [开发笔记usbTOcan]PyUSB访问设备
前面的几个章节的介绍,基本把usbTOcan的底层代码设计好,现在需要介绍PC端的PyUSB进行简单的测试. 在文章开始之前,需要简单的介绍一下整个系统. 0 | 部署 这里使用了两块TM4C123G ...
- 学习日志 - Openwrt安装python然后wallproxy
前提: - 先要把U盘插入路由器的usb口,大多数情况Openwrt都会自动挂载的吧,尽量找当前年或前一年的固件.ssh进路由器,可以看到/mnt/sda1 - 让路由器联网,因为需要从网络上下载安 ...
- OPENWRT安装Python到U盘
http://www.zcilxl.com/tech/23.html 研究了一下如何将软件安装在OPENWRT挂载的U盘上,以Python为例,把过程记录一下. 安装的前提是你的USB设备已经成功挂载 ...
- 极路由4pro(HC5962)安装python
基本配置 其实极路由4.极路由4 pro.极路由B70都是一个型号的(HC5962) CPU:MT7621AT + MT7612EN + 7603EN 内存:256MB DDR3 RAM 闪存:128 ...
- Openwrt路由器上安装python
在路由器安装python之前,还是经过了一番折腾的.淘宝上买了个已经刷好系统的小米迷你路由器,但里面安装的不是预期的Pandorbox,而是LEDE. 这个固件已经带了大量自带的软件,128的内存实在 ...
- Python+Appium实现自动抢微信红包
前言 过年的时候总是少不了红包,不知从何时开始微信红包横空出世,对于网速和手速慢的人只能在一旁观望,做为python的学习者就是要运用编程解决生活和工作上的事情. 于是我用python解决我们的手速问 ...
- Openwrt 安装软件到U盘或硬盘
http://blog.licess.org/openwrt-install-software-to-udisk-harddisk/ 运行一个多月的DDNAS被结婚来玩的小孩给关了,于是趁机更新了一下 ...
- python 之serial、pyusb 使用开发
说明:本次是在windows 系统操作实现的. serial 使用场景,获取得力扫码枪的扫码数据,该扫码枪支持三种通讯接口设置,如下图 即插即用的是 USB-KBW功能,插上去即可获取扫码数据,第二种 ...
- windodws pyusb hub端口对应连接的usb设备
源码: 1 #!/usr/bin/python 2 import sys 3 import usb.core 4 # find USB devices 5 dev = usb.core.find(fi ...
随机推荐
- Qt应用程序单实例化
在实际应用中,我们经常需要让应用程序只有一个实例,再打开新的文档或者页面时,只是替换现在的窗口或者新打开一个标签,而不是重新启动一次应用程序.Qt中是否可以做到这样呢,答案是肯定的,因为Qt本身可以直 ...
- vue之后台管理系统遇到的几个痛点
杂七杂八的一些日总结 1.vue(最)合理的处理表单提交和初始化表单数据显示的方式 对于表单处理,繁琐的一个地方就是当出现多个下拉选择的表单框的时候,我们需要进行多次将选择的文本去换对应的id值的操作 ...
- Consul之:服务健康监测
服务注册 - 服务进程在注册中心注册自己的位置.它通常注册自己的主机和端口号,有时还有身份验证信息,协议,版本号,以及运行环境的详细资料. 服务发现 - 客户端应用进程向注册中心发起查询,来获取服务的 ...
- Linux系统安装(centos6.8)符破解码
1.安装 VMware VMware 是一个虚拟 PC 的软件,可以在现有的操作系统上虚拟出一个新的硬件环境,相当于模拟出一台新的 PC,我们可以在上面构造出一个或多个别的系统,以此来实现在一台机器上 ...
- [UE4]使用另一个相机Scene Capture Component 2D当小地图
挂一个相机(Scene Capture Component 2D)在人物角色的正上方,相机朝下,让UI上的某一块区域看到相机所显示的内容. 一.在人物角色正上方添加相机组件Scene Capture ...
- phpStudy配置站点 解决You don't have permission to access / on this server
1.配置站点:打开phpStudy->其他选项菜单->站点域名管理 2.配置站点:打开phpStudy->其他选项菜单->打开hosts 3.在apache的配置文件vhost ...
- 搞定queryString
querystring字面上的意思就是查询字符串,一般是对http请求所带的数据进行解析.querystring模块只提供4个方法: querystring.parse querystring.str ...
- Redis进阶实践之十四 Redis-cli命令行工具使用详解
转载来源:http://www.cnblogs.com/PatrickLiu/p/8508975.html 一.介绍 redis学了有一段时间了,以前都是看视频,看教程,很少看官方的东西.现在redi ...
- (转)MTU&MSS
MTU是Maximum Transmission Unit的缩写,意为最大传输单元,通俗的理解就是在网络上传送的最大数据包,单位是字节. 以太网对数据帧的长度都有一个限制,其最大值为1500,这个特性 ...
- 10进制与16进制之间的转换 delphi
delphi中有直接把10进制转换成16进制的函数: function IntToHex(Value: Integer; Digits: Integer): string; o ...