Spring Boot2.0之整合Mybatis
我在写这个教程时候,踩了个坑,一下子折腾到了凌晨两点半。
坑: Spring Boot对于Mysql8.1的驱动支持不好啊
我本地安装的是Mysql8.1版本,在开发时候。pom提示不需要输入驱动版本(因为Spring Boot会自动匹配),毛啊。根本就没有匹配成功。然后我尝试了各种办法。没有解决。
最后安装的mysql5.6版本轻松搞定
废话不多说了,赶紧写完,睡觉觉。
1、创建maven工程,pom:
<project xmlns="http://maven.apache.org/POM/4.0.0" xmlns:xsi="http://www.w3.org/2001/XMLSchema-instance" xsi:schemaLocation="http://maven.apache.org/POM/4.0.0 http://maven.apache.org/xsd/maven-4.0.0.xsd">

  <modelVersion>4.0.0</modelVersion>

  <groupId>jdbcTemplate</groupId>

  <artifactId>com.toov5.jdbc</artifactId>

  <version>0.0.1-SNAPSHOT</version>

  <parent>

        <groupId>org.springframework.boot</groupId>

        <artifactId>spring-boot-starter-parent</artifactId>

        <version>1.3.2.RELEASE</version>

        <relativePath /> <!-- lookup parent from repository -->

    </parent>

    <dependencies>

        <dependency>

            <groupId>org.springframework.boot</groupId>

            <artifactId>spring-boot-starter</artifactId>

        </dependency>

        <dependency>

            <groupId>org.springframework.boot</groupId>

            <artifactId>spring-boot-starter-test</artifactId>

            <scope>test</scope>

        </dependency>

        <dependency>

            <groupId>org.mybatis.spring.boot</groupId>

            <artifactId>mybatis-spring-boot-starter</artifactId>

            <version>1.1.1</version>

        </dependency>

        <dependency>

            <groupId>mysql</groupId>

            <artifactId>mysql-connector-java</artifactId>

        </dependency>

        <dependency>

            <groupId>org.springframework.boot</groupId>

            <artifactId>spring-boot-starter-web</artifactId>

        </dependency>

        <dependency>

            <groupId>org.projectlombok</groupId>

            <artifactId>lombok</artifactId>

            <version>1.16.20</version>

            <scope>provided</scope>

        </dependency>

    </dependencies>

</project>
2、application.properties:
spring.datasource.url=jdbc:mysql://localhost:3306/test

spring.datasource.username=root

spring.datasource.password=root

spring.datasource.driver-class-name=com.mysql.jdbc.Driver
3、User类代码:
package com.toov5.entity;

import lombok.Data;

@Data

public class User {

  private Integer age;

  private String name;

  private  Integer id;

}
用了lombok插件
4、Mapper代码:
package com.toov5.mapper;

import org.apache.ibatis.annotations.Insert;

import org.apache.ibatis.annotations.Param;

import org.apache.ibatis.annotations.Select;

import com.toov5.entity.User;

public interface UserMapper {

        @Select("SELECT * FROM USERS WHERE NAME = #{name}")

        User findByName(@Param("name") String name);

        @Insert("INSERT INTO USERS(NAME, AGE) VALUES(#{name}, #{age})")

        int insert(@Param("name") String name, @Param("age") Integer age);

}
这里没有用到 @Mapper注解哦 因为启动类里面有个好东西代替了!请接着往下读
5、service代码
package com.toov5.service;

import org.springframework.beans.factory.annotation.Autowired;

import org.springframework.stereotype.Service;

import com.toov5.mapper.UserMapper;

import lombok.extern.slf4j.Slf4j;

@Service

@Slf4j

public class UserService {

  @Autowired

  private UserMapper userMapper;

  public int insertUser(String name, Integer age){

     int result = userMapper.insert(name, age);

      log.info("####################",result);

      return result;

  }

}
6、Controller代码:
package com.toov5.controller;

import org.springframework.beans.factory.annotation.Autowired;

import org.springframework.web.bind.annotation.RequestMapping;

import org.springframework.web.bind.annotation.RestController;

import com.toov5.service.UserService;

@RestController

public class UserController {

@Autowired

private UserService userService;

@RequestMapping("/insertUser")

  public Integer insertUser(String name, Integer age){

     return userService.insertUser(name, age);

     }

}
7、启动类
package com.toov5.app;

import org.mybatis.spring.annotation.MapperScan;

import org.springframework.boot.SpringApplication;

import org.springframework.boot.autoconfigure.SpringBootApplication;

import org.springframework.context.annotation.ComponentScan;

@ComponentScan(basePackages="com.toov5")

@MapperScan(basePackages="com.toov5.mapper")

@SpringBootApplication

public class app {

  public static void main(String[] args){

      SpringApplication.run(app.class, args);

  }

}
这里重点说下:

这个注解,省去了mapper层类的@Mapper注解
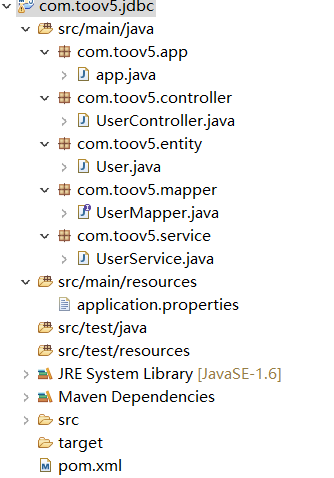
整个项目目录结构:
访问:

查看数据库:
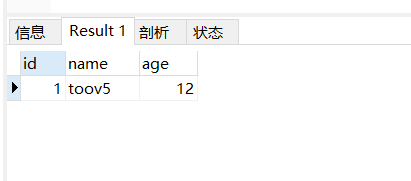
都成功了~~ 是不是很好玩呀
Spring Boot2.0之整合Mybatis的更多相关文章
- Spring Boot2.0之整合事物管理
首先Spring 事务分类 1.声明事务 原理:基于编程事务的 2.编程事务 指定范围 扫包去解决 3.事务原理:AOP技术 通过环绕通知进行了拦截 使用Spring 事务注意事项: 不要tr ...
- Sprin Boot2.0之整合Mybatis整合分页插件
pageHelper PageHelper 是一款好用的开源免费的 Mybatis 第三方物理分页插件 物理分页 支持常见的 12 种数据库.Oracle,MySql,MariaDB,SQLite,D ...
- Spring Boot2.0之 整合XXL-Job
参考git上面的 springboot demo 创建maven工程: pom: <project xmlns="http://maven.apache.org/POM/4.0.0&q ...
- Spring Boot2.0之整合JSP
首先不建议整合JSP哈,spring boot 对jsp的支持力度不大. 内置tomcat不支持jsp. 注意:在创建项目时候一定是war类型的,而不是跟之前那个freemarker那种jar类型. ...
- Spring Boot2.0之整合多数据源
一般公司分两个数据库: 一个放共同配置文件, 一个数据库垂直业务数据库 垂直拆分和水平拆分: 垂直是根据业务划分具体数据库 在一个项目中有多个数据源(不同库jdbc) 无限个的哈~ 根据包名 或者 注 ...
- Spring Boot2.0之 整合Zookeeper集群
普通的连接: pom: <project xmlns="http://maven.apache.org/POM/4.0.0" xmlns:xsi="http://w ...
- Spring Boot2.0之 整合Redis集群
项目目录结构: pom: <project xmlns="http://maven.apache.org/POM/4.0.0" xmlns:xsi="http:// ...
- Spring Boot2.0之 整合Redis事务
Redis事物 Redis 事务可以一次执行多个命令, 并且带有以下两个重要的保证: 事务是一个单独的隔离操作:事务中的所有命令都会序列化.按顺序地执行.事务在执行的过程中,不会被其他客户端发送来的命 ...
- Spring Boot2.0之整合Redis
需要的maven依赖 jar包,是对Jedis的封装 maven依赖: <project xmlns="http://maven.apache.org/POM/4.0.0" ...
随机推荐
- opengl加载多个3ds模型失败记
VC6 下载 http://blog.csdn.net/bcbobo21cn/article/details/44200205 opengl环境配置 http://blog.csdn.net/bcbo ...
- apue学习笔记(第四章 文件和目录)
本章将描述文件系统的其他特性和文件的性质. 函数stat.fstat.fstatat和lstat #include <sys/stat.h> int stat(const char *re ...
- Java集合框架GS Collections具体解释
Java集合框架GS Collections具体解释 作者:chszs.未经博主同意不得转载.经许可的转载需注明作者和博客主页:http://blog.csdn.net/chszs GS Collec ...
- Java Swing界面编程(25)---事件处理:鼠标事件及监听处理
假设想对一个鼠标的操作进行监听,假设鼠标按下.松开等.则能够使用MouseListener接口. package com.beyole.util; import java.awt.event.Mous ...
- Java中使用com.sun相关jar包出现编译错误,但是运行没有错误的解决方法和原因
[解决方法]如果你用的是Eclipse 在preference->java->complier->errors/warning->deprecated and restrict ...
- 安装gi的时候回退root.sh的运行
</pre><pre name="code" class="html">/u01/app/11.2.0/grid/crs/install ...
- 王立平--eclipse中改动android项目的版本
改动版本 1.右键-->properties 2.android.改动须要的版本 watermark/2/text/aHR0cDovL2Jsb2cuY3Nkbi5uZXQvdTAxMzQyNTU ...
- dede列表页调用文章,其实是所有页面都可以调用,第一次应用sql标签
{dede:sql sql="SELECT aid,typeid,body,userip FROM `#@__addonarticle` where aid='6' or aid='7' o ...
- 查看mysql 的存储过程定义
查询数据库中的存储过程 方法一: select `name` from mysql.proc where db = 'your_db_name' and `type` = 'PROCEDURE' 方法 ...
- Web网页开发常见经典问题
1.网络请求参数共享 转发dispatcher和重定向redirect 对于参数共享的区别 Redirect和Dispatcher 区别