
(转)Spring使用AspectJ进行AOP的开发:注解方式
http://blog.csdn.net/yerenyuan_pku/article/details/69790950
Spring使用AspectJ进行AOP的开发:注解方式
之前我已讲过Spring使用AspectJ通过配置文件的方式来进行AOP的开发,现在就来讲怎样使用注解方式进行AOP的开发。
- 创建一个Web项目, 引入相关的jar包。所要导入的jar包如下:
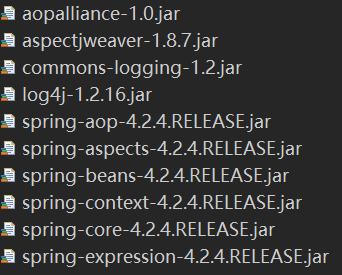
引入Spring的配置文件。主要引入AOP的约束:
<?xml version="1.0" encoding="UTF-8"?>

<beans xmlns="http://www.springframework.org/schema/beans"

    xmlns:xsi="http://www.w3.org/2001/XMLSchema-instance"

    xmlns:aop="http://www.springframework.org/schema/aop" xsi:schemaLocation="

        http://www.springframework.org/schema/beans

        http://www.springframework.org/schema/beans/spring-beans.xsd

        http://www.springframework.org/schema/aop

        http://www.springframework.org/schema/aop/spring-aop.xsd">

</beans>
编写目标类。
在Web项目的src目录下创建一个cn.itcast.aop包,并在该包下编写一个Book类:public class Book { public void add() {
System.out.println("book add.................");
} }编写切面类。
再在cn.itcast.aop包下编写一个MyBook增强类:public class MyBook { public void before1() {
System.out.println("before........");
} }在增强的类上面使用
@Aspect注解@Aspect
public class MyBook { public void before1() {
System.out.println("before........");
} }在增强类的方法里面,使用注解配置通知类型:
@Aspect
public class MyBook { // 前置通知
// *:方法的访问修饰符,也可写为execution(public void cn.itcast.aop.Book.*(..)),但一般都不会用
@Before("execution(* cn.itcast.aop.Book.*(..))")
public void before1() {
System.out.println("before........");
} }- 1
AspectJ的AOP的注解:
@Aspect:定义切面类的注解@Before:前置通知,相当于BeforeAdvice@AfterReturning:后置通知,相当于AfterReturningAdvice@Around:环绕通知,相当于MethodInterceptor@AfterThrowing:抛出通知,相当于ThrowAdvice@After:最终final通知,不管是否异常,该通知都会执行@Pointcut:定义切入点的注解
开启AspectJ的注解
<aop:aspectj-autoproxy></aop:aspectj-autoproxy>创建Book类和MyBook类的两个对象(使用配置文件)
<bean id="book" class="cn.itcast.aop.Book"></bean>

<bean id="myBook" class="cn.itcast.aop.MyBook"></bean>
最后在cn.itcast.aop包下编写一个TestDemo单元测试类
public class TestDemo {

    @Test

    public void testBook() {

        ApplicationContext context = new ClassPathXmlApplicationContext("bean1.xml");

        Book book = (Book) context.getBean("book");

        book.add();

    }

}- 1
测试即可。
Spring的JDBC模板
Spring是一个分层的JavaSE/EEfull-stack(一站式)轻量级开源框架。它针对JavaEE三层中的每一层都提供了不同的解决技术,在dao层,Spring提供了JDBC模板的技术,可对数据库进行CRUD操作。Spring提供了很多持久层技术的模板类简化了编程,如下图: 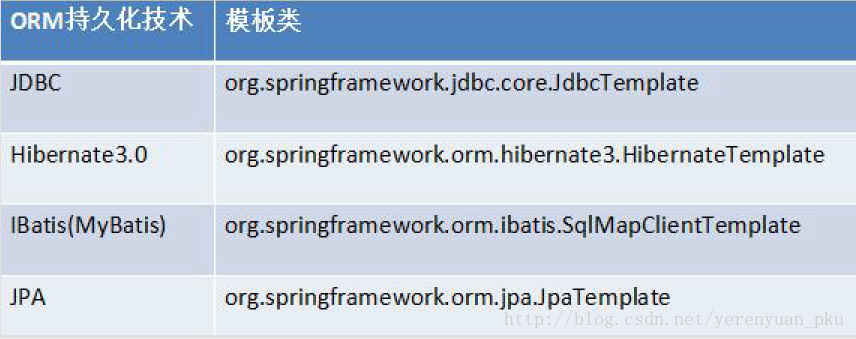
我再次加以说明:Spring框架对不同的持久层技术做了封装,如对传统的JDBC使用JdbcTemplate进行了封装,对Hibernate框架使用HibernateTemplate进行了封装。JdbcTemplate对JDBC进行了简单封装,使用类似于dbutils,但是使用并没有dbutils方便,只是提供了一种实现的方式而已。下面来演示使用JdbcTemplate模板类实现CRUD操作。
使用JdbcTemplate模板类实现CRUD操作
首先创建数据库和表,如下:
create database spring_lee;

use spring_lee;

DROP TABLE IF EXISTS `user`;

CREATE TABLE `user` (

  `username` varchar(100) DEFAULT NULL,

  `password` varchar(100) DEFAULT NULL

) ENGINE=InnoDB DEFAULT CHARSET=utf8;- 1
使用JdbcTemplate模板类还须导入jar包,先引入JdbcTemplate的jar包:
但我们要知道spring-jdbc-4.2.4.RELEASE.jar包才是最主要的。除此之外还须导入MySQL数据库驱动的jar包。

添加操作
在src目录下创建一个cn.itcast.jdbcTemplate包,并在该包下编写一个JdbcTemplateDemo1单元测试类。现在要编写一个add方法来测试添加操作。
public class JdbcTemplateDemo1 {

    // 1.添加操作

    @Test

    public void add() {

        // 1.设置数据库相关信息(JDBC模板依赖连接池获得数据库连接,所以必须先构造连接池)

        DriverManagerDataSource dataSource = new DriverManagerDataSource(); // 数据源

        dataSource.setDriverClassName("com.mysql.jdbc.Driver");

        dataSource.setUrl("jdbc:mysql:///spring_lee");

        dataSource.setUsername("root");

        dataSource.setPassword("yezi");

        // 2.做添加的操作

        JdbcTemplate jdbcTemplate = new JdbcTemplate(dataSource);

        String sql = "insert into user values(?,?)";

        int rows = jdbcTemplate.update(sql, "liayun", "lee");

        System.out.println(rows);

    }

}- 1
注意:JDBC模板依赖连接池获得数据库连接,所以必须先构造连接池,然后再创建JdbcTemplate模板类对象。而且还须用到JdbcTemplate模板类的update方法: 
这个方法中有两个参数:
- 第一个参数是sql语句。
- 第二个参数是传递的参数值,Object类型的可变参数。
修改操作
现在要在单元测试类中编写一个update方法来测试修改操作。
public class JdbcTemplateDemo1 {

    // 2.修改操作

    @Test

    public void update() {

        // 1.设置数据库相关信息

        DriverManagerDataSource dataSource = new DriverManagerDataSource(); // 数据源

        dataSource.setDriverClassName("com.mysql.jdbc.Driver");

        dataSource.setUrl("jdbc:mysql:///spring_lee");

        dataSource.setUsername("root");

        dataSource.setPassword("yezi");

        // 实现修改操作

        JdbcTemplate jdbcTemplate = new JdbcTemplate(dataSource);

        String sql = "update user set password=? where username=?";

        int rows = jdbcTemplate.update(sql, "9999", "liayun");

        System.out.println(rows);

    }

}- 1
删除操作
现在要在单元测试类中编写一个delete方法来测试删除操作。
public class JdbcTemplateDemo1 {

    // 3.删除操作

    @Test

    public void delete() {

        // 1.设置数据库相关信息

        DriverManagerDataSource dataSource = new DriverManagerDataSource(); // 数据源

        dataSource.setDriverClassName("com.mysql.jdbc.Driver");

        dataSource.setUrl("jdbc:mysql:///spring_lee");

        dataSource.setUsername("root");

        dataSource.setPassword("yezi");

        // 实现删除操作

        JdbcTemplate jdbcTemplate = new JdbcTemplate(dataSource);

        String sql = "delete from user where username=?";

        int rows = jdbcTemplate.update(sql, "liayun");

        System.out.println(rows);

    }

}- 1
查询操作
查询表中的记录数
现在要在单元测试类中编写一个testCount方法来测试查询表中记录数的操作。
public class JdbcTemplateDemo1 {

    // 查询表记录数

    @Test

    public void testCount() {

        // 1.设置数据库相关信息

        DriverManagerDataSource dataSource = new DriverManagerDataSource(); // 数据源

        dataSource.setDriverClassName("com.mysql.jdbc.Driver");

        dataSource.setUrl("jdbc:mysql:///spring_lee");

        dataSource.setUsername("root");

        dataSource.setPassword("yezi");

        // 2.创建JdbcTemplate模板类的对象

        JdbcTemplate jdbcTemplate = new JdbcTemplate(dataSource);

        // 3.sql语句

        String sql = "select count(*) from user";

        // 4.调用JdbcTemplate模板类里面的方法

        // 返回int类型

        int count = jdbcTemplate.queryForObject(sql, Integer.class);

        System.out.println(count);

    }

}- 1
在查询表中记录数的操作时,用到了JdbcTemplate模板类里面的queryForObject方法,如下: 
这个方法中有两个参数:
- 第一个参数:sql语句
- 第二个参数:返回类型的class
查询返回对象
使用JdbcTemplate模板类进行查询操作的时候,还是比较麻烦的。前面我也说过JdbcTemplate对JDBC进行了简单封装,使用类似于dbutils,但是使用并没有dbutils方便,只是提供了一种实现的方式而已。我是为何这么说呢?因为在dbutils里面帮我们编写好了一些实现类,使用这些实现类可以封装结果,这些实现类都实现了接口ResultSetHandler;使用JdbcTemplate模板类进行查询操作返回数据结果的时候,虽然在JdbcTemplate模板类中有个接口,但是并没有提供实现类,故还需要自己编写实现类来封装结果。
好了,接下来复习一下编写JDBC最原始的代码做查询操作,基本功不要忘记了啊!
首先在cn.itcast.jdbcTemplate包下编写一个User类。
public class User {

    private String username;

    private String password;

    public String getUsername() {

        return username;

    }

    public void setUsername(String username) {

        this.username = username;

    }

    public String getPassword() {

        return password;

    }

    public void setPassword(String password) {

        this.password = password;

    }

    @Override

    public String toString() {

        return "User [username=" + username + ", password=" + password + "]";

    }

}- 1
然后再在该包下编写一个JdbcTemplateDemo2单元测试类,编写JDBC最原始的代码做查询操作。
public class JdbcTemplateDemo2 {

    // jdbc最原始的代码做查询操作

    @Test

    public void testJDBC() {

        Connection conn = null;

        PreparedStatement psmt = null;

        ResultSet rs = null;

        try {

            Class.forName("com.mysql.jdbc.Driver");

            conn = DriverManager.getConnection("jdbc:mysql:///spring_lee", "root", "yezi");

            String sql = "select * from user where username=?";

            // 对sql进行预编译操作

            psmt = conn.prepareStatement(sql);

            psmt.setString(1, "mary");

            // 执行sql

            rs = psmt.executeQuery();

            // 遍历结果

            while (rs.next()) {

                String username = rs.getString("username");

                String password = rs.getString("password");

                User user = new User();

                user.setUsername(username);

                user.setPassword(password);

                System.out.println(user);

            }

        } catch (Exception e) {

        } finally {

            try {

                rs.close();

                psmt.close();

                conn.close();

            } catch (Exception e2) {

            }

        }

    }

}- 1
接下来,就来讲如何使用JdbcTemplate模板类进行查询操作并返回一个User类的对象。其中就要用到JdbcTemplate模板类里面的queryForObject方法: 
这个方法有3个参数:
- 第一个参数:sql语句
- 第二个参数:RowMapper接口
- 之前使用dbutils进行查询时,返回结果有ResultSetHandler接口,但是在dbutils里面有其对应的实现类。
- 使用JdbcTemplate模板类的时候,虽然提供了RowMapper接口,但是这个接口没有实现类,需要自己进行实现,然后进行数据封装。
- 第三个参数:可变参数
现在要在JdbcTemplateDemo2单元测试类中编写一个testObject方法来测试查询时返回一个User类对象的操作。
public class JdbcTemplateDemo2 {

    // 1.查询返回对象

    @Test

    public void testObject() {

        // 1.设置数据库相关信息

        DriverManagerDataSource dataSource = new DriverManagerDataSource(); // 数据源

        dataSource.setDriverClassName("com.mysql.jdbc.Driver");

        dataSource.setUrl("jdbc:mysql:///spring_lee");

        dataSource.setUsername("root");

        dataSource.setPassword("yezi");

        // 2.创建JdbcTemplate对象

        JdbcTemplate jdbcTemplate = new JdbcTemplate(dataSource);

        // 3.sql语句

        String sql = "select * from user where username=?";

        // 4.调用方法执行

        // 第二个参数是接口,RowMapper,要自己创建一个类实现这个接口,在里面进行封装

        User user = jdbcTemplate.queryForObject(sql, new MyRowMapper(), "mary");

        System.out.println(user);

    }

}- 1
注意,还要编写RowMapper接口的一个实现类。在以上JdbcTemplateDemo2.java源代码文件中编写RowMapper接口的一个MyRowMapper实现类。
// T:表示要将数据封装到哪个类的对象中

class MyRowMapper implements RowMapper<User> {

    // 实现接口里面的方法,在方法中实现数据封装

    // 第一个参数:返回的结果集,第二个参数是当前的行数(即第几行)

    @Override

    public User mapRow(ResultSet rs, int rows) throws SQLException {

        // 从结果集得到数据

        String username = rs.getString("username");

        String password = rs.getString("password");

        // 封装到对象里面

        User user = new User();

        user.setUsername(username);

        user.setPassword(password);

        return user;

    }

}- 1
查询返回List集合
现在要在JdbcTemplateDemo2单元测试类中编写一个testList方法来测试查询时返回List集合的操作。
public class JdbcTemplateDemo2 {

    // 2.返回List集合

    @Test

    public void testList() {

        // 1.设置数据库相关信息

        DriverManagerDataSource dataSource = new DriverManagerDataSource(); // 数据源

        dataSource.setDriverClassName("com.mysql.jdbc.Driver");

        dataSource.setUrl("jdbc:mysql:///spring_lee");

        dataSource.setUsername("root");

        dataSource.setPassword("yezi");

        // 2.查询操作

        JdbcTemplate jdbcTemplate = new JdbcTemplate(dataSource);

        String sql = "select * from user";

        List<User> list = jdbcTemplate.query(sql, new MyRowMapper());

        System.out.println(list);

    }

}
在进行查询并返回List集合的操作时,须用到JdbcTemplate模板类里面的query方法: 
或 
Spring配置连接池
在实际开发中,一般都会用Spring配置C3P0连接池,所以下面我就来重点介绍在Spring中如何配置C3P0连接池。
首先引入Spring的配置文件,主要是引入约束:
<?xml version="1.0" encoding="UTF-8"?>

<beans xmlns="http://www.springframework.org/schema/beans"

    xmlns:xsi="http://www.w3.org/2001/XMLSchema-instance"

    xmlns:context="http://www.springframework.org/schema/context"

    xmlns:aop="http://www.springframework.org/schema/aop"

    xmlns:tx="http://www.springframework.org/schema/tx"

    xsi:schemaLocation="http://www.springframework.org/schema/beans

    http://www.springframework.org/schema/beans/spring-beans.xsd

    http://www.springframework.org/schema/context

    http://www.springframework.org/schema/context/spring-context.xsd

    http://www.springframework.org/schema/aop

    http://www.springframework.org/schema/aop/spring-aop.xsd

    http://www.springframework.org/schema/tx

    http://www.springframework.org/schema/tx/spring-tx.xsd">

</beans>
接着导入Spring的基本jar包,除此之外,还要导入C3P0的jar包: 
试想要是以前在Web项目中配置C3P0连接池,势必会写这样的代码:
ComboPooledDataSource dataSource = new ComboPooledDataSource();

dataSource.setDriverClass(driverClass);

dataSource.setJdbcUrl(jdbcUrl);

dataSource.setUser(user);

dataSource.setPassword(password);
而现在我们就可以在Spring配置文件(bean2.xml)中配置C3P0连接池了,即在Spring配置文件中添加如下配置:
<!-- 配置C3P0连接池 -->

<bean id="dataSource" class="com.mchange.v2.c3p0.ComboPooledDataSource">

    <property name="driverClass" value="com.mysql.jdbc.Driver"></property>

    <property name="jdbcUrl" value="jdbc:mysql:///spring_lee"></property>

    <property name="user" value="root"></property>

    <property name="password" value="yezi"></property>

</bean>现在举例来演示如何在Spring中配置C3P0连接池了。我的思路是这样的:创建一个UserService类和一个UserDao类,然后在UserService类里面调用UserDao类的方法,在UserDao类中使用JdbcTemplate模板类进行数据库CRUD操作,并且用上C3P0连接池。
先在src目录下创建一个cn.itcast.c3p0包,并在该包下编写一个UserDao类。
public class UserDao {

    // 在Dao里面要得到JdbcTemplate对象

    private JdbcTemplate jdbcTemplate;

    public void setJdbcTemplate(JdbcTemplate jdbcTemplate) {

        this.jdbcTemplate = jdbcTemplate;

    }

    // 添加操作,使用JdbcTemplate模板来实现添加

    public void add() {

        String sql = "insert into user values(?,?)";

        jdbcTemplate.update(sql, "李阿昀", "lee");

    }

}
再在该包下编写一个UserService类,并在UserService类里面调用UserDao类的add方法。
public class UserService {

    private UserDao userDao;

    public void setUserDao(UserDao userDao) {

        this.userDao = userDao;

    }

    public void add() {

        userDao.add();

    }

}
那么Spring核心配置文件就应该像下面这样配置:
<!-- 配置service和dao以及它们的注入 -->

<bean id="userService" class="cn.itcast.c3p0.UserService">

    <property name="userDao" ref="userDao"></property>

</bean>

<bean id="userDao" class="cn.itcast.c3p0.UserDao">

    <property name="jdbcTemplate" ref="jdbcTemplate"></property>

</bean>

<!-- 配置JdbcTemplate模板类的对象 -->

<bean id="jdbcTemplate" class="org.springframework.jdbc.core.JdbcTemplate">

    <!-- 注入dataSource,因为在其源代码中dataSource属性有其对应的set方法,故可直接注入 -->

    <property name="dataSource" ref="dataSource"></property>

</bean>
从上面的配置可看出:UserDao中注入了JdbcTemplate对象,JdbcTemplate对象里面又注入了dataSource。
最后再在该包下编写一个TestDemo单元测试类。
public class TestDemo {

    @Test

    public void testBook() {

        ApplicationContext context = new ClassPathXmlApplicationContext("bean2.xml");

        UserService userService = (UserService) context.getBean("userService");

        userService.add();

    }

}
(转)Spring使用AspectJ进行AOP的开发:注解方式的更多相关文章
- Spring基于AspectJ的AOP的开发——注解
源码:https://gitee.com/kszsa/dchart 一, AspectJ的概述: AspectJ是一个面向切面的框架,它扩展了Java语言.AspectJ定义了AOP语法所以它有一个专 ...
- [Spring框架]Spring AOP基础入门总结二:Spring基于AspectJ的AOP的开发.
前言: 在上一篇中: [Spring框架]Spring AOP基础入门总结一. 中 我们已经知道了一个Spring AOP程序是如何开发的, 在这里呢我们将基于AspectJ来进行AOP 的总结和学习 ...
- 在Spring整合aspectj实现aop的两种方式
-----------------------------基于XML配置方案目标对象接口1 public interface IUserService { public void add(); pub ...
- Spring 基于 AspectJ 的 AOP 开发
Spring 基于 AspectJ 的 AOP 开发 在 Spring 的 aop 代理方式中, AspectJ 才是主流. 1. AspectJ 简介 AspectJ 是一个基于 java 语言的 ...
- Spring整合AspectJ的AOP
学而时习之,不亦说乎! --<论语> 看这一篇之前最好先看前面关于AOP的两篇. http://www.cnblogs.com/z ...
- Spring声明式事务管理(基于注解方式实现)
----------------------siwuxie095 Spring 声明式事务管理(基于注解方式实现) 以转 ...
- 不依赖Spring使用AspectJ达到AOP面向切面编程
网上大多数介绍AspectJ的文章都是和Spring容器混用的,但有时我们想自己写框架就需要抛开Spring造轮子,类似使用原生AspectJ达到面向切面编程.步骤很简单,只需要两步. 1.导入依赖 ...
- Spring框架的AOP技术(注解方式)
1. 步骤一:创建JavaWEB项目,引入具体的开发的jar包 * 先引入Spring框架开发的基本开发包 * 再引入Spring框架的AOP的开发包 * spring的传统AOP的开发的包 * sp ...
- Spring第七弹—依赖注入之注解方式注入及编码解析@Resource原理
注入依赖对象可以采用手工装配或自动装配,在实际应用中建议使用手工装配,因为自动装配会产生未知情况,开发人员无法预见最终的装配结果. 手工装配依赖对象 手工装配依赖对象,在这种方式中又有两种编 ...
随机推荐
- GrideView(二)---删除功能
情景一. 没有外键关联, 操作:在数据源中将删除选项选中--- GrideView 中的删除 选项选中 即可情景二. 有外键关联 *RowDeleting 行删除前触发 *RowDeleted 行删除 ...
- codeforces 686A A. Free Ice Cream(水题)
题目链接: A. Free Ice Cream //#include <bits/stdc++.h> #include <vector> #include <iostre ...
- repo+manifests+git方式管理安卓代码
repo+manifests+git方式管理安卓代码 1.repo的获取 repo只是google用Python脚本写的调用git的一个脚本,主要是用来下载.管理Android项目的软件仓库.(也就是 ...
- bzoj2502【有上下界的最大流】
2502: 清理雪道 Time Limit: 10 Sec Memory Limit: 128 MBSubmit: 834 Solved: 442[Submit][Status][Discuss] ...
- INT_PTR数据类型
A signed integer type for pointer precision. Use when casting a pointer to an integer to perform poi ...
- PHP编程常见小错误错误
使用PHP的过程中经常因为粗心出一些简单的错误,先将自己遇到几个的记录下来,以后慢慢增加. 1 Fatal error: Function name must be a string 翻译很简单,就是 ...
- Java多线程系列七——ExecutorService
java.util.concurrent.ExecutorService接口提供了许多线程管理的方法 Method 说明 shutdown 拒绝接收新的任务,待已提交的任务执行后关闭,且宿主线程不阻塞 ...
- ubuntu 12.04 alt+tab无法切换窗口的问题(转载)
转自:http://www.2cto.com/os/201209/153282.html ubuntu 12.04 alt+tab无法切换窗口的问题 安装cpmpiz配置管理程序. sudo ...
- win7/8系统中php5.3和5.4、5.5不能加载php_curl.dll解决办法
win7/8系统中php5.3和5.4.5.5不能加载php_curl.dll解决办法 作者:用户 来源:互联网 时间:2016-06-23 18:54:33 php变量注释系统模块 摘要: 本文 ...
- UVA Recurrences 矩阵相乘+快速幂
题目大意: f(n) = a1 f(n - 1) + a2 f(n - 2) + a3 f(n - 3) + ... + ad f(n - d),已给递推公式,求f(n)的大小. 解题思路: n很大, ...