
swift4.2 - 一个自定义view弹框
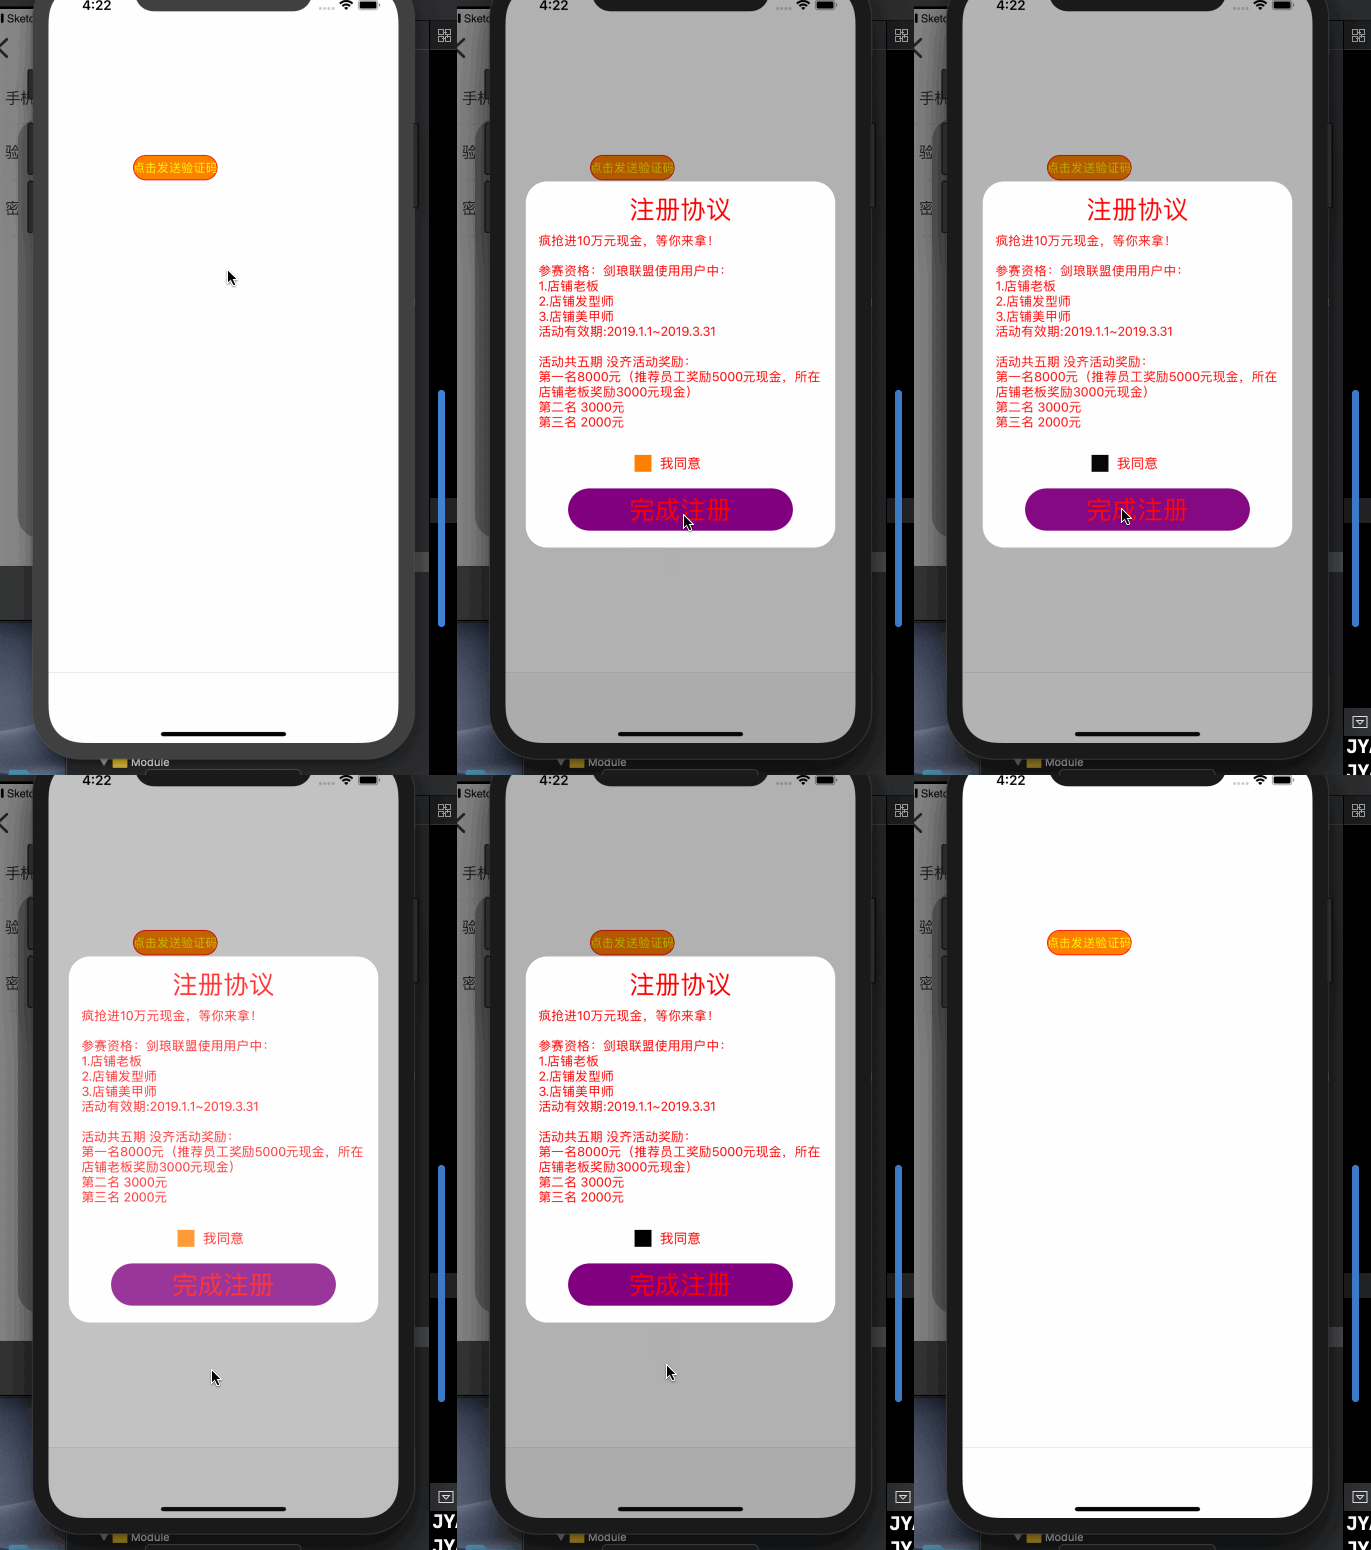
import UIKit

/*

 *  注册协议view:没找到 UI原图,咱不实现

 */

class JYRegisterProtocolView: UIView {

    /// 点击同意协议的回调

    private var clickSelectedBtnBlock:((_ isSelected:Bool) -> Void)?

    /// 点击完成按钮的回调

    private var clickCompleteBtnBlock:(() -> Void)?

    /// 单例属性

    static let share : JYRegisterProtocolView = {

        let view = JYRegisterProtocolView()

        return view

    }()

    /// 背景view

    private lazy var bgView : UIView = {

        let v = JYUIModel.createView()

        v.layer.cornerRadius = 25

        v.layer.masksToBounds = true

        return v

    }()

    /// 注册协议标题

    private lazy var titleLabel : UILabel = JYUIModel.creatLabe(text: "注册协议", font: UIFont.systemFont(ofSize: 30), textColor: UIColor.red, textAlignment: NSTextAlignment.center)

    /// 副标题标题

    private lazy var subtitleLabel : UILabel = {

        let lab = JYUIModel.creatLabe(text: "疯抢进10万元现金,等你来拿!\n\n参赛资格:剑琅联盟使用用户中:\n1.店铺老板 \n2.店铺发型师 \n3.店铺美甲师 \n活动有效期:2019.1.1~2019.3.31\n \n活动共五期 没齐活动奖励:\n第一名8000元(推荐员工奖励5000元现金,所在店铺老板奖励3000元现金)\n第二名 3000元 \n第三名 2000元", font: UIFont.systemFont(ofSize: 15), textColor: UIColor.red, textAlignment: NSTextAlignment.left)

        lab.numberOfLines = 0

        return lab

    }()

    /// 选择按钮

    private lazy var selectedBtn : UIButton = {

        let btn = JYUIModel.createBtn()

        btn.addTarget(self, action: #selector(clickSelectedBtn), for: UIControl.Event.touchUpInside)

        btn.backgroundColor = UIColor.orange

        return  btn

    }()

    /// 同意文字标题

    private lazy var agreeLabel : UILabel = JYUIModel.creatLabe(text: "我已认真阅读并同意", font: UIFont.systemFont(ofSize: 16), textColor: UIColor.red, textAlignment: NSTextAlignment.center)

    /// 完成按钮

    private lazy var completeBtn : UIButton = {

        let btn = JYUIModel.createBtn()

        btn.titleLabel?.font = UIFont.systemFont(ofSize: 30)

        btn.layer.cornerRadius = 25

        btn.layer.masksToBounds = true

        btn.backgroundColor = UIColor.purple

        btn.setTitle("完成注册", for: UIControl.State.normal)

        btn.setTitleColor(UIColor.red, for: UIControl.State.normal)

        btn.setTitle("完成注册", for: UIControl.State.selected)

        btn.setTitleColor(UIColor.green, for: UIControl.State.selected)

        btn.addTarget(self, action: #selector(clickcompleteBtn), for: UIControl.Event.touchUpInside)

        return  btn

    }()

    override init(frame: CGRect) {

        super.init(frame: frame)

        configUI()

    }

    required init?(coder aDecoder: NSCoder) {

        fatalError("init(coder:) has not been implemented")

    }

    //点击背景view 移除当前控件

    override func touchesBegan(_ touches: Set<UITouch>, with event: UIEvent?) {

        if let touch = touches.first  {

            var point =  touch.location(in: self)

            point = bgView.layer.convert(point, from: self.layer)

            if !bgView.layer.contains(point){

                self.removeView()

            }

        }

    }

    /// 移除弹框(内部移除)

    private func removeView() {

        UIView.animate(withDuration: 0.5, animations: { [weak self] in

            self?.alpha = 0

        }) { [weak self] (res) in

            self?.removeFromSuperview()

        }

    }

    /// 初始化欢迎弹框

    convenience init(titleText:String? = nil,

                     subtitle: String? = nil ,

                     agree:String? = nil,

                     buttonText: String? = nil) {

        self.init()

        if agree != nil {

            self.titleLabel.text = titleText

        }

        if agree != nil {

            self.agreeLabel.text = agree

        }

        if subtitle != nil{

            self.subtitleLabel.text = subtitle

        }

        if buttonText != nil{

            self.completeBtn.setTitle(buttonText, for: .normal)

        }

    }

    /// 显示弹框

    func showAlert(selectedBtnBlock:((_ isSelected:Bool) -> Void)? , completeBtnBlock:(() -> Void)?) {

        JYWindow.subviews.forEach { (v) in

            if v is JYRegisterProtocolView {

                return

            }

        }

        JYWindow.addSubview(self)

        self.clickSelectedBtnBlock = selectedBtnBlock

        self.clickCompleteBtnBlock = completeBtnBlock

        self.alpha = 0

        self.isUserInteractionEnabled = false

        UIView.animate(withDuration: 0.5) {

            self.alpha = 1

            self.isUserInteractionEnabled = true

        }

    }

}

// MARK: - 点击事件

extension JYRegisterProtocolView{

    /// 点击阅读

    @objc private func clickSelectedBtn(){

        selectedBtn.isSelected.toggle()

        if selectedBtn.isSelected == true {

            selectedBtn.backgroundColor = UIColor.black

        }else{

            selectedBtn.backgroundColor = UIColor.orange

        }

        clickSelectedBtnBlock?(selectedBtn.isSelected)

    }

    /// 点击完成注册

    @objc private func clickcompleteBtn(){

        if selectedBtn.isSelected == false{

           DDLOG(message: "给个提示")

        }else{

            clickCompleteBtnBlock?()

            self.removeView()

        }

    }

}

// MARK: - UI

extension JYRegisterProtocolView{

    func configUI(){

        self.backgroundColor = "000000".jy.getColor().withAlphaComponent(0.3)

        self.frame = UIScreen.main.bounds

        self.layoutIfNeeded()

        configBgView()

        let vd : [String:UIView] = ["bgView":bgView]

        addSubview(bgView)

        self.addConstraints(NSLayoutConstraint.constraints(withVisualFormat: "|-24-[bgView]-24-|", options: [], metrics: nil, views: vd))

        self.addConstraints(NSLayoutConstraint.constraints(withVisualFormat: "V:[bgView]", options: [], metrics: nil, views: vd))

        bgView.centerYAnchor.constraint(equalTo: self.centerYAnchor).isActive = true

        bgView.centerXAnchor.constraint(equalTo: self.centerXAnchor).isActive = true

        addSubview(bgView)

    }

    /// 背景view的UI

    func configBgView(){

        let vd : [String : UIView] = ["titleLabel":titleLabel,

                                      "subtitleLabel":subtitleLabel,

                                      "selectedBtn":selectedBtn,

                                      "agreeLabel":agreeLabel,

                                      "completeBtn":completeBtn]

        bgView.addSubview(titleLabel)

        bgView.addSubview(subtitleLabel)

        bgView.addSubview(selectedBtn)

        bgView.addSubview(agreeLabel)

        bgView.addSubview(completeBtn)

        bgView.addConstraints(NSLayoutConstraint.constraints(withVisualFormat: "|[titleLabel]|", options: [], metrics: nil, views: vd))

        bgView.addConstraints(NSLayoutConstraint.constraints(withVisualFormat: "|-15-[subtitleLabel]-15-|", options: [], metrics: nil, views: vd))

        bgView.addConstraints(NSLayoutConstraint.constraints(withVisualFormat: "[selectedBtn(20)]-10-[agreeLabel]", options: [.alignAllCenterY], metrics: nil, views: vd))

        bgView.addConstraints(NSLayoutConstraint.constraints(withVisualFormat: "|-50-[completeBtn]-50-|", options: [], metrics: nil, views: vd))

        bgView.addConstraints(NSLayoutConstraint.constraints(withVisualFormat: "V:|-15-[titleLabel]-10-[subtitleLabel]-30-[agreeLabel]-20-[completeBtn(50)]-20-|", options: [.alignAllCenterX], metrics: nil, views: vd))

        selectedBtn.heightAnchor.constraint(equalToConstant: 20).isActive = true

    }

}
swift4.2 - 一个自定义view弹框的更多相关文章
- CodePush自定义更新弹框及下载进度条
CodePush 热更新之自定义更新弹框及下载进度 先来几张弹框效果图 非强制更新场景 image 强制更新场景 image 更新包下载进度效果 image 核心代码 这里的热更新Modal框,是封装 ...
- 使用xib封装一个自定义view的步骤
使用xib封装一个自定义view的步骤 1> 新建一个继承UIView的自定义view,假设类名叫做(MJAppView) 2> 新建一个MJAppView.xib文件来描述MJAppVi ...
- JavaScript实现自定义alert弹框
aaarticlea/png;base64,iVBORw0KGgoAAAANSUhEUgAAAh0AAAFkCAYAAACEpYlzAAAfj0lEQVR4nO3dC5BddZ0n8F93pxOQCO
- 自定义 popWindow弹框 工具包
前言:因为Android 没有像IOS一样的ActionSheet,虽然在github上看到有一些类似ActionSheet的库,总觉得不好用,不如自己写一个弹框通用类,样式全部自已来多好. Step ...
- vue中超简单的方法实现点击一个按钮出现弹框,点击弹框外关闭弹框
效果图展示: View层 <template> <div> <div class="mask" v-if="showModal" ...
- 如何优雅的写一个Vue 的弹框
写Vue或者是react 都会遇见弹框的问题.也尝试了多种办法来写弹框,一直都不太满意,今天特地看了一下 Element UI 的源码,模仿着写了一个简易版. 大概有一下几个问题: 1.弹框的层级问题 ...
- 自定义alert弹框,title不显示域名
问题: 系统默认的alert弹框的title会默认显示网页域名 解决办法: (修改弹框样式) (function() { window.alert = function(name) { $(" ...
- 自定义alert弹框,title不显示域名(重写alert)
问题: 系统默认的alert弹框的title会默认显示网页域名 解决办法: (修改弹框样式) (function() { window.alert = function(name) { $(" ...
- IOS中使用.xib文件封装一个自定义View
1.新建一个继承UIView的自定义view,假设类名叫做 MyAppVew #import <UIKit/UIKit.h> @class MyApp; @interface MyAppV ...
随机推荐
- HBuilder开发APP自动登录时跳过"登录页面"
刚接触开发公司APP项目,用HBuilder开发工具. manifest.json中的入口页面就是"登录页面",现在获取到自动登录状态是true,但是真机联调时"登录页面 ...
- 【坑】tableView cell默认选中
在tableView展示的过程时候,如果想一开始就有一些cell默认被选中,不能在cellForRowAtIndexPath中cell.selected=YES, 必须在willDisplayCell ...
- javascript_ajax 地址三级联动
1.三级地址联动思路如下: 2.建立数据库.这里直接使用网上的地址数库,最后一个字段无用,先不去管它 3.建立一个server.php 文件 <?php // 数据库连接 mysql_conne ...
- Mysql(MyISAM和InnoDB)及Btree和索引优化
MYSQL 一.引擎 mysql:MySQL是一个关系型数据库管理系统,其中有两种引擎最为常见MyISAM和InnoDB MyISAM(非聚集索引) MySQL 5.0 之前的默认数据库引擎,最为常 ...
- 利用目录函数(opendir,readdir,closedir)查找文件个数
如何知道一个目录下的所有文件个数呢?或许可以用tree来学(zhuang)习(bi)的同时知道文件个数.Linux系统io函数为我们提供了目录操作函数,其中有一个比较重要(实际上有三个,因为它们经常配 ...
- java.lang.ClassNotFoundException: org.hibernate.engine.SessionFactoryImplementor
Hibernate4.x与spring3.x整合,有关事务的处理,用Junit4测试,出现org.springframework.beans.factory.BeanCreationException ...
- English Conversation – NUMBERS
English Conversation – NUMBERS Share Tweet Share Tagged With: Numbers Study the pronunciation of num ...
- 钩子函数mounted:
1.钩子函数 钩子函数是Windows消息处理机制的一部分,通过设置“钩子”,应用程序可以在系统级对所有消息.事件进行过滤,访问在正常情况下无法访问的消息.钩子的本质是一段用以处理系统消息的程序,通过 ...
- Statemnet和PerparedStstemnent有哪些区别
Statement 和 PreparedStatement之间的关系和区别. 关系:PreparedStatement继承自Statement,都是接口 区别:PreparedStat ...
- [Linux]Ubuntu下安装Sublime-text 且 支持中文输入
------------------------------------------------------------------------------------------ 首先进行如下操作: ...