
吴裕雄--天生自然 pythonTensorFlow图形数据处理:输入文件队列
import tensorflow as tf

# 1. 生成文件存储样例数据。

def _int64_feature(value):

    return tf.train.Feature(int64_list=tf.train.Int64List(value=[value]))

num_shards = 2

instances_per_shard = 2

for i in range(num_shards):

    filename = ('E:\\data.tfrecords-%.5d-of-%.5d' % (i, num_shards))

    # 将Example结构写入TFRecord文件。

    writer = tf.python_io.TFRecordWriter(filename)

    for j in range(instances_per_shard):

    # Example结构仅包含当前样例属于第几个文件以及是当前文件的第几个样本。

        example = tf.train.Example(features=tf.train.Features(feature={'i': _int64_feature(i),'j': _int64_feature(j)}))

        writer.write(example.SerializeToString())

    writer.close()
# 2. 读取文件。

files = tf.train.match_filenames_once("E:\\data.tfrecords-*")

filename_queue = tf.train.string_input_producer(files, shuffle=False)

reader = tf.TFRecordReader()

_, serialized_example = reader.read(filename_queue)

features = tf.parse_single_example(serialized_example,features={'i': tf.FixedLenFeature([], tf.int64),'j': tf.FixedLenFeature([], tf.int64)})

with tf.Session() as sess:

    sess.run([tf.global_variables_initializer(), tf.local_variables_initializer()])

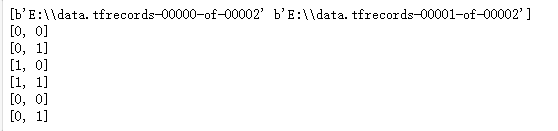
    print(sess.run(files))

    coord = tf.train.Coordinator()

    threads = tf.train.start_queue_runners(sess=sess, coord=coord)

    for i in range(6):

        print(sess.run([features['i'], features['j']]))

    coord.request_stop()

    coord.join(threads)
# 3. 组合训练数据(Batching)

example, label = features['i'], features['j']

batch_size = 2

capacity = 1000 + 3 * batch_size

example_batch, label_batch = tf.train.batch([example, label], batch_size=batch_size, capacity=capacity)

with tf.Session() as sess:

    tf.global_variables_initializer().run()

    tf.local_variables_initializer().run()

    coord = tf.train.Coordinator()

    threads = tf.train.start_queue_runners(sess=sess, coord=coord)

    for i in range(3):

        cur_example_batch, cur_label_batch = sess.run([example_batch, label_batch])

        print(cur_example_batch, cur_label_batch)

    coord.request_stop()

    coord.join(threads)

吴裕雄--天生自然 pythonTensorFlow图形数据处理:输入文件队列的更多相关文章
- 吴裕雄--天生自然 pythonTensorFlow图形数据处理:队列操作
import tensorflow as tf #1. 创建队列,并操作里面的元素. q = tf.FIFOQueue(2, "int32") init = q.enqueue_m ...
- 吴裕雄--天生自然 pythonTensorFlow图形数据处理:输入数据处理框架
import tensorflow as tf # 1. 创建文件列表,通过文件列表创建输入文件队列 files = tf.train.match_filenames_once("F:\\o ...
- 吴裕雄--天生自然 pythonTensorFlow图形数据处理:数据集高层操作
import tempfile import tensorflow as tf # 1. 列举输入文件. # 输入数据生成的训练和测试数据. train_files = tf.train.match_ ...
- 吴裕雄--天生自然 pythonTensorFlow图形数据处理:循环神经网络预测正弦函数
import numpy as np import tensorflow as tf import matplotlib.pyplot as plt # 定义RNN的参数. HIDDEN_SIZE = ...
- 吴裕雄--天生自然 pythonTensorFlow图形数据处理:数据集基本使用方法
import tempfile import tensorflow as tf # 1. 从数组创建数据集. input_data = [1, 2, 3, 5, 8] dataset = tf.dat ...
- 吴裕雄--天生自然 pythonTensorFlow图形数据处理:多线程队列操作
import tensorflow as tf #1. 定义队列及其操作. queue = tf.FIFOQueue(100,"float") enqueue_op = queue ...
- 吴裕雄--天生自然 pythonTensorFlow图形数据处理:图像预处理完整样例
import numpy as np import tensorflow as tf import matplotlib.pyplot as plt #随机调整图片的色彩,定义两种顺序. def di ...
- 吴裕雄--天生自然 pythonTensorFlow图形数据处理:TensorFlow图像处理函数
import numpy as np import tensorflow as tf import matplotlib.pyplot as plt #读取图片 image_raw_data = tf ...
- 吴裕雄--天生自然 pythonTensorFlow图形数据处理:读取MNIST手写图片数据写入的TFRecord文件
import numpy as np import tensorflow as tf from tensorflow.examples.tutorials.mnist import input_dat ...
随机推荐
- 14 —— npm —— 基本使用 ——初始化项目
概念:类似积木,可以组装成各种应用 node 的强大之处 : 可以随意使用这些组件 一,npm 是什么: nodejs 自带的包(模块)管理工具 二,查看 npm 的所有选项 三,查看各个选项的具体作 ...
- 9 ~ express ~ 用户注册
一,/public/js/index.js //登陆 $login.find('button').on('click',()=>{ $.ajax({ type:'post', url:'/api ...
- mybatis中实体类跟数据库属性不一致解决方案
1.在Mapper.xml映射配置文件中给sql语句起别名 select id as uid,username as name from user 2.mybatis中可以单独的配置查询结果的列名和实 ...
- Python pip换源
前言 哈喽呀,小伙伴们,晚上好呀,今天要给大家带来点什么呐,我们就来说说python的pip换源吧,这个换源,相对来说,还是比较重要的,能少生好几次气的,哈哈哈 为什么要换源 我们搞python的,肯 ...
- sqlcook sql经典实例 emp dept 创建语句
创建表语句 create table dept( deptno int primary key, dname varchar(30), loc varchar(30) ); create table ...
- google docker镜像下载
https://anjia0532.github.io/2017/11/15/gcr-io-image-mirror/
- PIP一次性导入所有环境和指定镜像源
镜像源: 阿里云:https://mirrors.aliyun.com/pypi/simple/豆瓣:https://pypi.douban.com/simple/清华大学:https://pypi. ...
- 程序中出现list assignment index out of range的解决方法
class stack: def __init__(self): self.num = 0 self.elem=[] def isEmoty(self): if self.num == 0: prin ...
- mysql比较运算,逻辑运算,范围查询,模糊查询
比较运算 > < = != <> <= >= 逻辑运算 and or not 范围查询 in 模糊查询 like ...
- POJ 1837:Balance 天平DP。。。
Balance Time Limit: 1000MS Memory Limit: 30000K Total Submissions: 11878 Accepted: 7417 Descript ...