WPF 4 Ribbon 开发 之 标签工具栏(Tab Toolbar)
原文:WPF 4 Ribbon 开发 之 标签工具栏(Tab Toolbar)
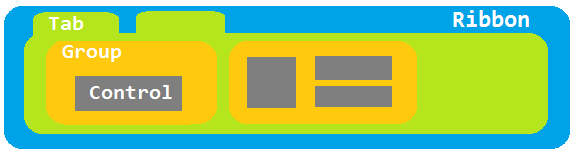
本篇将开始介绍标签工具栏的开发内容,标签工具栏可以说是Ribbon 的核心部分,应用程序所有的功能特性都会集中在这里,一个强大的Ribbon 工具栏也是一款软件成功的关键。在开始前还是先来看看标签工具栏的结构,从图中可看出Ribbon 工具栏主要分为四部分:Ribbon -> Tab -> Group -> Control。
下面来添加一个Clipboard 菜单组,其中包括三个RibbonButton 控件分别实现“粘贴”、“拷贝”、“剪切”功能。与前两篇文章一样,先为Button 控件编写<RibbonCommand> 和Command 事件内容。

<r:RibbonCommand x:Key="PasteCommand" LabelTitle="Paste"

                 CanExecute="PasteCommand_CanExecute"

                 Executed="PasteCommand_Executed"

                 SmallImageSource="Images/Paste.png"

                 LargeImageSource="Images/Paste.png"

                 ToolTipTitle="Paste"
                 ToolTipDescription="Paste contents" />

<r:RibbonCommand x:Key="CopyCommand" LabelTitle="Copy"

                 CanExecute="CopyCommand_CanExecute"

                 Executed="CopyCommand_Executed"

                 SmallImageSource="Images/Copy.png"

                 LargeImageSource="Images/Copy.png"

                 ToolTipTitle="Copy"
                 ToolTipDescription="Copy selected contents" />

<r:RibbonCommand x:Key="CutCommand" LabelTitle="Cut"

                 CanExecute="CutCommand_CanExecute"

                 Executed="CutCommand_Executed"

                 SmallImageSource="Images/Cut.png"

                 LargeImageSource="Images/Cut.png"

                 ToolTipTitle="Cut"
                 ToolTipDescription="Cut selected contents" />
private void PasteCommand_CanExecute(object sender, CanExecuteRoutedEventArgs e)

{

    e.CanExecute = ApplicationCommands.Paste.CanExecute(FocusManager.GetFocusedElement(this), null);

}

private void PasteCommand_Executed(object sender, ExecutedRoutedEventArgs e)

{

    ApplicationCommands.Paste.Execute(FocusManager.GetFocusedElement(this), null);

}

private void CopyCommand_CanExecute(object sender, CanExecuteRoutedEventArgs e)

{

    e.CanExecute = ApplicationCommands.Copy.CanExecute(FocusManager.GetFocusedElement(this), null);

}

private void CopyCommand_Executed(object sender, ExecutedRoutedEventArgs e)

{

    ApplicationCommands.Copy.Execute(FocusManager.GetFocusedElement(this), null);

}

private void CutCommand_CanExecute(object sender, CanExecuteRoutedEventArgs e)

{

    e.CanExecute = ApplicationCommands.Cut.CanExecute(FocusManager.GetFocusedElement(this), null);

}

private void CutCommand_Executed(object sender, ExecutedRoutedEventArgs e)

{

    ApplicationCommands.Cut.Execute(FocusManager.GetFocusedElement(this), null);

}
在Command 事件中使用了ApplicationCommands 来完成Paste、Copy、Cut 各项功能。同时使用FocusManger.GetFocusedElement 来锁定ApplicationCommands 的操作对象(TextBox),这也就是为什么在《WPF 4 Ribbon 开发 之 快捷工具栏(Quick Access Toolbar)》一文中提到的将<Ribbon> 的FocusManager.IsFocusScope 属性设为True 的原因。将上面RibbonCommand 设置加入相应<RibbonButton>的Command 属性中。
<r:Ribbon DockPanel.Dock="Top" FocusManager.IsFocusScope="True" Title="WPF4 Notepad">

    <r:Ribbon.QuickAccessToolBar>

        ... ...

    </r:Ribbon.QuickAccessToolBar>

    <r:Ribbon.ApplicationMenu>

        ... ...

    </r:Ribbon.ApplicationMenu>

    <r:RibbonTab Label="Home">

        <r:RibbonGroup HasDialogLauncher="True" Command="{StaticResource GroupCommand}">

            <r:RibbonGroup.GroupSizeDefinitions>

                <r:RibbonGroupSizeDefinitionCollection>

                    <r:RibbonGroupSizeDefinition>

                        <r:RibbonControlSizeDefinition ImageSize="Large" />

                        <r:RibbonControlSizeDefinition ImageSize="Small" />

                        <r:RibbonControlSizeDefinition ImageSize="Small" />

                    </r:RibbonGroupSizeDefinition>

                </r:RibbonGroupSizeDefinitionCollection>

            </r:RibbonGroup.GroupSizeDefinitions>

            <r:RibbonButton Command="{StaticResource PasteCommand}" />

            <r:RibbonButton Command="{StaticResource CopyCommand}" />

            <r:RibbonButton Command="{StaticResource CutCommand}" />

        </r:RibbonGroup>

    </r:RibbonTab>

    <r:RibbonTab Label="View" />

    <r:RibbonTab Label="Help" />

</r:Ribbon>
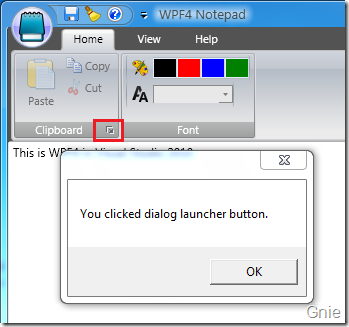
上面程序中通过RibbonControlSizeDefinition 来定义RibbonButton 控件在Group 中的图标显示方式(分别为大、小两种),在本例中我们将Paste 设为大图标,另外Copy、Cut 两个设为小图标。HasDialogLauncher 属性用于设定是否显示Dialog Box Launcher 按键(如下图),如果有需要也可以为Dialog Launcher 添加工具栏。
这样一个RibbonGroup 就完成了。有了上面的基础对于Font 组的开发就轻而易举了,在该组中使用了两个<RibbonControlGroup>控件组分别用于字体颜色和尺寸大小的设置,大家可以参考下面代码进一步了解。
<r:RibbonGroup>

    <r:RibbonGroup.Command>

        <r:RibbonCommand LabelTitle="Font" />

    </r:RibbonGroup.Command>

    <r:RibbonControlGroup>

        <r:RibbonLabel ToolTip="Font Color">

            <r:RibbonLabel.Content>

                <Image Source="Images/Paint.png" Width="16" Height="16" />

            </r:RibbonLabel.Content>

        </r:RibbonLabel>

        <r:RibbonButton ToolTip="Black" Background="Black"

                        CommandParameter="Black">

            <r:RibbonButton.Command>

                <r:RibbonCommand Executed="FontColorCommand_Executed" />

            </r:RibbonButton.Command>

        </r:RibbonButton>

        <r:RibbonButton ToolTip="Red" Background="Red"

                        CommandParameter="Red">

            <r:RibbonButton.Command>

                <r:RibbonCommand Executed="FontColorCommand_Executed" />

            </r:RibbonButton.Command>

        </r:RibbonButton>

        <r:RibbonButton ToolTip="Blue" Background="Blue"

                        CommandParameter="Blue">

            <r:RibbonButton.Command>

                <r:RibbonCommand Executed="FontColorCommand_Executed" />

            </r:RibbonButton.Command>

        </r:RibbonButton>

        <r:RibbonButton ToolTip="Green" Background="Green"

                        CommandParameter="Green">

            <r:RibbonButton.Command>

                <r:RibbonCommand Executed="FontColorCommand_Executed" />

            </r:RibbonButton.Command>

        </r:RibbonButton>

    </r:RibbonControlGroup>

    <r:RibbonControlGroup>

        <r:RibbonLabel ToolTip="Font Size">

            <r:RibbonLabel.Content>

                <Image Source="Images/Font.png" Width="16" Height="16" />

            </r:RibbonLabel.Content>

        </r:RibbonLabel>

        <r:RibbonComboBox x:Name="fontComboBox" Width="80"

                          SelectionChanged="fontComboBox_SelectionChanged">

            <r:RibbonComboBoxItem Content="10"/>

            <r:RibbonComboBoxItem Content="20"/>

            <r:RibbonComboBoxItem Content="30"/>

        </r:RibbonComboBox>

    </r:RibbonControlGroup>

</r:RibbonGroup>
private void FontColorCommand_Executed(object sender, ExecutedRoutedEventArgs e)

{

    txtBox.Foreground = new SolidColorBrush(

            (Color)ColorConverter.ConvertFromString(e.Parameter as string));

}

private void fontComboBox_SelectionChanged(object sender, SelectionChangedEventArgs e)

{

    double fontSize = 0;

    switch (fontComboBox.SelectedIndex)

    {

        case 0:

            fontSize = 10;

            break;

        case 1:

            fontSize = 20;

            break;

        case 2:

            fontSize = 30;

            break;

        default:

            break;

    }

    txtBox.FontSize = fontSize;

}
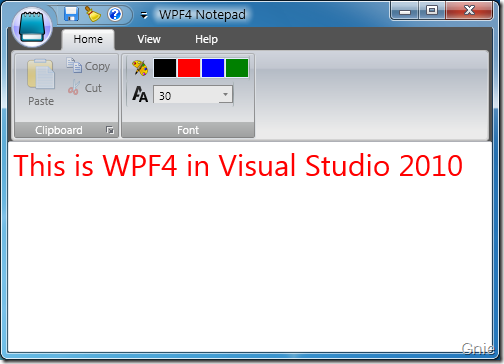
修改字体大小和颜色后的效果图:
至此,Ribbon 工具栏相关内容的介绍已全部完成,希望该系列对大家有所帮助。当然Ribbon 控件库中的控件还不止这些,有很多其他控件供开发者使用,有兴趣的朋友可以按需要进行选择,并完善软件的Ribbon 工具栏功能。
本系列相关文章
1. WPF 4 Ribbon 开发 之 快捷工具栏(Quick Access Toolbar)
2. WPF 4 Ribbon 开发 之 应用程序菜单(Application Menu)
源代码下载
WPF 4 Ribbon 开发 之 标签工具栏(Tab Toolbar)的更多相关文章
- WPF 4 Ribbon 开发 之 快捷工具栏(Quick Access Toolbar)
转自 http://www.cnblogs.com/gnielee/archive/2010/05/10/wpf4-ribbon-quick-access-toolbar.html 在Office 2 ...
- WPF 4 Ribbon 开发 之 应用程序菜单(Application Menu)
原文:WPF 4 Ribbon 开发 之 应用程序菜单(Application Menu) 在上一篇中我们完成了快捷工具栏的开发,本篇将讲解应用程序菜单开发的相关内容.如下图所示,点击程序窗 ...
- WPF中Ribbon控件的使用
这篇博客将分享如何在WPF程序中使用Ribbon控件.Ribbon可以很大的提高软件的便捷性. 上面截图使Outlook 2010的界面,在Home标签页中,将所属的Menu都平铺的布局,非常容易的可 ...
- VSTO 学习笔记(十)Office 2010 Ribbon开发
原文:VSTO 学习笔记(十)Office 2010 Ribbon开发 微软的Office系列办公套件从Office 2007开始首次引入了Ribbon导航菜单模式,其将一系列相关的功能集成在一个个R ...
- UltraEdit 标签(tab)不见的3个解决办法
UltraEdit 标签(tab)不见的3个解决办法 2010-11-08 09:19 1042人阅读 评论(0) 收藏 举报 工具c 方法1:点 视图->视图/列表(V)->打开文件标签 ...
- 从0到1:使用Caliburn.Micro(WPF和MVVM)开发简单的计算器
从0到1:使用Caliburn.Micro(WPF和MVVM)开发简单的计算器 之前时间一直在使用Caliburn.Micro这种应用了MVVM模式的WPF框架做开发,是时候总结一下了. Calibu ...
- WPF一步步开发XMPP IM客户端1:入门
[起因&目标] 因为工作原因接触openfire服务端和spark客户端开发,主要是基于openfire扩展开发了针对企业用途的服务器插件,还开发了各个平台上的客户端(Windows\mac\ ...
- EasyUI创建异步树形菜单和动态添加标签页tab
创建异步树形菜单 创建树形菜单的ul标签 <ul class="easyui-tree" id="treeMenu"> </ul> 写j ...
- JSP进阶 之 SimpleTagSupport 开发自定义标签
绝大部分 Java 领域的 MVC 框架,例如 Struts.Spring MVC.JSF 等,主要由两部分组成:控制器组件和视图组件.其中视图组件主要由大量功能丰富的标签库充当.对于大部分开发者而言 ...
随机推荐
- ConcurrentHashMap 内部实现分析
ConcurrentHashMap ConcurrentHashMap是一个线程安全的Hash Table,它的主要功能是提供了一组和HashTable功能相同但是线程安全的方法.Concurrent ...
- 利用C#与AE调用GP工具
转自原文 利用C#与AE调用GP工具 第一,首先要明确自己需要调用arctoolbox里面的什么工具,实现什么样的功能. 第三,编写command或tool工具,编写自己要的功能工具. 1)首先创建一 ...
- nginx源代码分析--ngx_http_optimize_servers()函数
这个函数做了连部分工作:1)以port为入口点 将实用的信息存放到hash表内 2)调用ngx_http_init_listening()函数 对port进行监听 1. 在ngx_http_core_ ...
- 怎样解决CRITICAL glance [-] AttributeError: 'NoneType' object has no attribute 'drivername'
今天在配置OpenStack的Glance时.前边进行的都非常顺利.当作到这一步时sudo glance-manage db_sync时出现了例如以下错误 依据错误提示,想到可能是配置问题.于是就查找 ...
- 前端切图:一个好看的表格css样式
<!DOCTYPE html><html> <head> <meta charset="UTF-8"> ...
- 7个在线学习C++编程的最佳途径
7个在线学习C++编程的最佳途径 jopen 2012-09-27 15:51:13 • 发布 摘要:C++是一种静态数据类型检查的.支持多重编程范式的通用程序设计语言.它支持过程化程序设计.数据抽象 ...
- js进阶 9-12 js如何实现级联菜单 (章节测试)
js进阶 9-12 js如何实现级联菜单 (章节测试) 一.总结 一句话总结: 1.js如何实现级联菜单 ? 二维数组,以第一级菜单的文本值做键,以对应的二级菜单选项的文本做值 2.用哪个属性可以获 ...
- 【a802】最少转弯问题
Time Limit: 10 second Memory Limit: 2 MB 问题描述 给出一张地图,这张地图被分为n*m(n,m<=100)个方块,任何一个方块不是平地就是高山.平地可以通 ...
- Thermal zone monitoring in an electronic device
FIELD One embodiment of the invention relates to a closed loop thermal control process in a portable ...
- 【Material Design视觉设计语言】开篇
作者:郭孝星 微博:郭孝星的新浪微博 邮箱:allenwells@163.com 博客:http://blog.csdn.net/allenwells Github:https://github.co ...